Showing posts with label Arcane Armorials. Show all posts

Monday, 2 December 2013

Arcane Armorials: Psygnosis inspired owl face


Those of you who frequented the home computer in the late '80s and early '90s will recall the above image with delight. Yes, Psygnosis, creators of Shadow of the Beast, Lemmings and parallax scrolling among a great many other great things. Zhu mentioned the possibility of using this image to create an old school shield design a few posts back and I wondered if such a thing was possible. 

So defying a nasty eye infection, I set to work on the shield. 


Stage One: Using the reverse side of a plastic shield (its best to fill the rim side with greenstuff or just file it off) I undercoated with a mix of light blue and blue ink. A couple of coats and the tone was flat enough to start!


Stage Two: Here I applied the white following some of the structure of the Psygnosis original. I preferred to keep things a little more symmetrical than in the original design. 


Stage Three: Add the black. Create the eyebrows, eyes and the beak.Once I was happy I had the design elements I was after, I tidied up the black line with more white paint.


Stage Four: Using white, I created circles within the eye balls and then painted them yellow. Before the yellow paint could dry, I used a little orange ink to vary the colour slightly. 


Stage Five: Blob on the pupils and tidy up the blue design features. 


Stage Six. Add tiny white dots to the eyes and cut the shield off the sprue.


Stage Seven: Pack the rim of the shield black and do the same to the rear. Oh, and attach it to a suitable model.


And there we have it! Another freehand shield on another new Old School model. I painted this skeleton specifically for the owl design as, for me anyway, these old Citadel skeletons are the perfect hanger for a shield! I think I might have a go at a more traditional owl face design at some point in the future, perhaps for my Warhammer Bestiary Wood Elf??

What not have a go at one of these yourselves? Or even better, can you suggest another design that would make a good old school shield design? If so, please comment below and I will have a go at painting it!

Saturday, 30 November 2013

Arcane Armorials: Tiger Face Shield Tutorial


A few posts back I suggested a tutorial about my tiger faced shield, inspired by the old 1970s and 1980s symbol used by the publisher, Paper Tiger. Feedback was positive so here it is. As with previous tutorials, I opted for a large, plastic Citadel shield. I have just bought quite a few new sprues from ebay so I am keen to try out a fair few new designs, including an owl face. They are fairly easy to get hold of if you are patient, but don't even think about forking on some of the more ridiculous prices you will see. Pay no more than a pound or so for a sprue, and less is much better!

I always keep a part of the sprue attached to the shield as it makes handling the surface much easier in the long run. The hole in the centre is quickly filled with greenstuff and smoothed down. Once dry, give the shield a couple of thin coats of white undercoat.


Step One: I mixed Hobgoblin Orange with an orange ink to get a more vibrant colour. This mix was fairly watery, so I gave the shield a couple of good base coats until things were looking pretty even. I made use of a hairdryer to speed up this drying process. 


Step Two: Mix up a watery white and splodge on the two shapes shown above. There is really no need to be particularly accurate at this stage.


Step Three: Add a mid yellow to your orange mix, and use this to highlight up the shape of the tiger's face. Try and suggest the brows and the muzzle as well as the cheeks. You can use this as an opportunity to tidy up your white. Leave the basecoat orange where the eye holes are going to be. 


Step Four: Add a further blob of yellow to you orange and continue to work up the highlights. You may want to also include more white on the brow and around the tiger's mouth here, as it is a good opportunity to tidy things up a little. Ensure that the basecolour still shows in the the sockets. 


Step Five: Start adding the black detailing. I use black ink, though you need to be aware that the mix is far more fluid than paint. Make good use of test strokes with your brush before working on the shield, this will reduce the risk of pooling the ink and spoiling your work. Fill in the eyes in a suitably feline shape and define the nostrils and mouth. 


Step Six: Add the black detailing to the eyes and nose. Good reference material is vital here (such as a picture of a real tiger or the Paper Tiger design shown above) and make sure that whatever you do on one side of the face is mirrored on the other. These lines need to be added quickly. Be confident and move your brush with speed. You may want to practice this on paper first.  


Step Seven: Tidy up the brows and then continue to add the detail on the animal's forehead. Once you are happy with the way things are looking, block in the shield with black. 


Step Eight: Using the black in once more, create little dots around the tiger's mouth and add two white dots for the eyes. Be careful here. Practice making dots with your brush if you haven't done this before as too much ink will cause pooling and too little with produce nasty marks that are not circular enough. 


Step Nine: Dot the centre of your white eyes with a smaller black dot. Once this is dry add a smaller white dot on top of the black one. This should cause your eyes to 'pop' and the design to suddenly become alive. I added a few dots of silver to the nail details on the shield rim too!

Job done!

Happy painting!

Orlygg.

Wednesday, 8 May 2013

Arcane Armorials: Painting an Oldhammer Banner Part Two


Now the last time we spoke I had left you with a banner with a completed face. This time, I aim to take you through what I did to finish off the banner design. To be honest, it ended up a little trial and error at times, remember this is the first time I have tried something like this, but I am happy with the resilts. Like last post I will take you through a short step by step guide of what I did in the hope that others are inspired enough to have a go, no matter their skill level. 


Step Ten: Wait for your paint and ink to dry thoroughly. Then mix up a batch of your background colour and carefully re-apply to the banner, trying to tidy up the detail around the face design.


Step Eleven: Add white to the background mix, and continue to tidy up the banner, being careful not to obscure the edges of the face or the waggles (or wiggles?) that move away from the invisible centre. Don't worry if you make a few errors, some black ink subtly applied can tidy up any slippages. Continue to add white to the mix until you have the desired colour, mine being an off yellow similar to parchment.  


Step Twelve: Using an off white mix (to create this just add a smidgen of your background base to white) start to weather the edges of the banner. I did this with vertical strokes, inspired by the waft (or is it weft?) found in fabrics and concentrated around the edges. Later, once this had dried, I painted on lines in a horizontal fashion to even out the appearance of the shading. Using the same mix, I painted a lighter outline around the face and the waggles to enhance the central design and add coherency to banner. 


Step Thirteen: I toyed with adding writing (taken from the Dark Tongue section in the Lost and the Damned) but I wasn't satisfied with the finished result. So I painted over my efforts and added some additional waggles (or wiggles?), again edging with of white. I mixed up some pure white, and very finely highlighted the very edges of the banner. And I was done - just the basic painted on the banner pole in the future when I fix this to a miniature. 

And there we have it! The finished banner. What do you, dear followers (and lurkers), think of my efforts? Any comments? Have you had a go at an Oldhammer style banner in the past and can provide a link? I'd love to see, and be inspired by, other slaves to the brush.

Orlygg.

Sunday, 5 May 2013

Arcane Armorials: Painting a Citadelesque Banner Part One

If you recall my last post, I described to you how I built myself an old school style banner. Well, now its is time to start the process of painting one. Large banners of this type are going to be THE central focus point of your army, so getting the paint job right is very important. The skills employed are very similar to those used on freehand shields, only on a larger scale. Now, shields don't take me long. Maybe 30 minutes not including drying time. This first part of my banner tutorial reflects about two and a half hours work, including drying time. I am still a long way from finishing, but I hope I can show you how I went about painting the central 'Ogre Face' design. 

So here goes... 


Step One: Prepare your painting surface with several thin layers of sprayed on undercoat. I chose white, though any colour will do. You should have your finished result in the back of your mind when you choose your undercoat, I wanted a light, bright banner so went for white. More dreary colour schemes, like those of the skaven or Nurgle worshippers, may require a darker base.


Step Two: Sketch on your design with a soft pencil. You can try out all your ideas doing this and have some idea what the final product is going to look like. My sketch is shown above, and I quickly established that the Khorne symbol and the chaos star would clutter the banner so I painted over them in white. I also toyed with a chequered boarder, but also considered that this would clutter the banner so that went too!


Stage Three: Base colours and inking. Here I used watered down paint to fill in the base colours. A dirty yellow for the backdrop and red for the face. Once this was dry, I used black ink to pick out the deepest details of the design and filled in the edge. I then added the Blanche style 'wiggles' (anyone know what the correct terms for these are?) also using ink. There were a few white patches here and there, but nothing to worry about this stage. 


Stage Four: Here I built up the underlying highlights using increasing amounts of orange and white added to my base colour of red. Use a medium sized brush for this and keep the paint very fluid with plenty of water. You are really looking for the consistency of milk for this. Be very painterly; use dots, dabs and quick brush strokes. Try and work in the ink lining and start to build depth using the base colour. Don't worry if your face looks too pallid at this stage, your final highlights (switch to a smaller brush to do these) should be almost white. 


Stage Five: Next I used a mix of inks to build up the vibrancy of the colour over the top of my initial highlights. On the advice of Andy Craig, I invested in a set of Windor and Newton inks from a craft shop. What a difference these made to the colour tones I was able to achieve and I am looking forward to experimenting further when I get on to my chaos lord! Mixing in some brown ink, I was able to create a sense of mid tone depth around the crevices on the face.


Stage Six: Then it was a case of highlighting once more, adding increasing amounts of yellow (and later white) to the mix and building up the character of the face. Again, I tried to be as painterly as possible, employing quick strokes (you'll need to keep your water very watery to achieve accurate results), squiggles and stippling. Try and focus your highlighting on the areas around the initial black lines and reduce them down further until they are the thinnest of thin lines. Ensure that your eyes, nose and mouth stand out with bright highlighting around them. 


Stage Seven: Add the white to create the eyeball and teeth. Again, keep you paint fluid so that it is easier to work with. Be careful with the teeth. Paint from the outside in, starting with the big teeth and ending in the centre with the smaller ones.


Stage Eight: Return to your black ink, using it straight from bottle, to edge the teeth, deepen the mouth and complete the eyes as I have shown you above. This is detailed work, and it is important not to flood your painting by loading too much ink on to your brush. Test your brush on a scrap piece of paper first to check that the ink is flowing as you want it to. Take your time at this stage, be confident with your brush strokes, as this will reduce wobble and ensure straighter lines. 


Stage Nine: Mix some blue ink. Keep the first batch quite watery and start to apply it around the mouth and eye sockets. You might want to mix in a little red or orange to create a colour harmony. Once the initial ink application is dry, add more blue and focus your attention around the very edge of the mouth to create the impression of lips. Do the same, only more subtly, around the eyes. Repeat this process with the teeth, using brown ink (and a little black) around the base of each tooth. Wait for this ink to dry before re-highlighting over with white paint. Tidy up the edges of the teeth with your black in and, hey presto, you are finished. 

Well, so far so good. The face is finished but there is still much work to be done on the banner. Attention must now shift to the background of the piece and, of course, the wiggly things that strike out like the rays of some evil sun. Next time we talk about banners, we will look at how to create a background colour that doesn't look too flat and will discuss adding what my dad (a railway modeller) would describe as 'super details'. 

Namely writing in the Dark Tongue itself!

In the meantime, I hope you found this tutorial useful. Again, your feedback is very important to me, so if you have something to add, please do!

Orlygg.


Arcane Armorials: Constructing an Oldhammer Banner


In issue 102 of White Dwarf there is an excellent article about how to get the best out of painting shields and banners. I am sure that it was highly inspirational in its day, and it remains so today. When I first started out painting shields for my Realm of Chaos campaigns several years ago I knew that freehand shields were going to be essential to the old school look I was going to go for with the paint jobs.

Trouble was, I was utterly useless at painting shields, and had been for twenty years. But with a little determination and a little practice I managed to develop the skill. To be honest, I was surprise quite how quickly I was able to master (if that is the correct word) the technique. One thing that really helped me get to grips with painting horrible little faces was the step by step guide to the classic ogre face by Mr John Blanche himself.  

Have a quick read of the article below to see what I mean.
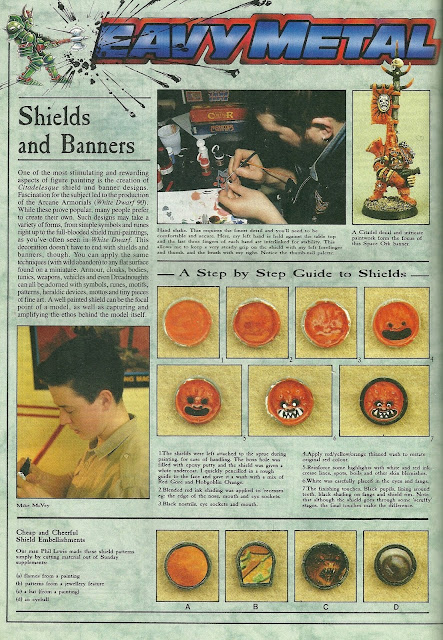
Blanche and McVey hard at it. The famous stage by stage ogre face. Phil Lewis using cut outs from newspapers to create shields.
The article goes on to showcase some of the varied and exciting shield designs that were knocking around the studio circa 1986, including some seminal work by the 'Greatest', Fraser Grey, not to mention Brian George and others. Even the StD chap with the 'Blut' banner (recently rediscovered by Steve Casey among the collection of the Mighty Avenger himself) makes an early appearance to inform the reader about how the rules of shield design can be applied to a banner.
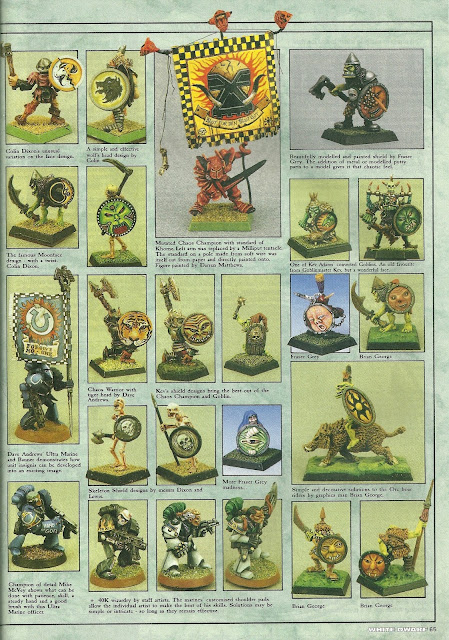
A selection of shields and other designs by Citadel's Old Masters.
As the article continues, we are presented with quite an informed discussion about the ethos of shield designs during the '80s, including a little comment about where Blanche drew his inspiration for the now famous ogre face design. It highlights the importance to search through historical references to pick out ideas that can be adapted, or even whole-heartedly stolen, from history. Almost as an afterthought, the piece ends with a paragraph about transferring the skills discussed onto large scale banners, and also includes an image on how to go about constructing them. 


It was this little nugget that has left me contemplating how easy, or indeed how hard, putting together a old school style banner would be. I've experimented with a couple of things so far, mostly using plasticard, but found the results less than expected. The banners and their poles were often flimsy and unsubstantial, so it was something that I left unexplored as I got on with other things - namely completing my Third Edition Khorne Army. Now as this project is starting to draw to a close, for a while at least, it needs several character pieces to finished it off. Namely, the mounted chaos lord and his bannerman. 


So a banner, painted in a similar style to the shields, would be required. In this post I hope to explain to you how I set about constructing my banner in the hope that it might inspire other Oldhammerers who haven't made flags before to try something new. Well, this is how I did it.

Materials Required

  • A tin tube of food paste - tomato or garlic puree being the best.
  • Heavy duty scissors
  • Large spoon
  • Flexible florist's or gardener's wire on reel
  • 5mm wire in strands
  • Superglue or epoxy resin glue 
  • White paint/Spray undercoat.
  • Wet sandpaper or needle file


To start I emptied the tin tube of its contents, squeezing it out in the sink and washing away the remains to keep the wife happy, and brought the crushed tube to the table. Using my heavy duty scissors I carefully cut off the the top and the bottom of the tube, before cutting along one side. Unfolding the tube takes a little care, as the edges of the cut tin can be sharp. Once open and reasonably flat, I washed out the remaining puree in soapy water and left the metal to dry for a few minutes. 


Then I used the spoon to smooth out the tin. This took a while and revealed just how important it is to squeeze out the contents of the tube in a systematic way. Use quite a bit of pressure and move the spoon in the same up and down motion until its is a flat as you can possibly make it. Don't worry about the odd wrinkle here and there as this makes little difference when the banner is painted. When the tin is as flat and smooth as you can make it, its time to start cutting the metal once more. 


Even out the shape of the metal with the scissors, a good rectangular shape will be best. I did this by eye, as I am quite practiced at cutting shapes out my hand (years of being a teacher of young children) though you may want to measure this and score the shape on the tin with a soft pencil. Once happy, trim your sheet to the desired shape and add any additional shape that you may require, I chose two flaps at the top to attach to the bannerpole, though you could easily choose any number of these, or include battle damage or more. You could even bend the banner into a shape to suggest wind blowing through the material. It really is up to you and the sky is the limit here. I went for something simple for my first banner, you may well want to do the same. I added a plastic '80s shield for scale purposes so you can see just how big the banner is. 


Your next job is to source your wine. A reel of soft wire (such as that the florist's or garden centre sell) and a slightly more sturdy straight wire. Cut your wire to the appropriate size and put to one side. 


Use the flaps that you cut into the metal to attach the banner as I have shown above. Use this as an opportunity to get the shape of your banner correct and do not think about gluing anything down at this stage. Bend the flaps (you should find this very easy with the tin) over so that it grips the wire quite tightly. You should then be able to slide the wire free and move on to the next stage. 


Get hold of your softer wire and coil it around the two wires that represent the bannerpole. This may be fiddly to start with but you should eventually end up with a nice tight join. Then carefully wind more wire over the top of your knot to create the impression of rope bindings. Snip off any unwanted wire as soon as you are happy with the result. 


Then slide the bannerpole back into the banner itself, using the flaps you constructed early. Stick these down now with super glue or epoxy resin and wait to dry. While the glue is drying, cut a thin strip of tin from your remaining supply and stick this over the top of the pole that runs vertically down the back of the banner. This will create strength and stop your banner flopping around later on when it helps lead your old school Citadel to victory in glorious Third Edition battle.


Once the glue has dried, flip the banner over and clip off the wire that you do not want. I used my heavy duty scissors again to do this, though you could use clippers or a knife if you were that way inclined. You may well want to tidy up any rough or sharp edges at this point (use wet sand paper or a needle file) before washing the banner in warm soapy water and setting it aside to dry. 


Once the banner is dry, its a simple case of undercoating it. I used a spray paint as I found it hard to get the initial layers of paint to adhere satisfactorily. Do a couple of coats, waiting for each one to dry first, before finishing. I noticed that the paint took slightly longer to dry than it would on a metal miniature so be careful not to get any fingerprints in the paint while you are doing this. 

And so ends this little tutorial. If you have followed my instructions you should now be the proud owner of a sturdy banner. The beauty of this method is that it can be applied to any scale and any type of model, so you can easily transfer what you have to your historical or science fiction models. 

Feedback is really important to me when I do a tutorial. Was I clear enough in my instructions? Are the photographs informative enough? Please contact me if you have any suggestions, or indeed, advice in the business of banner building. 

I will be following up this article shortly with a guide to how to paint a design (the ogre face of course!) on to the banner as well as how to add those little extra details. 

Until then, getting snipping.

Orlygg. 

Saturday, 18 August 2012

Arcane Armorials: Painting Skulls... The Old School Way!


Regularly followers of my blog will know about my struggle to paint designs free hand on old '80s Citadel plastic shields. For years, such skill eluded me... But recently, after discovering an ancient guide in an equally ancient White Dwarf I managed to paint a quite convincing Blanche 'Citadelesque' style grinning face and can now pull of variations of these quickly and effectively. The next thing on the list was to be able to paint a convincing skull, especially considering I have been working on some undead miniatures in recent weeks.

Well this blog is going to serve to document this little journey. I've had a few practices and even worked up my first skull onto a shield (though I have tweaked it since by adding more detail) and armed a skelly with it.

First though, I had to do the research and collect together some templates to act as inspiration.

How about these for technical brilliance? The work of Colin Dixon in 1986. What a fantastic range of images to copy and adapt when painting old school shields. I'm no where near this level of painting yet but it is certainly something I aspire to achieve in the future. Below are a few other skulls images culled from the excellent resources found on thecitadelcollector from Bryan Ansell's collection.

Standard Bearer from the Nightmare Legion Regiment of Renown. I'm not sure if that is grey hair or ethereal slime dribbling from the skull's mouth.

A simple conversion here. Note the old tin foil banner (with some damage) but a good use of the skull from Arcane Armorials. I borrowed the single eye idea for one of my skulls.

Three troopers from the Nightmare Legion. Early use of photocopier there! Cut out and stuck on skulls on each of the shields. Simple, but effective. I really, really like this skull design. Fantastic with a taste of horror. 

If you Google skull clip are you get loads of ideas. Most of them are unusable for a 2D painting but there are some real crackers among them. Here are a few I really liked...


Right, let's have a look at what I've managed to produce recently then...


Keen eyed readers may recognise the shield on the right. I've worked it up a bit since you last saw it, with a mystic symbol in the forehead and yellow, staring eyes. The other is more of a flat design, quickly produced with the house of cards symbol on the forehead.

Okay, let's have a look at how you can paint a skull design in a few easy steps...

 First off, prepare your shield. Give it a nice base colour of your choice (here I used Bilious Green) and a darker wash over the top to create a little shading around the rim. 
 Once dry, block out the outline of your skull in a nice dark brown. Don't worry too much about coverage here.
 Using black ink, paint on the details and complete the outline of the skull.
 Highlight up with a lighter brown. Remember to pick out the teeth.
 Do a further highlight with Bleached Bone, remember to keep the paint quite watery and go for a fluid, painterly style in application.
 Final highlight around the edges with white. Again, keep the paint nice and fluid. 
Tidy up the rim, I used stippling to do this, and add the silver rivets. I added a nice red symbol to the forehead too. 

Job done!

Orlygg