This post will be short and sweet, and somewhat bittersweet. After 7.25 years and 1,035 posts I am taking a step back from blogging for a little while. Bite-Sized Thoughts will still be here and I will post intermittently, but the frequency will be less and likely variable.
With more demands on my time these days (a toddler-sized one, in particular!) blogging is still an enjoyable activity, but it also tends to feel like something on my To Do list. I hope in the future that will change and I will post regularly once more, but for now I am reducing the number of things I try to squeeze into each week and freeing up time for family, life and the occasional bit of relaxation (rare, with a toddler!).
I can read others' blogs on the train and so you may still see comments from me, or I may read and not comment, but for those of you who have read Bite-Sized Thoughts for weeks, months or years - thank you for your support and enthusiasm along the way. I look forward to checking in occasionally and perhaps reconnecting regularly in the future.

Showing posts with label blog. Show all posts
Showing posts with label blog. Show all posts
Sunday, July 1, 2018
Wednesday, March 11, 2015
Vegan custard tarts (and Bite-Sized Thoughts turns 4)
Today is the 4-year anniversary of Bite-Sized Thoughts. Coincidentally, it is also the 9-month anniversary of our move from Perth to London. I think both deserve celebration, and vegan custard tarts are my celebratory item of choice.

Before getting to the tarts, though, forgive me if I reflect just a little on the last blogging year. The top 10 posts of 2014, as per Google Analytics statistics, are...
Before getting to the tarts, though, forgive me if I reflect just a little on the last blogging year. The top 10 posts of 2014, as per Google Analytics statistics, are...
- Vegan lemon meringue pie
- Healthier sticky date pudding in a mug
- Raw zucchini noodles with a spicy peanut sauce
- Hazelnut praline chocolates, and chocolate spread (my 2014 blog anniversary post)
- Cherry ripe balls for Mother's Day
- Chocolate sweet potato ice cream
- Raw apple-vanilla or banana-cinnamon buckwheat porridge
- Raw bakewell tart bars
- In My Kitchen July 2014 (featuring my new UK kitchen) and November 2014 (featuring products from Borough Market)
- Wave Rock, Western Australia
Sunday, January 11, 2015
Orange-mustard stir fry with tofu and Asian greens, and a new blog header
First, thanks so much for your enthusiasm regarding my marathon plans! It is lovely to have encouragement from around the globe and I look forward to sharing progress as April draws nearer. I managed to trip over and fall flat on the concrete on this morning's run (fortunately no major injuries) so I am hoping that gets my uncoordinated streak out of the way...
On other topics, you may have noticed a new header on my blog this week. I seem to change my headers around this time of year, and whilst I wasn't really tired of the old one yet, I thought a fresh image would be nice. I hope you like it (if you don't, feedback is always welcome). The new one ties in with my Facebook page header without being exactly the same.
 |
| Bite-sized thoughts over the years (2011 and 2012 along the top, and 2013 and 2014 along the bottom) |
In terms of today's recipe, I have been on a bit of an orange kick lately - something that is reflected in this post coming straight after my orange coconut ice. I actually have a few other orange recipes too, but I won't bring them all out at once. Keep an eye out over coming months, as I'll share them in spaced out doses!

Friday, March 7, 2014
Tri-pepper, five-colour spaghetti
Remember, in this post, when I talked about the various 'niggles' that may haunt a dish? The things that can go wrong, the ideas you can't quite make, the recipes you somehow lose...
Dear readers, I have lost a recipe. Not a terribly complicated recipe, or even a very exciting one, but a combination of ingredients that turned pasta from simple to exciting. Lost might in fact be a little generous; I distinctly remember throwing the piece of paper out (!). I thought I had transferred my scribbled notes to a draft blog post, but it seems that happened in my imagination and not reality.

I am really very sorry.
On the plus side, I can remember most (perhaps all - who knows!) of the things that went into this dish. And, pasta dishes are pretty much a concept anyway. And, I'm sure you all adapt recipes to what you have to hand.
Maybe we can pretend it isn't so bad.
Wednesday, May 15, 2013
Failed yoghurt, thank yous, and 11 questions
You may remember that I recently found coconut yoghurt (that reads a bit like I found religion), and that I had high hopes for using the yoghurt as a starter for making non-dairy yoghurt myself.

People, my hopes are dashed.

People, my hopes are dashed.
Monday, March 11, 2013
2 years of blogging, raw sushi, and raw chilli-cinnamon-sea salt chocolates
Today marks two years since Bite-Sized Thoughts started. I have taken it as an opportunity for reflection and for edible celebration.
On the reflection side of things, I continue to get a lot of pleasure from blogging and the blogging community. I am more creative in the kitchen than I was two years ago. I know a lot more about vegan and vegetarian cooking and eating, and have seen my eating preferences and patterns change and evolve. I have met (in a virtual sense) people with whom I feel a huge amount of connection, especially when considering that our interactions are limited to online comments and discussions.
From a blog perspective, the last year saw me switch from my blogspot address to bitesizedthoughts.com, create a (very basic) favicon for the blog, and start participating in link-up events like Ricki's Wellness Weekends, Healthy Vegan Fridays, Cityhippyfarmgirl's 'loving this week' posts, and Celia's In My Kitchen series. More recently, I changed my header again and learned how to do drop-down menus.
According to Google Analytics, the most frequently viewed posts in the last year were:
I think we all have a list of amusing search terms that somehow led someone to our blog. In the last year, some of the more amusing phrases to lead here include...
Moving to the edible part of today's post, I realised that I set the bar a bit high last year by making three types of raw vegan cheesecake for my one year blog anniversary. Such foolish enthusiasm! I don't have three varieties of raw vegan dessert for you today, but I decided to stick with the raw theme for the simple reason that I find it fun. My diet is not predominantly or even mostly raw, but I find that making raw vegan dishes is even more rewarding than making vegan ones. It is like kitchen alchemy.
Raw sushi must be one of the easiest raw dishes to make, although I got into a muddle about whether mirin and rice wine vinegar are technically raw or not. (Usually I wouldn't worry, but if I was calling this raw, I wanted to make sure it actually was.) My version uses tahini for flavour and carrot, capsicum and watercress as vegetable fillings. If you like avocado, that would be a great option to include too.
My sushi is always messy and this raw version is no exception. For images of neater raw sushi, I recommend the pictures in Hannah's recent post on Wayfaring Chocolate!


This is, obviously, different in texture and flavour to rice-filled sushi. If you don't expect a like-for-like substitution, I think most people would enjoy it. It is certainly an easy way to boost your intake of vegetables, and I think the mix of cauliflower rice with fruit fillings would be an enjoyable combination too. I'd also like to experiment further with including dried herbs and seasonings in the cauliflower mix.
Raw sushi is all well and good, but I will confess to being more excited about the second dish I made. These individual raw chocolates are made with cocoa butter, cocoa nibs, cocoa powder, chilli flakes, cinnamon and sea salt. I loved them.

Before looking into raw chocolate making, I didn't really have any idea how it was done. It turns out that it's surprisingly simple. You need to invest in cacao butter, and may also want to purchase cacao nibs, but you're likely to have most of the other necessary components in your kitchen. What is more, while I spent $30 on the cacao butter, nibs and raw cacao powder, those purchases should allow me to make another 3 or 4 batches similar to the one below. This places the cost per 100g of chocolate in the region of $4 - $5, including the cost of other ingredients, whereas commercial raw chocolate costs at least $10 per 100g (around me anyway).
Cost aside, there are other advantages to making chocolate this way yourself: it is really fun, and you design your flavour. The following recipe takes you through what I did, but you can modify the cocoa percentage and the flavour add-ins to taste.
I can only describe this chocolate as wonderful. I am sure I am a little biased, and I'd love it if you tried a version out yourself and let me know how you got on. For now, though, let me say that if I bought this in a shop I would definitely buy it again.

The chilli gives a subtle kick without being overpowering, the sea salt comes through in waves, and the cinnamon is only just detectable but works to brings the different flavours together. The nibs provide a subtle texture contrast and the chocolate is dark and deep and slightly sweet. I think the texture of the cacao nibs also helps to avoid (or, perhaps, to distract from) the grittiness that sometimes accompanies raw chocolate.

 |
| Raw vegetable sushi and raw chilli-cinnamon-sea salt chocolates. |
On the reflection side of things, I continue to get a lot of pleasure from blogging and the blogging community. I am more creative in the kitchen than I was two years ago. I know a lot more about vegan and vegetarian cooking and eating, and have seen my eating preferences and patterns change and evolve. I have met (in a virtual sense) people with whom I feel a huge amount of connection, especially when considering that our interactions are limited to online comments and discussions.
From a blog perspective, the last year saw me switch from my blogspot address to bitesizedthoughts.com, create a (very basic) favicon for the blog, and start participating in link-up events like Ricki's Wellness Weekends, Healthy Vegan Fridays, Cityhippyfarmgirl's 'loving this week' posts, and Celia's In My Kitchen series. More recently, I changed my header again and learned how to do drop-down menus.
 |
| Bite-sized thoughts version 1 (2011-2012) |
According to Google Analytics, the most frequently viewed posts in the last year were:
- Body image and eating disorders awareness week (posted September 2011)
- Les Mills Body Attack (posted July 2011)
- Making non-dairy yoghurt (November 2011)
- Sweet potato chickpea and hemp seed veggie burgers (posted August 2012)
- Vegemite, Marmite and Promite (November 2011)
- Raw vegan cheesecake, three ways (my one year anniversary post, March 2012)
- Thai fish cakes, vegetarian style (March 2012)
- Treehouses (May 2012)
- Raspberry and white chocolate muffins, for my parents (October 2011)
- Vegan lemon slice for a modern afternoon tea (June 2012)
I think we all have a list of amusing search terms that somehow led someone to our blog. In the last year, some of the more amusing phrases to lead here include...
- "Yılbaşı yemekleri." Apparently, this is Turkish for New Year's Eve dinners. How and why multiple people have used it to search for this site is beyond me.
- "New york times white bean pasta." I'm pretty sure no New York Times recipes are on my blog. And hardly any pasta ones.
- "Are fish cakes vegetarian?" Um, no.
- "Good thoughts in english with images." What?
- "Bicep hurts shooting basketball." This one I understand. I feel your pain.
- "Bite hair." I don't really want to know what this is about.
- "Green and black's dark chocolate tastes like liquorice?" No, it doesn't, but now I wish it did.
- "How do I know if I broke my toe." Frankly, I don't think I'm the person you should be asking...
 |
| Bite-sized thoughts version 2 (2012-2013) |
Moving to the edible part of today's post, I realised that I set the bar a bit high last year by making three types of raw vegan cheesecake for my one year blog anniversary. Such foolish enthusiasm! I don't have three varieties of raw vegan dessert for you today, but I decided to stick with the raw theme for the simple reason that I find it fun. My diet is not predominantly or even mostly raw, but I find that making raw vegan dishes is even more rewarding than making vegan ones. It is like kitchen alchemy.
Raw sushi must be one of the easiest raw dishes to make, although I got into a muddle about whether mirin and rice wine vinegar are technically raw or not. (Usually I wouldn't worry, but if I was calling this raw, I wanted to make sure it actually was.) My version uses tahini for flavour and carrot, capsicum and watercress as vegetable fillings. If you like avocado, that would be a great option to include too.
My sushi is always messy and this raw version is no exception. For images of neater raw sushi, I recommend the pictures in Hannah's recent post on Wayfaring Chocolate!

Raw vegetable sushi
Makes 2 large handrolls, or 10 large slices.
Raw and vegan.
Food processor required.
Ingredients
1/4 head cauliflower
1 tbsp apple cider vinegar
1/4 - 1/2 tsp agave nectar (to taste)
Pinch salt
2 tbsp unhulled tahini
2 sheets nori (dried, not roasted)
1 medium carrot, cut into thin slices
1 small capsicum, cut into thin slices
A thick handful of watercress
Method
Process the cauliflower in a food processor until fine and rice-like in texture. Mix through the apple cider vinegar, agave and salt and rest in the fridge for at least 30 minutes.
Take one sheet of nori and lay flat on a chopping board, or sushi mat if you have one (I don't). Spread approximately half of the cauliflower mix over half of the nori sheet, leaving an inch at the bottom edge and several inches at the top edge.
Spread 1 tablespoon of the tahini over the cauliflower, and then place your vegetable fillings in a row towards the bottom of the sheet. Roll up and seal nori edges with water as required.
Repeat for the second nori sheet.
Slice and serve.

This is, obviously, different in texture and flavour to rice-filled sushi. If you don't expect a like-for-like substitution, I think most people would enjoy it. It is certainly an easy way to boost your intake of vegetables, and I think the mix of cauliflower rice with fruit fillings would be an enjoyable combination too. I'd also like to experiment further with including dried herbs and seasonings in the cauliflower mix.
Raw sushi is all well and good, but I will confess to being more excited about the second dish I made. These individual raw chocolates are made with cocoa butter, cocoa nibs, cocoa powder, chilli flakes, cinnamon and sea salt. I loved them.

Before looking into raw chocolate making, I didn't really have any idea how it was done. It turns out that it's surprisingly simple. You need to invest in cacao butter, and may also want to purchase cacao nibs, but you're likely to have most of the other necessary components in your kitchen. What is more, while I spent $30 on the cacao butter, nibs and raw cacao powder, those purchases should allow me to make another 3 or 4 batches similar to the one below. This places the cost per 100g of chocolate in the region of $4 - $5, including the cost of other ingredients, whereas commercial raw chocolate costs at least $10 per 100g (around me anyway).
 |
| Raw cacao butter and raw cacao nibs. |
Cost aside, there are other advantages to making chocolate this way yourself: it is really fun, and you design your flavour. The following recipe takes you through what I did, but you can modify the cocoa percentage and the flavour add-ins to taste.
Raw chilli-cinnamon-sea salt dark chocolate
Makes about 240g, or 24 small chocolates.
Raw and vegan.
71% cocoa content.
Inspiration drawn from Choc Chic's simple raw chocolate recipe,
Indigo Herbs post on how to make raw chocolate,
and the chocolate making process outlined on Pana Chocolate.
Indigo Herbs post on how to make raw chocolate,
and the chocolate making process outlined on Pana Chocolate.
Ingredients
60g (~1/2 cup) raw cacao butter
80g (~3/4 cup) raw cacao powder (or regular / roasted cacao powder, if preferred)
30g (~1/4 cup) raw cacao nibs (or more cacao powder)
65-70g (~1/4 cup) agave nectar
1 tsp vanilla
1 tsp sea salt
1 tsp cinnamon powder
1/2 tsp chilli flakes (or to taste)
Method
Lay out individual silicon moulds for setting the chocolate in, or use cupcake liners if you don't have moulds available.
Create a double-boiler system by placing a glass dish on top of a large saucepan half-filled with water. Heat the water over low heat.
If you want to ensure the chocolate is raw, use a candy thermometer to monitor the temperature of the glass dish and ensure it stays below 42'C / 108'F. If you aren't worried about the raw aspect, keeping the water in the saucepan below simmering point should approximate a temperature below 42'C anyway.
Add the cacao butter to the glass dish and stir regularly until it has fully melted. This step may take up to 5 minutes.
When the cacao butter has melted, add the cacao nibs and cacao powder. Stir until dissolved (the nibs will still be identifiable).
Add the agave and stir until incorporated, and then add the vanilla, sea salt, cinnamon and chilli flakes (or other flavourings to taste).
Transfer into your moulds / cupcake liners and set in the fridge for at least 2 hours.
 |
| Left to right: Cacao butter in unmelted form; melted cacao butter; liquid raw chocolate. |
I can only describe this chocolate as wonderful. I am sure I am a little biased, and I'd love it if you tried a version out yourself and let me know how you got on. For now, though, let me say that if I bought this in a shop I would definitely buy it again.

The chilli gives a subtle kick without being overpowering, the sea salt comes through in waves, and the cinnamon is only just detectable but works to brings the different flavours together. The nibs provide a subtle texture contrast and the chocolate is dark and deep and slightly sweet. I think the texture of the cacao nibs also helps to avoid (or, perhaps, to distract from) the grittiness that sometimes accompanies raw chocolate.
I can not wait to make more, and to try different flavours.

I am sending these recipes to Raw Foods Thursdays 14th March 2013, and Ricki's Wellness Weekend 14th to 18th March 2013.
Happy two years from bite-sized thoughts!
Thank you to each and every one of you who stops by, leaves a comment, or lets me know that you've tried out a recipe - you all contribute to the pleasure I get from blogging and blog reading.
Sunday, February 3, 2013
How to create drop-down menus in Blogger
This post is a definite side-step from my usual topics, and I know the side-step won't be of interest to everyone. I apologise in advance if that is the case for you, and will be back tomorrow with a post that is food-focused rather than web-focused. For today, though, I did want to document the following for those of you who have asked about drop-down menus. It also seemed wise to document the information for my own reference.

<div id='mbtnavbar'>
<ul id='mbtnav'>
<li>
<a href='LINK TO PAGE 1’>NAME OF PAGE 1</a>
</li>
<li>
<a href='LINK TO PAGE 2’>NAME OF PAGE 2 </a>
<ul>
<li><a href=’LINK TO PAGE 2, SUB-PAGE 1 '>NAME OF PAGE 2, SUB-PAGE 1</a>
</li>
</ul>
</li>
<li>
<a href='LINK TO PAGE 3'>NAME OF PAGE 3</a>
<ul>
<li><a href='LINK TO PAGE 3, SUB-PAGE 1’>NAME OF PAGE 3, SUB-PAGE 1</a>
</li>
<li><a href='LINK TO PAGE 3, SUB-PAGE 2’>NAME OF PAGE 3, SUB-PAGE 2 </a>
</li>
<li><a href='LINK TO PAGE 3, SUB-PAGE 3’>NAME OF PAGE 3, SUB-PAGE 3 </a>
</li>
</ul>
</li>
</li></ul>
</div>
<div id='mbtnavbar'>
<ul id='mbtnav'>
<li>
<a href='http://www.bitesizedthoughts.com/'>Home</a>
</li>
<li>
<a href='http://www.bitesizedthoughts.com/p/about-this-blog.html'>About this blog</a>
<ul>
<li><a href='http://www.bitesizedthoughts.com/p/disclosure-policy.html'>Disclosure policy</a>
</li>
</ul>
Save your gadget. At this stage the formatting won’t be at all right, so if you preview it, don’t worry about how it looks (it will look wrong!).
Your Layout page should now look like this:
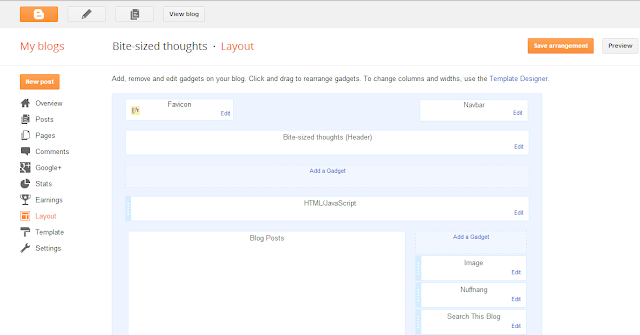
The HTML / Java Script along the top is what you have just added.
For Step Two, go to the Template section of Blogger. You can do the following through ‘Edit HTML’ (which is actually what we did when working out what to do), but it is easier if you select ‘Customize’.

When in the Blogger Template editor, select ‘Advanced’. Scroll down to the very bottom of the list of editing options, to ‘Add CSS’.
Copy the following into the ‘Add custom CSS’ box:
.Header h1 {text-shadow: 2px 2px #FFFFFF; }
/*----- MBT Drop Down Menu ----*/
#mbtnavbar {
/* background: #ff0000; */
width: 100%;
color: #FFF;
margin: 0px;
padding: 0;
position: relative;
border-top:0px solid #960100;
height: 41px;
}
#mbtnav {
background: #909092;
margin: 0;
padding: 0;
}
#mbtnav ul {
float: left;
list-style: none;
margin: 0;
padding: 0;
}
#mbtnav li {
list-style: none;
margin: 0;
padding: 0;
/* border-left:1px solid #333;
border-right:1px solid #333; */
height:41px;
}
#mbtnav li a, #mbtnav li a:link, #mbtnav li a:visited {
color: #FFF;
display: block;
font:bold 15px Arial, Tahoma, Helvetica, FreeSans, sans-serif;
margin: 0;
padding: 9px 12px 10px 12px;
text-decoration: none;
}
#mbtnav li a:hover, #mbtnav li a:active {
background: #909092;
color: #FFF;
display: block;
text-decoration: none;
margin: 0;
padding: 9px 12px 10px 12px;
}
#mbtnav li {
float: left;
padding: 0;
}
#mbtnav li ul {
z-index: 9999;
position: absolute;
left: -999em;
height: auto;
width: 200px;
margin: 0;
padding: 0;
}
#mbtnav li ul a {
width: 180px;
}
#mbtnav li ul ul {
margin: -35px 0 0 161px;
}
#mbtnav li:hover ul ul, #mbtnav li:hover ul ul ul, #mbtnav li.sfhover ul ul, #mbtnav li.sfhover ul ul ul {
left: -999em;
}
#mbtnav li:hover ul, #mbtnav li li:hover ul, #mbtnav li li li:hover ul, #mbtnav li.sfhover ul, #mbtnav li li.sfhover ul, #mbtnav li li li.sfhover ul {
left: auto;
}
#mbtnav li:hover, #mbtnav li.sfhover {
position: static;
}
#mbtnav li li a, #mbtnav li li a:link, #mbtnav li li a:visited {
background: #909092;
/* width: 140px; */
color: #FFF;
display: block;
font:bold 13px Arial, Tahoma, Helvetica, FreeSans, sans-serif;
margin: 0;
padding: 9px 12px 10px 12px;
text-decoration: none;
z-index:9999;
border-bottom:1px dotted #333;
}
#mbtnav li li a:hover, #mbtnavli li a:active {
background: #060505;
color: #FFF;
display: block;
margin: 0;
padding: 9px 12px 10px 12px;
text-decoration: none;
}
.tabs-inner .widget #mbtnavbar li a {
border-left:none;
}
.tabs-outer .widget, .section {
margin:0;
}
.tabs-inner {
padding: 0px;
}

You can preview the appearance of your menu now. As the above is set to the formatting I wanted, you will probably need to change things like colour, font size, and so on to suit your own requirements. You can change these in the CSS syntax above.
Once you are happy with the format and appearance, there is one final step to do.
Although this post is written for Blogger, the HTML components should be applicable to WordPress and other blogging platforms too. I just can't advise on where you should make changes, or on which sections of your template to edit.
By drop-down menus, I am referring to a set of tabs that open up to additional, drop-down tabs when you hover over them. You can see them along the top of this blog, and if you use the internet, you will undoubtedly have used them to navigate content at some stage.
This is what I'm talking about...
You can use drop-down menus to navigate to separate pages on your blog, or to navigate to sections within a page. In my case, an example of the former is the drop-down menu under 'About this blog', which allows you to navigate to 'Disclosure policy' (a separate page). An example of the latter is under 'Recipes', where you can navigate to different sections of the overall Recipes page. To make links to different sections within a page, you will need to create anchors. If you aren’t familiar with them, I recommend reading Johanna’s tutorial at Green Gourmet Giraffe, which is where I first learnt about how to create them.
Once you have created your pages and/or anchors and know what you want your drop-down menu to include, you are ready to start. Before doing so, check that under Blogger's 'Pages' (down the side menu of Blogger), you have selected to show pages as top tabs. (We will change this later but it is easier if it is on to start with.)
You now need to make changes to your Blogger template in three places.
The first change is under Layout, where you want to add a customisable ‘HTML / Java Script’ gadget. To do this, click the ‘add a gadget’ box underneath your blog header. Then scroll down to ‘HTML/Java Script’ and select it.
You will be asked to enter a title and content for this new gadget. The title can be blank. For the contents, copy the following:
<div id='mbtnavbar'>
<ul id='mbtnav'>
<li>
<a href='LINK TO PAGE 1’>NAME OF PAGE 1</a>
</li>
<li>
<a href='LINK TO PAGE 2’>NAME OF PAGE 2 </a>
<ul>
<li><a href=’LINK TO PAGE 2, SUB-PAGE 1 '>NAME OF PAGE 2, SUB-PAGE 1</a>
</li>
</ul>
</li>
<li>
<a href='LINK TO PAGE 3'>NAME OF PAGE 3</a>
<ul>
<li><a href='LINK TO PAGE 3, SUB-PAGE 1’>NAME OF PAGE 3, SUB-PAGE 1</a>
</li>
<li><a href='LINK TO PAGE 3, SUB-PAGE 2’>NAME OF PAGE 3, SUB-PAGE 2 </a>
</li>
<li><a href='LINK TO PAGE 3, SUB-PAGE 3’>NAME OF PAGE 3, SUB-PAGE 3 </a>
</li>
</ul>
</li>
</li></ul>
</div>
The sections in capitals need to be customised to your blog. For me, the start of the syntax looks like this:
<div id='mbtnavbar'>
<ul id='mbtnav'>
<li>
<a href='http://www.bitesizedthoughts.com/'>Home</a>
</li>
<li>
<a href='http://www.bitesizedthoughts.com/p/about-this-blog.html'>About this blog</a>
<ul>
<li><a href='http://www.bitesizedthoughts.com/p/disclosure-policy.html'>Disclosure policy</a>
</li>
</ul>
Save your gadget. At this stage the formatting won’t be at all right, so if you preview it, don’t worry about how it looks (it will look wrong!).
Your Layout page should now look like this:

The HTML / Java Script along the top is what you have just added.
For Step Two, go to the Template section of Blogger. You can do the following through ‘Edit HTML’ (which is actually what we did when working out what to do), but it is easier if you select ‘Customize’.
Select 'customise'
When in the Blogger Template editor, select ‘Advanced’. Scroll down to the very bottom of the list of editing options, to ‘Add CSS’.
Copy the following into the ‘Add custom CSS’ box:
.Header h1 {text-shadow: 2px 2px #FFFFFF; }
/*----- MBT Drop Down Menu ----*/
#mbtnavbar {
/* background: #ff0000; */
width: 100%;
color: #FFF;
margin: 0px;
padding: 0;
position: relative;
border-top:0px solid #960100;
height: 41px;
}
#mbtnav {
background: #909092;
margin: 0;
padding: 0;
}
#mbtnav ul {
float: left;
list-style: none;
margin: 0;
padding: 0;
}
#mbtnav li {
list-style: none;
margin: 0;
padding: 0;
/* border-left:1px solid #333;
border-right:1px solid #333; */
height:41px;
}
#mbtnav li a, #mbtnav li a:link, #mbtnav li a:visited {
color: #FFF;
display: block;
font:bold 15px Arial, Tahoma, Helvetica, FreeSans, sans-serif;
margin: 0;
padding: 9px 12px 10px 12px;
text-decoration: none;
}
#mbtnav li a:hover, #mbtnav li a:active {
background: #909092;
color: #FFF;
display: block;
text-decoration: none;
margin: 0;
padding: 9px 12px 10px 12px;
}
#mbtnav li {
float: left;
padding: 0;
}
#mbtnav li ul {
z-index: 9999;
position: absolute;
left: -999em;
height: auto;
width: 200px;
margin: 0;
padding: 0;
}
#mbtnav li ul a {
width: 180px;
}
#mbtnav li ul ul {
margin: -35px 0 0 161px;
}
#mbtnav li:hover ul ul, #mbtnav li:hover ul ul ul, #mbtnav li.sfhover ul ul, #mbtnav li.sfhover ul ul ul {
left: -999em;
}
#mbtnav li:hover ul, #mbtnav li li:hover ul, #mbtnav li li li:hover ul, #mbtnav li.sfhover ul, #mbtnav li li.sfhover ul, #mbtnav li li li.sfhover ul {
left: auto;
}
#mbtnav li:hover, #mbtnav li.sfhover {
position: static;
}
#mbtnav li li a, #mbtnav li li a:link, #mbtnav li li a:visited {
background: #909092;
/* width: 140px; */
color: #FFF;
display: block;
font:bold 13px Arial, Tahoma, Helvetica, FreeSans, sans-serif;
margin: 0;
padding: 9px 12px 10px 12px;
text-decoration: none;
z-index:9999;
border-bottom:1px dotted #333;
}
#mbtnav li li a:hover, #mbtnavli li a:active {
background: #060505;
color: #FFF;
display: block;
margin: 0;
padding: 9px 12px 10px 12px;
text-decoration: none;
}
.tabs-inner .widget #mbtnavbar li a {
border-left:none;
}
.tabs-outer .widget, .section {
margin:0;
}
.tabs-inner {
padding: 0px;
}
This is where you paste the above syntax
You can preview the appearance of your menu now. As the above is set to the formatting I wanted, you will probably need to change things like colour, font size, and so on to suit your own requirements. You can change these in the CSS syntax above.
Once you are happy with the format and appearance, there is one final step to do.
Step Three is required to make it possible to navigate your blog's pages when the site is viewed on a mobile phone. Blogger’s standard way of showing pages (not a drop-down menu) automatically adjusts when someone views your blog on a mobile. You want to keep that standard system for phone views, but turn it off for computer-based views that will now benefit from your drop-down system.
To achieve this, you will need to edit your HTML. When in the Template section of Blogger, select ‘Edit HTML’ and then do a search (control + F) for ‘PageList1’.
This will bring up a line of syntax that you can edit to look like the following:
<b:widget id='PageList1' locked='false' mobile='only' title='Pages' type='PageList'/>
You should now have drop-down menus when your blog is viewed through a computer, and a phone-friendly menu version when your blog is viewed on a mobile phone.
For extra advice and information, also see this post and try searching for 'CSS only drop down menus'.
Lastly, Mr Bite offers the tip of creating a random, non-public blog (given Blogger blogs are free) that you can practice formatting changes on before transferring them to your 'real' blog. My tip is to find your own Mr B equivalent who can do that testing for you and then help you out!
Update June 2013: A few people have let me know that they couldn't get the code to work until they used double quotation marks (" ") instead of single (' ') in the link html. So, instead of the following:
<li>
<a href='LINK TO PAGE 1’>NAME OF PAGE 1</a>
</li>
You may want to try:
<li>
<a href="LINK TO PAGE 1">NAME OF PAGE 1</a>
</li>
Update July 2013: Johanna at Green Gourmet Giraffe shared her experience on adding drop down menus in this post, based on her experiences with the information outlined here and in other tutorials.
I always love receiving your comments and questions, but please note that I am not a trained programmer and I don't have the knowledge or capacity to answer detailed questions about how the above might be modified to your blog or specific needs. If you leave a question below and I know the answer, I'll certainly reply. However, I won't be able to respond to detailed or lengthy questions that are beyond what I can assist with.
Monday, January 7, 2013
Sweet chilli tofu and greens
Today marked the first day of my first full week of work for 2013. I am very glad I had my one day work week last week to ease into things. The prospect of five full days is rather unappealing at this point, but I think it would have been worse if I hadn't worked last Friday!
I am grateful to have had such an enjoyable break, and to be entering the new work year with an organised frame of mind. In addition to holiday-type activities, my New Year cleaning of the kitchen was complemented by washing of sofa covers, vacuuming within and behind said sofas (ick), and sorting and reorganising my cupboards to generate 2 large bags of clothes for charity and a further bag for the bin. I have been keeping clothes since I was about 16, and it is time to admit (13 years later!) that some of them are never going to be fashionable again and/or just don't fit.
With regards to blog organisation, I am also delighted to announce that the list of pages along the top of the blog, underneath the header, now have drop-down menus where relevant. I have wanted to do this for some time but my programming skills didn't prove capable to the task. Mr Bite came to my rescue with a solution late last year, and after a lot (a lot!) of tweaking and adjusting the new system is finally in place. A huge thank you to him, and I hope it will make navigation easier for you.

Moving to the recipe focus for today, this must be one of the simplest meals I have posted. I usually hold back from posting super simple dishes, but I decided to share this one because I enjoyed it so much. Moreover, I like seeing simple dishes on others' blogs. Whilst I often bookmark complicated recipes it is the easy ones that are more likely to be made quickly!

I am sure many of you have your own version of this stir fry mix, but if you are after a fresh, light, summer-appropriate meal that can be put together quickly - this may appeal to you too.

I could happily eat this all day. And I did. Which is why both serves disappeared in under 24 hours.
Submitted to Health Vegan Friday 25, co-hosted by Gabby and Carrie.
What easy meals are you eating this week?
I am grateful to have had such an enjoyable break, and to be entering the new work year with an organised frame of mind. In addition to holiday-type activities, my New Year cleaning of the kitchen was complemented by washing of sofa covers, vacuuming within and behind said sofas (ick), and sorting and reorganising my cupboards to generate 2 large bags of clothes for charity and a further bag for the bin. I have been keeping clothes since I was about 16, and it is time to admit (13 years later!) that some of them are never going to be fashionable again and/or just don't fit.
With regards to blog organisation, I am also delighted to announce that the list of pages along the top of the blog, underneath the header, now have drop-down menus where relevant. I have wanted to do this for some time but my programming skills didn't prove capable to the task. Mr Bite came to my rescue with a solution late last year, and after a lot (a lot!) of tweaking and adjusting the new system is finally in place. A huge thank you to him, and I hope it will make navigation easier for you.

Moving to the recipe focus for today, this must be one of the simplest meals I have posted. I usually hold back from posting super simple dishes, but I decided to share this one because I enjoyed it so much. Moreover, I like seeing simple dishes on others' blogs. Whilst I often bookmark complicated recipes it is the easy ones that are more likely to be made quickly!

I am sure many of you have your own version of this stir fry mix, but if you are after a fresh, light, summer-appropriate meal that can be put together quickly - this may appeal to you too.
Sweet chilli tofu and greens
Serves 2
Vegan, easy and very adaptable
Ingredients
350g block firm tofu
1 tbsp sweet chilli sauce
1 tbsp soy sauce
1 tsp lime juice
1 tsp nutritional yeast
2 bunches bok choi (Chinese cabbage)
2 - 3 bunches gai lan (also known as kai-lan or Chinese brocolli)
Rice or noodles, to serve (optional)
Method
Press your tofu using a tofu press (if you have one) or between chopping boards and under books (if you're like me).
While the tofu is pressing, combine the sweet chilli sauce, soy sauce, lime juice and nutritional yeast. Cut the pressed tofu into large squares and then pour the sweet chilli mixture over the tofu and allow to marinate briefly, about 15 minutes.
Wash the bok choi and gai lan and roughly chop or tear into medium sized pieces.
In a non-stick pan, stir fry the marinated tofu on medium-high heat until browned on both sides. Reserve any remaining marinade. When the tofu is cooked, reduce the heat to low and add the greens along with any remaining marinade. Continue stir frying for about 5 minutes, until the vegetables are just cooked but still crisp.
Serve with rice or noodles, or eat straight up.

I could happily eat this all day. And I did. Which is why both serves disappeared in under 24 hours.
Submitted to Health Vegan Friday 25, co-hosted by Gabby and Carrie.
Thursday, January 3, 2013
Raw pear and cashew balls (and a new blog header)
I made these balls before Christmas, but in the frenzy of Christmas themed posts and New Year summaries they got left behind until now. This is a little unfair, as they are delightful balls and would have been a happy accompaniment to other Christmassy snacks. It is fortunate that they are the sort of snack that suits consumption at any time of the year. Indeed, if you are heading back to work this week or next (I return tomorrow, which gives a one-day work week!), they would be a good match for 3pm snack urges.

I don't much like cashews plain, but have discovered that they go very nicely in fruit and nut balls like these. This pear version follows my earlier papaya and cashew balls, and pineapple and cashew balls. Pear isn't as strong in flavour as papaya or pineapple, but it matches the cashews nicely all the same.

In other news, and as at least one of you has already seen, Bite-Sized Thoughts has a new header. I am rather in love with it but please let me know if it looks odd in your browser (I have checked Chrome, Internet Explorer and Firefox but not Mac varieties).

There are a few other organisational changes in the works too, designed to streamline finding information, but I will update on those when they are finalised. If the blog disappears at random, you will know that my efforts backfired and I organised things into oblivion!
I'm submitting these snack balls to Ricki's Wellness Weekend 3rd - 7th January 2013,
and to Heather's new link up event of Raw Foods Thursday, 3rd January 2013,
Tell me - cashews, yes or no?
And if you work, when do you head back?

I don't much like cashews plain, but have discovered that they go very nicely in fruit and nut balls like these. This pear version follows my earlier papaya and cashew balls, and pineapple and cashew balls. Pear isn't as strong in flavour as papaya or pineapple, but it matches the cashews nicely all the same.
Pear and cashew balls
Raw and vegan
You will need a food processor for this recipe
Makes about 20 small balls
Ingredients
1 cup dried pear pieces (about 150g)
1/2 cup raw cashews (about 75g)
1 tsp vanilla extract
Scant 1/4 cup dessicated coconut (about 15g)
Method
Roughly chop the dried pear, and then add to a food processor together with the cashews, vanilla and coconut. Process until finely ground and the mixture clumps together.
Roll into small balls and set in the fridge for about an hour. Best served cold.


There are a few other organisational changes in the works too, designed to streamline finding information, but I will update on those when they are finalised. If the blog disappears at random, you will know that my efforts backfired and I organised things into oblivion!
I'm submitting these snack balls to Ricki's Wellness Weekend 3rd - 7th January 2013,
and to Heather's new link up event of Raw Foods Thursday, 3rd January 2013,
Tell me - cashews, yes or no?
And if you work, when do you head back?
Sunday, January 1, 2012
2012 aspirations
I know it's the 3rd January today. And that most people seemed to post their 2012 goals, if they made them, at the end of December. The 1st January at the very latest.
However, clearly I am not that organised.
I do, nonetheless, have some things I'm hoping for in 2012. Not resolutions, perhaps, but goals and aspirations - things I'd like to keep in mind over the next 12 months.
What I hope to achieve in 2012

This is the first year I've had a blog to record goals for the year ahead, and I think it will help with reflecting back at the end of the year. I can already sense that some may prove challenging, but then a list of easy-to-achieve goals wouldn't be much use at all.
In other news, there are some modest blog changes about;
However, clearly I am not that organised.
I do, nonetheless, have some things I'm hoping for in 2012. Not resolutions, perhaps, but goals and aspirations - things I'd like to keep in mind over the next 12 months.
What I hope to achieve in 2012
In work -
Making the most of opportunities without over-committing myself
Using work time to its maximum potential, so I can shut the door at home
Achieving several specific work goals that I won't outline here
Being more social at work!
In fitness -
Keep cycling and keep making it to Body Attack
Run in the Perth City2Surf for the second time, in August (my choices will be 12km or a half marathon)
In life -
Fulfill emerging travel plans, most immediately to Exmouth (northern WA) at Easter and then more provisionally to Europe and possibly Morocco (!) in September, around a conference I have in Portugal
(Possibly) buy a house with Mr Bite...not in Australia, to add a twist
Continue learning how to use my camera!
Continue expanding horizons in the kitchen, especially with main meals

This is the first year I've had a blog to record goals for the year ahead, and I think it will help with reflecting back at the end of the year. I can already sense that some may prove challenging, but then a list of easy-to-achieve goals wouldn't be much use at all.
In other news, there are some modest blog changes about;
- A new header, which I really hope appears ok on all browsers. The title will look better in Chrome and Firefox than in Internet Explorer, but should work in all (you might need to refresh the page though).
- An updated and much extended About page
- A new page for 'themed' posts (for lack of a better word), called Categories of Posts
- The final update to my Books list from 2011...2012 will start up soon
And one change that's still in progress:
- A new Google Site for organizing all my recipes. Links to the original recipes (in post form) will still appear under the Recipes page, but that now includes a link to the new site, which is easier to navigate and makes printing simpler. All new recipes will now include a "print recipe" link that goes to the Site and I'm gradually putting all of the old recipes in there too.
Please let me know if there are any problems with any of the above (or if you don't like any aspect)...I'm made very aware of my technological limitations when doing updates like these!
Subscribe to:
Comments (Atom)