Showing posts with label Tutorial. Show all posts

Tuesday, 20 January 2015

Put Your Right Foot In........


Baby Legwarmers as I call these.....stashing these gorgeous little long boots for some gifts for upcoming mothers.....I'm addicted to making them, although I have taken on a couple of international orders and still in the midst of pattern writing so I've had to stop myself from making a second pair.....and I'm mucking around with the sizing as well, want to make some of these for bigger bubs.  You'll find the pattern here and my pair here with some additional notes and amendments I made to the pattern.  What do you think, cute?


Bye, Vx


Monday, 10 February 2014

The Squircle Ends.....


Such a silly name for a blanket, but it's stuck now!!


Anyway it's completed, blocked and put away for possibly a gift with all the other woolly bits and bobs, who knows.  I bordered and blocked the blanket last night.  For the border as per the post on the tutorial, I changed to a 3.5mm hook and just continued going around the blanket with double stitch clusters, the dinky stitch you use on a granny square....you can see my strength does not lie in crochet, not even sure of the stitch names!!  I did 7 rows of this.

I did  think about not putting a little sweet scalloped edging around it, but I thought it needed something to off set the circles.  To do the border it was a simple, single crochet into the gap left between the last row of granny stitches, then 3 chains then a single crochet, then 3 chains....right around the blanket.  At each corner I did a single crochet then 1 chain and then another single crochet into the same corner...this just stops the border from pulling.

The scalloping was just working in the 3 chains and it was a single crochet stitch, then a HDC stitch, then 2 x double crochet stitches, back to a HDC stitch then a single crochet stitch.  You then just move onto the next 3 chains space....you don't do a chain in between or anything just straight into your single crochet stitch, then a HDC, then 2 x double, back to a HDC, a single crochet.....you get the picture.

I've put The Squircle up on Ravelry right here. Again it's got a link to my tute.

Anyway it's Monday and it's movie night, so I'm going to get some lunch have a little rest and get ready.

Enjoy your week.

Vx

Sunday, 9 February 2014

The Squircle....


You know Brangelina, Kimye, Bennifer....and yes there was TomKat.....now here is the Squircle......a crochet blanket, circle within a square.

I've done a tutorial....you'll find it here or over on the right hand side of my blog under the "This is how we do it" heading.  In actual fact I went so far as to show you how to join as you go....so it's a mammoth post, and there are lots and lots of images.

Hope it's helpful, and I'll be back tomorrow with the finished article.


I'm off for a large drink....of the G&T variety.


Enjoy Vx


Saturday, 8 February 2014

Clover Again.......


Did you ever see just a toothy grin.....Baby Q in her little mauve Clover hat.....This little image will soon make its way to the front page of my Clover Knit your own at home pattern.  At the moment when you download my pattern from Etsy or Ravelry you get gorgeous little Miss A on your cover....but shortly there will be a second version of Clover and you can choose the image of Baby Q, and hopefully soon also a third image from Joy Wright Photography as well.  I just think it's nice to have a bit of variety....it's the spice of life!

This image above is courtesy of Sarah Brown Photography.  Sarah is from Griffith in NSW, Australia and she answered a call out on my FB page....her work is delightful and I instantly fell in love with her photos and also she is a Mum to 4 little ones....superwoman really!  Feel free to stop by her Facebook page and send her some world wide love.

Also don't forget Katherine Heise from Lamb Loves Fox or at her Facebook page....also brilliant photography of her gorgeous children going on here.

Well that's enough of me, I'll be back on Monday with a crochet tutorial.....The Squircle Blanket as I'm calling it.

See you soon.

Vx


Saturday, 1 February 2014

Stuff......


Hello, again apologies for being absent for so long.  I've been busy....nothing new there!!  Just wanted to say that in answer to some questions about the blanket that was on the post here......no it wasn't from a pattern, it was something I made up.

In answering a further question, is there a tutorial?.....at this exact time no but  happy to do a basic one in the next few days.....I lost my DSLR battery charger and had to order another one, so photos are non existent at the moment....probably explains the lack of posts. So look for that in the next few days

As for the sandals....yes they are Swedish, they are mustard suede and they're from here....clog number 667! And I love them so.


Anyway today and tomorrow are heading back into the 40's....it's going to be hot hot hot again,  I'm counting the weeks till the end of Summer....I even bought some new seasons knitwear earlier this week for Autumn and Winter.....thought it may just move the time along a little quicker.

Anyway must fly....heading out to work today, at least it will be lovely and air-conditioned.

Stay warm, stay cool wherever you may be.

Vicki x

Saturday, 28 December 2013

Blocking.....


To block or not to block that is the question.

I'm a blocker, I block my hats, blankets, whether they be knit or crochet and any little baby knits, such as jumpers, cardis, leggings etc.

Blocking just gives everything a professional finish in my opinion.  It relaxes the fibres of wool, and makes your work soft and drapey, it also has the advantage of stretching your work, should you find your items, a little small or tight.  There are so many different ways you can block your knitted/crocheted goodies, but I am of the type that finishes the item off, then blocks on completion.

There are others that block their knitting piece by piece before sewing the garment up.  There are crocheters that block by square before crocheting a blanket together......not me.

I like to unpin the item off a towel or blocking board and know that it's finished.

Just thought I'd give you a quick look at how I block.....I finished a couple of little cardigans over the weekend, and I just wanted to show you the before and after shots.

As mentioned, I had sewn the little cardigan up, except I hadn't put buttons on it....they did come last.  Buttons are always last, because sometimes with blocking you do have to do a bit of stretching and maneuvering and the buttons can end up in the wrong spot, just saves having to un do the buttons and replace.


Firstly I knit all the pieces of the little garment.  The knit is patterned with little fleur de lis in it, as you can see they are very hard to see....the fibres of this wool are all tight.


All little pieces sewn into place and ready for blocking.


I don't do anything special when blocking.  I have a stash of normal sewing pins with coloured tips (so I can see where I've placed them on my knit), a polystyrene board with an old towel on it (this acts as my blocking board and works a treat).  A spray water bottle with just room temp water in it and that's it.

As this little garment was quite squished up, I did spray it damp first so it was more pliable, especially the back of the little garment, and then just placed it flat on the board, and started pinning into place.....Nice and flat, without stretching the rib, but trying to get as much of the pattern to sit flat as I could.

I'll just let you know, it took a good 20 minutes to block this little 3M to 9M cardi into place.  I moved, straightened, stretched, flattened and just played around with it till I was happy with it....It looked like this.

Once flat and pinned, then I get trigger happy with the water bottle and just spray until the knit is damp to wet to the touch.  I then like to pat the water that sits on top of the wool into the item, and then give it one final spray again.  I then leave it until it's dry to the touch, unpin and usually then just pop it on the back of a chair, or the top of the clothes horse so it gets some air around it.


And then, once dry, it's beautiful and flat, soft as butter, and very drapey, and the patterning opens up so you can see it in all its knitted beauty......lots of relaxed fibres in this little knit!!


I did two little cardis, in the end!

The process I use is the same for blankets, nothing changes.


Hope I'm being helpful here, some of you will be au fait with all of this, but for those that don't....You learn something every day!!

 Any way, I'm done for the evening.  Hope you all had a wonderful Christmas, and I probably will be back in 2014....weather permitting.....loving this hot weather a little too much!!


These little cardis, are for sale, and you'll find them in my Etsy store.  The link is at the side of the page.


Cheers

Vicki x

Sunday, 25 August 2013

A Week Away.....


Little Clover is a week away.  All writing and photography work on my first knitting pattern is now completed.  I have some knitters testing the pattern, I'm just doing some final testing myself and someone else is looking at spelling, grammar and punctuation and that is it I think.

The release date will be Sunday 1st September and for now I'll be selling the pattern from my Ravelry store.  I'm still undecided about Etsy, I'll have a think about that during this week.   I'll update this page next week with the details, but for now I'll leave you with this stunning image from photographer Katherine Heise-Vouros from Lamb loves Fox.  It's her beautiful daughter in her Clover hat. Katherine is also a very talented crocheter.  To see some of her crochet work, stop by at Crochetlatte blog.

See you back here next week,


Sunday, 11 August 2013

Bobble Border Tutorial


Bobble border....cute as can be, and as simple as can be....I'm big on easy around these parts, simple yet striking, that just about sums it up.

Ok, I've just used a simple granny square as an example, but for now I'm pretending it's a blanket or similar!!  Firstly I'll just show you what a granny square blanket would look like if you didn't put some sort of simple bordering on it before you put your row of bobbles.  It would look like this.


In my opinion you've lost the visual on the bobble, it seems to have blended into the granny square itself.....It may have something to do with the last row of clusters and the bobbles being the same colour....Never the less, I still think it doesn't work if you're going to be using it on a big project like a blanket where you want the edging to stand out a little....or a lot for that matter!


So from there I went right around the edge of the granny square 4 times with just a simple single crochet stitch (US terminology) for conversion to English crochet stitches see here.  Using a slip stitch to complete the row.  Also don't be limited to a border of single crochet, the bobble stitch will work on any border, I just went for something simple....remember I like simple and easy!


Next step is to do 1 chain stitch and then after doing this, turn your work around so you have the back of your work facing you as the bobble stitch is worked on the wrong side, as the picture below shows.


Now the next step below is to single crochet into the same stitch where you have just chained, this is the only time you will work into the same stitch you have just worked.


Once you have done that then working into the next stitch along through the two top loops do a treble/triple stitch as pictured below.


And then you end up with the long treble stitch completed and it should look like it does in the next picture.


From there you then do a single crochet into the next top two loops of the next stitch (not the same stitch, the next stitch along remember), so basically the treble stitch folds backwards on itself and this makes the bobble poke out to the front of your work.


Easy, then back to another treble, single, treble the whole way around your edge.


If you give it a quick turn over you can see the bobbles forming.


Continue all the way around using a slip stitch to join your last stitch to where you commenced your first bobble.


Pretty isn't it?


Don't be limited by single colours either.  You can make your bobble edging in another colour.  I simply added yellow into the stitch where I finished the blue, did one yellow chain, turned my work around and did my first single stitch into the same stitch where I did the chain, then my treble....you know the score by now.


On completion....


So there you have it.....the bobble border.  I always drop my crochet hook down by half a size when doing a border because I don't like that too wavy too many stitch look, and this square was no different.  Your edging and border may look a little tight, but a good block of your work once pulled and pinned into shape can sort that out.  It also has the added bonus of making your work look soft and drapey and gives it a professional finish.


Hope I made this easy for you.


Saturday, 3 August 2013

A Tutorial of Sorts....Hexagon Blanket Border


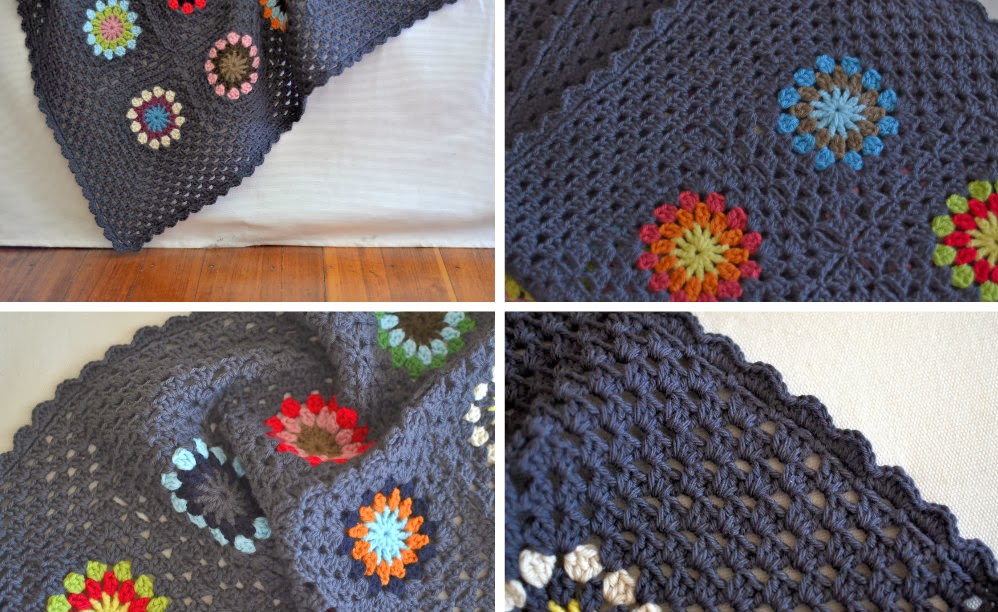
I've had a few people, well actually more than a few ask me about the border on my hexie blanket....most of you that hang around here will know I don't like blankets with wavy edges....I like to make them straight....and I know I'm not alone, so I made this up as I went along using the theory of different crochet stitches have different lengths so you can always fill most gaps.

I attempted to do a tutorial on how I did this border, but time has got away so I'll do my best to explain to you in a basic form.  Those of you that crochet will probably understand, for those of you that don't, I apologise and when I have more time, I'll attempt to do it a bit better. You Tube is great for assisting you with the stitches I talk about so you may just find it falls into place.

The first thing that I do is always change my hook down half a size from what I made the blanket with.  So I used Baby Cashmerino yarn for this blanket and used a 3.5mm hook, so I created the border with a 3.00 mm hook....this just stops the border from being loose and getting that wavy, too many stitches look about it.

I've photographed the corner of the blanket completed so you know how I got around the corner and also how I filled those zig, zag gaps on the left of the blanket... and filling the half hexies across the top is easy, and here is a good phototutorial right here


Firstly I used the burnt orange yarn and starting on a straight edge and crocheting into a space in the previous row between 2 double crochet stitches I went the whole way around the blanket doing a single crochet stitch (US terms) and then 3 chains, then a single crochet, then 3 chains into the gaps left by the edges of all the hexies.  I repeated this the whole way around the blanket apart from where the hexie corners stuck out, then I did 1 single crochet then 1 chain stitch and then1 single crochet.  I've marked these stitches in the photo below with green arrows. 

When doing this I also made sure that I did the single crochet in the space over the join where the two hexagons are joined together if that makes sense.  I highlighted this with the royal blue arrows. The pink arrows are just to highlight where I did my single crochets on the half hexagons. Again I did most of these over the joins of the two colours and in the centre circle.  Continue around the whole blanket joining with a slip stitch.


Now the next row crocheted in turquoise blue is the difficult one but after this it's a breeze. I say difficult because I did have to use my noggin' here and think this out.

I found this picture below on Pinterest and this is what got me through, and I will link it back here to the owner of Tinking Turtles blog as she's done all the hard work for us by providing the picture.


Basically what you are doing now is filling the gaps with stitches.   Now starting on the straight edge is the easiest and just work clusters of  3 double crochet stitches marked with the purple arrows in the photo below.  You are doing these stitches in the space you created by making the 3 chains in burnt orange on the previous row. Keep going till you get to your first corner  You will finish your last cluster where the green arrow is.

Now you'll create the corner where the red arrow is.  The first cluster is 3 double crochet stitches marked with the yellow arrow and then do 2 chains to create a space in the corner, marked with a red arrow, then marked with the royal blue arrow I did 3 treble stitches. That's the corner completed.


Moving to the next cluster of stitches in the photo below.  Marked with a green arrow into this chain 3 space you do 2 double crochets stitches and 1 half double crochet, and then the next stitch marked with a pink arrow you do 2 half double crochet and 1 single crochet stitches.  Now do 2 chain stitches marked with red arrow and work backwards following the instructions again for the pink and green arrows.


Next bit is doing the 2 clusters in the dip of the zig zag, marked in black in the photo below. Each stitch is made up of 3 treble/triple clusters....and I'm going to be quite honest here, on the odd occasion on the 2 inside stitches I did a double treble stitch because it needed a some extra length, not often just sometimes.


Keep going all the way around your blanket using the above instructions and join with a slip stitch to where you started.


The remainder is easy,  changing to apricot yarn, just do your single crochet and 3 chains all over again, the only difference this time is when you get to the corner do 2 chains in between your 2 single crochets.  Marked in pink in the photo below.


The next row in dark teal blue is just back to 3 double crochets in each apricot chain 3 space.  This is just like doing a granny square, and again just do a normal granny square corner and do a 2 chain space in that corner.

Next row was mustard and back to doing what you did for the apricot row, all the way around.  Then bright turquoise, same as the dark teal blue row, and lastly a row of jaffa orange in single crochet all the way around to complete

Done!!


I do apologise that all the terminology is in US stitches, but that's the way I roll.   Here is a link to the UK terminology so you can to the comparison.

I will state again as I have previously on my blog, I'm not an experienced crocheter.  I'm self taught....I'm a knitter through and through but I like to dabble with crochet every now and again.

If you need any help with the above I'll do my best to assist.

The last step is to block your work on completion. I block the overall blanket rather than square by square, this is a must and this will straighten out your border if it's a bit tight and just give your work a professional finish and it also relaxes the fibres of the wool and your work becomes all soft and drapey rather than tight and stiff.

Lastly this tute above is not set in concrete, use it as a guide, because different plys of yarns will give different results, so if you don't think you need a treble stitch where I've put it and your stitch needs to be a bit shorter make it a double stitch instead....don't be scared of crochet it's fun, easy and  you can pull out stitches without having to unravel miles of yarn if you've made an error, crochet is a lot more forgiving....unlike knitting!!

Anyway best of luck if you choose to do a similar border as mine and as long as you fill the gaps you can do any number of different stitches to create a world of different edgings.


Here is the link to my blanket on Ravelry


Thanks


Friday, 2 August 2013

Friday, 16 November 2012

Late Spring Cleaning.....


Just a quick pop by to say hi and let you know that I've started to clear away some elements here on my blog in anticipation of some tutorials, patterns and woolly business!!

I've decided to keep it about me rather that others now, so I've removed several banners of other businesses, I've streamlined the archives, added a tutorial banner and I'm probably not finished entirely yet....might cull some other items as I go along.

I'm busy toing and froing with the template for the pattern layout, I think it's pretty much done....all my patterns will be identical in layout,

a: because I like things to look streamlined, and

b: because I know nothing about Powerpoint, so my good friends that are helping me are trying to make my life easier so if I should ever muck one of the patterns up.....I may just be able to fix it myself!

I'll be putting a banner up for each pattern release, and all my little hints, tips, extra instructions will be there, in that one place for that hat including....fingers crossed some video....it's all very exciting, and hopefully by this time next week, I should be starting to knit, write and photograph the step by step instructions.

Anyway here is a little look at the front page of my pattern as it stands, I don't think the front page will change, if at all.  I will have several versions of the same pattern for this hat with different photos on the front cover, some girl images, some for a boy, maybe a newborn image but the patten instruction will be identical in all versions....and there will be a pink version of the pattern as well as the teal blue, nothing like a bit of variety. Also there won't be a grey banner around the page, I just popped it there so you could see the pattern against the white background....but you get the idea I hope.  What do you think?

Any way must fly, loads to do, enjoy your weekend everyone.


Vicki x


Sunday, 26 February 2012

Let's Hear It For The Boys......


I still have so many WIP....works in progress, but I picked up two different projects this morning and did a little work on both.

Crochet Baby Bullseye Blanket for a little guy.....merino, silk, cashmere and alpaca.....absolute luxury.


And this new little hat .... also for the boys....it's a peaked hat with earflaps, converted from an old 1960's pattern.  The writing of patterns back in those days was terrible, I'm having major problems with this pattern and so I am virtually re-writing it as I go....I'm also writing a larger size as I knit this one.  Anyway I'm putting it down for now as I have a major headache and I've pulled out that many rows and restarted 4 times, that if I don't put it down.....I may just throw it at a wall.  My hats are meant to be made with love, but at this moment in time....there ain't no love here!!


And one other item I've pulled out is this Chevron Blanket, so it's getting a go again as I do love it....it's just that I find knitting blankets a long process, so my choice is to always crochet them instead....but as it's started it deserves to be finished.


But for now, I have two more hats to complete for a magazine that has approached me for some dover & madden knits for a Winter edition.  If they make it to print I'll let you know when and what magazine, but for now I'll just keep it under wraps.


Enjoy your day.

Vicki x

Friday, 3 February 2012

Baking Stuff.....Banana and Walnut Muffins.

I love baking....cakes, biscuits, bread, muffins....the sweet stuff.....don't like cooking the main meal stuff that much though.  Anyway you won't find any of those fancy schmancy macarons or fairy cakes around my crib....if it's rustic it's on the menu, so that's why these muffins are loved so much around here.

I can whip these up in 5 minutes, and then 20 minutes cooking time, and they can be on someones table still warm within the hour.  No dairy and no eggs, but they do have walnuts....At times I have substituted those out for raisins or sultanas, but they're never the same in my opinion.  These can be frozen for later....but they never really last that long to make the freezer.

The recipe isn't mine, it comes from "The Liver Cleansing Diet" book.....great diet, even better muffins...anyway too good not to share.


5 very ripe bananas
1/4 cup light olive oil...you can use walnut or macadamia oil also
1/4 cup honey to a 1/3 cup of honey depending on sweetness...I don't like them too sweet so I go 1/4 cup
1 teaspoon vanilla extract...the good stuff not the essence
2 and a 1/4 cups plain wholemeal flour, or you can substitute gluten free flour
3/4 teaspoon baking powder
3/4 cup chopped walnuts
1/2 teaspoon salt
3/4 teaspoon ground nutmeg
1 teaspoon baking soda

Preheat oven to 175c or 350f,  Lightly oil a 12 cup muffin tray...I use non stick pans and as these muffins have oil in them they have never got stuck for me. Mash the bananas, then add all the wet ingredients together and mix.....then I add all the other dry ingredients into the wet apart from the flour....I do this last because sometimes I only use 2 cups of flour....I leave out the last 1/4...the mixture should be a little sloppy but not over dry.  Spoon into the muffin tin and bake until golden brown, so around 20 mins....Serve warm, if they last that long.

These muffins are a very healthy choice considering what you can normally find in a shop bought muffin.  These have no sugar, no added fat other than olive oil and that's a good fat, wholemeal or whole wheat flour with lots of grainy bits in it, bananas, walnuts for heart and liver health....too good not to enjoy and I have a vegan friend who loves the fact that these are something they can enjoy.

PS I'm a banana freezer...soon as those bad boys start to spot up....they're straight in the deep freeze.  They're slimey when defrosted, but soooo good for any banana baked goodies.


Note added 27th May 2013.  Have tried substituting the olive oil or macadamia oil for organic coconut oil....if you try this you will need to make sure the oil is around half a cup when liquid....remembering coconut oil solidifies when cooled....you'll notice that the batter is more dough like rather than cake like, but the muffins turned out just fine albeit with a slightly coconut flavour....I also added chia seeds around 1/4 cup as another element.  Vicki x


Enjoy

Vicki x