在 Google Cloud 控制台中建構文件摘要工具
您可以使用 Document AI 建立摘要處理器,輕鬆總結文件內容,並依據所需長度和格式自訂輸出結果。
以下是生成實體的 JSON 輸出範例:
{
  "type": "summary",
  "mentionText": " Superconductivity is a phenomenon in which a material conducts
  electricity with no resistance. It was discovered in 1911 by Dutch physicist Heike
  Kamerlingh Onnes. In 1986, a new class of materials was discovered that can superconduct
  at much higher temperatures. These materials are called high-temperature superconductors.
  They have the potential to revolutionize the way we use electricity. However,
  high-temperature superconductors are still very expensive to produce. Scientists
  are working on ways to make them more affordable.",
  "normalizedValue": {
    "text": " Superconductivity is a phenomenon in which a material conducts
    electricity with no resistance. It was discovered in 1911 by Dutch physicist
    Heike Kamerlingh Onnes. In 1986, a new class of materials was discovered that
    can superconduct at much higher temperatures. These materials are called
    high-temperature superconductors. They have the potential to revolutionize
    the way we use electricity. However, high-temperature superconductors are
    still very expensive to produce. Scientists are working on ways to make
    them more affordable."
  }
}
程序
在本快速入門導覽課程中,您將建立文件摘要處理器、上傳要處理的範例文件,以及自訂處理器版本來調整摘要結構。
如要直接在 Google Cloud 控制台按照逐步指南操作,請按一下「Guide me」(逐步引導):
事前準備
- Sign in to your Google Cloud account. If you're new to Google Cloud, create an account to evaluate how our products perform in real-world scenarios. New customers also get $300 in free credits to run, test, and deploy workloads.
-
In the Google Cloud console, on the project selector page, select or create a Google Cloud project.
-
Make sure that billing is enabled for your Google Cloud project.
-
Enable the Document AI, Cloud Storage APIs.
-
In the Google Cloud console, on the project selector page, select or create a Google Cloud project.
-
Make sure that billing is enabled for your Google Cloud project.
-
Enable the Document AI, Cloud Storage APIs.
建立摘要處理器
您可以使用 Google Cloud 控制台建立摘要處理器。詳情請參閱「建立及管理處理器」。
在 Google Cloud 控制台,依序前往「Document AI」專區和「Workbench」頁面。
在「Summarizer」(摘要) 部分,選取
「Create processor」(建立處理器) 。
在「Create processor」(建立處理器) 選單中,輸入處理器名稱,例如
quickstart-summarizer。請選取最接近您所在位置的區域。
選取「Create」(建立)。
處理器已建立完成。
測試處理器
您已進入新建處理器的「Processor overview」(處理器總覽) 頁面。
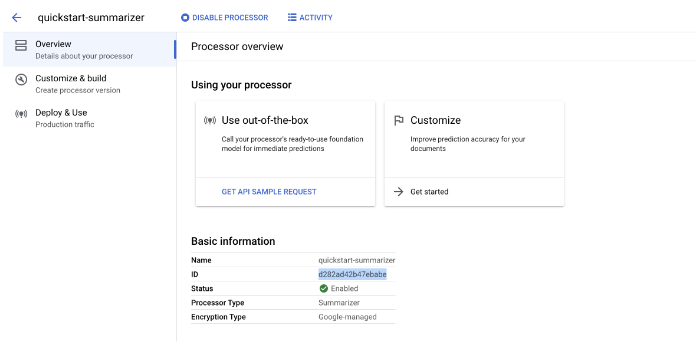
點選
「Customize & build」(自訂與建構) 分頁標籤,開始測試處理器。
-
這個 PDF 檔案中含有超導現象的維基百科頁面。
點選
「Upload Test Document」(上傳測試文件) ,然後選取剛才下載的文件。您現在已進入「Summary」(摘要) 頁面,畫面上會顯示 OCR 偵測到的文字和文件摘要。

將
「Length」(長度) 和「Format」(格式) 設定分別調整為「Moderate」(中等) 與「Bulleted」(加上項目符號),然後點選「Rewrite」(重新編寫) 並觀察結果。返回「Customize & build」(自訂與建構) 頁面。
部署處理器版本
如要在透過 API 處理文件時採用指定的摘要設定,請根據這些設定建立處理器版本。
「Summarization settings」(摘要設定) 會設為您先前在上一頁中使用的值。點選
「Create New Version」(建立新版本) ,便能以指定的「Summarization settings」(摘要設定) 建立處理器版本。輸入處理器版本的名稱 (例如
quickstart-moderate-bulleted),然後選取「Create Version」(建立版本)。前往
「Deploy & Use」(部署及使用) 分頁查看部署狀態。部署作業需要幾分鐘才能完成。版本部署完成後,您可以將該版本設為
「Default version」(預設版本) ,或在使用 API 處理文件時提供版本 ID。使用 Document AI API:
您已成功使用 Document AI 擷取並統整文件內容。
清除所用資源
如要避免系統向您的 Google Cloud 帳戶收取本頁所用資源的費用,請按照下列步驟操作。
請透過Google Cloud console 刪除不需要的處理器和專案,以免產生不必要的 Google Cloud 費用。