می توانید تصاویر را در بالای نقشه خود به عنوان لایه کاشی اضافه کنید. لایههای کاشی روی کاشی نقشه در یک سطح بزرگنمایی خاص قرار میگیرند. با کاشیهای کافی، میتوانید دادههای نقشه Google را برای کل نقشه، در سطوح زوم چندگانه تکمیل کنید.
مقدمه
لایههای کاشی که گاهی به آنها پوشش کاشی نیز گفته میشود، به شما امکان میدهند تصاویر را روی کاشیهای نقشه پایه Google قرار دهید. از این ویژگی برای افزودن داده هایی مانند نقاط مورد علاقه یا اطلاعات ترافیک و تصاویر محلی به برنامه خود استفاده کنید. وقتی با نوع نقشه kGMSTypeNone ترکیب میشود، لایههای کاشی به طور موثر به شما امکان میدهند دادههای نقشه پایه Google را با دادههای خود جایگزین کنید.
لایههای کاشی زمانی مفید هستند که میخواهید تصاویر گستردهای را که معمولاً مناطق جغرافیایی بزرگی را پوشش میدهند، به نقشه اضافه کنید. در مقابل، پوششهای زمین زمانی مفید هستند که میخواهید یک تصویر را در یک نقطه از نقشه ثابت کنید.
مختصات کاشی
Maps API تصاویر را در هر سطح بزرگنمایی به مجموعه ای از کاشی های نقشه مربعی تقسیم می کند که در یک شبکه مرتب مرتب شده اند. هنگامی که یک نقشه به یک مکان جدید یا به یک سطح بزرگنمایی جدید پیمایش میکند، Maps API تعیین میکند که کدام کاشیها مورد نیاز است، و آنها را به مجموعهای از کاشیها برای بازیابی ترجمه میکند.
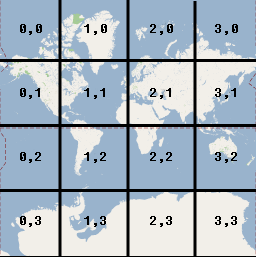
در اجرای طرح مرکاتور گوگل، کاشی با مختصات (0،0) همیشه در گوشه شمال غربی نقشه قرار دارد، با مقادیر x از غرب به شرق و مقادیر y از شمال به جنوب افزایش مییابد. کاشی ها با استفاده از مختصات x,y از آن مبدا نمایه می شوند. به عنوان مثال، در سطح زوم 2، زمانی که زمین به 16 کاشی تقسیم می شود، هر کاشی را می توان با یک جفت x,y منحصر به فرد ارجاع داد:
هر کاشی نقشه یک مربع نقطه 256x256 است. در سطح زوم 0، کل جهان در یک کاشی واحد نمایش داده می شود. هر سطح زوم بزرگنمایی را دو برابر افزایش می دهد. بنابراین، برای مثال، در سطح زوم 1، نقشه به صورت یک شبکه 2x2 کاشی، در سطح زوم 2 به عنوان یک شبکه 4x4 و در سطح بزرگنمایی 3 به عنوان یک شبکه 8x8 ارائه می شود. برای ایجاد تصاویر برای یک لایه کاشی، یک تصویر 256x256 نقطه ای برای هر کاشی در هر سطح بزرگنمایی که می خواهید پشتیبانی کنید ایجاد کنید.
به صورت اختیاری ویژگی zIndex را تغییر دهید تا موقعیت آن را در رابطه با سایر لایههای کاشی تنظیم کنید.
با تنظیم ویژگی map شی GMSTileLayer را به نقشه اختصاص دهید.
Maps SDK برای iOS سه کلاس ارائه می دهد که می توان از آنها برای پیاده سازی یک لایه کاشی استفاده کرد. با هر کلاس، باید نحوه واکشی کاشی نقشه صحیح را برای یک مجموعه معین از مختصات {x,y,zoom} تعریف کنید. گزینه های موجود عبارتند از:
زیر کلاس GMSSyncTileLayer ، اجرای tileForX:y:zoom را ارائه می دهد که نمونه های UIImage را برمی گرداند.
زیر کلاس GMSTileLayer ، اجرای روش ناهمزمان requestTileForX:y:zoom ارائه می دهد که بعداً با یک تصویر کاشی دوباره فراخوانی می شود.
از کلاس موجود، GMSURLTileLayer برای واکشی خودکار کاشی ها از URL ها استفاده کنید و بلوک GMSTileURLConstructor را ارائه دهید. GMSURLTileLayer یک کلاس مشخص است که نمی توان آن را زیر کلاس قرار داد.
در مورد زیرردهبندی GMSSyncTileLayer یا GMSTileLayer ، ارائه یک نتیجه nil به SDK Maps برای iOS میگوید که دادهها در دسترس نیست اما ممکن است در آینده در دسترس باشند. از طرف دیگر، kGMSTileLayerNoTile برگردانید تا نشان دهید که هیچ کاشی در این مکان وجود ندارد.
برای GMSURLTileLayer ، بازگشت nil از GMSTileURLConstructor نشان میدهد که هیچ کاشی در این مکان وجود ندارد.
از GMSURLTileLayer برای واکشی کاشی ها از URL ها استفاده کنید
GMSURLTileLayer نیازی به زیر کلاس بندی ندارد، اما باید بلوک GMSTileURLConstructor را پیاده سازی کنید. کد زیر نحوه استفاده از GMSURLTileLayer برای نمایش پلان یک ساختمان چند طبقه نشان می دهد.
سویفت
letfloor=1// Implement GMSTileURLConstructor// Returns a Tile based on the x,y,zoom coordinates, and the requested floorleturls:GMSTileURLConstructor={(x,y,zoom)inleturl="https://www.example.com/floorplans/L\(floor)_\(zoom)_\(x)_\(y).png"returnURL(string:url)}// Create the GMSTileLayerletlayer=GMSURLTileLayer(urlConstructor:urls)// Display on the map at a specific zIndexlayer.zIndex=100layer.map=mapView
هدف-C
NSIntegerfloor=1;// Create the GMSTileLayerGMSURLTileLayer*layer=[GMSURLTileLayertileLayerWithURLConstructor:^NSURL*_Nullable(NSUIntegerx,NSUIntegery,NSUIntegerzoom){NSString*url=[NSStringstringWithFormat:@"https://www.example.com/floorplans/L%ld_%lu_%lu_%lu.png",(long)floor,(unsignedlong)zoom,(unsignedlong)x,(unsignedlong)y];return[NSURLURLWithString:url];}];// Display on the map at a specific zIndexlayer.zIndex=100;layer.map=mapView;
زیر کلاس GMSSyncTileLayer برای ارائه کاشی ها به عنوان UIImage
GMSSyncTileLayer و GMSTileLayer کلاسهای انتزاعی هستند که برای زیر کلاسبندی طراحی شدهاند. شما می توانید از این کلاس ها برای ارائه کاشی ها به عنوان UIImage استفاده کنید. مثال زیر نشان میدهد که چگونه میتوان یک تصویر سفارشی را روی برخی از کاشیهای روی نقشه با زیر کلاسبندی GMSSyncTileLayer ارائه کرد.
سویفت
classTestTileLayer:GMSSyncTileLayer{overridefunctileFor(x:UInt,y:UInt,zoom:UInt)->UIImage?{// On every odd tile, render an image.if(x%2==1){returnUIImage(named:"australia")}else{returnkGMSTileLayerNoTile}}}
هدف-C
@interfaceTestTileLayer : GMSSyncTileLayer@end@implementationTestTileLayer-(UIImage*)tileForX:(NSUInteger)xy:(NSUInteger)yzoom:(NSUInteger)zoom{// On every odd tile, render an image.if(x%2==1){return[UIImageimageNamed:@"australia"];}else{returnkGMSTileLayerNoTile;}}@end
برای افزودن لایه به نقشه خود، شی را نمونه سازی کنید و ویژگی نقشه آن را تنظیم کنید.
با تنظیم tileSize روی 512 می tileSize از تصاویر با DPI بالا با GMSSyncTileLayer یا GMSURLTileLayer استفاده کنید. این به طور پیشفرض روی 256 است - ابعاد کاشی Google Maps در یک دستگاه غیر شبکیه چشم.
اگر کاشیهای DPI معمولی را روی دستگاهی با DPI بالا نمایش میدهید، میتوانید با تنظیم tileSize روی 512، تصاویر را افزایش دهید. توجه داشته باشید که افزایش مقیاس تصاویر ممکن است کیفیت تصویر را کاهش دهد، مخصوصاً برای خطوط ظریف یا متن. برای بهترین نتیجه، tileSize و DPI تصویر را با نمایشگر مطابقت دهید. نقشههایی که روی دستگاه رتینا نشان داده میشوند، هنگام نمایش تصاویر با DPI بالا با tileSize 512 بهترین ظاهر را خواهند داشت. در حالی که نقشه های نشان داده شده در دستگاه غیر رتینا با تصاویر معمولی و tileSize پیش فرض ۲۵۶ عالی به نظر می رسند.
کاشی های کهنه را پاک کنید
اگر کاشیهای ارائهشده توسط لایه «بیات» شوند، روش clearTileCache باید بر روی لایه فراخوانی شود تا مجبور به تازهسازی شود. این باعث می شود که تمام کاشی های این لایه دوباره بارگذاری شوند.
تاریخ آخرین بهروزرسانی 2025-07-23 بهوقت ساعت هماهنگ جهانی.
[[["درک آسان","easyToUnderstand","thumb-up"],["مشکلم را برطرف کرد","solvedMyProblem","thumb-up"],["غیره","otherUp","thumb-up"]],[["اطلاعاتی که نیاز دارم وجود ندارد","missingTheInformationINeed","thumb-down"],["بیشازحد پیچیده/ مراحل بسیار زیاد","tooComplicatedTooManySteps","thumb-down"],["قدیمی","outOfDate","thumb-down"],["مشکل ترجمه","translationIssue","thumb-down"],["مشکل کد / نمونهها","samplesCodeIssue","thumb-down"],["غیره","otherDown","thumb-down"]],["تاریخ آخرین بهروزرسانی 2025-07-23 بهوقت ساعت هماهنگ جهانی."],[[["\u003cp\u003eTile layers allow you to overlay images on top of Google Maps base map tiles to add custom data or imagery.\u003c/p\u003e\n"],["\u003cp\u003eTile layers are organized in a grid system, with each tile representing a square portion of the map at a specific zoom level.\u003c/p\u003e\n"],["\u003cp\u003eYou can create tile layers using \u003ccode\u003eGMSURLTileLayer\u003c/code\u003e to fetch tiles from URLs or by subclassing \u003ccode\u003eGMSSyncTileLayer\u003c/code\u003e or \u003ccode\u003eGMSTileLayer\u003c/code\u003e to provide tile images directly.\u003c/p\u003e\n"],["\u003cp\u003eUse a \u003ccode\u003etileSize\u003c/code\u003e of 512 for high DPI tiles on Retina devices for optimal visual quality.\u003c/p\u003e\n"],["\u003cp\u003eCall \u003ccode\u003eclearTileCache\u003c/code\u003e to refresh stale or outdated tile data.\u003c/p\u003e\n"]]],[],null,["Select platform: [Android](/maps/documentation/android-sdk/tileoverlay \"View this page for the Android platform docs.\") [iOS](/maps/documentation/ios-sdk/tiles \"View this page for the iOS platform docs.\") [JavaScript](/maps/documentation/javascript/customoverlays \"View this page for the JavaScript platform docs.\")\n\n\u003cbr /\u003e\n\nYou can add images on top of your map as a Tile Layer. Tile Layers are\nplaced overtop of a map tile at a specific zoom level. With enough tiles, you\ncan supplement Google's map data for the entire map, at multiple zoom levels.\n\nIntroduction\n\nTile layers, sometimes referred to as Tile Overlays, let you superimpose\nimages on top of Google's base map tiles. Use this feature to add data,\nsuch as points of interest or traffic information, and local imagery to\nyour app. When combined with the `kGMSTypeNone` map type,\ntile layers effectively let you replace Google's base map data with your own.\n\nTile layers are useful when you want to add extensive imagery, typically\ncovering large geographical areas, to the map. By contrast, [ground\noverlays](/maps/documentation/ios-sdk/overlays) are useful when you want to fix a single image at one\npoint on the map.\n\nTile coordinates\n\nThe Maps API breaks up imagery at each zoom level into a set of square map\ntiles, which are arranged in an ordered grid. When a map scrolls to\na new location, or to a new zoom level, the Maps API determines which tiles\nare needed, and translates that into a set of tiles to retrieve.\n\nIn the Google implementation of the Mercator projection, the tile with\ncoordinate (0,0) is always at the northwest corner of the map, with `x` values\nincreasing from west to east and `y` values increasing from north to south.\nTiles are indexed using `x,y` coordinates from that origin. For example, at\nzoom level 2, when the earth is divided up into 16 tiles, each tile can be\nreferenced by a unique `x,y` pair:\n\nEach map tile is a 256x256 point square. At zoom level 0, the entire world is\nrendered in a single tile. Each zoom level increases the magnification by a\nfactor of two. So, for example, at zoom level 1 the map is rendered as a 2x2\ngrid of tiles, at zoom level 2 as a 4x4 grid , and at zoom level 3 as an 8x8\ngrid. To create images for a tile layer, create a\n256x256 point image for each tile at each zoom level that you want to support.\n\nAdd a Tile Layer\n\n1. Instantiate a [`GMSURLTileLayer`](/maps/documentation/ios-sdk/reference/objc/Classes/GMSURLTileLayer) object, or a custom subclass of [`GMSTileLayer`](/maps/documentation/ios-sdk/reference/objc/Classes/GMSTileLayer) or [`GMSSyncTileLayer`](/maps/documentation/ios-sdk/reference/objc/Classes/GMSSyncTileLayer).\n2. Optionally modify the `zIndex` property to adjust its position in relation to other tile layers.\n3. Assign the `GMSTileLayer` object to the map by setting its `map` property.\n\nThe Maps SDK for iOS provides three classes that can be used to\nimplement a tile layer. With each class, you will need to define how to fetch\nthe correct map tile for a given set of `{x,y,zoom}` coordinates. The\navailable options are:\n\n- Subclass `GMSSyncTileLayer`, providing the implementation of `tileForX:y:zoom` that returns `UIImage` instances.\n- Subclass `GMSTileLayer`, providing the implementation of the asynchronous method `requestTileForX:y:zoom` that later calls back with a tile image.\n- Use the existing class, `GMSURLTileLayer`, to fetch tiles automatically from URLs, providing the `GMSTileURLConstructor` block. `GMSURLTileLayer` is a concrete class that cannot be subclassed.\n\nIn the case of subclassing `GMSSyncTileLayer` or `GMSTileLayer`, providing a\n`nil` tile result will tell the Maps SDK for iOS that data is\nunavailable but that it may be available in the future. Alternatively,\nreturn `kGMSTileLayerNoTile` to indicate that there is no tile at this\nlocation.\n\nFor `GMSURLTileLayer`, returning `nil` from the `GMSTileURLConstructor` will\nindicate that there is no tile at this location.\n\nUse GMSURLTileLayer to fetch tiles from URLs\n\nThe `GMSURLTileLayer` does not require subclassing, but you will have to\nimplement the `GMSTileURLConstructor` block. The below code shows how to\nuse `GMSURLTileLayer` to display the floor plan of a multistory building.\n\n\nSwift \n\n```swift\nlet floor = 1\n\n// Implement GMSTileURLConstructor\n// Returns a Tile based on the x,y,zoom coordinates, and the requested floor\nlet urls: GMSTileURLConstructor = { (x, y, zoom) in\n let url = \"https://www.example.com/floorplans/L\\(floor)_\\(zoom)_\\(x)_\\(y).png\"\n return URL(string: url)\n}\n\n// Create the GMSTileLayer\nlet layer = GMSURLTileLayer(urlConstructor: urls)\n\n// Display on the map at a specific zIndex\nlayer.zIndex = 100\nlayer.map = mapView\n \n```\n\nObjective-C \n\n```objective-c\nNSInteger floor = 1;\n\n// Create the GMSTileLayer\nGMSURLTileLayer *layer = [GMSURLTileLayer tileLayerWithURLConstructor:^NSURL * _Nullable(NSUInteger x, NSUInteger y, NSUInteger zoom) {\n NSString *url = [NSString stringWithFormat:@\"https://www.example.com/floorplans/L%ld_%lu_%lu_%lu.png\",\n (long)floor, (unsigned long)zoom, (unsigned long)x, (unsigned long)y];\n return [NSURL URLWithString:url];\n}];\n\n// Display on the map at a specific zIndex\nlayer.zIndex = 100;\nlayer.map = mapView;\n \n```\n\n\u003cbr /\u003e\n\nSubclass GMSSyncTileLayer to serve tiles as a UIImage\n\nThe `GMSSyncTileLayer` and `GMSTileLayer` are abstract classes designed to be\nsubclassed. You can use these classes to serve tiles as `UIImage`'s. The below\nexample shows how to render a custom image over some of the tiles on the map\nby subclassing `GMSSyncTileLayer`.\n\n\nSwift \n\n```swift\nclass TestTileLayer: GMSSyncTileLayer {\n override func tileFor(x: UInt, y: UInt, zoom: UInt) -\u003e UIImage? {\n // On every odd tile, render an image.\n if (x % 2 == 1) {\n return UIImage(named: \"australia\")\n } else {\n return kGMSTileLayerNoTile\n }\n }\n}\n\n \n```\n\nObjective-C \n\n```objective-c\n@interface TestTileLayer : GMSSyncTileLayer\n@end\n\n@implementation TestTileLayer\n\n- (UIImage *)tileForX:(NSUInteger)x y:(NSUInteger)y zoom:(NSUInteger)zoom {\n // On every odd tile, render an image.\n if (x % 2 == 1) {\n return [UIImage imageNamed:@\"australia\"];\n } else {\n return kGMSTileLayerNoTile;\n }\n}\n\n@end\n \n```\n\n\u003cbr /\u003e\n\nTo add the layer to your map, instantiate the object and set its map property.\n\n\nSwift \n\n```swift\nlet layer = TestTileLayer()\nlayer.map = mapView\n \n```\n\nObjective-C \n\n```objective-c\nGMSTileLayer *layer = [[TestTileLayer alloc] init];\nlayer.map = mapView;\n \n```\n\n\u003cbr /\u003e\n\nHigh DPI Tiles for Retina devices\n\nYou can use high DPI images with either [`GMSSyncTileLayer`](/maps/documentation/ios-sdk/reference/objc/Classes/GMSSyncTileLayer)\nor [`GMSURLTileLayer`](/maps/documentation/ios-sdk/reference/objc/Classes/GMSURLTileLayer) by setting the `tileSize` to 512.\nThe `tileSize` property indicates the number of pixels that the returned tile\nimages will prefer to display as; this defaults to 256 --- the dimension\nof a Google Maps tile on a non-Retina device.\n\nIf you are displaying normal DPI tiles on a high DPI device you can scale the\nimages up by setting `tileSize` to 512. Note that upscaling images may reduce\nimage quality, especially for fine lines or text. For best results, match the\n`tileSize` and image DPI to the display. Maps shown on a Retina device will\nlook their best when displaying high DPI images with a `tileSize` of 512;\nwhile maps shown on a non-Retina device will look great with normal images\nand the default `tileSize` of 256.\n| **Note:** Values less than 256 are not recommended for Retina devices.\n\nClear stale tiles\n\nIf the tiles provided by the layer become 'stale', then the method\n`clearTileCache` should be called on the layer to force a refresh. This will\ncause all of the tiles on this layer to be reloaded.\n\n\nSwift \n\n```swift\nlayer.clearTileCache()\n \n```\n\nObjective-C \n\n```objective-c\n[layer clearTileCache];\n \n```\n\n\u003cbr /\u003e"]]