Showing posts with label JAVA. Show all posts

Friday, June 15, 2012

Create Dynamic JButton with Image and ActionListener - Java Swing

0 comments
In this tutorial you will learn how to create JButton dynamically with Image and the ActionListener . You will be able to change the button height , width horizontal gap and vertical gap in one place.

I have create dummy database class which will return the Main menu items and the Sub menu items.You will see the Main menu item in your JFrame. If you select main Item (FOOD) from the button panel it will load Sub Items from the dummy database class (sub items of the FOOD)


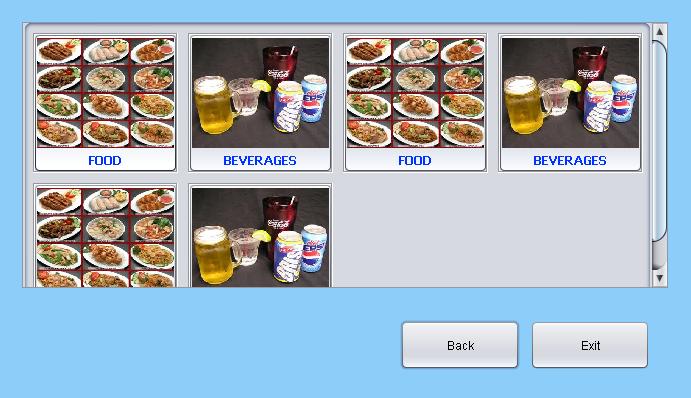
Here are the screen shots

Main menu items


Sub menu items


Create Main Frame


Open NetBeans and create New Project, name it as
DynamicButton

  • Add New JFrame Form give class name as DynamicSwingButton
  • Add these code to your DynamicSwingButton class and import relevant classes and interfaces
  private final static int button_width   =   145;        // button width
private final static int button_height = 140; // button height
private final static int horizontalGap = 10; // horizontal gap in button
private final static int verticalGap = 10; // verticle gap in button
private final static int numberOfColumns= 4; // number of colums in the button panel
private final static int fontSize = 11; // font size of button name
private final static int fontType = Font.BOLD; // font type
private final static String fontName = "Thoma"; // font name
private final static Color fontColor = new Color(0, 51, 255); // font colot

  • Add Scroll Pane to your Frame from the palette and set the height and width to Scroll Pane
  • Add JPanel to the Scroll Pane and change the panel variable name as pnl_button
  • Add bellow function to your DynamicSwingButton class
    private void addMainMenue() {

pnl_button.removeAll();
repaint();

Image img, sub;
ImageIcon icon;
String imagePath,imag = "/com/images/";

ArrayList menue = new ArrayList();
ArrayList itemName = new ArrayList();

for (int size = 0 ; size<ItemDB.mainMenuCodes.length; size++) {
menue.add(ItemDB.mainMenuCodes[size]);
itemName.add(ItemDB.mainMenuDesc[size]);
}

JButton[] buttons = new JButton[menue.size()];

for (int i = 0; i < buttons.length; i++) {

imagePath = imag+menue.get(i).toString()+".jpeg";

URL url = getClass().getResource(imagePath);
// System.out.println(imagePath +" Get Res : " +getClass().getResource(imagePath));

if(url!=null){
img = Toolkit.getDefaultToolkit().getImage(url);
sub = img.getScaledInstance(button_width - 8, button_height - 30, Image.SCALE_FAST);
icon = new ImageIcon(sub);
}
else
icon = new ImageIcon();

buttons[i] = new JButton(itemName.get(i).toString(), icon);
buttons[i].setVerticalTextPosition(AbstractButton.BOTTOM);
buttons[i].setHorizontalTextPosition(AbstractButton.CENTER);

buttons[i].setBorder(javax.swing.BorderFactory.createEtchedBorder());
buttons[i].setFont(new java.awt.Font("Tahoma", 1, 13));
buttons[i].setForeground(new java.awt.Color(0, 51, 255));

buttons[i].setActionCommand(menue.get(i).toString());
buttons[i].addActionListener(new ActionListener() {

public void actionPerformed(ActionEvent e) {
String choice = e.getActionCommand();
addSubmenue(choice);
}
});
}

int b = 0;
int vGap = verticalGap;
int hGap = horizontalGap;
int bLength = buttons.length;
int bRows = bLength/numberOfColumns +1;

L1: for (int j = 0; j <bRows; j++) {
vGap = 10;
for (int k = 0; k < numberOfColumns; k++) {

pnl_button.add(buttons[b], new org.netbeans.lib.awtextra.AbsoluteConstraints(vGap, hGap, button_width, button_height));
repaint();
vGap +=button_width+verticalGap;
b++;
if(b>=bLength){
break L1;
}
}
hGap +=button_height+horizontalGap;
}
pack();
}

private void addSubmenue(String choice) {
pnl_button.removeAll();
repaint();

Image img, sub;
ImageIcon icon;
String imagePath,imag = "/com/images/";

ArrayList menue = new ArrayList();
ArrayList itemName = new ArrayList();

ArrayList list = ItemDB.getSubMenu(choice);
String subCode[] = (String[]) list.get(0);
String subDesc[] = (String[]) list.get(1);

for (int size = 0 ; size<subCode.length; size++) {
menue.add(subCode[size]);
itemName.add(subDesc[size]);
}

JButton[] buttons = new JButton[menue.size()];

for (int i = 0; i < buttons.length; i++) {

imagePath = imag+menue.get(i).toString()+".jpeg";

URL url = getClass().getResource(imagePath);
// System.out.println(imagePath +" Get Reso : " +getClass().getResource(imagePath));

if(url!=null){
img = Toolkit.getDefaultToolkit().getImage(url);
sub = img.getScaledInstance(button_width - 8, button_height - 30, Image.SCALE_FAST);
icon = new ImageIcon(sub);
}
else
icon = new ImageIcon();


buttons[i] = new JButton(itemName.get(i).toString(), icon);
buttons[i].setVerticalTextPosition(AbstractButton.BOTTOM);
buttons[i].setHorizontalTextPosition(AbstractButton.CENTER);

buttons[i].setBorder(javax.swing.BorderFactory.createEtchedBorder());
buttons[i].setFont(new java.awt.Font("Tahoma", 1, 13));
buttons[i].setForeground(new java.awt.Color(0, 51, 255));


buttons[i].setActionCommand(menue.get(i).toString());
buttons[i].addActionListener(new ActionListener() {

public void actionPerformed(ActionEvent e) {
String choice = e.getActionCommand();
addItems(choice);
}
});
}
int b = 0;
int vGap = verticalGap;
int hGap = horizontalGap;
int bLength = buttons.length;
int bRows = bLength/numberOfColumns +1;

L1: for (int j = 0; j <bRows; j++) {
vGap = 10;
for (int k = 0; k < numberOfColumns; k++) {

pnl_button.add(buttons[b], new org.netbeans.lib.awtextra.AbsoluteConstraints(vGap, hGap, button_width, button_height));
repaint();
vGap +=button_width+verticalGap;
b++;
if(b>=bLength){
break L1;
}
}
hGap +=button_height+horizontalGap;
}
pack();
}

private void addItems(String choice) {

if(choice.equals("P"))
choice = "PIZZA";
else if(choice.equals("B"))
choice = "BURGER";
else if(choice.equals("FJ"))
choice = "FRUIT JUICE";
else if(choice.equals("HB"))
choice = "HOT BEVERAGES";
JOptionPane.showMessageDialog(this, "You have select "+choice);
}


  • Go to Window->Navigating-> Inspector, Right Click your Frame and add window open event


  • Add this function to windows opened event
    addMainMenue();

  • Add tow buttons and name one as Back and another as Exit
  • Select Back button and add Action performed event with addMainMenue(); function
  • Select Exit button and add Action performed event with System.exit(0);
  • Add this dummy database class to your project


import java.util.ArrayList;

/**
*
* @author JSupport
*/
class ItemDB {

public static String mainMenuCodes[] = {"FOOD","BEVE","FOOD","BEVE","FOOD","BEVE"};
public static String mainMenuDesc[] = {"FOOD","BEVERAGES","FOOD","BEVERAGES","FOOD","BEVERAGES"};
private static ArrayList list;

public static ArrayList getSubMenu(String mainMenuCodes){

list = new ArrayList();
if(mainMenuCodes.equals("FOOD")){
String subCode[] = {"P","B"};
String subDesc[] = {"PIZZA","BURGER"};

list.add(subCode);
list.add(subDesc);

}else if(mainMenuCodes.equals("BEVE")){
String subCode[] = {"FJ","HB"};
String subDesc[] = {"Fruit Juice","Hot Beverages"};

list.add(subCode);
list.add(subDesc);
}
return list;
}
}

  • Run the DynamicSwingButton frame.

Read more...

Thursday, June 7, 2012

Synthetica Look And Feel Java Swing

19 comments

How to Apply Synthetica Look And Feel to JFrame in Netbeans


Here I am going to explain how to apply Synthetica Look And Feel to a JFrame in Netbeans,in the previous tutorial I was explained how to apply Nimbus Look and Feel Java Swing to a JFrame.You will be able to apply

  • SyntheticaSkyMetallicLookAndFeel
  • SyntheticaBlueMoonLookAndFeel
  • SyntheticaBlueIceLookAndFeel
  • SyntheticaWhiteVisionLookAndFeel
  • and SystemLookAndFeel which will your OS look and feel.
To apply Synthetica look and feel you must add Synthetica libraries to your project class path.

This code will remove your current look and feel which will help to apply new look and feel clearly.

UIManager.removeAuxiliaryLookAndFeel(UIManager.getLookAndFeel());

To apply new look and feel you must use this code snip which will update all Component with new look and feel

SwingUtilities.updateComponentTreeUI(this);


Look and Feel change function


private void changeLookandFeel() {
        try {

            UIManager.removeAuxiliaryLookAndFeel(UIManager.getLookAndFeel());
            SyntheticaLookAndFeel.setWindowsDecorated(false);
            UIManager.setLookAndFeel(UIMANAGER_STRING);

//             for (int i = 0; i < LookAndFeel.getFrames().length; ++i) {
//                SwingUtilities.updateComponentTreeUI(LookAndFeel.getFrames()[i]);
//                SwingUtilities.updateComponentTreeUI(this);
//            }
            SwingUtilities.updateComponentTreeUI(this);

        } catch (Exception ex) {
            try {
                UIManager.setLookAndFeel(UIManager.getSystemLookAndFeelClassName());
            } catch (Exception e) {
                e.printStackTrace();
            }
        }
    }

Synthetica Blue Moon Look And Feel

Synthetica Blue Moon Look And Feel

Synthetica Blue Moon Look And Feel


Synthetica White Vision Look And Feel

Synthetica White Vision Look And Feel

Synthetica White Vision Look And Feel


System Look And Feel (Windows 7)

System Look And Feel (Windows 7 Look And Feel)


Synthetica Sky Metallic Look And Feel

Synthetica Sky Metallic Look And Feel

Synthetica Sky Metallic Look And Feel


Synthetica Blue Ice Look And Feel

Synthetica Blue Ice Look And Feel

SyntheticaBlueIceLookAndFeel


Download the Netbean project from here Synthetica Look and Feel, you will be find libraries in the lib folder

 
Look And Feel Netbeans Project
Read more...

Tuesday, June 5, 2012

Nimbus Look and Feel Java Swing

4 comments
It is very easy to apply  Nimbus Look and Feel which was introduced in Java SE 6 update 10 release. Copy and past following code before creating the (GUI) Graphical User Interface


Nimbus Look and Feel

nimbus look and feel

Before Applying the Nimbus Look and Feel

Java Look and Feel


try {
            UIManager.setLookAndFeel("com.sun.java.swing.plaf.nimbus.NimbusLookAndFeel");
            
        } catch (Exception ex) {
            // If the nibus is not available, GUI will set to the system's look and feel  
            UIManager.setLookAndFeel(UIManager.getSystemLookAndFeelClassName());
        }
Read more...

Monday, May 14, 2012

Send Email in Java Mail API using Gmail SMTP Server

7 comments
To send email using java you must have mail server and user name and password to access the mail server. In this tutorial I used gmail SMTP server with SSL connection. You must add Java Mail API to your class path.


package jsupport.mail;

import java.util.Properties;
import javax.mail.Authenticator;
import javax.mail.Message;
import javax.mail.Message.RecipientType;
import javax.mail.MessagingException;
import javax.mail.PasswordAuthentication;
import javax.mail.Session;
import javax.mail.Transport;
import javax.mail.internet.InternetAddress;
import javax.mail.internet.MimeMessage;

/**
 *
 * @author Java Srilankan Support - JSupport
 */
public class SendMail {
    
    public void sendMail(String m_from,String m_to,String m_subject,String m_body){

      try {

            m_properties     = new Properties();
            m_properties.put("mail.smtp.host", "smtp.gmail.com"); 
            m_properties.put("mail.smtp.socketFactory.port", "465");
            m_properties.put("mail.smtp.socketFactory.class","javax.net.ssl.SSLSocketFactory");
            m_properties.put("mail.smtp.auth", "true");
            m_properties.put("mail.smtp.port", "465");
            

            m_Session        =   Session.getDefaultInstance(m_properties,new Authenticator() {
                protected PasswordAuthentication getPasswordAuthentication() {
                    return new PasswordAuthentication("username","password"); // username and the password
                }

            });
            
            m_simpleMessage  =   new MimeMessage(m_Session);

            m_fromAddress    =   new InternetAddress(m_from);
            m_toAddress      =   new InternetAddress(m_to);


            m_simpleMessage.setFrom(m_fromAddress);
            m_simpleMessage.setRecipient(RecipientType.TO, m_toAddress);
            m_simpleMessage.setSubject(m_subject);
            m_simpleMessage.setContent(m_body,"text/plain");

            Transport.send(m_simpleMessage);

        } catch (MessagingException ex) {
            ex.printStackTrace();
        }
    }

    public static void main(String[] args) {

      SendMail send_mail    =   new SendMail();
      send_mail.sendMail("[email protected]", "[email protected]", "Test Mail", "Hi this is Test mail from Java Srilankan Support");
    }

    private Session m_Session;
    private Message m_simpleMessage;
    private InternetAddress m_fromAddress;
    private InternetAddress m_toAddress;
    private Properties m_properties;
}
Read more...

Saturday, March 24, 2012

How To Validate Email Address in Java Mail API

1 comments

Validate Email Address using Java Mail API


In this tutorial you will find how to validate email address using java Mail API. You must to import javax.mail.internet.InternetAddress 


package jsupport;

import javax.mail.internet.AddressException;
import javax.mail.internet.InternetAddress;

/**
 *
 * @author Jsupport http://javasrilankansupport.blogspot.com
 */
public class ValidateEmailAddress {

    public static  boolean  validateEmail(String email) {
        try {
            new InternetAddress(email).validate();

        } catch (AddressException ex) {
            System.out.println("Error : " + ex.getMessage());
            return false;
        }
        return true;
    }

    public static void main(String[] args) {

        validateEmail("[email protected]");

    }
}

Read more...

Thursday, March 22, 2012

How to Create Directory in Java,Directory Creation in Java

0 comments

Java Create Directory - Java Tutorial


In this Tutorial you will learn how to create directory and check whether that directory is exist.If the directory is exist then it will not create otherwise,


import java.io.File;

/**
 *
 * @author JSupport http://javasrilankansupport.blogspot.com
 */
public class CreateDirectory {

    public static void main(String[] args) {

        String directory = "JAVADIR";
        String directory_tree = "JSUPPORT/JAVA";
        boolean dir_exist = false;

        try {
            // Check whether the derectory is exist
            dir_exist = new File(directory).isDirectory();

            if (dir_exist) {
                System.out.println("directory already created.....");
            } else {
                // creat directory
                new File(directory).mkdir();
            }

            // Check whether the derectory is exist
            dir_exist = new File(directory_tree).isDirectory();

            if (dir_exist) {
                System.out.println("directories already created.....");
            } else {
                // create directories
                new File(directory_tree).mkdirs();
            }

        } catch (Exception e) {
            System.out.println("Error : "+e.getMessage());
        }

    }
}

Read more...

How to Write a File in Java,Java Write to File Example,Write a File in Java

0 comments

Java a Write file  - Java Tutorial

In this Tutorial you will learn how to write a file,It use FileWriter class and BufferedWriter class to write the file.


import java.io.BufferedWriter;
import java.io.FileWriter;
import java.io.IOException;

/**
 *
 * @author JSupport http://javasrilankansupport.blogspot.com
 */
public class WriteFile {


    public static void writToFile(String data){

        try {

            // Create a new file  TEST.txt
            FileWriter file_writer  = new FileWriter("TEST.txt");
            BufferedWriter bufferd_writer   =   new BufferedWriter(file_writer);

            // write data to file
            bufferd_writer.write(data);
            // flush and close the file
            bufferd_writer.flush();
            bufferd_writer.close();

        } catch (IOException ex) {
            System.out.println("Cannot write    :" + ex.getMessage());
        }
    }

    public static void main(String[] args) {
        writToFile("Hello Java Sri Lankan Support");
    }
}

Read more...

Wednesday, March 21, 2012

How To Get Date Range in Java Calendar's set() add() and roll()

0 comments

 Calendar (Java 2 Platform SE 5.0) set() add()  and roll() 


import java.text.SimpleDateFormat;
import java.util.Calendar;
import java.util.Date;

/**
 *
 * @author JSupport http://javasrilankansupport.blogspot.com
 */

enum DateEnum {
    DAILY,
    WEEKLY,
    MONTHLY;
}

public class DateRange {

    public int x = 2;
    public String date,stdate,endate;

    private String getDateTime(DateEnum type) {

        Calendar c = Calendar.getInstance();
        SimpleDateFormat sdf = new SimpleDateFormat("dd/MM/yyyy");
        Date d = c.getTime();
        
        c.setTime(d);

        switch (type) {

            case DAILY:
                c.roll(Calendar.DAY_OF_WEEK, -1);
                date = sdf.format(c.getTime());
                break;
            case WEEKLY:
                 c.roll(Calendar.DAY_OF_WEEK, -1);
                 stdate = sdf.format(c.getTime());
                 c.roll(Calendar.WEEK_OF_MONTH,-1);
                 endate = sdf.format(c.getTime());
                 date = stdate+","+endate;
                break;

            case MONTHLY:
                 c.roll(Calendar.DAY_OF_WEEK, -1);
                 stdate = sdf.format(c.getTime());
                 c.roll(Calendar.MONTH,-1);
                 endate = sdf.format(c.getTime());
                 date = stdate+","+endate;
                break;
        }
        return date;
    }

    public static void main(String[] arr) {

        DateRange dr = new DateRange();

        System.out.println(dr.getDateTime(DateEnum.DAILY));
        System.out.println(dr.getDateTime(DateEnum.WEEKLY));
        System.out.print(dr.getDateTime(DateEnum.MONTHLY));

    }
}

Read more...

Wednesday, March 14, 2012

Insert and Retrieve Values from a Map (HashMap)

0 comments
  • Insert values into HashMap
  • Retrieve values from HashMap

import java.util.HashMap;
import java.util.Iterator;
import java.util.Map;
import java.util.Set;

/**
*
* @author JSupport
* http://javasrilankansupport.blogspot.com
*
*/

public class InsertRetrieveDataFromMap {

// get values from HashMap
public static void getHashMapData(Map order_details){
Set key_set;

// gat all key to Set
key_set     =   order_details.keySet();

for (Iterator it = key_set.iterator(); it.hasNext();) {

String key      =   (String) it.next();
String  value   =   (String) order_details.get(key);

System.out.println("Map key : "+key +"\tKey Value : "+key);
}

}
public static void main(String[] args) {

HashMap order_details   =   new HashMap();

//     add key value pairs to HashMap

order_details.put("kitchName", "Chinese Kitchen");
order_details.put("waiterName", "Silva");
order_details.put("tableName", "20");

getHashMapData(order_details);
}
}


This program dose answer to following....
  • How to Insert values into HashMap in Java
  • How to Insert values into HashMap in Java
  • How to Retrieve values from HashMap in Java
  • How to Retrieve values from Map in Java
Read more...

Thursday, March 8, 2012

Get Available COM Ports in Java Comm

0 comments
First of all you must properly install Java Comm API.There is nothing much more


package jsupport.com;

import gnu.io.CommPortIdentifier;
import java.util.Enumeration;

/**
 *
 * @author JSupport
 */
public class GetAvailableComPorts {

    public static void getComPorts(){
        String     port_type;
        Enumeration  enu_ports  = CommPortIdentifier.getPortIdentifiers();

        while (enu_ports.hasMoreElements()) {
            CommPortIdentifier port_identifier = (CommPortIdentifier) enu_ports.nextElement();

            switch(port_identifier.getPortType()){
                case CommPortIdentifier.PORT_SERIAL:
                    port_type   =   "Serial";
                    break;
                case CommPortIdentifier.PORT_PARALLEL:
                    port_type   =   "Parallel";
                    break;
                case CommPortIdentifier.PORT_I2C:
                    port_type   =   "I2C";
                    break;
                case CommPortIdentifier.PORT_RAW:
                    port_type   =   "Raw";
                    break;
                case CommPortIdentifier.PORT_RS485:
                    port_type   =   "RS485";
                    break;
                default:
                    port_type   =   "Unknown";
                    break;
            }

            System.out.println("Port : "+port_identifier.getName() +" Port type : "+port_type);
        }
    }
    public static void main(String[] args) {
        getComPorts();
    }
}

Read more...

Friday, February 24, 2012

How to Resize Image according to the screen size using Java

0 comments
package jsupport.com;

import java.awt.Dimension;
import java.awt.Graphics2D;
import java.awt.RenderingHints;
import java.awt.Toolkit;
import java.awt.image.BufferedImage;
import java.io.IOException;
import java.net.URL;
import javax.imageio.ImageIO;

/**
 *
 * @author JSupport
 */
public class ResizeImage {

    private  URL url = null;

    public  BufferedImage resize() {
        try {
                url = getClass().getResource("/images/image.jpeg");
                BufferedImage originalImage = ImageIO.read(url);
                Dimension dim = Toolkit.getDefaultToolkit().getScreenSize();

                int screenWidth = (int) dim.getWidth();
                int screenHeight = (int) dim.getHeight();

                int w = originalImage.getWidth();
                int h = originalImage.getHeight();
                BufferedImage dimg = dimg = new BufferedImage(screenWidth, screenHeight, originalImage.getType());
                Graphics2D g = dimg.createGraphics();
                g.setRenderingHint(RenderingHints.KEY_INTERPOLATION, RenderingHints.VALUE_INTERPOLATION_BILINEAR);
                g.drawImage(originalImage, 0, 0, screenWidth, screenHeight, 0, 0, w, h, null);
                g.dispose();

                return dimg;
        }catch (IOException ex) {
            ex.printStackTrace();
            return null;
        }
    }
}

Read more...

How To Get Installed Printer name using Java

1 comments
Get Installed printers in Java
  • You can get installed printers by using both javax.print.PrintService and javax.print.PrintServiceLookup 
  • PrintServiceLookup.lookupDefaultPrintService().getName(); will gives default printer name;

package jsupport.com;

import javax.print.PrintService;
import javax.print.PrintServiceLookup;

/**
 *
 * @author Jsupport
 */

public class ShowPrinters {

    String defaultPrinter;
    public void SearchPrinter() {
        PrintService[] ser = PrintServiceLookup.lookupPrintServices(null, null);

        System.out.println("**************** All Printers ******************");
        for (int i = 0; i < ser.length; ++i) {
            String p_name = ser[i].getName();
            System.out.println(p_name);
        }
        System.out.println("***********************************************\n");
        defaultPrinter  =   PrintServiceLookup.lookupDefaultPrintService().getName();
        System.out.println("Default Printer  : "+defaultPrinter );
    }

    public static void main(String[] args) {
        new ShowPrinters().SearchPrinter();
    }
}


Read more...

Friday, February 17, 2012

How to Read Property file using Java - Get Database connection parameters from property file

7 comments
  • Here is the java class to read property file which will help to create database connection. 


package jsupport.com.db;

import java.io.FileInputStream;
import java.io.IOException;
import java.util.Properties;

/**
 *
 * @author JSupport http://javasrilankansupport.blogspot.com/
 */
public class ReadPropertyFile {

    public static String db_driver;
    public static String db_url;
    public static String db_username;
    public static String db_password;

    static {
        try {
            Properties prop = new Properties();
            prop.load(new FileInputStream("Config.properties"));

            String driver = prop.getProperty("db_driver");
            String ip = prop.getProperty("db_ip");
            String dbName = prop.getProperty("db_name");

            db_username = prop.getProperty("db_username");
            db_password = prop.getProperty("db_password");

            if (driver.equals("SQL2000")) {
                db_driver = "com.microsoft.jdbc.sqlserver.SQLServerDriver";
                db_url = "jdbc:microsoft:sqlserver://" + ip + ":1433;DatabaseName=" + dbName;
            } else if (driver.equals("SQL2005")) {
                db_driver = "com.microsoft.sqlserver.jdbc.SQLServerDriver";
                db_url = "jdbc:sqlserver://" + ip + ":1433;databaseName=" + dbName;
            } else if (driver.equals("MySQL")) {
                db_driver = "com.mysql.jdbc.Driver";
                db_url = "jdbc:mysql://" + ip + ":3306/" + dbName;
            }

            System.out.println("Database Driver :"+db_driver+ " Database URL :"+db_url);

        } catch (IOException ex) {
            System.out.println("Can not read property file...");
        }
    }
}


  • Create Config.properties under your source code package and add following properties 


Config.properties


# JSupport http://javasrilankansupport.blogspot.com/

#databace properties
#db_driver=SQL2000
#db_driver=SQL2005
db_driver=MySQL
db_ip=localhost
db_name=mysql
db_username=root
db_password=123

Read more...

Wednesday, February 15, 2012

Connect To Access Database Using Java

11 comments
package jsupport.com.db;

import java.sql.Connection;
import java.sql.DriverManager;
import java.sql.ResultSet;
import java.sql.SQLException;
import java.sql.Statement;
import java.util.logging.Level;
import java.util.logging.Logger;

/**
 *
 * @author Jsupport
 */
public class AccessDatabaseConnection {

    public static Connection connect() {

        Connection con;
        try {

            Class.forName("sun.jdbc.odbc.JdbcOdbcDriver");
            String database = "jdbc:odbc:Driver={Microsoft Access Driver (*.mdb)};DBQ=Data.mdb;";
            con = DriverManager.getConnection(database, "Admin", "64");

        } catch (Exception ex) {
            return null;
        }
        return con;
    }

    public void getData(){

        try {

            Statement stmt = connect().createStatement();
            ResultSet rset = stmt.executeQuery("SELECT * FROM tblData");

            if (rset.next()) {

                String name     = rset.getString("user_name");
                String email    = rset.getString("user_email");

                System.out.println("Name  : " +name +"  Email : "+email);
            }


        } catch (SQLException ex) {
            
        }
    }

    public static void main(String[] args) {
        new AccessDatabaseConnection().getData();
    }
}


Access Database table


     Data.mdb


Read more...

Wednesday, July 6, 2011

How To Create XML File in JAVA - (DOM)

0 comments
In Java, we can create XML by using DOM class.


Example :


This is the XML format you  create latter


<?xml version="1.0" encoding="UTF-8" ?>
 <order>
 <orderDetails>
  <waiterName>Siridasa</waiterName>
  <kitchName>Chines Kitchen</kitchName>
  <tableName>20</tableName>
  </orderDetails>
<item>
  <itemid>ARR01</itemid>
  <itemName>DCL White Arak</itemName>
  <itemQty>1</itemQty>
  </item>
 <item>
  <itemid>ARR02</itemid>
  <itemName>Lemon Gin</itemName>
  <itemQty>2</itemQty>
  </item>
 <item>
  <itemid>ARR03</itemid>
  <itemName>Ritz</itemName>
  <itemQty>10</itemQty>
  </item>
  </order>


package jsupport.xml;

import java.io.File;
import java.io.FileOutputStream;
import java.io.IOException;
import java.util.ArrayList;
import java.util.HashMap;
import java.util.Iterator;
import java.util.Map;
import java.util.Set;

import javax.xml.parsers.*;
import javax.xml.transform.*;
import javax.xml.transform.dom.*;
import javax.xml.transform.stream.*;
import org.w3c.dom.*;

/**
 *
 * @author JSupport http://javasrilankansupport.blogspot.com
 */
public class CreateXML {

    DocumentBuilderFactory documentBuilderFactory;
    DocumentBuilder documentBuilder;
    Document document;

    public void createXML(Map order_details, ArrayList item_details) {

        Set set;
        Iterator iterator;

        try {
//              Creating an empty XML Document

            documentBuilderFactory = DocumentBuilderFactory.newInstance();
            documentBuilder = documentBuilderFactory.newDocumentBuilder();
            document = documentBuilder.newDocument();

//               Creating XML tree
//               create the root element and add it to the document

            Element orderElement = document.createElement("order");
            document.appendChild(orderElement);

            Element orderDetailElement = document.createElement("orderDetails");
            orderElement.appendChild(orderDetailElement);

            set = order_details.keySet();
            iterator = set.iterator();

//                create child element acording to the key set,add an attribute, and add to root (orderDetails)

            while (iterator.hasNext()) {

                String key = (String) iterator.next();
                Element detailElement = document.createElement(key);
                detailElement.appendChild(document.createTextNode((String) order_details.get(key)));
                orderDetailElement.appendChild(detailElement);

            }

            for (int i = 0; i < item_details.size(); i++) {

//                  create item element and add item details as child

                Element itemElement = document.createElement("item");
                orderElement.appendChild(itemElement);

                Element itemId;
                String itemdetails[] = (String[]) item_details.get(i);


                itemId = document.createElement("itemid");
                itemId.appendChild(document.createTextNode(itemdetails[0]));

                itemElement.appendChild(itemId);
                itemId = document.createElement("itemName");
                itemId.appendChild(document.createTextNode(itemdetails[1]));

                itemElement.appendChild(itemId);
                itemId = document.createElement("itemQty");
                itemId.appendChild(document.createTextNode(itemdetails[2]));
                itemElement.appendChild(itemId);

            }

//              create XML file


            File xmlFile = new File("C:\\Test.xml");
            xmlFile.createNewFile();
            FileOutputStream isod = new FileOutputStream(xmlFile);
            TransformerFactory transformerFactory = TransformerFactory.newInstance();
            Transformer transformer = transformerFactory.newTransformer();

            DOMSource source = new DOMSource(document);
            StreamResult result = new StreamResult(isod);
            transformer.transform(source, result);

            isod.flush();
            isod.close();

        } catch (IOException ex) {
            ex.printStackTrace();
        } catch (TransformerException ex) {
            ex.printStackTrace();
        } catch (ParserConfigurationException ex) {
            ex.printStackTrace();
        }

    }

    public static void main(String[] args) {


        CreateXML cXML = new CreateXML();
        Map order_details = new HashMap();
        ArrayList item_details = new ArrayList();
        String itemDetails[] = new String[3];
        String itemDetails2[] = new String[3];
        String itemDetails3[] = new String[3];

//     add order details
        order_details.put("kitchName", "Chines Kitchen");
        order_details.put("waiterName", "Siridasa");
        order_details.put("tableName", "20");

//     add item details
        itemDetails[0] = "ARR01";
        itemDetails[1] = "DCL White Arak";
        itemDetails[2] = "1";
        item_details.add(itemDetails);

        itemDetails2[0] = "ARR02";
        itemDetails2[1] = "Lemon Gin";
        itemDetails2[2] = "2";
        item_details.add(itemDetails2);

        itemDetails3[0] = "ARR03";
        itemDetails3[1] = "Ritz";
        itemDetails3[2] = "10";
        item_details.add(itemDetails3);

        cXML.createXML(order_details, item_details);

    }
}

Read more...