Are you interested in running macOS on your Windows PC? Whether for development, testing, or just exploring a different operating system, running macOS on Windows can be highly beneficial. In this guide, we will provide a step-by-step tutorial on how to install and run macOS on Windows. Using virtualization software, you can experience macOS on your Windows system without the need for dual-booting or hardware changes.
Create a Bootable macOS Installation USB Drive
The first step of installing macOS on your Windows PC is making your bootable USB drive with macOS. Once you have your Mac and USB ready, ensure the steps given below to create a bootable macOS USB.
Step 1: Open the Mac App Store on your Mac. Sign in to your Apple account there. Find and download the latest version of macOS.
Step 2: Restart your Mac and press Command + R to enter recovery mode.
Step 3: Release Command + R when the Apple icon and progress bar appear on the screen. Wait for macOS Recovery to load.
Step 4: Then click Utilities → Terminal. When the Terminal opens, type “csrutil disable” in it and press Enter.
Step 5: Wait until the terminal displays a message that the SIP is disabled.
Step 6: Click on the Apple menu and restart your Mac. Once your Mac boots up, plug in your USB. Then open Disk Utility, select the USB drive in the left column, and click Erase. In the pop-up menu that appears, select the name of your USB drive, select macOS Extended (Written material) format, and click Erase. Lastly, click Done.
Step 7: Run the Unibeast app. If you don't have it, download the latest version first. Click Next and then agree until you are ready to use the app. Finally, you will see a window containing the USB drive you set up earlier. Then click Next. Then select Catalina and click Next. Then select UEFI Boot Mode or Legacy Boot Mode and click Continue. If you have older hardware, you should select legacy boot mode.
Step 8: Then select whether you have an NVIDIA or ATI graphics card and click Next.
Step 9: Lastly, review your choices and click Next. Then enter your password when prompted and click OK.
Install macOS on Windows using Installation USB
As per the previous steps, we have created a bootable drive to install macOS on the system. Now, to install macOS on your system, refer to the steps given below:
Step 1: Go to Clover boot screen and select “Boot macOS Installation” from “Install macOS Catalina”.
Step 2: Select your preferred language and click Next. Then select Disk Utility from the macOS Utilities menu.
Step 3: Click on your PC's hard drive in the left column. Then click Delete.
Step 4: From there, select a new name for the drive, select APFS as the format, and click Erase. Then click Done.
Step 5: Return to the macOS Utilities main menu, select Install macOS, and click Next.
Step 6: Click Next again to continue installing macOS on your PC.
Step 7: Once the installation process is complete, your PC will restart. If macOS doesn't load automatically, select macOS Catalina from the bootloader.
Install macOS on VirtualBox
This is the most important prerequisite for installing the Mac operating system on the device. The device should have the Windows operating system as its primary operating system. These users should install this proper software. This is open-source software. This software is available free of cost on the internet. Users need to install & ready with them before going for the installation of the Mac operating system.
Step 1: First, users need to open the Virtual Box software on their devices. There will be an option inside the software. There will be a new button. Users need to click on the New button.

Step 2: After that, a small new window will open. From there, users will need to provide a name. The name should be the operating system name. In this case, users need to write macOS in that field. Now, users need to click on Next.

Step 3: Now, in the next window, there, users need to adjust the memory size of the operating system disk. To install the macOS, users need to adjust the size of the disk to 4000 MB or 4 GB minimum size. After that, click on Next.

Step 4: In the next window, there is no need to make any changes. Users just need to click on the Create button.

Step 5: Now, in the next window, users need to click on the VHD (Virtual Hard Disk) option. Then users need to click on the Next button.

Step 6: Now, there is no need to make any changes in the next window. Users need to click on the Dynamically allocated option. Users just need to click on the Next button to proceed.

Step 7: In this case also, there is no need to make any changes. In this window, the software will ask for the location of the installation. It is recommended not to make any changes there. Users just need to click on the Create button.

Step 8: Hence, users have successfully installed & added the macOS to the Virtual Box on Windows operating system.

Configuration of macOS on Windows
Step 1: After successfully installing the macOS in the Virtual Box, it is time to complete the configuration. After making the configuration, the macOS will start running. For that purpose, users need to click on the Start option.

Step 2: Now, the macOS will start running. Users need to wait till the next window comes.

Step 3: Now, choose the appropriate language from the provided list & click on the Next arrow there.

Step 4: Now, there will be some more options present. However, users need to click on the Installation macOS option. Then they need to click on the Continue button.
Note: This is not an installation of macOS. Instead, this is the configuration step. macOS will automatically configure itself for the device. The configuration will take a long time to complete. This will try to adjust the operating system with the device configuration.

Step 5: Now, the configuration will start. It will take nearly 30 minutes of time to complete. Users are advised to have patience for that.

Step 6: The window will now get changed. Users can now see the Apple logo there. But still, the configuration is going on there. It will take another 15 minutes of time to complete. Users should wait until the process is completed.

Step 7: Now, in the next step, it will ask for the permission of Data & Privacy. Users will need to click on the Continue button to move forward.
Note: It is always advisable to read all the documents before giving consent to them. Whatever the scenario is, users should always be cautious. In this case, it is advisable to read the whole document for Data & Privacy.

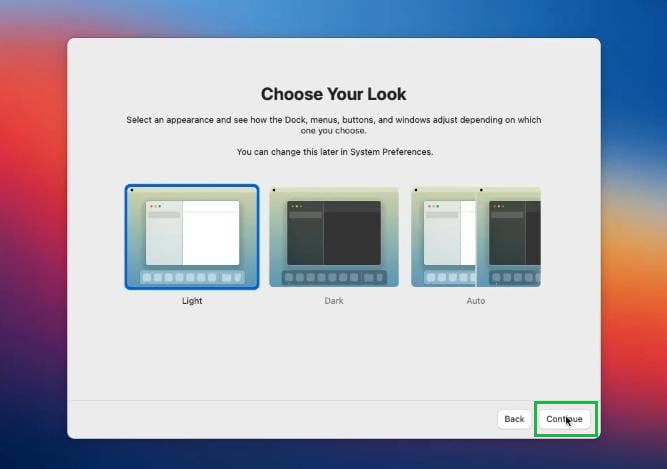
Step 8: Now in this step, it will ask you to choose any theme. Users can decide their favorite theme from that. Then they should click on the Continue button.
Step 9: Now, users will get the macOS window in front of them. So, users have completed all the processes & they can now operate the macOS there.

Hence, we have successfully run macOS on Windows operating system.
Running macOS on Windows opens up a world of possibilities for developers and tech enthusiasts. By following the steps outlined in this guide, you can easily set up macOS on your Windows PC using virtualization software. Enjoy the benefits of both operating systems on a single machine, and enhance your productivity and versatility.
Similar Reads
How to Install Windows on Mac Running Windows on your Mac can provide access to all the exclusive games, features, apps and the whole Windows environment. Mac is a powerful OS used for various operations but there are certain scenarios when you wish to work on a Windows system. Keeping this in mind, we have compiled this article
7 min read
How to Run Android APK on Windows? As we all know that the new Windows 11 has arrived. It is a very special version of Windows because it allows us to sideload our applications and games from other devices like Android phones. We can now run these APK files on our Windows devices easily. For that purpose, we require a special type of
3 min read
How to Play Windows Games on a Mac? Are you a Mac user who loves Windows games? Playing Windows games on a Mac is easier than you might think, thanks to various tools and software that bridge the gap between macOS and Windows. Whether you're looking to run your favourite PC games or explore new ones, this guide will show you how to pl
7 min read
How to Install Power ISO on Windows Are you looking to install Power ISO on Windows? Power ISO is a popular tool used for managing, editing, and creating disk image files like ISO, BIN, and others. Whether you're trying to download Power ISO for the first time or need a quick refresher on how to set it up, this guide will take you thr
4 min read
How to install Python on Windows? Python is a high-level programming language that has become increasingly popular due to its simplicity, versatility, and extensive range of applications. The process of How to install Python in Windows, operating system is relatively easy and involves a few uncomplicated steps. This article aims to
5 min read
How to Run Linux Software on Windows Although Windows users could also wish to run Linux software, Linux users frequently desire to run Windows applications on Linux. You can use Linux applications without leaving Windows, whether you're searching for an improved development environment or strong command-line tools. There are several a
5 min read