Creating your first serverless app in Azure
There are not many steps for creating your first serverless app in Azure. You can do it in a straightforward process when using the Azure portal. Follow these steps to get started:
- Log in to the Azure portal. To do so, open your web browser and navigate to the Azure portal at https://portal.azure.com/. Sign in with your Azure account credentials.
- In the Azure portal, click on the Create a resource button located in the upper-left corner.
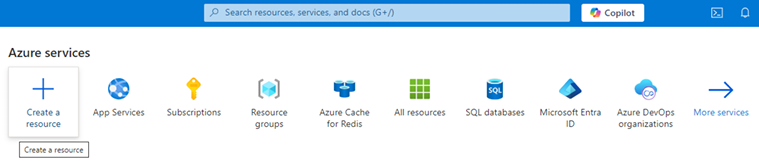
Figure 1.1: Creating a resource in the Azure portal
- In the Search services and marketplace window, search for Function App and select it from the search results. This service will also be presented in the Popular Azure services section.
- Click the Create button to start the creation process.

Figure 1.2: Selecting Function App for creation
As soon as you select Function App, you will be prompted to select the required hosting plan. Today, we have five options for hosting plans using Azure Functions. These plans vary according to the scaling behavior, cold start, the possibility of usage of a virtual network, and, obviously, pricing. The Consumption plan is exactly what serverless is all about, where you have no idea of where and how your code is running, and you only pay for the execution of the code. On the other hand, when you select the App Service or Container Apps environment plans, you will have more control over the hardware and consumption of resources, which means you get the flexibility of using Azure Functions in your solution, along with the management needed for larger applications.
The following screen will be presented to you as soon as you select to create an Azure function app. As we described previously, you will need to decide on the hosting plan according to your needs.

Figure 1.3: Function App hosting plans
For the purpose of this chapter, we will select the Consumption plan. Once you select this option, you will find a wizard to help you create the service. In this service, you will need to fill in the following information:
- Basics: Fill in the required fields such as Subscription, Resource Group, Function App name, Region, and Operating System. Ensure that the name you choose is unique. In Runtime stack, select the programming language of your functions. We will select .NET 8 Isolated worker model, but there are other options, as we presented before. It is worth mentioning that in-process models will be retired in 2026, so do not start projects using this approach.
- Storage: The function app needs an Azure storage account by default.
- Networking: This is where you will define whether the Azure function will be available for public access or not.
- Monitoring: Enable Application Insights to monitor your Function App for better diagnostics and performance tracking. Don’t forget that Azure Monitor logs will cause a cost increase.
- Deployment: It is also possible to initiate the setup of the deployment desired for the function app. This is interesting for enabling continuous deployment using GitHub Actions as default.
- Tags: Tagging the function app is considered a good practice for facilitating FinOps activity in professional environments.
In Chapter 2, Demystifying Microservices Applications, we will discuss the best way to interface microservices with the external world. For security reasons, it is not recommended that you provide functions directly to the public. You may decide to deliver them using an application gateway, such as Azure Application Gateway, or you can use Azure API Management as the entry for the APIs you develop using Azure Functions.
Once you click on Review and create, you will be able to check all the settings. Review your configuration and click the Create button again to deploy your function app:

Figure 1.4: Reviewing the function app setup
Once the deployment is complete, navigate to your new function app by clicking on the Go to resource button. You will find the function app running properly there:

Figure 1.5: Function app running
Now, it is time to understand the possibilities for development using Azure Functions and start coding.