A quick tour of Blender
The first time you open Blender, you might feel overwhelmed just by looking at the interface:

Figure 1.3 – Blender’s default interface
Let’s start with the bigger windows. The biggest one is the 3D Viewport, where you add objects, edit your models, and/or set up your scene overall.
In the upper right, we have the Outliner, which contains all objects in the scene and can help us locate different objects more easily.
Underneath it, we see the Properties Editor, where we can tweak several attributes and parameters of the currently selected mesh. It has several icons on its left side that illustrate what each tab inside of this editor affects.
Now, we can look at the Workspace menu at the very top of the Viewport:

Figure 1.4 – Workspace menu
There, we have many different workspaces, each one optimized with distinct interfaces for several different tasks, such as modeling, sculpting, and texturing.
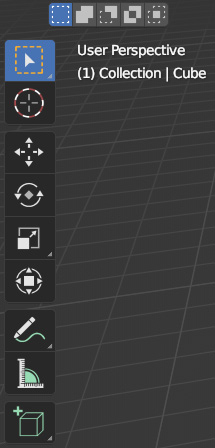
Now, to the left of the viewport, we see some tools:

Figure 1.5 – Viewport tools
These tools, from top to bottom, are the following:
- Select: This tool allows for box selection and has more modes that can be toggled using the shortcut W.
- Cursor: This defines the location of the 3D cursor, which has a round red and white contour. The 3D cursor defines where the objects are added to the scene.
- Move: This allows us to move the object in one or more of the three axes.
- Rotate: This allows us to rotate the model in one or more of the three axes.
- Scale: This allows us to scale the object in one or more of the three axes.
- Transform: This is an all-in-one tool that provides the functionality of the three previous tools in one.
- Annotation: This allows us to make any type of annotation in our project.
- Measure: This measures the length and angle by clicking and dragging.
- Add Cube: This allows us to draw a cube or cuboid shape by clicking and dragging.
Note that most of these tools are easily accessible using shortcuts, and once you get used to using shortcuts, you will rarely find yourself using these tools.
Now, we can move to the right side of the Viewport:

Figure 1.6 – More tools
There we have a few other tools, again described here from top to bottom:
- Options: This is a menu with a few options for the current selection mode
- Gizmo: You can use this to figure out the view’s orientation relative to the world coordinates and the scene, as well as rotating the view around by clicking and dragging
- Zoom: This zooms the view in or out by clicking and dragging
- Move: This pans the view
- Toggle camera view: This switches between the Camera and Orbit views
- Perspective: This switches between the Perspective and Orthographic views, which will be explained later in the chapter
While these may be tools for navigation in the viewport, there are easier ways of going about it: using shortcuts. The most common ones used for navigation are the following:
- Middle mouse button: Orbits the view around the scene.
- Shift + middle mouse button: Pans the view.
- Scroll wheel: Zooms in (scroll up) or out (scroll down). This can also be done using Ctrl + middle mouse button and dragging up or down.
For now, we will just mention the navigation shortcuts, but we will learn about more of them as we build out the headphones.


