


![Pytorch as numpy
import torch
# define pytorch tensors
x = torch.randn(10, 20)
y = torch.ones(20, 5)
# `@` mean matrix multiplication from python3.5, PEP-0465
res = x @ y
# get the shape
res.shape # torch.Size([10, 5])
# in place operations
x.add_(torch.ones(10, 20))
# get the mean and std
x.mean(dim=0)
x.std(dim=1)
# reshaping
x = x.view(3, -1)](https://image.slidesharecdn.com/01-diveintopytorchpdf-180905223551/85/Dive-Into-PyTorch-5-320.jpg)


![Simple layer with optimizer and loss
import torch
from torch.autograd import Variable
import torch.nn.functional as F
x = Variable(torch.randn(10, 20), requires_grad=False)
y = Variable(torch.randn(10, 3), requires_grad=False)
# define some weights
w1 = Variable(torch.randn(20, 5), requires_grad=True)
w2 = Variable(torch.randn(5, 3), requires_grad=True)
learning_rate = 0.1
loss_fn = torch.nn.MSELoss()
optimizer = torch.optim.SGD([w1, w2], lr=learning_rate)
for step in range(5):
pred = F.sigmoid(x @ w1)
pred = F.sigmoid(pred @ w2)
loss = loss_fn(pred, y)
# you still should manually zero all previous gradients
optimizer.zero_grad()
loss.backward()
optimizer.step()](https://image.slidesharecdn.com/01-diveintopytorchpdf-180905223551/85/Dive-Into-PyTorch-9-320.jpg)
![Tensorflow static graphs
# placeholders should be defined prior graph
x = tf.placeholder(tf.float32, shape=(None, 20))
y = tf.placeholder(tf.float32, shape=(None, 3))
w1 = tf.Variable(tf.random_normal((20, 5)))
w2 = tf.Variable(tf.random_normal((5, 3)))
pred = tf.sigmoid(x @ w1)
pred = tf.sigmoid(pred @ w2)
loss = tf.reduce_sum((y - pred) ** 2)
optimizer = tf.train.GradientDescentOptimizer(learning_rate=0.1)
minimization = optimizer.minimize(loss)
with tf.Session() as sess:
# Run the graph once to initialize the Variables w1 and w2.
sess.run(tf.global_variables_initializer())
x_value = np.random.randn(10, 20)
y_value = np.random.randn(10, 3)
for step in range(5):
loss_value, _ = sess.run([loss, minimization],
feed_dict={x: x_value, y: y_value})](https://image.slidesharecdn.com/01-diveintopytorchpdf-180905223551/85/Dive-Into-PyTorch-10-320.jpg)
![Tensorflow control flow
first_counter = tf.constant(0)
second_counter = tf.constant(10)
some_value = tf.Variable(15)
# condition should handle all args:
def cond(first_counter, second_counter):
return first_counter < second_counter
def body(first_counter, second_counter, some_value):
first_counter = tf.add(first_counter, 2)
second_counter = tf.add(second_counter, 1)
some_value = tf.add(some_value, second_counter)
return first_counter, second_counter, some_value
c1, c2, val = tf.while_loop(
cond, body, [first_counter, second_counter, some_value])
with tf.Session() as sess:
sess.run(tf.global_variables_initializer())
counter_1_res, counter_2_res = sess.run([c1, c2])](https://image.slidesharecdn.com/01-diveintopytorchpdf-180905223551/85/Dive-Into-PyTorch-11-320.jpg)
![Pytorch control flow
import torch
first_counter = torch.Tensor([0])
second_counter = torch.Tensor([10])
some_value = torch.Tensor(15)
while (first_counter < second_counter)[0]:
first_counter += 2
second_counter += 1
some_value += second_counter](https://image.slidesharecdn.com/01-diveintopytorchpdf-180905223551/85/Dive-Into-PyTorch-12-320.jpg)

![Sequential models definition
from collections import OrderedDict
import torch.nn as nn
# Example of using Sequential
model = nn.Sequential(
nn.Conv2d(1, 20, 5),
nn.ReLU(),
nn.Conv2d(20, 64, 5),
nn.ReLU()
)
# Example of using Sequential with OrderedDict
model = nn.Sequential(OrderedDict([
('conv1', nn.Conv2d(1, 20, 5)),
('relu1', nn.ReLU()),
('conv2', nn.Conv2d(20, 64, 5)),
('relu2', nn.ReLU())
]))
output = model(some_input)](https://image.slidesharecdn.com/01-diveintopytorchpdf-180905223551/85/Dive-Into-PyTorch-14-320.jpg)


![Self defined layers(old style)
class MyFunction(torch.autograd.Function):
def forward(self, input):
self.save_for_backward(input)
output = torch.sign(input)
return output
def backward(self, grad_output):
input, = self.saved_tensors
grad_output[input.ge(1)] = 0
grad_output[input.le(-1)] = 0
return grad_output
# usage
x = torch.randn(10, 20)
y = MyFunction()(x)
# and if we want to use inside nn.Module
class MyFunctionModule(torch.nn.Module):
def forward(self, x):
return MyFunction()(x)](https://image.slidesharecdn.com/01-diveintopytorchpdf-180905223551/85/Dive-Into-PyTorch-18-320.jpg)
![Self defined layers(new style)
class MyFunction(torch.autograd.Function):
@staticmethod
def forward(ctx, input):
ctx.save_for_backward(input)
output = torch.sign(input)
return output
@staticmethod
def backward(ctx, grad_output):
# saved tensors - tuple of tensors, so we need get first
input, = ctx.saved_variables
grad_output[input.ge(1)] = 0
grad_output[input.le(-1)] = 0
return grad_output
x = torch.randn(10, 20)
y = MyFunction.apply(x)
my_func = MyFunction.apply
y = my_func(x)
class MyFunctionModule(torch.nn.Module):
def forward(self, x):
return MyFunction.apply(x)](https://image.slidesharecdn.com/01-diveintopytorchpdf-180905223551/85/Dive-Into-PyTorch-19-320.jpg)


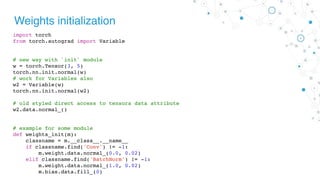
![Weights initialization
import math
from torch import nn
# for loop approach with direct access
class MyModel(nn.Module):
def __init__(self):
for m in self.modules():
if isinstance(m, nn.Conv2d):
n = m.kernel_size[0] * m.kernel_size[1] * m.out_channels
m.weight.data.normal_(0, math.sqrt(2. / n))
elif isinstance(m, nn.BatchNorm2d):
m.weight.data.fill_(1)
m.bias.data.zero_()
elif isinstance(m, nn.Linear):
m.bias.data.zero_()](https://image.slidesharecdn.com/01-diveintopytorchpdf-180905223551/85/Dive-Into-PyTorch-24-320.jpg)


![Pytorch data loader(definition)
import torchvision as tv
class ImagesDataset(torch.utils.data.Dataset):
def __init__(self, df, transform=None,
loader=tv.datasets.folder.default_loader):
self.df = df
self.transform = transform
self.loader = loader
def __getitem__(self, index):
row = self.df.iloc[index]
target = row['class_']
path = row['path']
img = self.loader(path)
if self.transform is not None:
img = self.transform(img)
return img, target
def __len__(self):
n, _ = self.df.shape
return n](https://image.slidesharecdn.com/01-diveintopytorchpdf-180905223551/85/Dive-Into-PyTorch-33-320.jpg)
![Pytorch data loader(usage)
import torchvision as tv
data_transforms = tv.transforms.Compose([
tv.transforms.RandomCrop((64, 64), padding=4),
tv.transforms.RandomHorizontalFlip(),
tv.transforms.ToTensor(),
])
train_df = pd.read_csv('path/to/some.csv')
train_dataset = ImagesDataset(
df=train_df,
transform=data_transforms
)
train_loader = torch.utils.data.DataLoader(
train_dataset, batch_size=10, shuffle=True,
num_workers=16)
# fetch the batch, same as `__getitem__` method
# NOTE: images dimensions in another order than tensorflow
for img, target in train_loader:
pass](https://image.slidesharecdn.com/01-diveintopytorchpdf-180905223551/85/Dive-Into-PyTorch-34-320.jpg)


Dive Into PyTorch
- 1. Dive into PyTorch. Comparison with TensorFlow.
- 2. About me Illarion Khlestov Researcher at the RingLabs, Faces department GitHub: https://github.com/ikhlestov Blog: https://medium.com/@illarionkhlestov
- 3. Why use pytorch? 1.Fast to produce production ready code 2.Easy to use if you know numpy 3.Small overhead above the CUDA 4.Ready as for large abstract layers, as for self designed layers
- 4. Resources 1.Documentation 2.Tutorials 3.Source code Notes: - Documentation and tutorials are stored separately - Docs, tutorials and source code can have different versions
- 5. Pytorch as numpy import torch # define pytorch tensors x = torch.randn(10, 20) y = torch.ones(20, 5) # `@` mean matrix multiplication from python3.5, PEP-0465 res = x @ y # get the shape res.shape # torch.Size([10, 5]) # in place operations x.add_(torch.ones(10, 20)) # get the mean and std x.mean(dim=0) x.std(dim=1) # reshaping x = x.view(3, -1)
- 6. Pytorch as numpy import torch import numpy as np numpy_tensor = np.random.randn(10, 20) # convert numpy array to pytorch array pytorch_tensor = torch.Tensor(numpy_tensor) # or another way pytorch_tensor = torch.from_numpy(numpy_tensor) # convert torch tensor to numpy representation pytorch_tensor.numpy() # if we want to use tensor on GPU provide another type dtype = torch.cuda.FloatTensor gpu_tensor = torch.randn(10, 20).type(dtype) # or just call `cuda()` method gpu_tensor = pytorch_tensor.cuda() # call back to the CPU cpu_tensor = gpu_tensor.cpu()
- 7. From tensors to variables import torch from torch.autograd import Variable # create variable x = Variable(torch.ones(2), requires_grad=True) # access variable tensor x.data # access variable gradient x.grad # None y = 5 * (x + 2) ** 2 # backward should be called only on a scalar o = (1 / 2) * torch.sum(y) # compute backward o.backward() # now we have the gradients of x x.grad # 10, 10
- 8. From tensors to variables # define an inputs x_tensor = torch.randn(10, 20) y_tensor = torch.randn(10, 5) x = Variable(x_tensor, requires_grad=False) y = Variable(y_tensor, requires_grad=False) # define some weights w = Variable(torch.randn(20, 5), requires_grad=True) # get variable tensor print(type(w.data)) # torch.FloatTensor # get variable gradient print(w.grad) # None loss = torch.mean((y - x @ w) ** 2) # calculate the gradients loss.backward() print(w.grad) # some gradients # manually apply gradients w.data -= 0.01 * w.grad.data # manually zero gradients after update w.grad.data.zero_()
- 9. Simple layer with optimizer and loss import torch from torch.autograd import Variable import torch.nn.functional as F x = Variable(torch.randn(10, 20), requires_grad=False) y = Variable(torch.randn(10, 3), requires_grad=False) # define some weights w1 = Variable(torch.randn(20, 5), requires_grad=True) w2 = Variable(torch.randn(5, 3), requires_grad=True) learning_rate = 0.1 loss_fn = torch.nn.MSELoss() optimizer = torch.optim.SGD([w1, w2], lr=learning_rate) for step in range(5): pred = F.sigmoid(x @ w1) pred = F.sigmoid(pred @ w2) loss = loss_fn(pred, y) # you still should manually zero all previous gradients optimizer.zero_grad() loss.backward() optimizer.step()
- 10. Tensorflow static graphs # placeholders should be defined prior graph x = tf.placeholder(tf.float32, shape=(None, 20)) y = tf.placeholder(tf.float32, shape=(None, 3)) w1 = tf.Variable(tf.random_normal((20, 5))) w2 = tf.Variable(tf.random_normal((5, 3))) pred = tf.sigmoid(x @ w1) pred = tf.sigmoid(pred @ w2) loss = tf.reduce_sum((y - pred) ** 2) optimizer = tf.train.GradientDescentOptimizer(learning_rate=0.1) minimization = optimizer.minimize(loss) with tf.Session() as sess: # Run the graph once to initialize the Variables w1 and w2. sess.run(tf.global_variables_initializer()) x_value = np.random.randn(10, 20) y_value = np.random.randn(10, 3) for step in range(5): loss_value, _ = sess.run([loss, minimization], feed_dict={x: x_value, y: y_value})
- 11. Tensorflow control flow first_counter = tf.constant(0) second_counter = tf.constant(10) some_value = tf.Variable(15) # condition should handle all args: def cond(first_counter, second_counter): return first_counter < second_counter def body(first_counter, second_counter, some_value): first_counter = tf.add(first_counter, 2) second_counter = tf.add(second_counter, 1) some_value = tf.add(some_value, second_counter) return first_counter, second_counter, some_value c1, c2, val = tf.while_loop( cond, body, [first_counter, second_counter, some_value]) with tf.Session() as sess: sess.run(tf.global_variables_initializer()) counter_1_res, counter_2_res = sess.run([c1, c2])
- 12. Pytorch control flow import torch first_counter = torch.Tensor([0]) second_counter = torch.Tensor([10]) some_value = torch.Tensor(15) while (first_counter < second_counter)[0]: first_counter += 2 second_counter += 1 some_value += second_counter
- 14. Sequential models definition from collections import OrderedDict import torch.nn as nn # Example of using Sequential model = nn.Sequential( nn.Conv2d(1, 20, 5), nn.ReLU(), nn.Conv2d(20, 64, 5), nn.ReLU() ) # Example of using Sequential with OrderedDict model = nn.Sequential(OrderedDict([ ('conv1', nn.Conv2d(1, 20, 5)), ('relu1', nn.ReLU()), ('conv2', nn.Conv2d(20, 64, 5)), ('relu2', nn.ReLU()) ])) output = model(some_input)
- 15. nn.Module models definition import torch.nn as nn import torch.nn.functional as F # names of layers will be based on class attribute name class Net(nn.Module): def __init__(self): super(Net, self).__init__() self.conv1 = nn.Conv2d(1, 6, 5) self.conv2 = nn.Conv2d(6, 16, 5) def forward(self, x): x = F.max_pool2d(F.relu(self.conv1(x)), (2, 2)) x = F.max_pool2d(F.relu(self.conv2(x)), 2) return x model = Net() output = model(some_input)
- 16. Mixed model definition from torch import nn class Model(nn.Module): def __init__(self): super().__init__() self.feature_extractor = nn.Sequential( nn.Conv2d(3, 12, kernel_size=3, padding=1, stride=1), nn.Conv2d(12, 24, kernel_size=3, padding=1, stride=1), ) self.second_extractor = nn.Conv2d( 24, 36, kernel_size=3, padding=1, stride=1) def forward(self, x): x = self.feature_extractor(x) x = self.second_extractor(x) return x
- 17. XNOR-net example
- 18. Self defined layers(old style) class MyFunction(torch.autograd.Function): def forward(self, input): self.save_for_backward(input) output = torch.sign(input) return output def backward(self, grad_output): input, = self.saved_tensors grad_output[input.ge(1)] = 0 grad_output[input.le(-1)] = 0 return grad_output # usage x = torch.randn(10, 20) y = MyFunction()(x) # and if we want to use inside nn.Module class MyFunctionModule(torch.nn.Module): def forward(self, x): return MyFunction()(x)
- 19. Self defined layers(new style) class MyFunction(torch.autograd.Function): @staticmethod def forward(ctx, input): ctx.save_for_backward(input) output = torch.sign(input) return output @staticmethod def backward(ctx, grad_output): # saved tensors - tuple of tensors, so we need get first input, = ctx.saved_variables grad_output[input.ge(1)] = 0 grad_output[input.le(-1)] = 0 return grad_output x = torch.randn(10, 20) y = MyFunction.apply(x) my_func = MyFunction.apply y = my_func(x) class MyFunctionModule(torch.nn.Module): def forward(self, x): return MyFunction.apply(x)
- 20. Train on CUDA import torch ### tensor example x_cpu = torch.randn(10, 20) w_cpu = torch.randn(20, 10) # direct transfer to the GPU x_gpu = x_cpu.cuda() w_gpu = w_cpu.cuda() result_gpu = x_gpu @ w_gpu # get back from GPU to CPU result_cpu = result_gpu.cpu() ### model example model = model.cuda() # train step inputs = Variable(inputs.cuda()) outputs = model(inputs) # get back from GPU to CPU outputs = outputs.cpu()
- 21. CUDA device allocation import torch # check is cuda enabled torch.cuda.is_available() # set required device torch.cuda.set_device(0) # work with some required cuda device with torch.cuda.device(1): # allocates a tensor on GPU 1 a = torch.cuda.FloatTensor(1) assert a.get_device() == 1 # but you still can manually assign tensor to required device d = torch.randn(2).cuda(2) assert d.get_device() == 2
- 22. CUDA wrapper class Trainer: def __init__(self, model, use_cuda=False, gpu_idx=0): self.use_cuda = use_cuda self.gpu_idx = gpu_idx self.model = self.to_gpu(model) def to_gpu(self, tensor): if self.use_cuda: return tensor.cuda(self.gpu_idx) else: return tensor def from_gpu(self, tensor): if self.use_cuda: return tensor.cpu() else: return tensor def train(self, inputs): inputs = self.to_gpu(inputs) outputs = self.model(inputs) outputs = self.from_gpu(outputs)
- 23. Weights initialization import torch from torch.autograd import Variable # new way with `init` module w = torch.Tensor(3, 5) torch.nn.init.normal(w) # work for Variables also w2 = Variable(w) torch.nn.init.normal(w2) # old styled direct access to tensors data attribute w2.data.normal_() # example for some module def weights_init(m): classname = m.__class__.__name__ if classname.find('Conv') != -1: m.weight.data.normal_(0.0, 0.02) elif classname.find('BatchNorm') != -1: m.weight.data.normal_(1.0, 0.02) m.bias.data.fill_(0)
- 24. Weights initialization import math from torch import nn # for loop approach with direct access class MyModel(nn.Module): def __init__(self): for m in self.modules(): if isinstance(m, nn.Conv2d): n = m.kernel_size[0] * m.kernel_size[1] * m.out_channels m.weight.data.normal_(0, math.sqrt(2. / n)) elif isinstance(m, nn.BatchNorm2d): m.weight.data.fill_(1) m.bias.data.zero_() elif isinstance(m, nn.Linear): m.bias.data.zero_()
- 25. Find the owl
- 26. Learning rate scheduler from torch.optim import lr_scheduler from torch import nn import torch model = nn.Sequential( nn.Conv2d(1, 20, 5), nn.ReLU(), nn.Conv2d(20, 64, 5), nn.ReLU() ) optimizer = torch.optim.SGD(model.parameters(), lr=0.01) scheduler = lr_scheduler.StepLR(optimizer, step_size=30, gamma=0.1) for epoch in range(100): scheduler.step() train() validate()
- 27. Random seed and train flag import torch # CPU seed torch.manual_seed(42) # GPU seed torch.cuda.manual_seed_all(42) # Train flag can be updated with boolean # to disable dropout and batch norm learning model.train(True) # execute train step model.train(False) # run inference step
- 28. Variables modes - requires_grad and volatile import torch from torch.autograd import Variable # requires grad # If there’s a single input to an operation that requires gradient, # its output will also require gradient. x = Variable(torch.randn(5, 5)) y = Variable(torch.randn(5, 5)) z = Variable(torch.randn(5, 5), requires_grad=True) a = x + y a.requires_grad # False b = a + z b.requires_grad # True # Volatile differs from requires_grad in how the flag propagates. # If there’s even a single volatile input to an operation, # its output is also going to be volatile. x = Variable(torch.randn(5, 5), requires_grad=True) y = Variable(torch.randn(5, 5), volatile=True) a = x + y a.requires_grad # False
- 29. Print model info import torch.nn as nn model = nn.Sequential( nn.Conv2d(1, 20, 5), nn.ReLU()) print(model) # Sequential ( # (0): Conv2d(1, 20, kernel_size=(5, 5), stride=(1, 1)) # (1): ReLU () # )
- 30. Print model info class Net(nn.Module): def __init__(self): super(Net, self).__init__() self.conv1 = nn.Conv2d(1, 6, 5) self.conv2 = nn.Conv2d(6, 16, 5) def forward(self, x): return x model = Net() print(model) # layers name as attributes names # Net ( # (conv1): Conv2d(1, 6, kernel_size=(5, 5), stride=(1, 1)) # (conv2): Conv2d(6, 16, kernel_size=(5, 5), stride=(1, 1)) # )
- 31. Model saving/loading import torch import torch.nn as nn model = nn.Sequential( nn.Conv2d(1, 20, 5), nn.ReLU(), nn.Conv2d(20, 64, 5), nn.ReLU() ) save_path = 'model.pkl' # save/load only the model parameters(prefered solution) torch.save(model.state_dict(), save_path) model.load_state_dict(torch.load(save_path)) # save whole model torch.save(model, save_path) model = torch.load(save_path)
- 33. Pytorch data loader(definition) import torchvision as tv class ImagesDataset(torch.utils.data.Dataset): def __init__(self, df, transform=None, loader=tv.datasets.folder.default_loader): self.df = df self.transform = transform self.loader = loader def __getitem__(self, index): row = self.df.iloc[index] target = row['class_'] path = row['path'] img = self.loader(path) if self.transform is not None: img = self.transform(img) return img, target def __len__(self): n, _ = self.df.shape return n
- 34. Pytorch data loader(usage) import torchvision as tv data_transforms = tv.transforms.Compose([ tv.transforms.RandomCrop((64, 64), padding=4), tv.transforms.RandomHorizontalFlip(), tv.transforms.ToTensor(), ]) train_df = pd.read_csv('path/to/some.csv') train_dataset = ImagesDataset( df=train_df, transform=data_transforms ) train_loader = torch.utils.data.DataLoader( train_dataset, batch_size=10, shuffle=True, num_workers=16) # fetch the batch, same as `__getitem__` method # NOTE: images dimensions in another order than tensorflow for img, target in train_loader: pass
- 35. Logging.. Only text or third party - https://github.com/oval-group/logger - https://github.com/torrvision/crayon - https://github.com/TeamHG-Memex/tensorboard_logger - https://github.com/lanpa/tensorboard-pytorch - https://github.com/facebookresearch/visdom
- 36. Final architecture overview - Data loader - Model definition - Trainer • Optimizer • Learning rate scheduler • Model saving/restoring • Monitoring
- 37. Final architecture example model = Net() optimizer = torch.optim.SGD(model.parameters(), lr=0.01) scheduler = lr_scheduler.StepLR(optimizer, step_size=30, gamma=0.1) criterion = torch.nn.MSELoss() dataset = ImagesDataset(path_to_images) data_loader = torch.utils.data.DataLoader(train_dataset, batch_size=10) train = True for epoch in range(epochs): if train: lr_scheduler.step() for inputs, labels in data_loader: inputs = Variable(to_gpu(inputs)) labels = Variable(to_gpu(labels)) outputs = model(inputs) loss = criterion(outputs, labels) if train: optimizer.zero_grad() loss.backward() optimizer.step() if not train: save_best_model(epoch_validation_accuracy)
- 38. Conclusion - PyTorch can be used as drop-in replacement of numpy with CUDA - Fast for prototyping and writing custom models/layers - Easy to debug - Not so easy to monitor or deploy to devices without python - Create tools out of the box