SlideShare a Scribd company logo
Windows SharePoint Master
Class:
Tutorials
By
Robert Crane
Computer Information Agency
http://www.ciaops.com
Windows SharePoint Master Class
© www.ciaops.com
11 December 2012 Page 2
Terms
This guide from the Computer Information Agency is provided as is. Every effort has been made by the
author to ensure that information provided is correct however this cannot be guaranteed.
By using this guide you also acknowledge that any work performed on production systems is a potentially
dangerous act and may involve significant business risk and downtime. You hereby agree to release, waive
and discharge the Computer Information Agency and/or the author from any liability incurred to yourself,
your business or customers for any and all loss or damage, and any claims or demands therefore on
account of problems arising from the use of this guide.
By using this guide you hereby assume full responsibility for any risk to computer systems, now and
forever arising out of, or related to the use of this guide on any computer system.
Distribution and Duplication Guidelines
This document is copyright and only available directly from the Computer Information Agency. If you have
received it via any other means please contact www.ciaops.com immediately to arrange for a registered
copy.
You are permitted to make backup copies of this guide for your own personal use and for backup
purposes; however you are not permitted to share them with anyone else, without obtaining specific
written authorization from the Computer Information Agency. Providing the documentation to a third
party, posting of documents to the Internet or public/private networks are all examples in violation of the
license and copyright agreements.
By using this guide you agree to these terms.
Windows SharePoint Master Class
© www.ciaops.com
11 December 2012 Page 3
Index
Introduction
1 Connecting to Outlook.……………………………………………Page 5
2 Creating linked fields……...……………………………………..Page 12
3 Configuring a basic workflow…….…….……………….……Page 20
4 Displaying an updating spreadsheet..….…………………Page 39
5 Taking files offline with Outlook 2007…………………….Page 49
6 Creating a wiki and linking to Outlook 2007…………..Page 67
7 Mapping a network place…..……………………….…………Page 87
8 Working with picture libraries..…………………….………..Page 93
9 Implementing shared OneNote………..………….………...Page 105
10 Uploading documents to SharePoint.….……….…….....Page 119
Conclusion
Windows SharePoint Master Class
© www.ciaops.com
11 December 2012 Page 4
Introduction
Windows SharePoint Services v3.0 from Microsoft is a very powerful tool that allows
businesses to not only save information but also share that information with others
inside and outside their business. The problem for most people when using SharePoint
is that they only scratch the surface of what is possible with Windows SharePoint
Services v3.0. Many want to understand how they can be more productive with
SharePoint.
It is also important to remember that the capabilities of Windows SharePoint Services
3.0 are greatly enhanced when it is combined with the Microsoft Office 2007 suite of
products. Windows SharePoint Services v3.0 can be linked to Office applications like
Outlook for things like viewing of calendars and contacts. It can be used with OneNote
to create shared digital notebooks and greatly reduce the amount of paper and email
clutter within a business. It can even be directly linked to Windows Explorer and appear
like any network share.
This book has been created to help users get the most from Windows SharePoint
Services v3.0 by demonstrating how to take advantage of some of the most powerful
features of the product. To follow along with these tutorials you will require access to a
Windows SharePoint Services v3.0 and Microsoft Office 2007 applications. Many of
these same features are also part of Microsoft Office SharePoint Server 2007 (MOSS)
and later versions of SharePoint but the focus here will be on the Windows SharePoint
Services v3.0 product.
To get the most from this book you are encouraged to follow along with each tutorial on
your own system. If you have later versions of SharePoint and Office many of the
concepts are identical just the look and feel for the applications is different.
Windows SharePoint Services v3.0 is a very powerful information hub in any
organization, greatly improving the productivity of those who use it. Armed with the
information in these tutorials you should be able to take much greater advantage of the
product. For more information about what can be done with SharePoint visit
http://www.ciaops.com/ or email director@ciaops.com.
1. Connecting to Outlook
This tutorial will show you the steps required to link Outlook 2007 to a WSS v3 calendar.
This will allow you to create appointments in either Windows SharePoint Services v3.0
(WSS v3) or Outlook 2007 and have them automatically sync with all other linked
calendars. Only using Outlook 2007 it is possible to achieve two way synchronization
between the calendars. It is possible to follow the same steps with Outlook 2003 but
you can only synchronize from WSS v3 to Outlook 2003 and the not the reverse.
The first step in the process is to locate the WSS v3 calendar you wish to synchronize
with Outlook 2007. It is also recommended that you have Outlook 2007 already running
before you commence this process.
Chapter 1 – Connecting to Outlook
© www.ciaops.com
11 December 2012 Page 6
From then menu bar select Actions | Connect to Outlook.
You will now be taken to Outlook 2007 where you will see the above message asking for
permission to connect Outlook 2007 to your WSS v3 calendar.
Select Yes to continue.
Chapter 1 – Connecting to Outlook
© www.ciaops.com
11 December 2012 Page 7
When you select Calendar in Outlook 2007 you should now see you have an additional
calendar from which you can select to view.
As you can see in the above screen shot above there is the normal (private) Outlook
calendar on the left (in blue) and the new linked WSS v3 calendar on the right (in green).
Under the All Calendar Items on the left hand side of the screen you can see that making
a selection of which calendar to view is as simple as clicking the selection box for that
calendar. Likewise, to remove any calendar from the view, simply uncheck the box that
corresponds to that calendar.
Chapter 1 – Connecting to Outlook
© www.ciaops.com
11 December 2012 Page 8
You will also notice on the left of the tab, at the top of the calendar, that contains the
name of the calendar there is an arrow. If you press this arrow that calendar will overlay
the other one.
In the above case, the Companyweb calendar (green) that was on the right of the screen
has been overlaid on the private Outlook 2007 calendar (blue). You will notice that
although the calendars are overlaid you can still see the appointments in both. If you
look closely at the appointment on the 12th
you will see that it is coloured blue. This
indicates that this appointment belongs in the private Outlook 2007 calendar (blue).
This overlay ability is unique to Outlook 2007 and provides an easy way to view two
calendars to determine whether appointments clash. This could prove to be very handy
if the WSS v3 calendar represented common company-wide appointments, because it
could be quickly linked and then overlaid on private calendars to determine business
scheduling.
Chapter 1 – Connecting to Outlook
© www.ciaops.com
11 December 2012 Page 9
To demonstrate the bi-direction synchronization ability of WSS v3 calendars and
Outlook 2007 a new appointment is created in the WSS v3 calendar from Outlook 2007.
To create a new appointment, simply locate the WSS v3 calendar (in this case green)
and double click on any day. This will launch the event window like shown above. You
will note that this new appointment will reside in the WS v3 calendar by examining the
lower left corner of this window. Here it says In Shared Folder: Companyweb – Calendar
confirming we are actually creating this new event in our WSS v3 calendar.
Complete the remaining details for the event and press Save and Close in the upper left
of the window when complete.
Chapter 1 – Connecting to Outlook
© www.ciaops.com
11 December 2012 Page 10
When you are returned to your calendar view you should now see the new appointment
you just created. In the above example we can see the new appointment on the right
hand side, in the green calendar on the 10th
.
Chapter 1 – Connecting to Outlook
© www.ciaops.com
11 December 2012 Page 11
If we now return to our calendar in WSS v3 and refresh the page, we can see that the
new appointment we just created in Outlook 2007 now appears in the WSS v3 calendar
(on the 10th
as expected).
To create calendar events in WSS v3 you must have the appropriate rights to do so,
these same rights apply when creating events from linked Outlook 2007 as well.
2. Creating linked fields
Good database design allows you to create fields which are linked between database
tables. This is known as relational databases and improves the performance of
databases by avoiding redundancy and data errors.
It is possible to create something similar within WSS v3 via the use of linked fields. In
this case we are going to create a new list that records telephone calls from an existing
list of customers. Here our WSS v3 site already has a list of the customer details so we
will link our new list to this.
As you can see from the above screen shot a list of contact details already exists in our
WSS v3 site. Note here that this list contains a field called Last Name which we will be
using to link to in our new list.
Chapter 2 – Creating linked fields
© www.ciaops.com
11 December 2012 Page 13
The first step in the process is to create our new list. To do this we select Site Actions |
Create from the upper right of the screen. Remember, that you do not see the Site
Actions tab unless you have the appropriate design rights on the WSS v3 site.
Next, select Custom List from under the Custom Lists heading.
Chapter 2 – Creating linked fields
© www.ciaops.com
11 December 2012 Page 14
Give the new list a name. In this case it is Callers. Add a description if desired, set the
navigation option and press the Create button to create a new list.
You should now see the new list displayed on the screen as shown above. You will
notice that it only has a single field called Title.
Chapter 2 – Creating linked fields
© www.ciaops.com
11 December 2012 Page 15
To create a new field select Settings | Create Column from the menu.
In the Create Column screen select a name for the field (in this case Caller) and then
select the type of field desired.
Chapter 2 – Creating linked fields
© www.ciaops.com
11 December 2012 Page 16
In this case we want the Caller field to reference another list so we select the Lookup
option.
Scroll down the screen for further options.
You can enter a description if desired.
In the Get Information From: field you will see a drop box, that when selected, will allow
to select from any existing list you have on your WSS v3 site. In this case we select our
existing list Contacts.
Once you have selected the existing list to retrieve information from you then need to
select which field in that list the information will come from. To do this, select the drop
down for In this column:. When selected this will show all the fields (or columns) in the
previously selected list (that we are linking to). In this case we wish to select the field
Last Name.
Press the OK button to create the new field.
Chapter 2 – Creating linked fields
© www.ciaops.com
11 December 2012 Page 17
You should now see the new field displayed in the list as shown above.
Continue to add any columns required for the new list.
If you now create a new item in that list you can see the linked field in operation.
Chapter 2 – Creating linked fields
© www.ciaops.com
11 December 2012 Page 18
In the above example you can see when a choice is required for the Caller field a drop
down selection is presented. This drop down is populated with entries from the Last
Name field of the list Contacts that we chose to link to. No option, unless it already
appears in the Contacts list, will be listed here. This greatly reduces the chance of errors
being introduced into your information since data in this new list is now directly linked
to information you already have present on your site.
Pres OK to save the item when compete.
Once we have saved this item we can see it displayed as shown above.
If you now click on the value for any entry in the linked field (in this case CRANE), you
will be taken directly to that entry in the linked list (in this case Contacts).
Chapter 2 – Creating linked fields
© www.ciaops.com
11 December 2012 Page 19
The display from the original linked list (in this case, Contacts) is shown above. To return
to the new list simply press the Back button on your browser.
The big advantage of using linked or lookup fields in your lists, is that you can reduce the
amount of information in each list and you can also improve your data integrity. This
means that when others use the WSS v3 site they do not have to remember what values
should appear in fields they simply select that from a drop down if that field is already
linked.
3. Configuring a basic workflow
A workflow is a pre-configure set of steps that are followed from beginning to end. WSS
v3 comes with what is known as three state workflow built in. It is also possible to
create additional workflows via SharePoint designer. In this tutorial we will only cover
the basics of using the standard three stage workflow.
For more information about Windows SharePoint workflows see:
Introduction to workflows: http://office.microsoft.com/en-
us/sharepointtechnology/HA101641241033.aspx
A good example of workflow might be where a new document is uploaded to a WSS v3
document library. Once this document is completed it needs to be reviewed and
approved by someone within the organization. You would like this process to be as
automatic as possible with the appropriate person being notified at each stage of the
process, as to what their requirements are. In short, that is exactly the process that this
tutorial will take you through.
The first step in the process is to locate the document library in your WSS v3 site that
you wish the workflow to apply to. Note that you can attach a workflow (or multiple
workflows) to many WSS v3 items, but not all.
Chapter 3 – Creating a basic workflow
© www.ciaops.com
11 December 2012 Page 21
The first step in the process is to create an additional field in our document library that
will be used for controlling the stages of our work flow. To add this field, from the menu
of the document library, select Settings | Create Column.
Give the new column or field a name (in this case Status) and select Choice for the type
of information that this column will hold.
Chapter 3 – Creating a basic workflow
© www.ciaops.com
11 December 2012 Page 22
Scroll down the screen for further options.
In the Type each choice on a separate line: box enter three values to represent the
different stages of your workflow (here created, pending and approved). Remember,
given that is a three state workflow any additional choices apart from the initial three
will have no effect on the workflow, although they could still be used at a later stage if
you wanted to have additional states available in this field after the workflow has
completed.
Select any additional choices that you require and press the OK button to save your
changes.
Chapter 3 – Creating a basic workflow
© www.ciaops.com
11 December 2012 Page 23
After you have been return to the document library, now select Settings | Document
Library Settings from the document library menu to commence configuring a workflow.
In the Customize Document Library window select Workflow settings from under the
Permissions and Management section in the middle of the window.
Chapter 3 – Creating a basic workflow
© www.ciaops.com
11 December 2012 Page 24
In the Workflow section, at the top of the page, you should see the only option available
is Three-State.
In the Name section, give your workflow a unique descriptive name because, remember,
it is possible to have multiple workflows attached to different elements of a WSS v3
element like this document.
Scroll down the screen for further options.
Chapter 3 – Creating a basic workflow
© www.ciaops.com
11 December 2012 Page 25
You now need to select a Task list to use with the workflow. You can use an existing task
list on your WSS v3 site but it is generally recommended that you select the option New
task list in order to have the workflow information separate from any other task lists
you may have on your site.
Additionally, you will require a History list to keep track of the operations of the
workflow. For reasons of separation again it is recommended that you select the option
Workflow History (new) from the drop down list to create a new history list.
In the Start Options section you specify how the workflow will be started. In this case we
require the options that the workflow be able to be started manually as well as
commencing automatically when a new item is created or uploaded.
When you have made the desired options press the Next button to continue.
Chapter 3 – Creating a basic workflow
© www.ciaops.com
11 December 2012 Page 26
In the Workflow states section you are now asked to select a field in your document
library that can be used to control the workflow progress.
In this case, because that field was created prior to starting the workflow configuration
process (at the beginning of this tutorial), it has automatically selected this field (which
is called Status). If you do not have a suitable field in your document library then you
will not be able to progress past this point, because you will have to return and create a
suitable field.
You can adjust the state values for Initial, Middle and Final to any value in the choice
field if required, however in this case they are correct.
Scroll down the screen for further options.
Chapter 3 – Creating a basic workflow
© www.ciaops.com
11 December 2012 Page 27
Next, you need to decide what actions will take place when a workflow is initiated (the
first stage of the workflow). You can now set the options for what will appear in the
workflow task list that you created in the previous screen and also determine when the
task is due and who the initial task will be assigned to.
Scroll down the screen for further options.
Chapter 3 – Creating a basic workflow
© www.ciaops.com
11 December 2012 Page 28
As part of the workflow initiation process you can also elect to send an email to any
email address as well as to whom the task is assigned to. The reason for this maybe to
give visibility to some third party that the workflow is progressing. Also, as part of that
email you can include a specific subject and body as well as a link to the list item.
The next section of the workflow is similar to that you have just completed except it
applies to actions that will be taken when the workflow changes to its middle state (or
second stage).
Once this information has been entered scroll down to the bottom of the screen and
press the OK button to save the workflow.
If we now return to the document library and upload a new document we will initiate
the workflow just created.
When we do this we see the Status field with the default entry of Created as shown
above. Once we press the OK button and save the document to the document library
the workflow will commence since we configured it to automatically commence
whenever a new item was created in the document library.
Chapter 3 – Creating a basic workflow
© www.ciaops.com
11 December 2012 Page 29
After saving the document to the document library we can now see it listed along with
the workflow field (Document Approval) which indicates that the workflow is In
Progress. We can also see that the Status of the item is set to Created.
If we now examine the inbox of the person whom we nominated to receive the
workflow initiated email alert when the workflow was initiated, we find the above email
Chapter 3 – Creating a basic workflow
© www.ciaops.com
11 December 2012 Page 30
from WSS v3. You will notice that the email has a link to the WSS v3 document library to
make access very easy.
Returning to the document library we now see there is an additional menu item on the
properties menu (the pull down arrow appears when you hover over the item in the
document library). This Workflow item allows us to view the workflow process in more
detail.
Select the item Workflow from the item’s property menu.
Chapter 3 – Creating a basic workflow
© www.ciaops.com
11 December 2012 Page 31
We can now see the details of the workflow for that item.
In this case we can see that the item is already running the Document approval
workflow and that it is In Progress.
Chapter 3 – Creating a basic workflow
© www.ciaops.com
11 December 2012 Page 32
If we now return to the file in our document library, view the properties of the item and
then change the Status field from Created to Pending and select OK to save we will
move the workflow from the initial stage to the next (or middle) stage of the workflow.
Once the document properties update is complete we see that the Status of the
document has now changed to Pending. Also note that our workflow field, (Document
approval), still shows as In Progress because the workflow still hasn’t been completed.
Chapter 3 – Creating a basic workflow
© www.ciaops.com
11 December 2012 Page 33
If we examine the inbox of the recipient of the email whom we configured to receive a
task alert when the workflow entered its second (or middle) stage, we find an email
similar to that shown above.
The email outlines the steps that must be taken to complete this task as well as links to
relevant areas in the WSS v3 site.
Chapter 3 – Creating a basic workflow
© www.ciaops.com
11 December 2012 Page 34
As part of this document approval process we return to the properties of the item in the
WSS v3 document library and change the Status field to Approved and press OK to
update.
Once the document status has been updated you will be returned to the document
library. You will now see that the workflow field, (Document approval), has changed to
read Completed. This indicates that the workflow process for that document is now
complete.
Chapter 3 – Creating a basic workflow
© www.ciaops.com
11 December 2012 Page 35
If you now select item properties for the item in the document library again and choose
the Workflows item you will be able to view the properties of the workflow again.
At the top of the screen you will see that it is possible to initiate another workflow on
this item (since the previous one is now complete). You will also notice that the status of
the workflow says Completed.
Chapter 3 – Creating a basic workflow
© www.ciaops.com
11 December 2012 Page 36
To view the history of the workflow click on the workflow name, in this case Document
approval, under the heading Completed Workflows at the bottom of the screen.
You can see the tasks that were assigned, their due dates as well as their status. You can
click on the task names if required for more information.
Continue to scroll down the screen for more information.
Chapter 3 – Creating a basic workflow
© www.ciaops.com
11 December 2012 Page 37
At the bottom of the screen you will find the workflow history providing you a complete
audit trail of all the steps that have been taken.
All of this workflow information is available at any stage during the workflow process.
Chapter 3 – Creating a basic workflow
© www.ciaops.com
11 December 2012 Page 38
If you View All Site Content (in the upper left above the Quick Start menu) you will find a
Task list corresponding to your workflow (in this case called Document approval Tasks) if
required for review.
This tutorial has taken you through the steps of configuring and using a basic three state
workflow that come standard with WSS v3.
4. Displaying an updating spreadsheet
This tutorial will cover the creation of an updating Excel graph displayed in WSS v3. This
can allows the display of a range of graphical results in WSS v3 directly linked and
updated from a spreadsheet.
The first step in the process is to create a spreadsheet including a graph using Excel. It is
recommended that the graph be moved to its own sheet (in this case called Chart1).
Chapter 4 – Displaying an updating spreadsheet
© www.ciaops.com
11 December 2012 Page 40
Once the spreadsheet has been created, save it into a document library within your WSS
v3 site (in this case Shared Documents).
You can save directly to a WSS v3 document library in Excel by typing the URL (i.e.
http://companyweb) into the File name field when you go to save the file and then
navigate the WSS v3 from there.
Chapter 4 – Displaying an updating spreadsheet
© www.ciaops.com
11 December 2012 Page 41
Once the save is complete, if you display the WSS v3 document library in a browser you
should see the spreadsheet file you just saved displayed (in this case forecast).
Now return to the spreadsheet and select the chart tab (in this case Chart1). Then select
Office Start Button | Save As | Other Formats.
Chapter 4 – Displaying an updating spreadsheet
© www.ciaops.com
11 December 2012 Page 42
Navigate to the same document library in WSS v3 if not already displayed. Change the
Save as type field to Web page (*.htm, *.html). Next, select the option to save the chart
rather than the entire workbook by selecting Selection: Chart in the Save: area towards
the bottom of the Save As window.
Now press the Publish button.
You should now see the Publish as Web Page window appear. The chart should already
be selected in the Choose: area, along with the filename which has a .htm extension and
destination of the WSS v3 document library.
If you wish this chart .htm file to be updated every time spreadsheet is saved then
ensure you check the AutoRepuplish every time this workbook is saved option. If you
also check the Open published web page in browser you will see the chart displayed as a
web page which is recommended.
Press the Publish button to complete the process.
Chapter 4 – Displaying an updating spreadsheet
© www.ciaops.com
11 December 2012 Page 43
The chart should now be displayed in your browser. Leave the page open so that the
URL address can be copied and pasted into your WSS v3 site later.
If you now examine the WSS v3 document library, which you may need to refresh in
your browser, you should see a new file. This file will be the .htm chart that was just
Chapter 4 – Displaying an updating spreadsheet
© www.ciaops.com
11 December 2012 Page 44
published (in this case forecast). If you look closely at the Type icon you will notice a
slight difference to the standard Excel file, denoting a published Excel file.
To display the graph you will need to insert a web part into the desired page. Remember
that web parts can only be added to web part pages generally. In this case a new web
part page called graph has been created to host the Excel chart.
Click the area Add a Web Part to continue.
Chapter 4 – Displaying an updating spreadsheet
© www.ciaops.com
11 December 2012 Page 45
From the Add Web Parts window that appears, scroll down until you locate the Page
Viewer Web Part option and place a tick in the corresponding box.
Press the Add button to continue.
Chapter 4 – Displaying an updating spreadsheet
© www.ciaops.com
11 December 2012 Page 46
When the web part is displayed on the page select the Edit option in the top right of the
web part and then Modify Shared Web Part from the menu that appears.
When the properties of the web part are displayed enter the URL of the chart by
copying and pasting from the previously viewed browser page. This URL should appear
something like http://companyweb/Shared%20Documents/forecast.htm.
Also ensure that the Web Page option is selected at the top of the column.
Scroll down the page for further options.
Chapter 4 – Displaying an updating spreadsheet
© www.ciaops.com
11 December 2012 Page 47
You may need to adjust how the chart page is displayed within the web part. This can be
done under the appearance options where you can set properties like the Title and the
size of the window in which the chart appears.
You may return at any point and re-edit these options if needed. When complete press
the OK button to continue.
Chapter 4 – Displaying an updating spreadsheet
© www.ciaops.com
11 December 2012 Page 48
If you now also exit Edit Mode (top right hand side if displayed) you should see the Excel
chart displayed on the WSS v3 page as shown above.
To ensure that the chart does indeed update, return to the Excel spreadsheet and make
a change. After saving the chart in Excel (remember, updates will only take place once
you save the updated spreadsheet), return to the WSS v3 chart page.
If you now press the refresh button in your browser you should see that the page has
updated. If not, ensure that you selected the option to AutoRefresh the graph
highlighted earlier.
This tutorial has shown you how to publish an updating Excel chart to a .htm file and to
display that chart via a web part in WSS v3.
5. Taking files offline with Outlook
2007
This tutorial is designed to explain how to take documents in WSS v3 Document
Libraries offline with Microsoft Outlook 2007. To complete this process you will require
access to a WSS v3 site via a web browser as well as Microsoft Outlook 2007 installed on
your local system.
To take files from a WSS v3 Document Library offline using Outlook 2007 firstly navigate
to the Document Library in your WSS v3 Site using a web browser.
Chapter 5 – Taking files offline with Outlook 2007
© www.ciaops.com
11 December 2012 Page 50
From the Actions menu item of the Document Library select Connect to Outlook item.
If not already open, Outlook 2007 will launch. You will then be presented with a warning
window like that shown above asking whether you wish to allow Outlook 2007 to
connect to this document library.
Chapter 5 – Taking files offline with Outlook 2007
© www.ciaops.com
11 December 2012 Page 51
Press the Yes button to allow this connection.
If you press the Advanced button a new window appears with a number of additional
options displayed that can be altered if desired.
Make any changes and press the OK button to continue.
Chapter 5 – Taking files offline with Outlook 2007
© www.ciaops.com
11 December 2012 Page 52
Once the WSS v3 Document Library is connected you will see that Outlook 2007 creates
an additional folder (if it did not already exist) called SharePoint Lists under the current
mail folders on the left of the screen. Underneath this folder you will find your linked
SharePoint list (in this case Test – Shared Documents).
If you click on this SharePoint List in Outlook 2007 you will see a list of the documents in
the WSS v3 document library appear as items. Selecting any of these items will display a
preview of that file (provided the appropriate file viewer is available in Outlook 2007).
You can open an item in the list by double clicking on it or using the right mouse and
selecting Open from the menu that appears.
Chapter 5 – Taking files offline with Outlook 2007
© www.ciaops.com
11 December 2012 Page 53
You will normally be prompted as to whether you wish to open the file since the source
may be un-trusted to the local machine.
In this case select the Open button to continue.
Chapter 5 – Taking files offline with Outlook 2007
© www.ciaops.com
11 December 2012 Page 54
The document will now open. Because the document opened is a Word document it will
open in the version of Word we have on our local machine. A document will not open on
the local machine unless the correct program to open that file is installed.
When opened in Word you will notice a message bar, just below the ribbon menu that
says:
Offline Server Document. To modify this document, edit it offline and save it to the
server later.
You will also notice an Edit Offline button to the right.
If you wish to edit the document press the Edit Offline button.
A message like shown above will be displayed indicating that a local copy of the
document will be stored in the SharePoint Drafts folder on the local machine. You will
also be informed that this setting can be altered by changing the Offline Editing Options
in Word.
Press the OK button to continue.
Chapter 5 – Taking files offline with Outlook 2007
© www.ciaops.com
11 December 2012 Page 55
The location of the SharePoint Draft folder by default is C:Documents and
Settings<current_user>My DocumentsSharePoint Drafts as shown above.
You can alter the offline Word options either by clicking the hyperlink shown in the
previous window or selecting Office Button | Word Options | Save in Word.
Chapter 5 – Taking files offline with Outlook 2007
© www.ciaops.com
11 December 2012 Page 56
When you do you will see a window similar to that displayed above. The middle section
on the right displays the offline editing options which can be changed if desired.
After you finish editing the document and close it,
Chapter 5 – Taking files offline with Outlook 2007
© www.ciaops.com
11 December 2012 Page 57
You will now see in a small icon in the bottom right of the item in Outlook 2007 as well a
message window in the document preview basically telling you that the changes made
to the document only reside on the local machine and have not been updated to the
WSS v3 Document Library. This is typically because the machine is now working in an
‘offline’ state, not connected to the original WSS v3 Document Library.
When the local machine is able to connect to the original document library again and
the same document is opened again, subsequently changed and closed, a message
window will appear like that shown above indicating that the WSS v3 Document Library
is available. The user is prompted to whether they wish to update the changes made
offline.
If the desired document changes are to be updated to the WSS v3 Document Library
simply press the Update button. Once pressed you should see a copy of the document
being saved to the WSS v3 Document Library as shown above.
Chapter 5 – Taking files offline with Outlook 2007
© www.ciaops.com
11 December 2012 Page 58
The actual SharePoint Lists folder in Outlook 2007 is merely a PST file saved on the local
workstation. You can determine the location of this PST by right mouse clicking on the
SharePoint Lists item in Outlook 2007 and then selecting Properties from the menu that
appears.
Chapter 5 – Taking files offline with Outlook 2007
© www.ciaops.com
11 December 2012 Page 59
In this case you can see that SharePoint Lists item is a Personal Folder File format (i.e.
PST) and by default its location is C:Documents and Settings<current_user>Local
SettingsApplication DataMicrosoftOutlook.
If you view this location with the Windows file manager you can see the .PST file (in this
case SharePoint Lists.pst).
Inside this PST file is initially kept a full copy of every document in your WSS v3
Document Library. If you wish to connect to a large document library it could result in a
large PST file being created on the local system.
It is also important to note that while the offline files remain read only they reside inside
this PST. When you elect to edit them locally a copy is also stored in the SharePoint
drafts folder also on the local machine as shown previously.
Chapter 5 – Taking files offline with Outlook 2007
© www.ciaops.com
11 December 2012 Page 60
It is possible to remove the offline copy of the file from the local PST file by right mouse
clicking on the item and selecting Remove Offline Copy from the menu that appears.
After doing this you will no longer see a preview of that file. If you wish to have an
offline copy for viewing simply click the Download this document button to copy that
file from the WSS v3 document library back to the local .PST file again.
Chapter 5 – Taking files offline with Outlook 2007
© www.ciaops.com
11 December 2012 Page 61
If you connect to a WSS v3 document library in Outlook 2007, subsequently take it
offline and edit documents offline, you may face the issue of document version conflicts
when you try and update a document to the WSS v3 Document Library upon return. This
is because another person may have already updated that document in your absence.
Any such document version conflicts will need to be handled by the document
application software.
To prevent document version conflicts you should ensure any documents you wish to
take offline for editing are checked out in the document library beforehand. This
checkout process can only be done via a browser in the WSS v3 Document Library and
not via Outlook 2007. Simply select the options arrow to the right of the document
name and select Check Out from the menu that appears.
Chapter 5 – Taking files offline with Outlook 2007
© www.ciaops.com
11 December 2012 Page 62
When you do a check out you will be prompted whether you wish to use the local drafts
folder. This again stores a copy of the file in your SharePoint Drafts folder as detailed
previously. If you elect not to use the local draft folder, a copy will be made anyway
when you elect to edit the document after opening it in Outlook 2007.
Chapter 5 – Taking files offline with Outlook 2007
© www.ciaops.com
11 December 2012 Page 63
When a document is checked out from a document library the type icon appears with a
little green arrow in the bottom right when viewed in a web browser. In this mode any
other user will only be able to view this file and not make changes until the file has been
checked back in.
After the file has been checked out, and in this case saved to the local drafts folder, you
will again see the icon in the bottom right of the item in Outlook 2007 and the message
window in the document preview telling you that the document is currently on the local
machine.
Chapter 5 – Taking files offline with Outlook 2007
© www.ciaops.com
11 December 2012 Page 64
When the local machine has been returned ‘online’ and any offline documents have
been updated you need to return to the WSS v3 Document Library via a web browser
and check in any documents that were previously checked out so other people can edit
them.
Chapter 5 – Taking files offline with Outlook 2007
© www.ciaops.com
11 December 2012 Page 65
When you check in a document you will be prompted as to whether you wish the
document to remain checked out and enter any comments about the version you wish.
Normally, you will select the option for Yes to check the document back into the library
and press the OK button to continue.
Once the document has been checked back in you will no longer see a green arrow in
the bottom right of the document type icon.
Chapter 5 – Taking files offline with Outlook 2007
© www.ciaops.com
11 December 2012 Page 66
If you also return to Outlook 2007, you will no longer see any indication that there is a
local edited copy.
6. Creating a wiki and linking to
Outlook 2007
This tutorial will demonstrate the process of creating a wiki as well as making it available
offline using Outlook 2007. You will need access to the WSS v3 site to complete this
tutorial and have Outlook 2007 installed on the local machine.
A wiki is a collection of web pages designed to enable anyone with access to contribute
or modify content, using an online editor. Wikis are used to create collaborative
websites and to provide a central location for business intelligence. The collaborative
encyclopaedia Wikipedia is one of the best-known examples of a wiki and is one of the
best places for a group of people to work with information rather than forwarding it
around using email.
To create a wiki, log into the WSS v3 site as at least a user with design rights. From the
Site Actions menu in the top right of the screen select Create.
Chapter 6 – Creating a wiki and linking to Outlook 2007
© www.ciaops.com
11 December 2012 Page 68
In the Create section select Wiki Page Library from the Libraries section at the left of the
window.
Next, provide a suitable name for the new wiki (in this case Knowledge Base) as well as a
description. Also, select whether you wish this new wiki library to appear in the Quick
Launch (which is the menu area to the left of most pages on a WSS v3 site).
Chapter 6 – Creating a wiki and linking to Outlook 2007
© www.ciaops.com
11 December 2012 Page 69
When complete press the Create button to continue.
When the wiki has been created you will be shown a screen like that displayed above.
This is actually a document in the wiki that has been created by default. To view all the
documents in the wiki select the wiki name (in this case Knowledge Base) from the
bread crumb navigation at the top of the page or from under the Documents heading in
the Quick Start menu (if you elected to display it there).
Chapter 6 – Creating a wiki and linking to Outlook 2007
© www.ciaops.com
11 December 2012 Page 70
You should now see two default documents in this new wiki called Home and How To
Use This Wiki Library.
To delete these default documents select the item option menu from the arrow at the
right of the Name field. Then select Delete from the menu that appears.
Chapter 6 – Creating a wiki and linking to Outlook 2007
© www.ciaops.com
11 December 2012 Page 71
Once you have removed the item Home from the wiki when you now access that wiki in
future you will see a list of all the items in the wiki much like when you view a Document
Library. However, if you wish your wiki to display an opening page simply create a new
item and call it Home. Now, when you select the wiki you will see the contents of the
item called Home displayed. In summary, if you create a wiki item called Home it will
always display when anyone visits the wiki. Removing the Home item will instead display
a list of all the items in the wiki.
Once these default documents have been deleted select the New item from the WSS v3
wiki menu to create a new item.
Chapter 6 – Creating a wiki and linking to Outlook 2007
© www.ciaops.com
11 December 2012 Page 72
Give the item a title. The title has a few restrictions and can’t include some special
characters like ./#)( etc.
In the Wiki Content area you can now enter the information required. You can
customize the text in this area using the menu bar that appears at the top of the box if
required.
When complete press the Create button.
Chapter 6 – Creating a wiki and linking to Outlook 2007
© www.ciaops.com
11 December 2012 Page 73
You should now see the information you entered displayed in the article.
Press the Edit button in the upper right to make changes to this item.
As you can see from the above screen shot, you are able to easily customize the
information displayed in the item at any time. This may include changing the text colour,
Chapter 6 – Creating a wiki and linking to Outlook 2007
© www.ciaops.com
11 December 2012 Page 74
making the text bold or even changing the font. You will also note that any internet
address will automatically be hyperlinked.
When you have completed making additional changes to the item press the OK button
to continue.
Once again, you should see the item displayed with all the changes you just made.
One of the benefits of the WSS v3 wiki is that it automatically tracks changes. To view
these changes select the History link in the upper right hand side of the screen.
Chapter 6 – Creating a wiki and linking to Outlook 2007
© www.ciaops.com
11 December 2012 Page 75
You should now see the number of versions of the document displayed on the left hand
side (in this case 2.0). You will also notice that version additions are marked in beige and
deletions in grey. You can also select to edit the item, delete the item, manage item
permissions, check the item out, view the version history and set up alerts on this item
from the menu.
When complete press the OK button to continue.
Chapter 6 – Creating a wiki and linking to Outlook 2007
© www.ciaops.com
11 December 2012 Page 76
When you edit a wiki item you are able to also make changes to the base HTML. To do
this select a wiki item and then select the Edit link. To work with the HTML directly
select the Edit HTML Source button (last one on top row) once you are editing the item.
A separate window will now appears showing you the HTML code for that item. Simply
make the required changes and press the OK button to continue.
Chapter 6 – Creating a wiki and linking to Outlook 2007
© www.ciaops.com
11 December 2012 Page 77
If you now return to the History link for that item, you will see that, in this case, three
separate versions of this item have been recorded.
Select the Version History item on the menu bar that appears across the top of the
item.
Chapter 6 – Creating a wiki and linking to Outlook 2007
© www.ciaops.com
11 December 2012 Page 78
You can now browse through the exact information for each separate version of the
item in a single screen.
You also have the option to Delete All Versions here which will save disk space.
If you return to the page history again and select a previous version on the left hand side
(in this case version 2.0) it will be displayed. You now have the option, via the menu bar
to Restore this version of the item. This will delete the current version and overwrite it
with the version that you are viewing. This allows you to recover from any mistakes or
errors in that item.
Chapter 6 – Creating a wiki and linking to Outlook 2007
© www.ciaops.com
11 December 2012 Page 79
When you create a wiki item you can also easily create a link to another wiki item. This is
recommended practice since it is much better to have a large amount of smaller
documents about specific topics than a few very large ones.
To create a link to a new wiki item, even if the page doesn’t already exist, simply place
the text inside double square brackets (i.e. [[ ]]).
As before, when editing is complete simply press the OK button.
Chapter 6 – Creating a wiki and linking to Outlook 2007
© www.ciaops.com
11 December 2012 Page 80
When you now view the document you will see that the text you enclosed in double
brackets has a broken line underneath it and is in fact hyperlinked.
If you now click on the hyperlinked words you will be automatically taken to that item in
the wiki.
Chapter 6 – Creating a wiki and linking to Outlook 2007
© www.ciaops.com
11 December 2012 Page 81
If the item link which you just selected does not already exist in the WSS v3 wiki then
you will be automatically placed in the edit mode for this item so it can be created. You
also note that the Name field has already been completed since this is what is linked.
To complete the process simply add the required information to the item and press the
OK button.
By allowing you to create links before you actually create the wiki items WSS v3 speeds
up the process of collaboration.
Chapter 6 – Creating a wiki and linking to Outlook 2007
© www.ciaops.com
11 December 2012 Page 82
Returning to the wiki library you should see the new document you just created.
Using the View option on the right hand side you can change the view of the wiki to only
see certain documents that meet that criteria. You can also create your own views if
desired.
Chapter 6 – Creating a wiki and linking to Outlook 2007
© www.ciaops.com
11 December 2012 Page 83
The most logical method for taking wiki information offline is to connect it with Outlook
2007. To do this, navigate to the wiki library and select Actions from the menu. From
the menu that appears select Connect to Outlook.
If Outlook is not already running it will be launched. You will then be prompted as to
whether you wish to connect to this SharePoint Document library.
Chapter 6 – Creating a wiki and linking to Outlook 2007
© www.ciaops.com
11 December 2012 Page 84
Select Yes to accept the connection.
Once the connection has been made you will find the Wiki information under
SharePoint Lists. However, when you select the list (in this case Test – Wiki) and an item
(in this case about ping.aspx) you will see that you receive no preview. This is because
there is currently no viewer for the wiki items (.aspx pages).
This limitation is a major drawback of connecting wikis to Outlook.
Chapter 6 – Creating a wiki and linking to Outlook 2007
© www.ciaops.com
11 December 2012 Page 85
An alternate connection method is to use an RSS feed.
Return to the WSS v3 wiki library and select Actions from the menu and then View RSS
Feed from the menu that appears.
You can then copy and paste this RSS feed into Outlook (which is also an RSS reader).
Chapter 6 – Creating a wiki and linking to Outlook 2007
© www.ciaops.com
11 December 2012 Page 86
This now allows you to view each wiki item as shown above.
Another major issue with WSS v3 wikis is that you can’t simply cut and paste an image
into a wiki item. An image will only appear in a WSS v3 wiki if it referenced via a link.
Thus, images that already appear on the Internet can be linked as well as images that
appear in the WSS v3 Picture Library can be easily added but simply cutting and pasting
from another document won’t work.
Thus, if you wish to add custom images to you wiki you need to ensure that they already
exist in the WSS v3 Picture Library before they are linked to the wiki item using the
insert image button. The above screen shot shows what happens when you press the
Insert Image button. You are requested to enter a link to the image you wish to display,
which you need to know beforehand.
Despite some limitation WSS v3 wiki can utilized to great effect in most businesses.
7. Mapping a network place
This tutorial will cover how to create a standard Windows network place that points to a
WSS v3 Document Library. You will need access to a local workstation and need to know
the address of the WSS v3 Document Library you wish to directly map to.
On a local workstation select the option to view Network Places after logging in as the
required user.
Chapter 7 –Mapping a network place
© www.ciaops.com
11 December 2012 Page 88
Select the option to Add a Network Place.
In this case click Next to continue with the wizard.
Chapter 7 –Mapping a network place
© www.ciaops.com
11 December 2012 Page 89
Click Next again to continue.
Enter the address of the WSS v3 Document Library, in this case
http://companyweb/shared documents.
Press Next to continue.
Chapter 7 –Mapping a network place
© www.ciaops.com
11 December 2012 Page 90
Provide a descriptive name for the new network place, in this case ‘shared documents
on companyweb’.
Leave the Open this network place when I click Finish checked.
Chapter 7 –Mapping a network place
© www.ciaops.com
11 December 2012 Page 91
Press the Finish button to complete the process.
The network place should now be displayed and it should display the files in the WSS v3
Document Library.
Chapter 7 –Mapping a network place
© www.ciaops.com
11 December 2012 Page 92
Now, when you use any application you can navigate to the network place you just
created that points to the SharePoint Document Library just like any other file location.
If you use Windows Explorer you should also be able to browse to this location under
My Network Places. The ability to create and edit documents here is determined by the
user rights within WSS v3.
8. Working with picture libraries
Picture libraries in WSS v3 work in a number of different ways from regular Document
Libraries. The reason for this is that they are designed specifically for operation with
images.
In most cases you access your Picture Library by clicking on the name of the library as it
appears in the left hand side Quick Start menu (in this case Images).
When clicked you should now a thumbnail preview of all the images in the library. If you
click on any of the images you will be taken to a more detailed view.
Chapter 8 – Working with picture libraries
© www.ciaops.com
11 December 2012 Page 94
Here you can perform a number of tasks, including editing the item, managing
permissions and so on.
If you now again click on the image you will be the full image only in your browser like
so:
Chapter 8 – Working with picture libraries
© www.ciaops.com
11 December 2012 Page 95
Uploading multiple images to a Picture Library
You can upload images into a Picture Library in much the same way that you can with
Document Libraries however there are number of differences when you wish to upload
multiple documents to the Picture Library.
The first step in the process of uploading multiple documents is to select Upload
Multiple Pictures from the Upload menu item in the main view of the Picture Library. It
is important to note that the Picture Library is currently using the All Pictures view.
You should now see a page like that shown above. This indicates that the actual
uploading process is going to be handled by another program.
Chapter 8 – Working with picture libraries
© www.ciaops.com
11 December 2012 Page 96
That program is the Microsoft Office Picture Manger that comes as part of Microsoft
Office. Thus, you simply use this application to locate the images you wish to upload and
when complete press the Upload and Close button in the lower right of the screen.
Once you press this button you will see in the lower left of the screen a progress bar
indicating the transfer of the images you have selected.
Chapter 8 – Working with picture libraries
© www.ciaops.com
11 December 2012 Page 97
When the process is complete, the Microsoft Office Picture Manager should now close
and you will be returned to the above WSS v3 page. Simply click on the link Go Back to
“Images” to return to your Picture library.
Once back at the picture library you should now see the additional images you select
appear in the list.
Chapter 8 – Working with picture libraries
© www.ciaops.com
11 December 2012 Page 98
Using the Microsoft Office Picture Manager program can prove cumbersome at times.
An alternate method to upload multiple documents is to firstly change the view of the
Picture Library from the default All Pictures to Explorer View. You do this by selecting
Explorer View from the View menu in the top right hand side of the Picture Library as
shown above.
In Explorer View you will see the images in the library displayed slightly differently from
what you saw before.
Chapter 8 – Working with picture libraries
© www.ciaops.com
11 December 2012 Page 99
To upload multiple images into the library now, simply open your normal Windows
Explorer file manager, locate the files you desire to upload and drag and drop them into
the Explorer View page in the WSS v3 page.
Once you have dropped the images into the WSS v3 Picture Library you should see them
being copied across like shown above.
Chapter 8 – Working with picture libraries
© www.ciaops.com
11 December 2012 Page 100
The new images should now appear in the Picture Library.
If you now change the view back to All Pictures all the images should now appear as the
thumbnails as they did before.
Chapter 8 – Working with picture libraries
© www.ciaops.com
11 December 2012 Page 101
A third method to upload multiple images is to firstly map a network place to the Picture
Library, as has been shown before for Document Libraries in Section 16.8. When this
mapping is complete the Picture Library should appear like:
You can change the view of the files just as you would any other folder using Windows
Explorer.
Chapter 8 – Working with picture libraries
© www.ciaops.com
11 December 2012 Page 102
Simply select View | Thumbnails to see previews of all the images in the library.
Because the Picture Library is now being displayed effectively in Explorer View you will
notice a number of additional folders that generally remain hidden in the WSS v3
library. It is important that these folders are not altered.
Chapter 8 – Working with picture libraries
© www.ciaops.com
11 December 2012 Page 103
To upload multiple images here simply copy the desired files from another Windows
Explorer windows and return to the WSS v3 mapped Picture Library. Then right mouse
click and select Paste from the menu that appears.
You should then see the images being copied over into the location.
Chapter 8 – Working with picture libraries
© www.ciaops.com
11 December 2012 Page 104
Once the copy is complete the new images should appear in the folder as shown above.
If you now return to the WSS v3 Picture Library and refresh the page all the new images
should appear in the library.
9. Implementing shared OneNote
OneNote is an electronic version of a paper notebook where you can record all sorts of
information that you probably now typically keep on paper. You enter the information
into OneNote in a variety of ways including typing, copying and pasting as well as using a
stylus if available. You can also easily draw diagrams and include other graphics to
enhance the information that you save.
OneNote allows you to easily edit and relocate your information. You can quickly and
easily create more space at the bottom of a page, move a section to another location or
create new pages and sections quickly and easily. You can even have multiple notebooks
for each different type of information.
When OneNote is installed it also installs a number of ‘clipping’ buttons to other
applications like Outlook and Internet Explorer. This allows you to easily send
information like emails or web pages directly to OneNote for later reference. As part of
this clipping service, OneNote will tag your information so you know exactly where it
came from for later reference if required.
By default, OneNote creates notebooks on your local computer. It is however also
possible to save these notebooks in a shared location such as a File or SharePoint server.
Once the notebooks are saved in a shared location they can be accessed by multiple
people. This allows a team to easily collaborate and share information such as emails
and projects. When changes are made they are immediately updated so that they are
available to all users of the notebook.
If the notebooks are saved in a shared location it is possible to work with them offline
and update the shared copy when back online. Using this feature it is possible to locate
OneNote notebooks on shared locations on the Internet and have them available to
users connected to the Internet. When these users are not connected to the Internet
they can still work on their local copy of the notebook and update the shared copy when
they return to being online.
This tutorial will show you how to create a shared OneNote notebook on a SharePoint
server that is hosted on the Internet.
Chapter 9 – Implementing shared OneNote
© www.ciaops.com
11 December 2012 Page 106
The first step is to ensure that you have OneNote installed on your local machine. If you
do not already have a copy you can download a free trial copy from:
http://trial.trymicrosoftoffice.com/trialaustralia/product.aspx?re_ms=oo&family=oneno
te&culture=en-AU
Once installed on your machine open OneNote, like shown above. You may find a
number of demonstration notebooks are loaded by default. You can either close these
or select to continue.
Chapter 9 – Implementing shared OneNote
© www.ciaops.com
11 December 2012 Page 107
To create a new shared OneNote notebook you will first need at least contributor rights
on a SharePoint site, whether hosted on a local server or on the Internet. You will also
need to know the location (directory or URL) into which the new notebooks will be
saved prior to creating the notebook. It is recommended that you create a separate
document library for saving OneNote notebooks to keep the same content types
together but this is not absolutely necessary.
Once you have this information select File | New | Notebook from the menu.
Chapter 9 – Implementing shared OneNote
© www.ciaops.com
11 December 2012 Page 108
You will then be prompted for a notebook name and template style for the new
notebook. It is recommended that you keep the notebook name as short but descriptive
as possible and avoid using special characters like spaces, question marks, exclamation
marks and so on.
Once you have selected these options press the Next button to continue.
Chapter 9 – Implementing shared OneNote
© www.ciaops.com
11 December 2012 Page 109
You will now be prompted for the location in which you wish to store the notebook. The
default option is usually ‘I will use it on this computer’, however to allow sharing select
the last option, ‘Multiple people will share the notebook’ and in this case because the
notebook will be hosted on a SharePoint server select the option ‘On a server’.
Press the Next button to continue.
You will now need to enter the path or URL of the location in which you wish to store
the notebook. Remember that you require the ability to create files in that location. In
this case, the new notebook is being stored on a SharePoint server that is hosted on the
Internet, so the full URL is entered.
You can also elect to send an email to others to let them know about this new shared
notebook but it is recommended that you uncheck this option because identical emails
can be sent out once the notebook has been created.
When you have entered the required information select the Create button to continue.
Chapter 9 – Implementing shared OneNote
© www.ciaops.com
11 December 2012 Page 110
If the location in which you have chosen to store the new notebook requires a password
for access you will need to enter it now. If you are storing the new notebook on an
internal server then you will normally not be prompted for credentials as they will
automatically be passed through to the server for you.
Press the OK button once you have entered your login details.
Chapter 9 – Implementing shared OneNote
© www.ciaops.com
11 December 2012 Page 111
You should now see a new notebook displayed in OneNote. You will notice that near the
notebook name, in the upper left of the screen, is a sync icon. In this case it is green
which indicates that the information on the server and the information displayed to you
are the same.
Once you start entering information into this notebook it will automatically be synced
with the server in the background. This process will also update any one else who is
working with the notebook from the server.
If you now visit the location where the notebook is stored on the SharePoint server, you
will find a folder with the name of the notebook in the document library (in this case
Work).
Chapter 9 – Implementing shared OneNote
© www.ciaops.com
11 December 2012 Page 112
If you drill into that folder you will find the contents of that notebook displayed as single
files.
In the above screen shot you can see only a single file as that is all that there currently is
in our new notebook.
Chapter 9 – Implementing shared OneNote
© www.ciaops.com
11 December 2012 Page 113
Once you update the notebook and add more pages you will see them appear in the
folder in the document library.
Although a notebook stored on a SharePoint server will automatically synchronize in the
background it is possible to force this synchronization process at any time. To do this
select File | Sync | Sync All Notebooks Now or simply press the F9 key.
When synchronization occurs, the green sync icon next to the notebook name in the
upper left of the screen will spin. Once it stops spinning the synchronization is complete.
If you return to the notebook after closing the OneNote application you will find that
OneNote automatically opens the notebook for you. However it merely opens the last
local copy of the notebook it has stored. It is possible that additional updates have been
Chapter 9 – Implementing shared OneNote
© www.ciaops.com
11 December 2012 Page 114
made to the notebook since it was closed so you need to ensure that these changes are
synchronized.
As you can see above, when you open the notebook at the top of the page will appear a
warning that prompts you that you need to login to get the latest changes to the
notebook from the remote server. This will normally not occur with internal servers as
they typically automatically pass through any login credentials.
To login to the remote notebook to access any changes simply click on the warning
message and select the location of the notebook that appears.
You will then be prompted to enter your login details for the remote notebook.
Press the OK button when complete.
Chapter 9 – Implementing shared OneNote
© www.ciaops.com
11 December 2012 Page 115
Upon correct login you should see the green sync icon near the notebook name spin as
any updates are loaded to your local copy. The time that this synchronization takes
depends on how many changes have occurred since the local notebook was last
synchronized with the server.
When the synchronization process is complete the sync icon will stop spinning and
remain green. Depending on how you have your notebook view configured you may
also see a green tick with the sync icon indicating that the process is complete.
Now the copy of the local notebook and the one on the server are the same.
If a file is embedded in a OneNote notebook that is stored on a SharePoint server that
file can be updated without the need for OneNote on the remote desktop.
Chapter 9 – Implementing shared OneNote
© www.ciaops.com
11 December 2012 Page 116
This is because the file that is embedded in the OneNote notebook page is actually
saved in a separate folder in the document library as shown above (in this case the
folder called Page 2_onefiles).
Chapter 9 – Implementing shared OneNote
© www.ciaops.com
11 December 2012 Page 117
Inside this folder you will find the embedded document which can be updated without
OneNote and any updates will also be pushed out to the OneNote notebooks when they
synchronize.
You can view the storage location of a OneNote notebook by simply right mouse
clicking on the notebook name in the upper left and selecting Properties from the menu
that appears.
Chapter 9 – Implementing shared OneNote
© www.ciaops.com
11 December 2012 Page 118
You will then see the path to which the notebook is displayed as well as an option to
change its location if desired.
Press the OK button when complete.
10.Uploading documents to SharePoint
The Shared Documents area in SharePoint is called a Document library. In here you can
store any sort of file you wish including things like documents and spreadsheets. This
paper will cover the following topics:
1. Uploading a single document via a web browser
2. Uploading multiple documents via a web browser
3. Uploading documents via mapped drives
1. Uploading a single document via a web browser
To upload a single document click on the Upload button from the menu bar of the
Document Library.
You should now see a screen like:
CClliicckk
UUppllooaadd
Chapter 10 – Uploading documents to SharePoint
© www.ciaops.com
11 December 2012 Page 120
If you click the Browse button you can navigate to any file on your local system like so:
After selecting the file to be uploaded and pressing the Open button the location of that
file will be transferred to the Name field in the SharePoint site.
CClliicckk
BBrroowwssee
SSeelleecctt ddeessiirreedd ffiillee
aanndd pprreessss OOppeenn
bbuuttttoonn
Chapter 10 – Uploading documents to SharePoint
© www.ciaops.com
11 December 2012 Page 121
To upload the selected document to the Shared Documents area of SharePoint, simply
press the OK button.
PPrreessss OOKK
ttoo uuppllooaadd
NNeeww ddooccuummeenntt
nnooww iinn lliibbrraarryy
Chapter 10 – Uploading documents to SharePoint
© www.ciaops.com
11 December 2012 Page 122
You should now see the document you selected appear in the list for the Document
Library. In this case, a Word document has been uploaded and the Word icon appears at
the beginning of the line to indicate the document type.
You can repeat this process of selecting Upload in a Document Library, then pressing the
Browse button and locating the desired file and finally selecting OK to upload
documents.
2. Uploading Multiple Documents via a web browser
SharePoint supports the ability to upload multiple documents, however it only does so
on machines that have Microsoft Office installed. This means that unless you have
Microsoft Office installed on the machine from which you plan to upload multiple
documents to SharePoint that functionality will not be available.
If you access a SharePoint Document Library from a machine without Microsoft Office
installed and select the pull down arrow next to Upload from the menu you will only see
one menu option like so:
However, if you repeat the process using a machine that has Microsoft Office installed
you will see two menu options like so:
Use the Upload multiple documents so you can transfer your documents by simply
selecting the files required and pressing the OK button.
To do this click the Upload multiple document option from the menu after clicking on
the arrow to the right of Upload to reveal the drop down menu.
Chapter 10 – Uploading documents to SharePoint
© www.ciaops.com
11 December 2012 Page 123
You should then see a window like shown below where you can simply navigate to the
files that you wish to upload onto your system that reside on your local workstation and
press the OK button to commence the upload.
Simply use the navigation pane on the left to locate the directories from which you wish
to upload file from your local machine. Once you have located the directory and opened
it for viewing, simply click in the box next to the required entry on the list of files that
appear on the right of the screen.
By default, the option to Overwrite existing files will be enabled. This can be disabled by
unchecking the option in the top right of the screen.
When you have completed making all your selections simply press the OK button to
commence the transfer. The time taken to transfer the files will vary depending on the
total size of the files you wish transferred.
When the transfer process is complete you will be returned to the Document Library.
3. Uploading documents via mapped drives
CClliicckk aarrrrooww ttoo
rreevveeaall mmeennuu
CChheecckk wwhhiicchh
ffiilleess ttoo uuppllooaadd
Chapter 10 – Uploading documents to SharePoint
© www.ciaops.com
11 December 2012 Page 124
The first step in the process is map a drive on your local computer that refers to the
SharePoint site. From there you can use this mapped location as you would any other
drive on your system, for example to simply drag and drop files between the locations.
The method of setting up a mapped drive varies slightly between versions of Windows.
Uploading documents via network places in Windows XP
This section will cover how to create a standard Windows XP network place that points
to a SharePoint Document Library. You will need access to a local workstation and need
to know the address (URL) of the SharePoint Document Library you wish to directly map
to.
On a local workstation running Windows XP select the option My Network Places from
the Start menu after logging in as the required user.
SSeelleecctt MMyy
NNeettwwoorrkk PPllaacceess
Chapter 10 – Uploading documents to SharePoint
© www.ciaops.com
11 December 2012 Page 125
Select the option to Add a Network Place located at the top left of the screen.
SSeelleecctt AAdddd aa
nneettwwoorrkk ppllaaccee
Chapter 10 – Uploading documents to SharePoint
© www.ciaops.com
11 December 2012 Page 126
In this case click Next to continue with the wizard.
Click Next again to continue.
Chapter 10 – Uploading documents to SharePoint
© www.ciaops.com
11 December 2012 Page 127
Enter the address of the SharePoint Document Library, in this case
http://companyweb/shared documents.
Press Next to continue.
EEnntteerr
SShhaarreePPooiinntt SSiittee
aaddddrreessss
Chapter 10 – Uploading documents to SharePoint
© www.ciaops.com
11 December 2012 Page 128
Provide a descriptive name for the new network place, in this case ‘shared documents
on companyweb’.
Chapter 10 – Uploading documents to SharePoint
© www.ciaops.com
11 December 2012 Page 129
Leave the Open this network place when I click Finish checked.
Press the Finish button to complete the process.
Chapter 10 – Uploading documents to SharePoint
© www.ciaops.com
11 December 2012 Page 130
The network place should now be displayed and it should display the files in the
SharePoint Document Library.
Chapter 10 – Uploading documents to SharePoint
© www.ciaops.com
11 December 2012 Page 131
Now, when you use any application you can navigate to the network place you just
created that points to the SharePoint Document Library just like any other file location.
Chapter 10 – Uploading documents to SharePoint
© www.ciaops.com
11 December 2012 Page 132
If you use Windows Explorer you should also be able to browse to this location under
My Network Places. The ability to create and edit documents here is determined by the
user rights within the SharePoint site.
Upload a document via network places in Windows 7 or Vista
Windows 7 and Vista provide the ability to map directly to a SharePoint site without the
need to create a network place. To do this firstly launch Windows Explorer which is
normally the folder icon just to the right of the start button as shown below.
CClliicckk
WWiinnddoowwss
EExxpplloorreerr
Chapter 10 – Uploading documents to SharePoint
© www.ciaops.com
11 December 2012 Page 133
Once Windows Explorer has launched select Computer from the window on the left.
CClliicckk
CCoommppuutteerr
Chapter 10 – Uploading documents to SharePoint
© www.ciaops.com
11 December 2012 Page 134
Upon selecting computer you should see all the drives that are available on your local
computer. You will also notice a menu bar appear just below the address bar at the top
of the window. One of these items is Map a network drive. Click here to proceed.
CClliicckk
MMaapp nneettwwoorrkk
ddrriivvee
Chapter 10 – Uploading documents to SharePoint
© www.ciaops.com
11 December 2012 Page 135
A Map Network Drive window will now appear asking you to select a drive letter and a
folder. If select the arrow to the right of the drive you can any drive letter.
Into the folder area you will need to type the address (URL) of your SharePoint site or
SharePoint Document Library like shown below.
SSeelleecctt
DDrriivvee
lleetttteerr
Chapter 10 – Uploading documents to SharePoint
© www.ciaops.com
11 December 2012 Page 136
You can also choose whether you wish to have this drive reconnect at login and whether
you wish to access this location with a different set of credentials that you are currently
using on your network. If you are planning to continue to use this SharePoint location it
is recommended that you check the box Reconnect at logon.
When you have made your selections press the Finish button.
EEnntteerr ssiittee
UURRLL
UUppllooaadd
Chapter 10 – Uploading documents to SharePoint
© www.ciaops.com
11 December 2012 Page 137
If the SharePoint location you connecting to requires a password you will be prompted
for one now.
Simply enter the login details you have been provided for this SharePoint site and check
the Remember my credentials checkbox if you plan to use this location regularly.
Press the OK button to continue.
Chapter 10 – Uploading documents to SharePoint
© www.ciaops.com
11 December 2012 Page 138
The mapping process should now be complete and you will see the SharePoint location
displayed as a drive under your Computer on the left hand side window. In the title for
the drive you will see the drive letter you selected previously (in this case Z:) and the
SharePoint site (in this case supportweb.ciaops.net.au).
If you expand this location you will see any other SharePoint resources that this
mapping now has access to.
Now that you have successfully mapped a network drive to a SharePoint location you
can easily drag and drop files between your local machine and the SharePoint site. You
can also work directly with SharePoint files in this drive from any application you have
on your local machine.
Conclusion
Hopefully this book has shown you how to take more advantage of what Windows
SharePoint Server v3.0 has to offer. You should now see how important the integration
is between Windows SharePoint Services v3.0 and Microsoft Office, it should be part of
any SharePoint solution.
This book has taken you beyond the basics with SharePoint and hopefully given you the
skills to implement similar solution on your own systems. Importantly, what is shown
here is only a start to the more advanced ways of working with Windows SharePoint
Services v3.0. Functionality like workflows can provide very powerful business solutions
that really enhance the productivity of any business but it is up to you to take what you
have learned here and apply it your own business.
If you have any feedback about any of the information detailed here please contact me
via director@ciaops.com. I would also encourage you to access the free resources at
http://www.ciaops.com/downloads as well as keep up to date with my SharePoint
discoveries at http://supportweb.ciaops.net.au/blog.
I wish you every success with SharePoint and thank you for taking the time to read this
book.
- Robert Crane (2011)
About
This book is designer for those that want to take Windows SharePoint Services v 3.0
beyond the basics. Implementing things like workflows and integrating with Microsoft
Office allows you to unleash so much more of the power behind SharePoint. Every
chapter in this book will give your techniques you can use with SharePoint to make it
work better in your business.
Apart from workflows you’ll learn how to create linking with Office products to create
updating charts, the ability to take SharePoint information offline and more. Even
though this book focuses on Windows SharePoint Services v3.0 the information is
relevant for all versions of SharePoint and provides a quick way for readers to get up to
speed with this powerful tool from Microsoft.
If you want to make the most of Windows SharePoint Services then this book is for you.
Author
Robert Crane BE MBA MCP
Robert has a degree in Electrical Engineering as well as Masters of Business
Administration. He is also a Small Business Specialist and Microsoft Certified SharePoint
Professional. Robert has over 15 years of IT experience in a variety of fields and
positions, including working on Wall St in New York. He is the founder and principal of
the Computer Information Agency. Apart from resolving client technical issues, Robert
continues to present at seminars as well as write on a number for topics. He can be
contacted via director@ciaops.com.

More Related Content

What's hot (20)

PDF
Calendar Basics for Blackboard Learn
aaopd
 
PDF
Part3 quistionare
Syaiful Ahdan
 
PPT
Share Point Server 2007 Calendars I I Connect A Share Point Calendar To ...
Oklahoma Dept. Mental Health
 
PDF
Happy Birthday from Neonway
Neonway
 
PDF
Part4 google calender
Syaiful Ahdan
 
PDF
Part5 googlekeep
Syaiful Ahdan
 
PDF
Office Share Point Server2007 Functionaland Architectural Overview
LiquidHub
 
DOCX
CREATING A WIKI WEBSITE
Justin Toth
 
PPT
Share Point Server 2007 - Calendars - Tips And Tricks
Oklahoma Dept. Mental Health
 
PDF
Dbi h315
Aravindharamanan S
 
PPTX
Microsoft outlook
babbankumarpal
 
PDF
MLT 7 v1.1
lettingandy
 
PPTX
Office 365 Productivity Tips -- November Smack-Down
Christian Buckley
 
PDF
Office 365 Productivity Tips November 2017 November Smack-Down
Thomas Duff
 
PDF
Ahg microsoft stream_insight_queries
Steve Xu
 
PDF
Office 2010 and SharePoint 2010
Nerea
 
DOC
Planning and architecture for office sharepoint server 2007, part 1
Stan Perlinski
 
PDF
Primavera manual tutorial book
Thomas Britto
 
PPT
Share Point Server 2007 - Calendars 1 - Make The Most Of Your Team Calendar
Oklahoma Dept. Mental Health
 
PDF
Outlook 2013 lesson 5 overview presentation
OCP-lab
 
Calendar Basics for Blackboard Learn
aaopd
 
Part3 quistionare
Syaiful Ahdan
 
Share Point Server 2007 Calendars I I Connect A Share Point Calendar To ...
Oklahoma Dept. Mental Health
 
Happy Birthday from Neonway
Neonway
 
Part4 google calender
Syaiful Ahdan
 
Part5 googlekeep
Syaiful Ahdan
 
Office Share Point Server2007 Functionaland Architectural Overview
LiquidHub
 
CREATING A WIKI WEBSITE
Justin Toth
 
Share Point Server 2007 - Calendars - Tips And Tricks
Oklahoma Dept. Mental Health
 
Microsoft outlook
babbankumarpal
 
MLT 7 v1.1
lettingandy
 
Office 365 Productivity Tips -- November Smack-Down
Christian Buckley
 
Office 365 Productivity Tips November 2017 November Smack-Down
Thomas Duff
 
Ahg microsoft stream_insight_queries
Steve Xu
 
Office 2010 and SharePoint 2010
Nerea
 
Planning and architecture for office sharepoint server 2007, part 1
Stan Perlinski
 
Primavera manual tutorial book
Thomas Britto
 
Share Point Server 2007 - Calendars 1 - Make The Most Of Your Team Calendar
Oklahoma Dept. Mental Health
 
Outlook 2013 lesson 5 overview presentation
OCP-lab
 

Similar to Windows SharePoint Master Class: Tutorials (20)

PPT
Davis calendaring ppt
davis1mj
 
PPTX
Outlook 2010 Procedures
jmdme
 
PDF
Add ons
Robert Crane
 
PDF
Introduction
Robert Crane
 
PPT
Introduction wss-3-and-moss-2007-12324
Mogili Venkatababu
 
PDF
General Index
Robert Crane
 
PDF
1 Introduction
Robert Crane
 
PPTX
Calendar options in m365
Rob Schmidt
 
PDF
Sharepoint 2010 User Stories
Shuffle IT Solutions
 
PDF
Advanced configuration
Robert Crane
 
PPTX
SharePoint - You've got it, now what?
Robert Crane
 
PPTX
Office 365 workshop intro slides for workshop leaders
NetSquared
 
PPT
Exchange presentation
PaceCTLT
 
PDF
Office Share Point Server2007 Functionaland Architectural Overview
LiquidHub
 
PPT
Training Outlook
cmonasmith
 
DOC
Simplify Your IT Management with Microsoft SharePoint Online: Whitepaper
Microsoft Private Cloud
 
PPT
Share point link
Itopia
 
DOCX
Avail Advanced Email Features with Microsoft Exchange Online: Whitepaper
Microsoft Private Cloud
 
PPS
Microsoft Outlook Calendar Self Study Guide
Syed Raza
 
Davis calendaring ppt
davis1mj
 
Outlook 2010 Procedures
jmdme
 
Add ons
Robert Crane
 
Introduction
Robert Crane
 
Introduction wss-3-and-moss-2007-12324
Mogili Venkatababu
 
General Index
Robert Crane
 
1 Introduction
Robert Crane
 
Calendar options in m365
Rob Schmidt
 
Sharepoint 2010 User Stories
Shuffle IT Solutions
 
Advanced configuration
Robert Crane
 
SharePoint - You've got it, now what?
Robert Crane
 
Office 365 workshop intro slides for workshop leaders
NetSquared
 
Exchange presentation
PaceCTLT
 
Office Share Point Server2007 Functionaland Architectural Overview
LiquidHub
 
Training Outlook
cmonasmith
 
Simplify Your IT Management with Microsoft SharePoint Online: Whitepaper
Microsoft Private Cloud
 
Share point link
Itopia
 
Avail Advanced Email Features with Microsoft Exchange Online: Whitepaper
Microsoft Private Cloud
 
Microsoft Outlook Calendar Self Study Guide
Syed Raza
 
Ad

More from Robert Crane (20)

PDF
202310
Robert Crane
 
PDF
September 2023 CIAOPS Need to Know Webinar
Robert Crane
 
PDF
August 2023 CIAOPS Need to Know Webinar
Robert Crane
 
PDF
July 2023 CIAOPS Need to Know Webinar
Robert Crane
 
PDF
June 2023 CIAOPS Need to Know Webinar
Robert Crane
 
PDF
May 2023 CIAOPS Need to Know Webinar
Robert Crane
 
PDF
April 2023 CIAOPS Need to Know Webinar
Robert Crane
 
PDF
March 2023 CIAOPS Need to Know Webinar
Robert Crane
 
PDF
January 2023 CIAOPS Need to Know Webinar
Robert Crane
 
PDF
December 2022 CIAOPS Need to Know Webinar
Robert Crane
 
PDF
November 2022 CIAOPS Need to Know Webinar
Robert Crane
 
PDF
October 2022 CIAOPS Need to Know Webinar
Robert Crane
 
PDF
September 2022 CIAOPS Need to Know Webinar
Robert Crane
 
PDF
August 2022 CIAOPS Need to Know Webinar
Robert Crane
 
PDF
July 2022 CIAOPS Need to Know Webinar
Robert Crane
 
PDF
June 2022 CIAOPS Need to Know Webinar
Robert Crane
 
PDF
May 2022 CIAOPS Need to Know Webinar
Robert Crane
 
PDF
April 2022 CIAOPS Need to Know Webinar
Robert Crane
 
PDF
An introduction to Defender for Business
Robert Crane
 
PDF
March 2022 CIAOPS Need to Know Webinar
Robert Crane
 
202310
Robert Crane
 
September 2023 CIAOPS Need to Know Webinar
Robert Crane
 
August 2023 CIAOPS Need to Know Webinar
Robert Crane
 
July 2023 CIAOPS Need to Know Webinar
Robert Crane
 
June 2023 CIAOPS Need to Know Webinar
Robert Crane
 
May 2023 CIAOPS Need to Know Webinar
Robert Crane
 
April 2023 CIAOPS Need to Know Webinar
Robert Crane
 
March 2023 CIAOPS Need to Know Webinar
Robert Crane
 
January 2023 CIAOPS Need to Know Webinar
Robert Crane
 
December 2022 CIAOPS Need to Know Webinar
Robert Crane
 
November 2022 CIAOPS Need to Know Webinar
Robert Crane
 
October 2022 CIAOPS Need to Know Webinar
Robert Crane
 
September 2022 CIAOPS Need to Know Webinar
Robert Crane
 
August 2022 CIAOPS Need to Know Webinar
Robert Crane
 
July 2022 CIAOPS Need to Know Webinar
Robert Crane
 
June 2022 CIAOPS Need to Know Webinar
Robert Crane
 
May 2022 CIAOPS Need to Know Webinar
Robert Crane
 
April 2022 CIAOPS Need to Know Webinar
Robert Crane
 
An introduction to Defender for Business
Robert Crane
 
March 2022 CIAOPS Need to Know Webinar
Robert Crane
 
Ad

Recently uploaded (20)

PDF
HCIP-Data Center Facility Deployment V2.0 Training Material (Without Remarks ...
mcastillo49
 
PDF
Reverse Engineering of Security Products: Developing an Advanced Microsoft De...
nwbxhhcyjv
 
PDF
Achieving Consistent and Reliable AI Code Generation - Medusa AI
medusaaico
 
PDF
DevBcn - Building 10x Organizations Using Modern Productivity Metrics
Justin Reock
 
PPTX
COMPARISON OF RASTER ANALYSIS TOOLS OF QGIS AND ARCGIS
Sharanya Sarkar
 
PDF
Newgen Beyond Frankenstein_Build vs Buy_Digital_version.pdf
darshakparmar
 
PDF
Bitcoin for Millennials podcast with Bram, Power Laws of Bitcoin
Stephen Perrenod
 
PDF
How Startups Are Growing Faster with App Developers in Australia.pdf
India App Developer
 
PDF
HubSpot Main Hub: A Unified Growth Platform
Jaswinder Singh
 
PPTX
"Autonomy of LLM Agents: Current State and Future Prospects", Oles` Petriv
Fwdays
 
PDF
Empower Inclusion Through Accessible Java Applications
Ana-Maria Mihalceanu
 
PDF
Log-Based Anomaly Detection: Enhancing System Reliability with Machine Learning
Mohammed BEKKOUCHE
 
PPTX
AUTOMATION AND ROBOTICS IN PHARMA INDUSTRY.pptx
sameeraaabegumm
 
PPTX
Webinar: Introduction to LF Energy EVerest
DanBrown980551
 
PDF
CIFDAQ Market Insights for July 7th 2025
CIFDAQ
 
PDF
CIFDAQ Token Spotlight for 9th July 2025
CIFDAQ
 
PPTX
WooCommerce Workshop: Bring Your Laptop
Laura Hartwig
 
PDF
Jak MŚP w Europie Środkowo-Wschodniej odnajdują się w świecie AI
dominikamizerska1
 
PDF
Newgen 2022-Forrester Newgen TEI_13 05 2022-The-Total-Economic-Impact-Newgen-...
darshakparmar
 
PPTX
Q2 FY26 Tableau User Group Leader Quarterly Call
lward7
 
HCIP-Data Center Facility Deployment V2.0 Training Material (Without Remarks ...
mcastillo49
 
Reverse Engineering of Security Products: Developing an Advanced Microsoft De...
nwbxhhcyjv
 
Achieving Consistent and Reliable AI Code Generation - Medusa AI
medusaaico
 
DevBcn - Building 10x Organizations Using Modern Productivity Metrics
Justin Reock
 
COMPARISON OF RASTER ANALYSIS TOOLS OF QGIS AND ARCGIS
Sharanya Sarkar
 
Newgen Beyond Frankenstein_Build vs Buy_Digital_version.pdf
darshakparmar
 
Bitcoin for Millennials podcast with Bram, Power Laws of Bitcoin
Stephen Perrenod
 
How Startups Are Growing Faster with App Developers in Australia.pdf
India App Developer
 
HubSpot Main Hub: A Unified Growth Platform
Jaswinder Singh
 
"Autonomy of LLM Agents: Current State and Future Prospects", Oles` Petriv
Fwdays
 
Empower Inclusion Through Accessible Java Applications
Ana-Maria Mihalceanu
 
Log-Based Anomaly Detection: Enhancing System Reliability with Machine Learning
Mohammed BEKKOUCHE
 
AUTOMATION AND ROBOTICS IN PHARMA INDUSTRY.pptx
sameeraaabegumm
 
Webinar: Introduction to LF Energy EVerest
DanBrown980551
 
CIFDAQ Market Insights for July 7th 2025
CIFDAQ
 
CIFDAQ Token Spotlight for 9th July 2025
CIFDAQ
 
WooCommerce Workshop: Bring Your Laptop
Laura Hartwig
 
Jak MŚP w Europie Środkowo-Wschodniej odnajdują się w świecie AI
dominikamizerska1
 
Newgen 2022-Forrester Newgen TEI_13 05 2022-The-Total-Economic-Impact-Newgen-...
darshakparmar
 
Q2 FY26 Tableau User Group Leader Quarterly Call
lward7
 

Windows SharePoint Master Class: Tutorials

  • 1. Windows SharePoint Master Class: Tutorials By Robert Crane Computer Information Agency http://www.ciaops.com
  • 2. Windows SharePoint Master Class © www.ciaops.com 11 December 2012 Page 2 Terms This guide from the Computer Information Agency is provided as is. Every effort has been made by the author to ensure that information provided is correct however this cannot be guaranteed. By using this guide you also acknowledge that any work performed on production systems is a potentially dangerous act and may involve significant business risk and downtime. You hereby agree to release, waive and discharge the Computer Information Agency and/or the author from any liability incurred to yourself, your business or customers for any and all loss or damage, and any claims or demands therefore on account of problems arising from the use of this guide. By using this guide you hereby assume full responsibility for any risk to computer systems, now and forever arising out of, or related to the use of this guide on any computer system. Distribution and Duplication Guidelines This document is copyright and only available directly from the Computer Information Agency. If you have received it via any other means please contact www.ciaops.com immediately to arrange for a registered copy. You are permitted to make backup copies of this guide for your own personal use and for backup purposes; however you are not permitted to share them with anyone else, without obtaining specific written authorization from the Computer Information Agency. Providing the documentation to a third party, posting of documents to the Internet or public/private networks are all examples in violation of the license and copyright agreements. By using this guide you agree to these terms.
  • 3. Windows SharePoint Master Class © www.ciaops.com 11 December 2012 Page 3 Index Introduction 1 Connecting to Outlook.……………………………………………Page 5 2 Creating linked fields……...……………………………………..Page 12 3 Configuring a basic workflow…….…….……………….……Page 20 4 Displaying an updating spreadsheet..….…………………Page 39 5 Taking files offline with Outlook 2007…………………….Page 49 6 Creating a wiki and linking to Outlook 2007…………..Page 67 7 Mapping a network place…..……………………….…………Page 87 8 Working with picture libraries..…………………….………..Page 93 9 Implementing shared OneNote………..………….………...Page 105 10 Uploading documents to SharePoint.….……….…….....Page 119 Conclusion
  • 4. Windows SharePoint Master Class © www.ciaops.com 11 December 2012 Page 4 Introduction Windows SharePoint Services v3.0 from Microsoft is a very powerful tool that allows businesses to not only save information but also share that information with others inside and outside their business. The problem for most people when using SharePoint is that they only scratch the surface of what is possible with Windows SharePoint Services v3.0. Many want to understand how they can be more productive with SharePoint. It is also important to remember that the capabilities of Windows SharePoint Services 3.0 are greatly enhanced when it is combined with the Microsoft Office 2007 suite of products. Windows SharePoint Services v3.0 can be linked to Office applications like Outlook for things like viewing of calendars and contacts. It can be used with OneNote to create shared digital notebooks and greatly reduce the amount of paper and email clutter within a business. It can even be directly linked to Windows Explorer and appear like any network share. This book has been created to help users get the most from Windows SharePoint Services v3.0 by demonstrating how to take advantage of some of the most powerful features of the product. To follow along with these tutorials you will require access to a Windows SharePoint Services v3.0 and Microsoft Office 2007 applications. Many of these same features are also part of Microsoft Office SharePoint Server 2007 (MOSS) and later versions of SharePoint but the focus here will be on the Windows SharePoint Services v3.0 product. To get the most from this book you are encouraged to follow along with each tutorial on your own system. If you have later versions of SharePoint and Office many of the concepts are identical just the look and feel for the applications is different. Windows SharePoint Services v3.0 is a very powerful information hub in any organization, greatly improving the productivity of those who use it. Armed with the information in these tutorials you should be able to take much greater advantage of the product. For more information about what can be done with SharePoint visit http://www.ciaops.com/ or email [email protected].
  • 5. 1. Connecting to Outlook This tutorial will show you the steps required to link Outlook 2007 to a WSS v3 calendar. This will allow you to create appointments in either Windows SharePoint Services v3.0 (WSS v3) or Outlook 2007 and have them automatically sync with all other linked calendars. Only using Outlook 2007 it is possible to achieve two way synchronization between the calendars. It is possible to follow the same steps with Outlook 2003 but you can only synchronize from WSS v3 to Outlook 2003 and the not the reverse. The first step in the process is to locate the WSS v3 calendar you wish to synchronize with Outlook 2007. It is also recommended that you have Outlook 2007 already running before you commence this process.
  • 6. Chapter 1 – Connecting to Outlook © www.ciaops.com 11 December 2012 Page 6 From then menu bar select Actions | Connect to Outlook. You will now be taken to Outlook 2007 where you will see the above message asking for permission to connect Outlook 2007 to your WSS v3 calendar. Select Yes to continue.
  • 7. Chapter 1 – Connecting to Outlook © www.ciaops.com 11 December 2012 Page 7 When you select Calendar in Outlook 2007 you should now see you have an additional calendar from which you can select to view. As you can see in the above screen shot above there is the normal (private) Outlook calendar on the left (in blue) and the new linked WSS v3 calendar on the right (in green). Under the All Calendar Items on the left hand side of the screen you can see that making a selection of which calendar to view is as simple as clicking the selection box for that calendar. Likewise, to remove any calendar from the view, simply uncheck the box that corresponds to that calendar.
  • 8. Chapter 1 – Connecting to Outlook © www.ciaops.com 11 December 2012 Page 8 You will also notice on the left of the tab, at the top of the calendar, that contains the name of the calendar there is an arrow. If you press this arrow that calendar will overlay the other one. In the above case, the Companyweb calendar (green) that was on the right of the screen has been overlaid on the private Outlook 2007 calendar (blue). You will notice that although the calendars are overlaid you can still see the appointments in both. If you look closely at the appointment on the 12th you will see that it is coloured blue. This indicates that this appointment belongs in the private Outlook 2007 calendar (blue). This overlay ability is unique to Outlook 2007 and provides an easy way to view two calendars to determine whether appointments clash. This could prove to be very handy if the WSS v3 calendar represented common company-wide appointments, because it could be quickly linked and then overlaid on private calendars to determine business scheduling.
  • 9. Chapter 1 – Connecting to Outlook © www.ciaops.com 11 December 2012 Page 9 To demonstrate the bi-direction synchronization ability of WSS v3 calendars and Outlook 2007 a new appointment is created in the WSS v3 calendar from Outlook 2007. To create a new appointment, simply locate the WSS v3 calendar (in this case green) and double click on any day. This will launch the event window like shown above. You will note that this new appointment will reside in the WS v3 calendar by examining the lower left corner of this window. Here it says In Shared Folder: Companyweb – Calendar confirming we are actually creating this new event in our WSS v3 calendar. Complete the remaining details for the event and press Save and Close in the upper left of the window when complete.
  • 10. Chapter 1 – Connecting to Outlook © www.ciaops.com 11 December 2012 Page 10 When you are returned to your calendar view you should now see the new appointment you just created. In the above example we can see the new appointment on the right hand side, in the green calendar on the 10th .
  • 11. Chapter 1 – Connecting to Outlook © www.ciaops.com 11 December 2012 Page 11 If we now return to our calendar in WSS v3 and refresh the page, we can see that the new appointment we just created in Outlook 2007 now appears in the WSS v3 calendar (on the 10th as expected). To create calendar events in WSS v3 you must have the appropriate rights to do so, these same rights apply when creating events from linked Outlook 2007 as well.
  • 12. 2. Creating linked fields Good database design allows you to create fields which are linked between database tables. This is known as relational databases and improves the performance of databases by avoiding redundancy and data errors. It is possible to create something similar within WSS v3 via the use of linked fields. In this case we are going to create a new list that records telephone calls from an existing list of customers. Here our WSS v3 site already has a list of the customer details so we will link our new list to this. As you can see from the above screen shot a list of contact details already exists in our WSS v3 site. Note here that this list contains a field called Last Name which we will be using to link to in our new list.
  • 13. Chapter 2 – Creating linked fields © www.ciaops.com 11 December 2012 Page 13 The first step in the process is to create our new list. To do this we select Site Actions | Create from the upper right of the screen. Remember, that you do not see the Site Actions tab unless you have the appropriate design rights on the WSS v3 site. Next, select Custom List from under the Custom Lists heading.
  • 14. Chapter 2 – Creating linked fields © www.ciaops.com 11 December 2012 Page 14 Give the new list a name. In this case it is Callers. Add a description if desired, set the navigation option and press the Create button to create a new list. You should now see the new list displayed on the screen as shown above. You will notice that it only has a single field called Title.
  • 15. Chapter 2 – Creating linked fields © www.ciaops.com 11 December 2012 Page 15 To create a new field select Settings | Create Column from the menu. In the Create Column screen select a name for the field (in this case Caller) and then select the type of field desired.
  • 16. Chapter 2 – Creating linked fields © www.ciaops.com 11 December 2012 Page 16 In this case we want the Caller field to reference another list so we select the Lookup option. Scroll down the screen for further options. You can enter a description if desired. In the Get Information From: field you will see a drop box, that when selected, will allow to select from any existing list you have on your WSS v3 site. In this case we select our existing list Contacts. Once you have selected the existing list to retrieve information from you then need to select which field in that list the information will come from. To do this, select the drop down for In this column:. When selected this will show all the fields (or columns) in the previously selected list (that we are linking to). In this case we wish to select the field Last Name. Press the OK button to create the new field.
  • 17. Chapter 2 – Creating linked fields © www.ciaops.com 11 December 2012 Page 17 You should now see the new field displayed in the list as shown above. Continue to add any columns required for the new list. If you now create a new item in that list you can see the linked field in operation.
  • 18. Chapter 2 – Creating linked fields © www.ciaops.com 11 December 2012 Page 18 In the above example you can see when a choice is required for the Caller field a drop down selection is presented. This drop down is populated with entries from the Last Name field of the list Contacts that we chose to link to. No option, unless it already appears in the Contacts list, will be listed here. This greatly reduces the chance of errors being introduced into your information since data in this new list is now directly linked to information you already have present on your site. Pres OK to save the item when compete. Once we have saved this item we can see it displayed as shown above. If you now click on the value for any entry in the linked field (in this case CRANE), you will be taken directly to that entry in the linked list (in this case Contacts).
  • 19. Chapter 2 – Creating linked fields © www.ciaops.com 11 December 2012 Page 19 The display from the original linked list (in this case, Contacts) is shown above. To return to the new list simply press the Back button on your browser. The big advantage of using linked or lookup fields in your lists, is that you can reduce the amount of information in each list and you can also improve your data integrity. This means that when others use the WSS v3 site they do not have to remember what values should appear in fields they simply select that from a drop down if that field is already linked.
  • 20. 3. Configuring a basic workflow A workflow is a pre-configure set of steps that are followed from beginning to end. WSS v3 comes with what is known as three state workflow built in. It is also possible to create additional workflows via SharePoint designer. In this tutorial we will only cover the basics of using the standard three stage workflow. For more information about Windows SharePoint workflows see: Introduction to workflows: http://office.microsoft.com/en- us/sharepointtechnology/HA101641241033.aspx A good example of workflow might be where a new document is uploaded to a WSS v3 document library. Once this document is completed it needs to be reviewed and approved by someone within the organization. You would like this process to be as automatic as possible with the appropriate person being notified at each stage of the process, as to what their requirements are. In short, that is exactly the process that this tutorial will take you through. The first step in the process is to locate the document library in your WSS v3 site that you wish the workflow to apply to. Note that you can attach a workflow (or multiple workflows) to many WSS v3 items, but not all.
  • 21. Chapter 3 – Creating a basic workflow © www.ciaops.com 11 December 2012 Page 21 The first step in the process is to create an additional field in our document library that will be used for controlling the stages of our work flow. To add this field, from the menu of the document library, select Settings | Create Column. Give the new column or field a name (in this case Status) and select Choice for the type of information that this column will hold.
  • 22. Chapter 3 – Creating a basic workflow © www.ciaops.com 11 December 2012 Page 22 Scroll down the screen for further options. In the Type each choice on a separate line: box enter three values to represent the different stages of your workflow (here created, pending and approved). Remember, given that is a three state workflow any additional choices apart from the initial three will have no effect on the workflow, although they could still be used at a later stage if you wanted to have additional states available in this field after the workflow has completed. Select any additional choices that you require and press the OK button to save your changes.
  • 23. Chapter 3 – Creating a basic workflow © www.ciaops.com 11 December 2012 Page 23 After you have been return to the document library, now select Settings | Document Library Settings from the document library menu to commence configuring a workflow. In the Customize Document Library window select Workflow settings from under the Permissions and Management section in the middle of the window.
  • 24. Chapter 3 – Creating a basic workflow © www.ciaops.com 11 December 2012 Page 24 In the Workflow section, at the top of the page, you should see the only option available is Three-State. In the Name section, give your workflow a unique descriptive name because, remember, it is possible to have multiple workflows attached to different elements of a WSS v3 element like this document. Scroll down the screen for further options.
  • 25. Chapter 3 – Creating a basic workflow © www.ciaops.com 11 December 2012 Page 25 You now need to select a Task list to use with the workflow. You can use an existing task list on your WSS v3 site but it is generally recommended that you select the option New task list in order to have the workflow information separate from any other task lists you may have on your site. Additionally, you will require a History list to keep track of the operations of the workflow. For reasons of separation again it is recommended that you select the option Workflow History (new) from the drop down list to create a new history list. In the Start Options section you specify how the workflow will be started. In this case we require the options that the workflow be able to be started manually as well as commencing automatically when a new item is created or uploaded. When you have made the desired options press the Next button to continue.
  • 26. Chapter 3 – Creating a basic workflow © www.ciaops.com 11 December 2012 Page 26 In the Workflow states section you are now asked to select a field in your document library that can be used to control the workflow progress. In this case, because that field was created prior to starting the workflow configuration process (at the beginning of this tutorial), it has automatically selected this field (which is called Status). If you do not have a suitable field in your document library then you will not be able to progress past this point, because you will have to return and create a suitable field. You can adjust the state values for Initial, Middle and Final to any value in the choice field if required, however in this case they are correct. Scroll down the screen for further options.
  • 27. Chapter 3 – Creating a basic workflow © www.ciaops.com 11 December 2012 Page 27 Next, you need to decide what actions will take place when a workflow is initiated (the first stage of the workflow). You can now set the options for what will appear in the workflow task list that you created in the previous screen and also determine when the task is due and who the initial task will be assigned to. Scroll down the screen for further options.
  • 28. Chapter 3 – Creating a basic workflow © www.ciaops.com 11 December 2012 Page 28 As part of the workflow initiation process you can also elect to send an email to any email address as well as to whom the task is assigned to. The reason for this maybe to give visibility to some third party that the workflow is progressing. Also, as part of that email you can include a specific subject and body as well as a link to the list item. The next section of the workflow is similar to that you have just completed except it applies to actions that will be taken when the workflow changes to its middle state (or second stage). Once this information has been entered scroll down to the bottom of the screen and press the OK button to save the workflow. If we now return to the document library and upload a new document we will initiate the workflow just created. When we do this we see the Status field with the default entry of Created as shown above. Once we press the OK button and save the document to the document library the workflow will commence since we configured it to automatically commence whenever a new item was created in the document library.
  • 29. Chapter 3 – Creating a basic workflow © www.ciaops.com 11 December 2012 Page 29 After saving the document to the document library we can now see it listed along with the workflow field (Document Approval) which indicates that the workflow is In Progress. We can also see that the Status of the item is set to Created. If we now examine the inbox of the person whom we nominated to receive the workflow initiated email alert when the workflow was initiated, we find the above email
  • 30. Chapter 3 – Creating a basic workflow © www.ciaops.com 11 December 2012 Page 30 from WSS v3. You will notice that the email has a link to the WSS v3 document library to make access very easy. Returning to the document library we now see there is an additional menu item on the properties menu (the pull down arrow appears when you hover over the item in the document library). This Workflow item allows us to view the workflow process in more detail. Select the item Workflow from the item’s property menu.
  • 31. Chapter 3 – Creating a basic workflow © www.ciaops.com 11 December 2012 Page 31 We can now see the details of the workflow for that item. In this case we can see that the item is already running the Document approval workflow and that it is In Progress.
  • 32. Chapter 3 – Creating a basic workflow © www.ciaops.com 11 December 2012 Page 32 If we now return to the file in our document library, view the properties of the item and then change the Status field from Created to Pending and select OK to save we will move the workflow from the initial stage to the next (or middle) stage of the workflow. Once the document properties update is complete we see that the Status of the document has now changed to Pending. Also note that our workflow field, (Document approval), still shows as In Progress because the workflow still hasn’t been completed.
  • 33. Chapter 3 – Creating a basic workflow © www.ciaops.com 11 December 2012 Page 33 If we examine the inbox of the recipient of the email whom we configured to receive a task alert when the workflow entered its second (or middle) stage, we find an email similar to that shown above. The email outlines the steps that must be taken to complete this task as well as links to relevant areas in the WSS v3 site.
  • 34. Chapter 3 – Creating a basic workflow © www.ciaops.com 11 December 2012 Page 34 As part of this document approval process we return to the properties of the item in the WSS v3 document library and change the Status field to Approved and press OK to update. Once the document status has been updated you will be returned to the document library. You will now see that the workflow field, (Document approval), has changed to read Completed. This indicates that the workflow process for that document is now complete.
  • 35. Chapter 3 – Creating a basic workflow © www.ciaops.com 11 December 2012 Page 35 If you now select item properties for the item in the document library again and choose the Workflows item you will be able to view the properties of the workflow again. At the top of the screen you will see that it is possible to initiate another workflow on this item (since the previous one is now complete). You will also notice that the status of the workflow says Completed.
  • 36. Chapter 3 – Creating a basic workflow © www.ciaops.com 11 December 2012 Page 36 To view the history of the workflow click on the workflow name, in this case Document approval, under the heading Completed Workflows at the bottom of the screen. You can see the tasks that were assigned, their due dates as well as their status. You can click on the task names if required for more information. Continue to scroll down the screen for more information.
  • 37. Chapter 3 – Creating a basic workflow © www.ciaops.com 11 December 2012 Page 37 At the bottom of the screen you will find the workflow history providing you a complete audit trail of all the steps that have been taken. All of this workflow information is available at any stage during the workflow process.
  • 38. Chapter 3 – Creating a basic workflow © www.ciaops.com 11 December 2012 Page 38 If you View All Site Content (in the upper left above the Quick Start menu) you will find a Task list corresponding to your workflow (in this case called Document approval Tasks) if required for review. This tutorial has taken you through the steps of configuring and using a basic three state workflow that come standard with WSS v3.
  • 39. 4. Displaying an updating spreadsheet This tutorial will cover the creation of an updating Excel graph displayed in WSS v3. This can allows the display of a range of graphical results in WSS v3 directly linked and updated from a spreadsheet. The first step in the process is to create a spreadsheet including a graph using Excel. It is recommended that the graph be moved to its own sheet (in this case called Chart1).
  • 40. Chapter 4 – Displaying an updating spreadsheet © www.ciaops.com 11 December 2012 Page 40 Once the spreadsheet has been created, save it into a document library within your WSS v3 site (in this case Shared Documents). You can save directly to a WSS v3 document library in Excel by typing the URL (i.e. http://companyweb) into the File name field when you go to save the file and then navigate the WSS v3 from there.
  • 41. Chapter 4 – Displaying an updating spreadsheet © www.ciaops.com 11 December 2012 Page 41 Once the save is complete, if you display the WSS v3 document library in a browser you should see the spreadsheet file you just saved displayed (in this case forecast). Now return to the spreadsheet and select the chart tab (in this case Chart1). Then select Office Start Button | Save As | Other Formats.
  • 42. Chapter 4 – Displaying an updating spreadsheet © www.ciaops.com 11 December 2012 Page 42 Navigate to the same document library in WSS v3 if not already displayed. Change the Save as type field to Web page (*.htm, *.html). Next, select the option to save the chart rather than the entire workbook by selecting Selection: Chart in the Save: area towards the bottom of the Save As window. Now press the Publish button. You should now see the Publish as Web Page window appear. The chart should already be selected in the Choose: area, along with the filename which has a .htm extension and destination of the WSS v3 document library. If you wish this chart .htm file to be updated every time spreadsheet is saved then ensure you check the AutoRepuplish every time this workbook is saved option. If you also check the Open published web page in browser you will see the chart displayed as a web page which is recommended. Press the Publish button to complete the process.
  • 43. Chapter 4 – Displaying an updating spreadsheet © www.ciaops.com 11 December 2012 Page 43 The chart should now be displayed in your browser. Leave the page open so that the URL address can be copied and pasted into your WSS v3 site later. If you now examine the WSS v3 document library, which you may need to refresh in your browser, you should see a new file. This file will be the .htm chart that was just
  • 44. Chapter 4 – Displaying an updating spreadsheet © www.ciaops.com 11 December 2012 Page 44 published (in this case forecast). If you look closely at the Type icon you will notice a slight difference to the standard Excel file, denoting a published Excel file. To display the graph you will need to insert a web part into the desired page. Remember that web parts can only be added to web part pages generally. In this case a new web part page called graph has been created to host the Excel chart. Click the area Add a Web Part to continue.
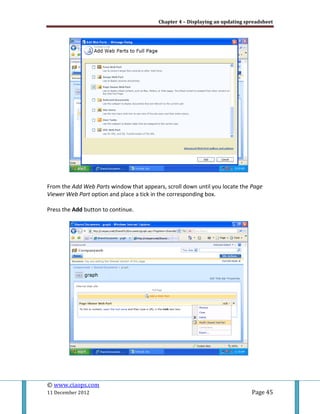
  • 45. Chapter 4 – Displaying an updating spreadsheet © www.ciaops.com 11 December 2012 Page 45 From the Add Web Parts window that appears, scroll down until you locate the Page Viewer Web Part option and place a tick in the corresponding box. Press the Add button to continue.
  • 46. Chapter 4 – Displaying an updating spreadsheet © www.ciaops.com 11 December 2012 Page 46 When the web part is displayed on the page select the Edit option in the top right of the web part and then Modify Shared Web Part from the menu that appears. When the properties of the web part are displayed enter the URL of the chart by copying and pasting from the previously viewed browser page. This URL should appear something like http://companyweb/Shared%20Documents/forecast.htm. Also ensure that the Web Page option is selected at the top of the column. Scroll down the page for further options.
  • 47. Chapter 4 – Displaying an updating spreadsheet © www.ciaops.com 11 December 2012 Page 47 You may need to adjust how the chart page is displayed within the web part. This can be done under the appearance options where you can set properties like the Title and the size of the window in which the chart appears. You may return at any point and re-edit these options if needed. When complete press the OK button to continue.
  • 48. Chapter 4 – Displaying an updating spreadsheet © www.ciaops.com 11 December 2012 Page 48 If you now also exit Edit Mode (top right hand side if displayed) you should see the Excel chart displayed on the WSS v3 page as shown above. To ensure that the chart does indeed update, return to the Excel spreadsheet and make a change. After saving the chart in Excel (remember, updates will only take place once you save the updated spreadsheet), return to the WSS v3 chart page. If you now press the refresh button in your browser you should see that the page has updated. If not, ensure that you selected the option to AutoRefresh the graph highlighted earlier. This tutorial has shown you how to publish an updating Excel chart to a .htm file and to display that chart via a web part in WSS v3.
  • 49. 5. Taking files offline with Outlook 2007 This tutorial is designed to explain how to take documents in WSS v3 Document Libraries offline with Microsoft Outlook 2007. To complete this process you will require access to a WSS v3 site via a web browser as well as Microsoft Outlook 2007 installed on your local system. To take files from a WSS v3 Document Library offline using Outlook 2007 firstly navigate to the Document Library in your WSS v3 Site using a web browser.
  • 50. Chapter 5 – Taking files offline with Outlook 2007 © www.ciaops.com 11 December 2012 Page 50 From the Actions menu item of the Document Library select Connect to Outlook item. If not already open, Outlook 2007 will launch. You will then be presented with a warning window like that shown above asking whether you wish to allow Outlook 2007 to connect to this document library.
  • 51. Chapter 5 – Taking files offline with Outlook 2007 © www.ciaops.com 11 December 2012 Page 51 Press the Yes button to allow this connection. If you press the Advanced button a new window appears with a number of additional options displayed that can be altered if desired. Make any changes and press the OK button to continue.
  • 52. Chapter 5 – Taking files offline with Outlook 2007 © www.ciaops.com 11 December 2012 Page 52 Once the WSS v3 Document Library is connected you will see that Outlook 2007 creates an additional folder (if it did not already exist) called SharePoint Lists under the current mail folders on the left of the screen. Underneath this folder you will find your linked SharePoint list (in this case Test – Shared Documents). If you click on this SharePoint List in Outlook 2007 you will see a list of the documents in the WSS v3 document library appear as items. Selecting any of these items will display a preview of that file (provided the appropriate file viewer is available in Outlook 2007). You can open an item in the list by double clicking on it or using the right mouse and selecting Open from the menu that appears.
  • 53. Chapter 5 – Taking files offline with Outlook 2007 © www.ciaops.com 11 December 2012 Page 53 You will normally be prompted as to whether you wish to open the file since the source may be un-trusted to the local machine. In this case select the Open button to continue.
  • 54. Chapter 5 – Taking files offline with Outlook 2007 © www.ciaops.com 11 December 2012 Page 54 The document will now open. Because the document opened is a Word document it will open in the version of Word we have on our local machine. A document will not open on the local machine unless the correct program to open that file is installed. When opened in Word you will notice a message bar, just below the ribbon menu that says: Offline Server Document. To modify this document, edit it offline and save it to the server later. You will also notice an Edit Offline button to the right. If you wish to edit the document press the Edit Offline button. A message like shown above will be displayed indicating that a local copy of the document will be stored in the SharePoint Drafts folder on the local machine. You will also be informed that this setting can be altered by changing the Offline Editing Options in Word. Press the OK button to continue.
  • 55. Chapter 5 – Taking files offline with Outlook 2007 © www.ciaops.com 11 December 2012 Page 55 The location of the SharePoint Draft folder by default is C:Documents and Settings<current_user>My DocumentsSharePoint Drafts as shown above. You can alter the offline Word options either by clicking the hyperlink shown in the previous window or selecting Office Button | Word Options | Save in Word.
  • 56. Chapter 5 – Taking files offline with Outlook 2007 © www.ciaops.com 11 December 2012 Page 56 When you do you will see a window similar to that displayed above. The middle section on the right displays the offline editing options which can be changed if desired. After you finish editing the document and close it,
  • 57. Chapter 5 – Taking files offline with Outlook 2007 © www.ciaops.com 11 December 2012 Page 57 You will now see in a small icon in the bottom right of the item in Outlook 2007 as well a message window in the document preview basically telling you that the changes made to the document only reside on the local machine and have not been updated to the WSS v3 Document Library. This is typically because the machine is now working in an ‘offline’ state, not connected to the original WSS v3 Document Library. When the local machine is able to connect to the original document library again and the same document is opened again, subsequently changed and closed, a message window will appear like that shown above indicating that the WSS v3 Document Library is available. The user is prompted to whether they wish to update the changes made offline. If the desired document changes are to be updated to the WSS v3 Document Library simply press the Update button. Once pressed you should see a copy of the document being saved to the WSS v3 Document Library as shown above.
  • 58. Chapter 5 – Taking files offline with Outlook 2007 © www.ciaops.com 11 December 2012 Page 58 The actual SharePoint Lists folder in Outlook 2007 is merely a PST file saved on the local workstation. You can determine the location of this PST by right mouse clicking on the SharePoint Lists item in Outlook 2007 and then selecting Properties from the menu that appears.
  • 59. Chapter 5 – Taking files offline with Outlook 2007 © www.ciaops.com 11 December 2012 Page 59 In this case you can see that SharePoint Lists item is a Personal Folder File format (i.e. PST) and by default its location is C:Documents and Settings<current_user>Local SettingsApplication DataMicrosoftOutlook. If you view this location with the Windows file manager you can see the .PST file (in this case SharePoint Lists.pst). Inside this PST file is initially kept a full copy of every document in your WSS v3 Document Library. If you wish to connect to a large document library it could result in a large PST file being created on the local system. It is also important to note that while the offline files remain read only they reside inside this PST. When you elect to edit them locally a copy is also stored in the SharePoint drafts folder also on the local machine as shown previously.
  • 60. Chapter 5 – Taking files offline with Outlook 2007 © www.ciaops.com 11 December 2012 Page 60 It is possible to remove the offline copy of the file from the local PST file by right mouse clicking on the item and selecting Remove Offline Copy from the menu that appears. After doing this you will no longer see a preview of that file. If you wish to have an offline copy for viewing simply click the Download this document button to copy that file from the WSS v3 document library back to the local .PST file again.
  • 61. Chapter 5 – Taking files offline with Outlook 2007 © www.ciaops.com 11 December 2012 Page 61 If you connect to a WSS v3 document library in Outlook 2007, subsequently take it offline and edit documents offline, you may face the issue of document version conflicts when you try and update a document to the WSS v3 Document Library upon return. This is because another person may have already updated that document in your absence. Any such document version conflicts will need to be handled by the document application software. To prevent document version conflicts you should ensure any documents you wish to take offline for editing are checked out in the document library beforehand. This checkout process can only be done via a browser in the WSS v3 Document Library and not via Outlook 2007. Simply select the options arrow to the right of the document name and select Check Out from the menu that appears.
  • 62. Chapter 5 – Taking files offline with Outlook 2007 © www.ciaops.com 11 December 2012 Page 62 When you do a check out you will be prompted whether you wish to use the local drafts folder. This again stores a copy of the file in your SharePoint Drafts folder as detailed previously. If you elect not to use the local draft folder, a copy will be made anyway when you elect to edit the document after opening it in Outlook 2007.
  • 63. Chapter 5 – Taking files offline with Outlook 2007 © www.ciaops.com 11 December 2012 Page 63 When a document is checked out from a document library the type icon appears with a little green arrow in the bottom right when viewed in a web browser. In this mode any other user will only be able to view this file and not make changes until the file has been checked back in. After the file has been checked out, and in this case saved to the local drafts folder, you will again see the icon in the bottom right of the item in Outlook 2007 and the message window in the document preview telling you that the document is currently on the local machine.
  • 64. Chapter 5 – Taking files offline with Outlook 2007 © www.ciaops.com 11 December 2012 Page 64 When the local machine has been returned ‘online’ and any offline documents have been updated you need to return to the WSS v3 Document Library via a web browser and check in any documents that were previously checked out so other people can edit them.
  • 65. Chapter 5 – Taking files offline with Outlook 2007 © www.ciaops.com 11 December 2012 Page 65 When you check in a document you will be prompted as to whether you wish the document to remain checked out and enter any comments about the version you wish. Normally, you will select the option for Yes to check the document back into the library and press the OK button to continue. Once the document has been checked back in you will no longer see a green arrow in the bottom right of the document type icon.
  • 66. Chapter 5 – Taking files offline with Outlook 2007 © www.ciaops.com 11 December 2012 Page 66 If you also return to Outlook 2007, you will no longer see any indication that there is a local edited copy.
  • 67. 6. Creating a wiki and linking to Outlook 2007 This tutorial will demonstrate the process of creating a wiki as well as making it available offline using Outlook 2007. You will need access to the WSS v3 site to complete this tutorial and have Outlook 2007 installed on the local machine. A wiki is a collection of web pages designed to enable anyone with access to contribute or modify content, using an online editor. Wikis are used to create collaborative websites and to provide a central location for business intelligence. The collaborative encyclopaedia Wikipedia is one of the best-known examples of a wiki and is one of the best places for a group of people to work with information rather than forwarding it around using email. To create a wiki, log into the WSS v3 site as at least a user with design rights. From the Site Actions menu in the top right of the screen select Create.
  • 68. Chapter 6 – Creating a wiki and linking to Outlook 2007 © www.ciaops.com 11 December 2012 Page 68 In the Create section select Wiki Page Library from the Libraries section at the left of the window. Next, provide a suitable name for the new wiki (in this case Knowledge Base) as well as a description. Also, select whether you wish this new wiki library to appear in the Quick Launch (which is the menu area to the left of most pages on a WSS v3 site).
  • 69. Chapter 6 – Creating a wiki and linking to Outlook 2007 © www.ciaops.com 11 December 2012 Page 69 When complete press the Create button to continue. When the wiki has been created you will be shown a screen like that displayed above. This is actually a document in the wiki that has been created by default. To view all the documents in the wiki select the wiki name (in this case Knowledge Base) from the bread crumb navigation at the top of the page or from under the Documents heading in the Quick Start menu (if you elected to display it there).
  • 70. Chapter 6 – Creating a wiki and linking to Outlook 2007 © www.ciaops.com 11 December 2012 Page 70 You should now see two default documents in this new wiki called Home and How To Use This Wiki Library. To delete these default documents select the item option menu from the arrow at the right of the Name field. Then select Delete from the menu that appears.
  • 71. Chapter 6 – Creating a wiki and linking to Outlook 2007 © www.ciaops.com 11 December 2012 Page 71 Once you have removed the item Home from the wiki when you now access that wiki in future you will see a list of all the items in the wiki much like when you view a Document Library. However, if you wish your wiki to display an opening page simply create a new item and call it Home. Now, when you select the wiki you will see the contents of the item called Home displayed. In summary, if you create a wiki item called Home it will always display when anyone visits the wiki. Removing the Home item will instead display a list of all the items in the wiki. Once these default documents have been deleted select the New item from the WSS v3 wiki menu to create a new item.
  • 72. Chapter 6 – Creating a wiki and linking to Outlook 2007 © www.ciaops.com 11 December 2012 Page 72 Give the item a title. The title has a few restrictions and can’t include some special characters like ./#)( etc. In the Wiki Content area you can now enter the information required. You can customize the text in this area using the menu bar that appears at the top of the box if required. When complete press the Create button.
  • 73. Chapter 6 – Creating a wiki and linking to Outlook 2007 © www.ciaops.com 11 December 2012 Page 73 You should now see the information you entered displayed in the article. Press the Edit button in the upper right to make changes to this item. As you can see from the above screen shot, you are able to easily customize the information displayed in the item at any time. This may include changing the text colour,
  • 74. Chapter 6 – Creating a wiki and linking to Outlook 2007 © www.ciaops.com 11 December 2012 Page 74 making the text bold or even changing the font. You will also note that any internet address will automatically be hyperlinked. When you have completed making additional changes to the item press the OK button to continue. Once again, you should see the item displayed with all the changes you just made. One of the benefits of the WSS v3 wiki is that it automatically tracks changes. To view these changes select the History link in the upper right hand side of the screen.
  • 75. Chapter 6 – Creating a wiki and linking to Outlook 2007 © www.ciaops.com 11 December 2012 Page 75 You should now see the number of versions of the document displayed on the left hand side (in this case 2.0). You will also notice that version additions are marked in beige and deletions in grey. You can also select to edit the item, delete the item, manage item permissions, check the item out, view the version history and set up alerts on this item from the menu. When complete press the OK button to continue.
  • 76. Chapter 6 – Creating a wiki and linking to Outlook 2007 © www.ciaops.com 11 December 2012 Page 76 When you edit a wiki item you are able to also make changes to the base HTML. To do this select a wiki item and then select the Edit link. To work with the HTML directly select the Edit HTML Source button (last one on top row) once you are editing the item. A separate window will now appears showing you the HTML code for that item. Simply make the required changes and press the OK button to continue.
  • 77. Chapter 6 – Creating a wiki and linking to Outlook 2007 © www.ciaops.com 11 December 2012 Page 77 If you now return to the History link for that item, you will see that, in this case, three separate versions of this item have been recorded. Select the Version History item on the menu bar that appears across the top of the item.
  • 78. Chapter 6 – Creating a wiki and linking to Outlook 2007 © www.ciaops.com 11 December 2012 Page 78 You can now browse through the exact information for each separate version of the item in a single screen. You also have the option to Delete All Versions here which will save disk space. If you return to the page history again and select a previous version on the left hand side (in this case version 2.0) it will be displayed. You now have the option, via the menu bar to Restore this version of the item. This will delete the current version and overwrite it with the version that you are viewing. This allows you to recover from any mistakes or errors in that item.
  • 79. Chapter 6 – Creating a wiki and linking to Outlook 2007 © www.ciaops.com 11 December 2012 Page 79 When you create a wiki item you can also easily create a link to another wiki item. This is recommended practice since it is much better to have a large amount of smaller documents about specific topics than a few very large ones. To create a link to a new wiki item, even if the page doesn’t already exist, simply place the text inside double square brackets (i.e. [[ ]]). As before, when editing is complete simply press the OK button.
  • 80. Chapter 6 – Creating a wiki and linking to Outlook 2007 © www.ciaops.com 11 December 2012 Page 80 When you now view the document you will see that the text you enclosed in double brackets has a broken line underneath it and is in fact hyperlinked. If you now click on the hyperlinked words you will be automatically taken to that item in the wiki.
  • 81. Chapter 6 – Creating a wiki and linking to Outlook 2007 © www.ciaops.com 11 December 2012 Page 81 If the item link which you just selected does not already exist in the WSS v3 wiki then you will be automatically placed in the edit mode for this item so it can be created. You also note that the Name field has already been completed since this is what is linked. To complete the process simply add the required information to the item and press the OK button. By allowing you to create links before you actually create the wiki items WSS v3 speeds up the process of collaboration.
  • 82. Chapter 6 – Creating a wiki and linking to Outlook 2007 © www.ciaops.com 11 December 2012 Page 82 Returning to the wiki library you should see the new document you just created. Using the View option on the right hand side you can change the view of the wiki to only see certain documents that meet that criteria. You can also create your own views if desired.
  • 83. Chapter 6 – Creating a wiki and linking to Outlook 2007 © www.ciaops.com 11 December 2012 Page 83 The most logical method for taking wiki information offline is to connect it with Outlook 2007. To do this, navigate to the wiki library and select Actions from the menu. From the menu that appears select Connect to Outlook. If Outlook is not already running it will be launched. You will then be prompted as to whether you wish to connect to this SharePoint Document library.
  • 84. Chapter 6 – Creating a wiki and linking to Outlook 2007 © www.ciaops.com 11 December 2012 Page 84 Select Yes to accept the connection. Once the connection has been made you will find the Wiki information under SharePoint Lists. However, when you select the list (in this case Test – Wiki) and an item (in this case about ping.aspx) you will see that you receive no preview. This is because there is currently no viewer for the wiki items (.aspx pages). This limitation is a major drawback of connecting wikis to Outlook.
  • 85. Chapter 6 – Creating a wiki and linking to Outlook 2007 © www.ciaops.com 11 December 2012 Page 85 An alternate connection method is to use an RSS feed. Return to the WSS v3 wiki library and select Actions from the menu and then View RSS Feed from the menu that appears. You can then copy and paste this RSS feed into Outlook (which is also an RSS reader).
  • 86. Chapter 6 – Creating a wiki and linking to Outlook 2007 © www.ciaops.com 11 December 2012 Page 86 This now allows you to view each wiki item as shown above. Another major issue with WSS v3 wikis is that you can’t simply cut and paste an image into a wiki item. An image will only appear in a WSS v3 wiki if it referenced via a link. Thus, images that already appear on the Internet can be linked as well as images that appear in the WSS v3 Picture Library can be easily added but simply cutting and pasting from another document won’t work. Thus, if you wish to add custom images to you wiki you need to ensure that they already exist in the WSS v3 Picture Library before they are linked to the wiki item using the insert image button. The above screen shot shows what happens when you press the Insert Image button. You are requested to enter a link to the image you wish to display, which you need to know beforehand. Despite some limitation WSS v3 wiki can utilized to great effect in most businesses.
  • 87. 7. Mapping a network place This tutorial will cover how to create a standard Windows network place that points to a WSS v3 Document Library. You will need access to a local workstation and need to know the address of the WSS v3 Document Library you wish to directly map to. On a local workstation select the option to view Network Places after logging in as the required user.
  • 88. Chapter 7 –Mapping a network place © www.ciaops.com 11 December 2012 Page 88 Select the option to Add a Network Place. In this case click Next to continue with the wizard.
  • 89. Chapter 7 –Mapping a network place © www.ciaops.com 11 December 2012 Page 89 Click Next again to continue. Enter the address of the WSS v3 Document Library, in this case http://companyweb/shared documents. Press Next to continue.
  • 90. Chapter 7 –Mapping a network place © www.ciaops.com 11 December 2012 Page 90 Provide a descriptive name for the new network place, in this case ‘shared documents on companyweb’. Leave the Open this network place when I click Finish checked.
  • 91. Chapter 7 –Mapping a network place © www.ciaops.com 11 December 2012 Page 91 Press the Finish button to complete the process. The network place should now be displayed and it should display the files in the WSS v3 Document Library.
  • 92. Chapter 7 –Mapping a network place © www.ciaops.com 11 December 2012 Page 92 Now, when you use any application you can navigate to the network place you just created that points to the SharePoint Document Library just like any other file location. If you use Windows Explorer you should also be able to browse to this location under My Network Places. The ability to create and edit documents here is determined by the user rights within WSS v3.
  • 93. 8. Working with picture libraries Picture libraries in WSS v3 work in a number of different ways from regular Document Libraries. The reason for this is that they are designed specifically for operation with images. In most cases you access your Picture Library by clicking on the name of the library as it appears in the left hand side Quick Start menu (in this case Images). When clicked you should now a thumbnail preview of all the images in the library. If you click on any of the images you will be taken to a more detailed view.
  • 94. Chapter 8 – Working with picture libraries © www.ciaops.com 11 December 2012 Page 94 Here you can perform a number of tasks, including editing the item, managing permissions and so on. If you now again click on the image you will be the full image only in your browser like so:
  • 95. Chapter 8 – Working with picture libraries © www.ciaops.com 11 December 2012 Page 95 Uploading multiple images to a Picture Library You can upload images into a Picture Library in much the same way that you can with Document Libraries however there are number of differences when you wish to upload multiple documents to the Picture Library. The first step in the process of uploading multiple documents is to select Upload Multiple Pictures from the Upload menu item in the main view of the Picture Library. It is important to note that the Picture Library is currently using the All Pictures view. You should now see a page like that shown above. This indicates that the actual uploading process is going to be handled by another program.
  • 96. Chapter 8 – Working with picture libraries © www.ciaops.com 11 December 2012 Page 96 That program is the Microsoft Office Picture Manger that comes as part of Microsoft Office. Thus, you simply use this application to locate the images you wish to upload and when complete press the Upload and Close button in the lower right of the screen. Once you press this button you will see in the lower left of the screen a progress bar indicating the transfer of the images you have selected.
  • 97. Chapter 8 – Working with picture libraries © www.ciaops.com 11 December 2012 Page 97 When the process is complete, the Microsoft Office Picture Manager should now close and you will be returned to the above WSS v3 page. Simply click on the link Go Back to “Images” to return to your Picture library. Once back at the picture library you should now see the additional images you select appear in the list.
  • 98. Chapter 8 – Working with picture libraries © www.ciaops.com 11 December 2012 Page 98 Using the Microsoft Office Picture Manager program can prove cumbersome at times. An alternate method to upload multiple documents is to firstly change the view of the Picture Library from the default All Pictures to Explorer View. You do this by selecting Explorer View from the View menu in the top right hand side of the Picture Library as shown above. In Explorer View you will see the images in the library displayed slightly differently from what you saw before.
  • 99. Chapter 8 – Working with picture libraries © www.ciaops.com 11 December 2012 Page 99 To upload multiple images into the library now, simply open your normal Windows Explorer file manager, locate the files you desire to upload and drag and drop them into the Explorer View page in the WSS v3 page. Once you have dropped the images into the WSS v3 Picture Library you should see them being copied across like shown above.
  • 100. Chapter 8 – Working with picture libraries © www.ciaops.com 11 December 2012 Page 100 The new images should now appear in the Picture Library. If you now change the view back to All Pictures all the images should now appear as the thumbnails as they did before.
  • 101. Chapter 8 – Working with picture libraries © www.ciaops.com 11 December 2012 Page 101 A third method to upload multiple images is to firstly map a network place to the Picture Library, as has been shown before for Document Libraries in Section 16.8. When this mapping is complete the Picture Library should appear like: You can change the view of the files just as you would any other folder using Windows Explorer.
  • 102. Chapter 8 – Working with picture libraries © www.ciaops.com 11 December 2012 Page 102 Simply select View | Thumbnails to see previews of all the images in the library. Because the Picture Library is now being displayed effectively in Explorer View you will notice a number of additional folders that generally remain hidden in the WSS v3 library. It is important that these folders are not altered.
  • 103. Chapter 8 – Working with picture libraries © www.ciaops.com 11 December 2012 Page 103 To upload multiple images here simply copy the desired files from another Windows Explorer windows and return to the WSS v3 mapped Picture Library. Then right mouse click and select Paste from the menu that appears. You should then see the images being copied over into the location.
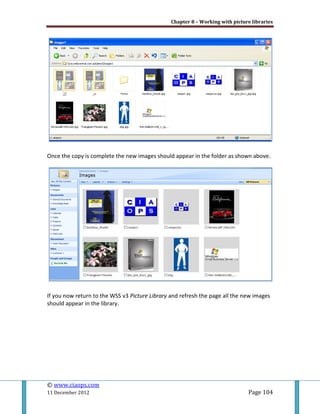
  • 104. Chapter 8 – Working with picture libraries © www.ciaops.com 11 December 2012 Page 104 Once the copy is complete the new images should appear in the folder as shown above. If you now return to the WSS v3 Picture Library and refresh the page all the new images should appear in the library.
  • 105. 9. Implementing shared OneNote OneNote is an electronic version of a paper notebook where you can record all sorts of information that you probably now typically keep on paper. You enter the information into OneNote in a variety of ways including typing, copying and pasting as well as using a stylus if available. You can also easily draw diagrams and include other graphics to enhance the information that you save. OneNote allows you to easily edit and relocate your information. You can quickly and easily create more space at the bottom of a page, move a section to another location or create new pages and sections quickly and easily. You can even have multiple notebooks for each different type of information. When OneNote is installed it also installs a number of ‘clipping’ buttons to other applications like Outlook and Internet Explorer. This allows you to easily send information like emails or web pages directly to OneNote for later reference. As part of this clipping service, OneNote will tag your information so you know exactly where it came from for later reference if required. By default, OneNote creates notebooks on your local computer. It is however also possible to save these notebooks in a shared location such as a File or SharePoint server. Once the notebooks are saved in a shared location they can be accessed by multiple people. This allows a team to easily collaborate and share information such as emails and projects. When changes are made they are immediately updated so that they are available to all users of the notebook. If the notebooks are saved in a shared location it is possible to work with them offline and update the shared copy when back online. Using this feature it is possible to locate OneNote notebooks on shared locations on the Internet and have them available to users connected to the Internet. When these users are not connected to the Internet they can still work on their local copy of the notebook and update the shared copy when they return to being online. This tutorial will show you how to create a shared OneNote notebook on a SharePoint server that is hosted on the Internet.
  • 106. Chapter 9 – Implementing shared OneNote © www.ciaops.com 11 December 2012 Page 106 The first step is to ensure that you have OneNote installed on your local machine. If you do not already have a copy you can download a free trial copy from: http://trial.trymicrosoftoffice.com/trialaustralia/product.aspx?re_ms=oo&family=oneno te&culture=en-AU Once installed on your machine open OneNote, like shown above. You may find a number of demonstration notebooks are loaded by default. You can either close these or select to continue.
  • 107. Chapter 9 – Implementing shared OneNote © www.ciaops.com 11 December 2012 Page 107 To create a new shared OneNote notebook you will first need at least contributor rights on a SharePoint site, whether hosted on a local server or on the Internet. You will also need to know the location (directory or URL) into which the new notebooks will be saved prior to creating the notebook. It is recommended that you create a separate document library for saving OneNote notebooks to keep the same content types together but this is not absolutely necessary. Once you have this information select File | New | Notebook from the menu.
  • 108. Chapter 9 – Implementing shared OneNote © www.ciaops.com 11 December 2012 Page 108 You will then be prompted for a notebook name and template style for the new notebook. It is recommended that you keep the notebook name as short but descriptive as possible and avoid using special characters like spaces, question marks, exclamation marks and so on. Once you have selected these options press the Next button to continue.
  • 109. Chapter 9 – Implementing shared OneNote © www.ciaops.com 11 December 2012 Page 109 You will now be prompted for the location in which you wish to store the notebook. The default option is usually ‘I will use it on this computer’, however to allow sharing select the last option, ‘Multiple people will share the notebook’ and in this case because the notebook will be hosted on a SharePoint server select the option ‘On a server’. Press the Next button to continue. You will now need to enter the path or URL of the location in which you wish to store the notebook. Remember that you require the ability to create files in that location. In this case, the new notebook is being stored on a SharePoint server that is hosted on the Internet, so the full URL is entered. You can also elect to send an email to others to let them know about this new shared notebook but it is recommended that you uncheck this option because identical emails can be sent out once the notebook has been created. When you have entered the required information select the Create button to continue.
  • 110. Chapter 9 – Implementing shared OneNote © www.ciaops.com 11 December 2012 Page 110 If the location in which you have chosen to store the new notebook requires a password for access you will need to enter it now. If you are storing the new notebook on an internal server then you will normally not be prompted for credentials as they will automatically be passed through to the server for you. Press the OK button once you have entered your login details.
  • 111. Chapter 9 – Implementing shared OneNote © www.ciaops.com 11 December 2012 Page 111 You should now see a new notebook displayed in OneNote. You will notice that near the notebook name, in the upper left of the screen, is a sync icon. In this case it is green which indicates that the information on the server and the information displayed to you are the same. Once you start entering information into this notebook it will automatically be synced with the server in the background. This process will also update any one else who is working with the notebook from the server. If you now visit the location where the notebook is stored on the SharePoint server, you will find a folder with the name of the notebook in the document library (in this case Work).
  • 112. Chapter 9 – Implementing shared OneNote © www.ciaops.com 11 December 2012 Page 112 If you drill into that folder you will find the contents of that notebook displayed as single files. In the above screen shot you can see only a single file as that is all that there currently is in our new notebook.
  • 113. Chapter 9 – Implementing shared OneNote © www.ciaops.com 11 December 2012 Page 113 Once you update the notebook and add more pages you will see them appear in the folder in the document library. Although a notebook stored on a SharePoint server will automatically synchronize in the background it is possible to force this synchronization process at any time. To do this select File | Sync | Sync All Notebooks Now or simply press the F9 key. When synchronization occurs, the green sync icon next to the notebook name in the upper left of the screen will spin. Once it stops spinning the synchronization is complete. If you return to the notebook after closing the OneNote application you will find that OneNote automatically opens the notebook for you. However it merely opens the last local copy of the notebook it has stored. It is possible that additional updates have been
  • 114. Chapter 9 – Implementing shared OneNote © www.ciaops.com 11 December 2012 Page 114 made to the notebook since it was closed so you need to ensure that these changes are synchronized. As you can see above, when you open the notebook at the top of the page will appear a warning that prompts you that you need to login to get the latest changes to the notebook from the remote server. This will normally not occur with internal servers as they typically automatically pass through any login credentials. To login to the remote notebook to access any changes simply click on the warning message and select the location of the notebook that appears. You will then be prompted to enter your login details for the remote notebook. Press the OK button when complete.
  • 115. Chapter 9 – Implementing shared OneNote © www.ciaops.com 11 December 2012 Page 115 Upon correct login you should see the green sync icon near the notebook name spin as any updates are loaded to your local copy. The time that this synchronization takes depends on how many changes have occurred since the local notebook was last synchronized with the server. When the synchronization process is complete the sync icon will stop spinning and remain green. Depending on how you have your notebook view configured you may also see a green tick with the sync icon indicating that the process is complete. Now the copy of the local notebook and the one on the server are the same. If a file is embedded in a OneNote notebook that is stored on a SharePoint server that file can be updated without the need for OneNote on the remote desktop.
  • 116. Chapter 9 – Implementing shared OneNote © www.ciaops.com 11 December 2012 Page 116 This is because the file that is embedded in the OneNote notebook page is actually saved in a separate folder in the document library as shown above (in this case the folder called Page 2_onefiles).
  • 117. Chapter 9 – Implementing shared OneNote © www.ciaops.com 11 December 2012 Page 117 Inside this folder you will find the embedded document which can be updated without OneNote and any updates will also be pushed out to the OneNote notebooks when they synchronize. You can view the storage location of a OneNote notebook by simply right mouse clicking on the notebook name in the upper left and selecting Properties from the menu that appears.
  • 118. Chapter 9 – Implementing shared OneNote © www.ciaops.com 11 December 2012 Page 118 You will then see the path to which the notebook is displayed as well as an option to change its location if desired. Press the OK button when complete.
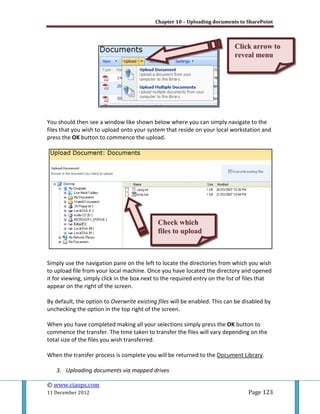
  • 119. 10.Uploading documents to SharePoint The Shared Documents area in SharePoint is called a Document library. In here you can store any sort of file you wish including things like documents and spreadsheets. This paper will cover the following topics: 1. Uploading a single document via a web browser 2. Uploading multiple documents via a web browser 3. Uploading documents via mapped drives 1. Uploading a single document via a web browser To upload a single document click on the Upload button from the menu bar of the Document Library. You should now see a screen like: CClliicckk UUppllooaadd
  • 120. Chapter 10 – Uploading documents to SharePoint © www.ciaops.com 11 December 2012 Page 120 If you click the Browse button you can navigate to any file on your local system like so: After selecting the file to be uploaded and pressing the Open button the location of that file will be transferred to the Name field in the SharePoint site. CClliicckk BBrroowwssee SSeelleecctt ddeessiirreedd ffiillee aanndd pprreessss OOppeenn bbuuttttoonn
  • 121. Chapter 10 – Uploading documents to SharePoint © www.ciaops.com 11 December 2012 Page 121 To upload the selected document to the Shared Documents area of SharePoint, simply press the OK button. PPrreessss OOKK ttoo uuppllooaadd NNeeww ddooccuummeenntt nnooww iinn lliibbrraarryy
  • 122. Chapter 10 – Uploading documents to SharePoint © www.ciaops.com 11 December 2012 Page 122 You should now see the document you selected appear in the list for the Document Library. In this case, a Word document has been uploaded and the Word icon appears at the beginning of the line to indicate the document type. You can repeat this process of selecting Upload in a Document Library, then pressing the Browse button and locating the desired file and finally selecting OK to upload documents. 2. Uploading Multiple Documents via a web browser SharePoint supports the ability to upload multiple documents, however it only does so on machines that have Microsoft Office installed. This means that unless you have Microsoft Office installed on the machine from which you plan to upload multiple documents to SharePoint that functionality will not be available. If you access a SharePoint Document Library from a machine without Microsoft Office installed and select the pull down arrow next to Upload from the menu you will only see one menu option like so: However, if you repeat the process using a machine that has Microsoft Office installed you will see two menu options like so: Use the Upload multiple documents so you can transfer your documents by simply selecting the files required and pressing the OK button. To do this click the Upload multiple document option from the menu after clicking on the arrow to the right of Upload to reveal the drop down menu.
  • 123. Chapter 10 – Uploading documents to SharePoint © www.ciaops.com 11 December 2012 Page 123 You should then see a window like shown below where you can simply navigate to the files that you wish to upload onto your system that reside on your local workstation and press the OK button to commence the upload. Simply use the navigation pane on the left to locate the directories from which you wish to upload file from your local machine. Once you have located the directory and opened it for viewing, simply click in the box next to the required entry on the list of files that appear on the right of the screen. By default, the option to Overwrite existing files will be enabled. This can be disabled by unchecking the option in the top right of the screen. When you have completed making all your selections simply press the OK button to commence the transfer. The time taken to transfer the files will vary depending on the total size of the files you wish transferred. When the transfer process is complete you will be returned to the Document Library. 3. Uploading documents via mapped drives CClliicckk aarrrrooww ttoo rreevveeaall mmeennuu CChheecckk wwhhiicchh ffiilleess ttoo uuppllooaadd
  • 124. Chapter 10 – Uploading documents to SharePoint © www.ciaops.com 11 December 2012 Page 124 The first step in the process is map a drive on your local computer that refers to the SharePoint site. From there you can use this mapped location as you would any other drive on your system, for example to simply drag and drop files between the locations. The method of setting up a mapped drive varies slightly between versions of Windows. Uploading documents via network places in Windows XP This section will cover how to create a standard Windows XP network place that points to a SharePoint Document Library. You will need access to a local workstation and need to know the address (URL) of the SharePoint Document Library you wish to directly map to. On a local workstation running Windows XP select the option My Network Places from the Start menu after logging in as the required user. SSeelleecctt MMyy NNeettwwoorrkk PPllaacceess
  • 125. Chapter 10 – Uploading documents to SharePoint © www.ciaops.com 11 December 2012 Page 125 Select the option to Add a Network Place located at the top left of the screen. SSeelleecctt AAdddd aa nneettwwoorrkk ppllaaccee
  • 126. Chapter 10 – Uploading documents to SharePoint © www.ciaops.com 11 December 2012 Page 126 In this case click Next to continue with the wizard. Click Next again to continue.
  • 127. Chapter 10 – Uploading documents to SharePoint © www.ciaops.com 11 December 2012 Page 127 Enter the address of the SharePoint Document Library, in this case http://companyweb/shared documents. Press Next to continue. EEnntteerr SShhaarreePPooiinntt SSiittee aaddddrreessss
  • 128. Chapter 10 – Uploading documents to SharePoint © www.ciaops.com 11 December 2012 Page 128 Provide a descriptive name for the new network place, in this case ‘shared documents on companyweb’.
  • 129. Chapter 10 – Uploading documents to SharePoint © www.ciaops.com 11 December 2012 Page 129 Leave the Open this network place when I click Finish checked. Press the Finish button to complete the process.
  • 130. Chapter 10 – Uploading documents to SharePoint © www.ciaops.com 11 December 2012 Page 130 The network place should now be displayed and it should display the files in the SharePoint Document Library.
  • 131. Chapter 10 – Uploading documents to SharePoint © www.ciaops.com 11 December 2012 Page 131 Now, when you use any application you can navigate to the network place you just created that points to the SharePoint Document Library just like any other file location.
  • 132. Chapter 10 – Uploading documents to SharePoint © www.ciaops.com 11 December 2012 Page 132 If you use Windows Explorer you should also be able to browse to this location under My Network Places. The ability to create and edit documents here is determined by the user rights within the SharePoint site. Upload a document via network places in Windows 7 or Vista Windows 7 and Vista provide the ability to map directly to a SharePoint site without the need to create a network place. To do this firstly launch Windows Explorer which is normally the folder icon just to the right of the start button as shown below. CClliicckk WWiinnddoowwss EExxpplloorreerr
  • 133. Chapter 10 – Uploading documents to SharePoint © www.ciaops.com 11 December 2012 Page 133 Once Windows Explorer has launched select Computer from the window on the left. CClliicckk CCoommppuutteerr
  • 134. Chapter 10 – Uploading documents to SharePoint © www.ciaops.com 11 December 2012 Page 134 Upon selecting computer you should see all the drives that are available on your local computer. You will also notice a menu bar appear just below the address bar at the top of the window. One of these items is Map a network drive. Click here to proceed. CClliicckk MMaapp nneettwwoorrkk ddrriivvee
  • 135. Chapter 10 – Uploading documents to SharePoint © www.ciaops.com 11 December 2012 Page 135 A Map Network Drive window will now appear asking you to select a drive letter and a folder. If select the arrow to the right of the drive you can any drive letter. Into the folder area you will need to type the address (URL) of your SharePoint site or SharePoint Document Library like shown below. SSeelleecctt DDrriivvee lleetttteerr
  • 136. Chapter 10 – Uploading documents to SharePoint © www.ciaops.com 11 December 2012 Page 136 You can also choose whether you wish to have this drive reconnect at login and whether you wish to access this location with a different set of credentials that you are currently using on your network. If you are planning to continue to use this SharePoint location it is recommended that you check the box Reconnect at logon. When you have made your selections press the Finish button. EEnntteerr ssiittee UURRLL UUppllooaadd
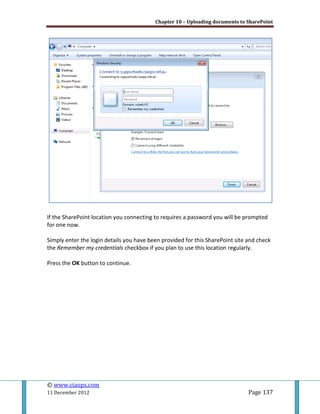
  • 137. Chapter 10 – Uploading documents to SharePoint © www.ciaops.com 11 December 2012 Page 137 If the SharePoint location you connecting to requires a password you will be prompted for one now. Simply enter the login details you have been provided for this SharePoint site and check the Remember my credentials checkbox if you plan to use this location regularly. Press the OK button to continue.
  • 138. Chapter 10 – Uploading documents to SharePoint © www.ciaops.com 11 December 2012 Page 138 The mapping process should now be complete and you will see the SharePoint location displayed as a drive under your Computer on the left hand side window. In the title for the drive you will see the drive letter you selected previously (in this case Z:) and the SharePoint site (in this case supportweb.ciaops.net.au). If you expand this location you will see any other SharePoint resources that this mapping now has access to. Now that you have successfully mapped a network drive to a SharePoint location you can easily drag and drop files between your local machine and the SharePoint site. You can also work directly with SharePoint files in this drive from any application you have on your local machine.
  • 139. Conclusion Hopefully this book has shown you how to take more advantage of what Windows SharePoint Server v3.0 has to offer. You should now see how important the integration is between Windows SharePoint Services v3.0 and Microsoft Office, it should be part of any SharePoint solution. This book has taken you beyond the basics with SharePoint and hopefully given you the skills to implement similar solution on your own systems. Importantly, what is shown here is only a start to the more advanced ways of working with Windows SharePoint Services v3.0. Functionality like workflows can provide very powerful business solutions that really enhance the productivity of any business but it is up to you to take what you have learned here and apply it your own business. If you have any feedback about any of the information detailed here please contact me via [email protected]. I would also encourage you to access the free resources at http://www.ciaops.com/downloads as well as keep up to date with my SharePoint discoveries at http://supportweb.ciaops.net.au/blog. I wish you every success with SharePoint and thank you for taking the time to read this book. - Robert Crane (2011)
  • 140. About This book is designer for those that want to take Windows SharePoint Services v 3.0 beyond the basics. Implementing things like workflows and integrating with Microsoft Office allows you to unleash so much more of the power behind SharePoint. Every chapter in this book will give your techniques you can use with SharePoint to make it work better in your business. Apart from workflows you’ll learn how to create linking with Office products to create updating charts, the ability to take SharePoint information offline and more. Even though this book focuses on Windows SharePoint Services v3.0 the information is relevant for all versions of SharePoint and provides a quick way for readers to get up to speed with this powerful tool from Microsoft. If you want to make the most of Windows SharePoint Services then this book is for you. Author Robert Crane BE MBA MCP Robert has a degree in Electrical Engineering as well as Masters of Business Administration. He is also a Small Business Specialist and Microsoft Certified SharePoint Professional. Robert has over 15 years of IT experience in a variety of fields and positions, including working on Wall St in New York. He is the founder and principal of the Computer Information Agency. Apart from resolving client technical issues, Robert continues to present at seminars as well as write on a number for topics. He can be contacted via [email protected].