SlideShare a Scribd company logo
Lecture 4: Shoot Basketball
Game #2
Dr. Kobkrit Viriyayudhakorn

iApp Technology Limited

kobkrit@iapp.co.th
ITS488 (Digital Content Creation with Unity - Game and VR Programming)
Lecture 4: ITS488 Digital Content Creation with Unity - Game and VR Programming
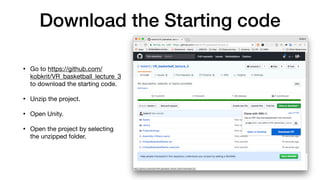
Download the Starting code
• Go to https://github.com/
kobkrit/VR_basketball_lecture_3
to download the starting code.

• Unzip the project.

• Open Unity.

• Open the project by selecting
the unzipped folder.
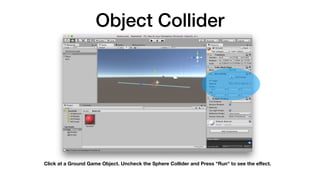
Object Collider
Click at a Ground Game Object. Uncheck the Sphere Collider and Press "Run" to see the effect.
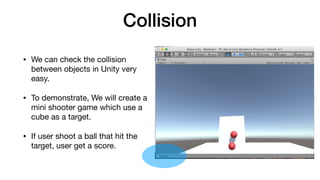
Collision
• We can check the collision
between objects in Unity very
easy.

• To demonstrate, We will create a
mini shooter game which use a
cube as a target.

• If user shoot a ball that hit the
target, user get a score.
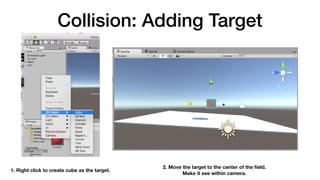
Collision: Adding Target
1. Right click to create cube as the target.
2. Move the target to the center of the field. 

Make it see within camera.
Collision: Counting Score
3. Change the name of the cube in the inspector,

as "Target"
4. Add the C# Script 5. Name it as "Score Count" and
Make it associated with the "Target".
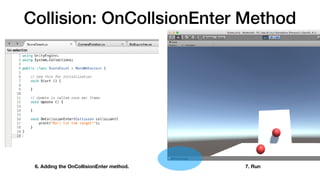
Collision: OnCollsionEnter Method
6. Adding the OnCollisionEnter method. 7. Run
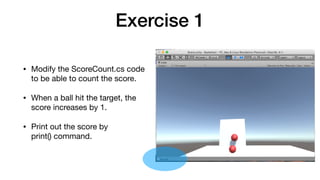
Exercise 1
• Modify the ScoreCount.cs code
to be able to count the score.

• When a ball hit the target, the
score increases by 1.

• Print out the score by

print() command.
Add multiple targets
• To complete the game, we are
going to have multiple targets,
as we have designed to have
multiple basketball’s
backboards

• We will cloning the target into
2-3 targets.

• Move the newly cloned target
to different locations.
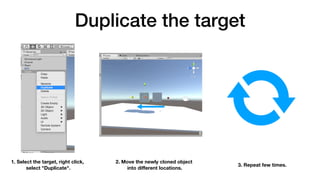
Duplicate the target
1. Select the target, right click,

select "Duplicate".
2. Move the newly cloned object

into different locations.
3. Repeat few times.
Local Score Problem
Press Run. We will see the local score problem. When we shoot a ball to
the same target, the score increase, but when we change the target, the
score will be reset to 1. We need to do the global score system.
Global Score System
1. Remove the duplicated target. 2. Select the target, and remove the Score Count component.
Global Score System #2
1. Create a new empty object, 

and name it "ScoreCounter"
2. Associate "ScoreCount.cs" code to

the ScoreCounter game object.
3. Create a new C# script file called

"DetectCollision.cs" and associate it

with the Target.
Global Score System #3
• Changing the method to other
name, like "IncreaseScore()"

• Add "public" in front of the
method to allow other classes
to call this method.

• By convention of the Unity, the
first letter of a method’s name
must be capitalized.
Edit your ScoreCount.cs to this content.
Global Score System #4
Make DetectCollision.cs call the ScoreCount’s Increase Score method, when there is a collision.
DetectCollision.cs
Run
Exercise 2: Create a target prefab.
• Use the prefab to make multiple targets

• Position them apart in the scene.

• Check if the score is update in one place.

• BONUS: If you can allow different targets to score differently.

• HINT: IncreaseScore() need an argument.
Making Multiple Scene
• We need the splash screen to
introduce the user about the game.

• We also need the end score screen to
show the final result of the game.

• We can make it by having multiple
scenes. One screen = One scene.
Making Multiple Scene #1
1. Create a new folder named "Scenes" 2. Move the scene that we already have 

into the Scenes folder by drag-and-drop.
3. Click, Press "Enter"

and rename it "2_Main"
Making Multiple Scene #2
4. Create a new Scene by right click, Create, Scene 5. Named it "1_Splash"
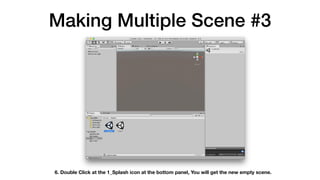
Making Multiple Scene #3
6. Double Click at the 1_Splash icon at the bottom panel, You will get the new empty scene.
Include Scenes into the Build
1. Go to File > Build Settings
2. Drag and drop both scenes into the "Scenes In Build".

***The order is very important***

"1_Splash" scene must be at the top of "2_Main" scene.
Moving one scene to another #1
1. Double click at the "1_Splash"
scene.

2. Create a new empty game
object named it "LevelManager"

3. Create a new C# script, named
it "LevelManager" as well.

4. Associate the C# script into the
Level Manager game object by
drag-and-drop.
Moving one scene to another #2
LevelManager.cs
Run
1_Splash
2_Main
SKIP IMMEDIATELY
Exercise 3: Trigger to next scene by spacebar
• Move from the 1_Splash scene to the 2_Main scene when user press
spacebar.

• Use GetKeyDown() method

• Seperate the logic for moving to the next scene in a new method.

• HINT: Edit at LevelManager.cs
Create Menu UI
1. Add the 1_Splash scene, change to 2D mode. 2. Create a new Canvas 3. Double click at "Canvas" game object

in the Hierarchy window or Zoom out a lot
(By middle mouse button).

You will see the boundary of the canvas.
Find image to put into canvas
1. Find in Google Image Search with the Noncommerical Reuse. 2. Download any image you like.
Import Images
1. Create a new folder called
"Images"

2. Drag and drop the download
image into that folder.
Add Image into Canvas
1. Select Canvas, Right click, UI, and Raw Image 2. Drag and drop the image into the RawImage’s Texture part.
Resize the Raw Image
• Make it bigger the canvas
by moving at the blue dot of
the Raw Image.

• Press Run to see the result.

• Try it in different screen
ratio. Resize the window in
different ways to make sure
that the raw image covered
all the display.
Exercise 4: Create a Game Over scene.
• Create a new scene

• Put it last in the build order.

• Add a canvas with the background image.

• Make it reachable from the game.
Adding Text into UI
1. Select the Canvas. Right-click, UI, Text
2. Select Text, Resize the text box by blue dot, Add text on the right

"Basketball Game", Change size, color, alignment as you wish.
Aerial is boring font.
1. Search Google for a matched font. 2. Download them.
Import Font into Unity
1. Create a new folder called "Fonts".

Drag and drop the font file into Unity
2. Select Text. Drag the font into Font box.

(GAME OF BRUSH font required ALL CAPITAL LETTERS)
Change text to match with the style.
Exercise 5: Complete Adding the Text
• Add "Hit space to play" instruction in the Splash Screen

• Add "Game Over" title in the Game Over Screen.

• Add "Hit space to try again" instruction in the Game Over Screen.

• Be Creative!!
Adding Button into UI
1. Add a button, by right-click at Canvas >

UI > Button.
2. Move the button to appropriate location.

Button always come with a text (as a child). 

Select the text, change front, change message as you wish.
Make it acts like a button
• Select the Button and
update their colors.

• Normal color

• Highlighted color

• Pressed color

• To give the feed back to
the user when the mouse
cursor is over a button.
Make Button OnClick() Working
1. Select Button. Press + at the On Click()

at the inspector window
2. Drag and drop the Level Manager Game Object to the OnClick Object Textbox
Make Button OnClick() Working #2
3. At LevelManager.cs

Add "public" at LoadNextScene() method 

to make it visible for Unity.
4. At the On Click() property of the button

Function > Level Manager > LoadNextScene()
Exercise 6: Add a "Play Again" Button
• Edit in the LevelManager script.

• You will need a LoadPreviousLevel() method.

• Add the button.

• Link it.
Adding Timer into the game!
Exercise 7: Progress after N seconds.
• Make the timeTillNextLevel configurable.

• Progress to next level when time run out.

• Make the default behavior to never progress.
Lecture 4: ITS488 Digital Content Creation with Unity - Game and VR Programming
Update TimeTillNextLevel for each Scene
Q/A

More Related Content

What's hot (19)

PPTX
Unity - Essentials of Programming in Unity
NexusEdgesupport
 
PDF
Run and jump tutorial (part 3) behaviours
Muhd Basheer
 
PPTX
unity basics
Reham Maher El-Safarini
 
PDF
DSC RNGPIT - Getting Started with Game Development Day 1
DeepMevada1
 
PPTX
Game Development with Unity
davidluzgouveia
 
PPTX
Hands On with the Unity 5 Game Engine! - Andy Touch - Codemotion Roma 2015
Codemotion
 
PDF
Presentación Unity
Laura Milena Parra Navarro
 
PPTX
Unity 3D, A game engine
Md. Irteza rahman Masud
 
DOCX
2d game engine workflow
luisfvazquez1
 
PPTX
Game Development with Unity - by Mickey MacDonald
Canada's Technology Triangle .NET User Group
 
PDF
Unity 3d
Srinivas Undinti
 
PDF
Unity introduction for programmers
Noam Gat
 
PPTX
Academy PRO: Unity 3D. Environment
Binary Studio
 
PPTX
Unity Game Engine
Vardan Meliksetyan
 
PDF
Mobile Game Development in Unity
Hakan Saglam
 
PDF
Systematic analysis of GWAP
Shih-Wen Huang
 
PPTX
Game development -session on unity 3d
Muhammad Maaz Irfan
 
PDF
Unity Introduction
Juwal Bose
 
PPT
Pb works howto
urse1515
 
Unity - Essentials of Programming in Unity
NexusEdgesupport
 
Run and jump tutorial (part 3) behaviours
Muhd Basheer
 
DSC RNGPIT - Getting Started with Game Development Day 1
DeepMevada1
 
Game Development with Unity
davidluzgouveia
 
Hands On with the Unity 5 Game Engine! - Andy Touch - Codemotion Roma 2015
Codemotion
 
Presentación Unity
Laura Milena Parra Navarro
 
Unity 3D, A game engine
Md. Irteza rahman Masud
 
2d game engine workflow
luisfvazquez1
 
Game Development with Unity - by Mickey MacDonald
Canada's Technology Triangle .NET User Group
 
Unity introduction for programmers
Noam Gat
 
Academy PRO: Unity 3D. Environment
Binary Studio
 
Unity Game Engine
Vardan Meliksetyan
 
Mobile Game Development in Unity
Hakan Saglam
 
Systematic analysis of GWAP
Shih-Wen Huang
 
Game development -session on unity 3d
Muhammad Maaz Irfan
 
Unity Introduction
Juwal Bose
 
Pb works howto
urse1515
 

Similar to Lecture 4: ITS488 Digital Content Creation with Unity - Game and VR Programming (20)

DOCX
Macromedia Flash Player Practical file
varun arora
 
PDF
Introduction
شكسبير ويليام
 
PDF
Run and jump tutorial (part 2) scenes
Muhd Basheer
 
PPTX
Polybot Onboarding Process
Nina Park
 
PPTX
PDT Engineering: ProE Tip #018
Product Development Technologies
 
KEY
ARTDM 170, Week 7: Scripting Interactivity
Gilbert Guerrero
 
PPT
Introduction to programming using Visual Basic 6
Jeanie Arnoco
 
PPTX
Keynote + Next Gen UIs.pptx
EqraKhattak
 
PDF
Gui builder
learnt
 
PPT
How to make ppt
Ali imran
 
PPTX
98 374 Lesson 05-slides
Tracie King
 
PPTX
Tutorial special mode e
Stella Gravois
 
PPTX
Scratch Pong Remix Tutorial
jwmcdonald24
 
PPT
Buttons In .net Visual Basic
manish maurya
 
PPTX
Apps in a Flash HCI
Jonathan Goldman
 
PDF
Make a match3
Fredy Alvarez Lamas
 
PDF
Instructional booklet on easy and effective Powerpoint design
YeonKyung Lee
 
PPT
How to present ppt presentation
Mathivanan Mba
 
PDF
Run and jump tutorial (part 1) actors
Muhd Basheer
 
Macromedia Flash Player Practical file
varun arora
 
Run and jump tutorial (part 2) scenes
Muhd Basheer
 
Polybot Onboarding Process
Nina Park
 
PDT Engineering: ProE Tip #018
Product Development Technologies
 
ARTDM 170, Week 7: Scripting Interactivity
Gilbert Guerrero
 
Introduction to programming using Visual Basic 6
Jeanie Arnoco
 
Keynote + Next Gen UIs.pptx
EqraKhattak
 
Gui builder
learnt
 
How to make ppt
Ali imran
 
98 374 Lesson 05-slides
Tracie King
 
Tutorial special mode e
Stella Gravois
 
Scratch Pong Remix Tutorial
jwmcdonald24
 
Buttons In .net Visual Basic
manish maurya
 
Apps in a Flash HCI
Jonathan Goldman
 
Make a match3
Fredy Alvarez Lamas
 
Instructional booklet on easy and effective Powerpoint design
YeonKyung Lee
 
How to present ppt presentation
Mathivanan Mba
 
Run and jump tutorial (part 1) actors
Muhd Basheer
 
Ad

More from Kobkrit Viriyayudhakorn (20)

PDF
Thai E-Voting System
Kobkrit Viriyayudhakorn
 
PPTX
Thai National ID Card OCR
Kobkrit Viriyayudhakorn
 
PPTX
Chochae Robot - Thai voice communication extension pack for Service Robot
Kobkrit Viriyayudhakorn
 
PDF
ศักยภาพของ AI สู่โอกาสใหม่แห่งการแข่งขันและความสำเร็จ (Thai AI updates in yea...
Kobkrit Viriyayudhakorn
 
PDF
Thai Text processing by Transfer Learning using Transformer (Bert)
Kobkrit Viriyayudhakorn
 
PDF
How Emoticon Affects Chatbot Users
Kobkrit Viriyayudhakorn
 
PPTX
หัวใจของปัญญาประดิษฐ์ (Gradient Descent ทำงานอย่างไร)
Kobkrit Viriyayudhakorn
 
PDF
Check Raka Chatbot Pitching Presentation
Kobkrit Viriyayudhakorn
 
PPTX
[Lecture 3] AI and Deep Learning: Logistic Regression (Coding)
Kobkrit Viriyayudhakorn
 
PPTX
[Lecture 4] AI and Deep Learning: Neural Network (Theory)
Kobkrit Viriyayudhakorn
 
PPTX
[Lecture 2] AI and Deep Learning: Logistic Regression (Theory)
Kobkrit Viriyayudhakorn
 
PDF
Lecture 12: React-Native Firebase Authentication
Kobkrit Viriyayudhakorn
 
PDF
Thai Word Embedding with Tensorflow
Kobkrit Viriyayudhakorn
 
PDF
Lecture 3 - ES6 Script Advanced for React-Native
Kobkrit Viriyayudhakorn
 
PDF
สร้างซอฟต์แวร์อย่างไรให้โดนใจผู้คน (How to make software that people love)
Kobkrit Viriyayudhakorn
 
PDF
Startup Pitching and Mobile App Startup
Kobkrit Viriyayudhakorn
 
PDF
React Native Firebase Realtime Database + Authentication
Kobkrit Viriyayudhakorn
 
PDF
React Native Firebase
Kobkrit Viriyayudhakorn
 
PDF
React-Native Lecture 11: In App Storage
Kobkrit Viriyayudhakorn
 
PDF
[React-Native Tutorial 10] Camera Roll / Gallery / Camera / Native Modules by...
Kobkrit Viriyayudhakorn
 
Thai E-Voting System
Kobkrit Viriyayudhakorn
 
Thai National ID Card OCR
Kobkrit Viriyayudhakorn
 
Chochae Robot - Thai voice communication extension pack for Service Robot
Kobkrit Viriyayudhakorn
 
ศักยภาพของ AI สู่โอกาสใหม่แห่งการแข่งขันและความสำเร็จ (Thai AI updates in yea...
Kobkrit Viriyayudhakorn
 
Thai Text processing by Transfer Learning using Transformer (Bert)
Kobkrit Viriyayudhakorn
 
How Emoticon Affects Chatbot Users
Kobkrit Viriyayudhakorn
 
หัวใจของปัญญาประดิษฐ์ (Gradient Descent ทำงานอย่างไร)
Kobkrit Viriyayudhakorn
 
Check Raka Chatbot Pitching Presentation
Kobkrit Viriyayudhakorn
 
[Lecture 3] AI and Deep Learning: Logistic Regression (Coding)
Kobkrit Viriyayudhakorn
 
[Lecture 4] AI and Deep Learning: Neural Network (Theory)
Kobkrit Viriyayudhakorn
 
[Lecture 2] AI and Deep Learning: Logistic Regression (Theory)
Kobkrit Viriyayudhakorn
 
Lecture 12: React-Native Firebase Authentication
Kobkrit Viriyayudhakorn
 
Thai Word Embedding with Tensorflow
Kobkrit Viriyayudhakorn
 
Lecture 3 - ES6 Script Advanced for React-Native
Kobkrit Viriyayudhakorn
 
สร้างซอฟต์แวร์อย่างไรให้โดนใจผู้คน (How to make software that people love)
Kobkrit Viriyayudhakorn
 
Startup Pitching and Mobile App Startup
Kobkrit Viriyayudhakorn
 
React Native Firebase Realtime Database + Authentication
Kobkrit Viriyayudhakorn
 
React Native Firebase
Kobkrit Viriyayudhakorn
 
React-Native Lecture 11: In App Storage
Kobkrit Viriyayudhakorn
 
[React-Native Tutorial 10] Camera Roll / Gallery / Camera / Native Modules by...
Kobkrit Viriyayudhakorn
 
Ad

Recently uploaded (20)

PPTX
Migrating Millions of Users with Debezium, Apache Kafka, and an Acyclic Synch...
MD Sayem Ahmed
 
PDF
Continouous failure - Why do we make our lives hard?
Papp Krisztián
 
PPTX
Human Resources Information System (HRIS)
Amity University, Patna
 
PDF
Streamline Contractor Lifecycle- TECH EHS Solution
TECH EHS Solution
 
PDF
GridView,Recycler view, API, SQLITE& NetworkRequest.pdf
Nabin Dhakal
 
PPTX
Comprehensive Guide: Shoviv Exchange to Office 365 Migration Tool 2025
Shoviv Software
 
PDF
iTop VPN With Crack Lifetime Activation Key-CODE
utfefguu
 
PDF
Capcut Pro Crack For PC Latest Version {Fully Unlocked} 2025
hashhshs786
 
PDF
Alexander Marshalov - How to use AI Assistants with your Monitoring system Q2...
VictoriaMetrics
 
PDF
GetOnCRM Speeds Up Agentforce 3 Deployment for Enterprise AI Wins.pdf
GetOnCRM Solutions
 
DOCX
Import Data Form Excel to Tally Services
Tally xperts
 
PPTX
Platform for Enterprise Solution - Java EE5
abhishekoza1981
 
PDF
Letasoft Sound Booster 1.12.0.538 Crack Download+ Product Key [Latest]
HyperPc soft
 
PPTX
Fundamentals_of_Microservices_Architecture.pptx
MuhammadUzair504018
 
PPTX
Engineering the Java Web Application (MVC)
abhishekoza1981
 
PPTX
How Odoo Became a Game-Changer for an IT Company in Manufacturing ERP
SatishKumar2651
 
PDF
Revenue streams of the Wazirx clone script.pdf
aaronjeffray
 
PPTX
Equipment Management Software BIS Safety UK.pptx
BIS Safety Software
 
PPTX
Hardware(Central Processing Unit ) CU and ALU
RizwanaKalsoom2
 
PDF
HiHelloHR – Simplify HR Operations for Modern Workplaces
HiHelloHR
 
Migrating Millions of Users with Debezium, Apache Kafka, and an Acyclic Synch...
MD Sayem Ahmed
 
Continouous failure - Why do we make our lives hard?
Papp Krisztián
 
Human Resources Information System (HRIS)
Amity University, Patna
 
Streamline Contractor Lifecycle- TECH EHS Solution
TECH EHS Solution
 
GridView,Recycler view, API, SQLITE& NetworkRequest.pdf
Nabin Dhakal
 
Comprehensive Guide: Shoviv Exchange to Office 365 Migration Tool 2025
Shoviv Software
 
iTop VPN With Crack Lifetime Activation Key-CODE
utfefguu
 
Capcut Pro Crack For PC Latest Version {Fully Unlocked} 2025
hashhshs786
 
Alexander Marshalov - How to use AI Assistants with your Monitoring system Q2...
VictoriaMetrics
 
GetOnCRM Speeds Up Agentforce 3 Deployment for Enterprise AI Wins.pdf
GetOnCRM Solutions
 
Import Data Form Excel to Tally Services
Tally xperts
 
Platform for Enterprise Solution - Java EE5
abhishekoza1981
 
Letasoft Sound Booster 1.12.0.538 Crack Download+ Product Key [Latest]
HyperPc soft
 
Fundamentals_of_Microservices_Architecture.pptx
MuhammadUzair504018
 
Engineering the Java Web Application (MVC)
abhishekoza1981
 
How Odoo Became a Game-Changer for an IT Company in Manufacturing ERP
SatishKumar2651
 
Revenue streams of the Wazirx clone script.pdf
aaronjeffray
 
Equipment Management Software BIS Safety UK.pptx
BIS Safety Software
 
Hardware(Central Processing Unit ) CU and ALU
RizwanaKalsoom2
 
HiHelloHR – Simplify HR Operations for Modern Workplaces
HiHelloHR
 

Lecture 4: ITS488 Digital Content Creation with Unity - Game and VR Programming

  • 1. Lecture 4: Shoot Basketball Game #2 Dr. Kobkrit Viriyayudhakorn iApp Technology Limited [email protected] ITS488 (Digital Content Creation with Unity - Game and VR Programming)
  • 5. Download the Starting code • Go to https://github.com/ kobkrit/VR_basketball_lecture_3 to download the starting code. • Unzip the project. • Open Unity. • Open the project by selecting the unzipped folder.
  • 6. Object Collider Click at a Ground Game Object. Uncheck the Sphere Collider and Press "Run" to see the effect.
  • 7. Collision • We can check the collision between objects in Unity very easy. • To demonstrate, We will create a mini shooter game which use a cube as a target. • If user shoot a ball that hit the target, user get a score.
  • 8. Collision: Adding Target 1. Right click to create cube as the target. 2. Move the target to the center of the field. 
 Make it see within camera.
  • 9. Collision: Counting Score 3. Change the name of the cube in the inspector,
 as "Target" 4. Add the C# Script 5. Name it as "Score Count" and Make it associated with the "Target".
  • 10. Collision: OnCollsionEnter Method 6. Adding the OnCollisionEnter method. 7. Run
  • 11. Exercise 1 • Modify the ScoreCount.cs code to be able to count the score. • When a ball hit the target, the score increases by 1. • Print out the score by
 print() command.
  • 12. Add multiple targets • To complete the game, we are going to have multiple targets, as we have designed to have multiple basketball’s backboards • We will cloning the target into 2-3 targets. • Move the newly cloned target to different locations.
  • 13. Duplicate the target 1. Select the target, right click,
 select "Duplicate". 2. Move the newly cloned object
 into different locations. 3. Repeat few times.
  • 14. Local Score Problem Press Run. We will see the local score problem. When we shoot a ball to the same target, the score increase, but when we change the target, the score will be reset to 1. We need to do the global score system.
  • 15. Global Score System 1. Remove the duplicated target. 2. Select the target, and remove the Score Count component.
  • 16. Global Score System #2 1. Create a new empty object, 
 and name it "ScoreCounter" 2. Associate "ScoreCount.cs" code to
 the ScoreCounter game object. 3. Create a new C# script file called
 "DetectCollision.cs" and associate it
 with the Target.
  • 17. Global Score System #3 • Changing the method to other name, like "IncreaseScore()" • Add "public" in front of the method to allow other classes to call this method. • By convention of the Unity, the first letter of a method’s name must be capitalized. Edit your ScoreCount.cs to this content.
  • 18. Global Score System #4 Make DetectCollision.cs call the ScoreCount’s Increase Score method, when there is a collision. DetectCollision.cs
  • 19. Run
  • 20. Exercise 2: Create a target prefab. • Use the prefab to make multiple targets • Position them apart in the scene. • Check if the score is update in one place. • BONUS: If you can allow different targets to score differently. • HINT: IncreaseScore() need an argument.
  • 21. Making Multiple Scene • We need the splash screen to introduce the user about the game. • We also need the end score screen to show the final result of the game. • We can make it by having multiple scenes. One screen = One scene.
  • 22. Making Multiple Scene #1 1. Create a new folder named "Scenes" 2. Move the scene that we already have 
 into the Scenes folder by drag-and-drop. 3. Click, Press "Enter"
 and rename it "2_Main"
  • 23. Making Multiple Scene #2 4. Create a new Scene by right click, Create, Scene 5. Named it "1_Splash"
  • 24. Making Multiple Scene #3 6. Double Click at the 1_Splash icon at the bottom panel, You will get the new empty scene.
  • 25. Include Scenes into the Build 1. Go to File > Build Settings 2. Drag and drop both scenes into the "Scenes In Build".
 ***The order is very important***
 "1_Splash" scene must be at the top of "2_Main" scene.
  • 26. Moving one scene to another #1 1. Double click at the "1_Splash" scene. 2. Create a new empty game object named it "LevelManager" 3. Create a new C# script, named it "LevelManager" as well. 4. Associate the C# script into the Level Manager game object by drag-and-drop.
  • 27. Moving one scene to another #2 LevelManager.cs
  • 29. Exercise 3: Trigger to next scene by spacebar • Move from the 1_Splash scene to the 2_Main scene when user press spacebar. • Use GetKeyDown() method • Seperate the logic for moving to the next scene in a new method. • HINT: Edit at LevelManager.cs
  • 30. Create Menu UI 1. Add the 1_Splash scene, change to 2D mode. 2. Create a new Canvas 3. Double click at "Canvas" game object
 in the Hierarchy window or Zoom out a lot (By middle mouse button).
 You will see the boundary of the canvas.
  • 31. Find image to put into canvas 1. Find in Google Image Search with the Noncommerical Reuse. 2. Download any image you like.
  • 32. Import Images 1. Create a new folder called "Images" 2. Drag and drop the download image into that folder.
  • 33. Add Image into Canvas 1. Select Canvas, Right click, UI, and Raw Image 2. Drag and drop the image into the RawImage’s Texture part.
  • 34. Resize the Raw Image • Make it bigger the canvas by moving at the blue dot of the Raw Image. • Press Run to see the result. • Try it in different screen ratio. Resize the window in different ways to make sure that the raw image covered all the display.
  • 35. Exercise 4: Create a Game Over scene. • Create a new scene • Put it last in the build order. • Add a canvas with the background image. • Make it reachable from the game.
  • 36. Adding Text into UI 1. Select the Canvas. Right-click, UI, Text 2. Select Text, Resize the text box by blue dot, Add text on the right
 "Basketball Game", Change size, color, alignment as you wish.
  • 37. Aerial is boring font. 1. Search Google for a matched font. 2. Download them.
  • 38. Import Font into Unity 1. Create a new folder called "Fonts".
 Drag and drop the font file into Unity 2. Select Text. Drag the font into Font box.
 (GAME OF BRUSH font required ALL CAPITAL LETTERS) Change text to match with the style.
  • 39. Exercise 5: Complete Adding the Text • Add "Hit space to play" instruction in the Splash Screen • Add "Game Over" title in the Game Over Screen. • Add "Hit space to try again" instruction in the Game Over Screen. • Be Creative!!
  • 40. Adding Button into UI 1. Add a button, by right-click at Canvas >
 UI > Button. 2. Move the button to appropriate location.
 Button always come with a text (as a child). 
 Select the text, change front, change message as you wish.
  • 41. Make it acts like a button • Select the Button and update their colors. • Normal color • Highlighted color • Pressed color • To give the feed back to the user when the mouse cursor is over a button.
  • 42. Make Button OnClick() Working 1. Select Button. Press + at the On Click()
 at the inspector window 2. Drag and drop the Level Manager Game Object to the OnClick Object Textbox
  • 43. Make Button OnClick() Working #2 3. At LevelManager.cs
 Add "public" at LoadNextScene() method 
 to make it visible for Unity. 4. At the On Click() property of the button
 Function > Level Manager > LoadNextScene()
  • 44. Exercise 6: Add a "Play Again" Button • Edit in the LevelManager script. • You will need a LoadPreviousLevel() method. • Add the button. • Link it.
  • 45. Adding Timer into the game!
  • 46. Exercise 7: Progress after N seconds. • Make the timeTillNextLevel configurable. • Progress to next level when time run out. • Make the default behavior to never progress.
  • 49. Q/A