SlideShare a Scribd company logo
Oracle Retail 13.2 High-
Availability Case Study Fusion
Middleware Cluster (Part 1)
An Oracle Case Study
April 2011
Copyright © 2011, Oracle and/or its affiliates. All rights reserved. This document is provided
for information purposes only and the contents hereof are subject to change without notice.
This document is not warranted to be error-free, nor subject to any other warranties or
conditions, whether expressed orally or implied in law, including implied warranties and
conditions of merchantability or fitness for a particular purpose. We specifically disclaim any
liability with respect to this document and no contractual obligations are formed either
directly or indirectly by this document. This document may not be reproduced or transmitted
in any form or by any means, electronic or mechanical, for any purpose, without our prior
written permission.
Oracle is a registered trademark of Oracle Corporation and/or its affiliates. Other names
may be trademarks of their respective owners.
Note: The following is intended to outline our general product
direction. It is intended for information purposes only, and may
not be incorporated into any contract. It is not a commitment to
deliver any material, code, or functionality, and should not be
relied upon in making purchasing decisions. The development,
release, and timing of any features or functionality described for
Oracle’s products remains at the sole discretion of Oracle.
Copyright © 2011, Oracle and/or its affiliates. All rights reserved. This document is provided for information purposes only and the contents hereof are
subject to change without notice. This document is not warranted to be error-free, nor subject to any other warranties or conditions, whether expressed
orally or implied in law, including implied warranties and conditions of merchantability or fitness for a particular purpose. We specifically disclaim any
liability with respect to this document and no contractual obligations are formed either directly or indirectly by this document. This document may not be
reproduced or transmitted in any form or by any means, electronic or mechanical, for any purpose, without our prior written permission.
Oracle is a registered trademark of Oracle Corporation and/or its affiliates. Other names may be trademarks of their respective owners.
Contents
Installation Overview...............................................................................................................1
Create Metadata Repository RAC Database .........................................................................2
Create Oracle 10g Release 2 Single Instance Oracle Internet Directory Database...................2
Convert Oracle 10g Release 2 Single Instance OID Database to RAC.......................................2
Configure a Shared spfile .............................................................................................................3
Prepare Database for RAC............................................................................................................4
Prepare dbserver2 for the Second Instance ................................................................................4
Startup Instance 2...........................................................................................................................5
Configure SRVCTL........................................................................................................................5
Configure TNSNAMES.ora..........................................................................................................6
Populate Metadata Repository Schemas Using REPCA .............................................................7
Create a Password File for the OID Database............................................................................7
Running the OracleAS Metadata Repository Creation Assistant ...........................................7
Install Oracle Application Server 10.1.4 Identity Management Software.........................13
Preparation work for OAS 10.1.4.0.1 Cluster Install..................................................................13
Installing OAS 10.1.4.0.1 Identity Management on appserver1...............................................14
Installing OAS 10.1.4.0.1 IM on appserver2................................................................................23
Upgrade to Release 10.1.4.3.0........................................................................................................34
Installing the OAS 10.1.4.3 Patch on appserver1........................................................................35
Installing the OAS 10.1.4.3 Patch on appserver2........................................................................41
Install Oracle Application Server 10.1.2.3 Identity Management Software Only.............47
Preparation for Oracle Application Server 10.1.2.3 Cluster Install..........................................47
Apply 10.1.2.3 Patch to appserver1..............................................................................................47
Apply 10.1.2.3 Patch on appserver2.............................................................................................50
Upgrade Oracle Internet Directory Database to 11g Release 2 ........................................55
Appendix A – Steps to Create a 10g Release2 OID Database...........................................57
Appendix B – init102.ora.......................................................................................................59
Appendix C - crdb1.sql..........................................................................................................61
Appendix D – crdb2.sql.........................................................................................................63
Appendix E – crdb3.sql .........................................................................................................65
Copyright © 2011, Oracle and/or its affiliates. All rights reserved. This document is provided for information purposes only and the contents hereof are
subject to change without notice. This document is not warranted to be error-free, nor subject to any other warranties or conditions, whether expressed
orally or implied in law, including implied warranties and conditions of merchantability or fitness for a particular purpose. We specifically disclaim any
liability with respect to this document and no contractual obligations are formed either directly or indirectly by this document. This document may not be
reproduced or transmitted in any form or by any means, electronic or mechanical, for any purpose, without our prior written permission.
Oracle is a registered trademark of Oracle Corporation and/or its affiliates. Other names may be trademarks of their respective owners.
Installation Overview
Oracle Retail applications can be deployed in a grid computing environment, using Oracle Fusion
Middleware active-active clustering and Oracle Real Application Cluster (RAC) databases to provide
high availability and scalability. This configuration allows lower-cost commodity systems to be
combined into a single scalable, fault-tolerant computing environment.
There are many options to configure an Oracle grid computing environment, and these options can have
a significant impact on how the environment is configured and built. The intent of this case study is not
to provide exhaustive documentation on all possible ways to configure a suitable grid computing
environment for Oracle Retail, but rather to document a specific configuration that was used for
verification purposes. Because of this, the specific installation steps documented in this case study only
apply in their entirety to the exact hardware and software configuration described in this case study.
This portion of the case study details the steps needed to create the high-availability Oracle Internet
Directory (OID) RAC database and Oracle Application Server (OAS) 10.1.4.3 cluster used for Oracle
Retail development:
Create Metadata Repository RAC database
– Create Oracle 10g Release 2 single instance Oracle Internet Directory database.
– Convert Oracle 10gRelease 2 single instance OID database to RAC.
– Populate Metadata Repository schemas using REPCA (Oracle Application Server
Metadata Repository Creation Assistant)
Install OAS 10.1.4.0.1 Identity Management cluster
Upgrade OAS 10.1.4.0.1 Identity Management cluster installation to 10.1.4.3.0
Upgrade OAS 10.1.4.3.0 Identity Management cluster installation with 10.1.2.3 software only. This
(10.1.2.3) updates different components than 10.1.4.3.0.
Upgrade Oracle Internet Directory database to 11g Release 2
Note: This document uses the hostnames appserver1, appserver2, and
appserver12vip.us.oracle.com for different systems in the cluster. You
should substitute the appropriate names of the hosts for your installation. In
some cases, the screenshots show redevlv0123, redevlv0124 and
redevlv0123-0124-vip.us.oracle.com which are appserver1, appserver2, and
appserver12vip.us.oracle.com respectively. It also uses dbserver1 and
dbserver2 for different db systems in the cluster. You should substitute the
appropriate names of the hosts for your installation. In some cases text and
screen shots show mspdev53 and mspdev54, which are dbserver1 and
dbserver2 respectively.
Oracle Retail 13.2 High-Availability Case Study Fusion Middleware Cluster (Part 1) 1
Create Metadata Repository RAC Database
This section describes how to create a metadata repository RAC database.
Create Oracle 10g Release 2 Single Instance Oracle Internet Directory
Database
To create an Oracle 10g Release 2 single instance Oracle Internet Directory database:
1. If a single-instance 10g Release 2 OID doesn’t already exists, create one on dbserver1 following the
instructions as per Appendix A – Steps to Create a 10gR2 OID database.
Be sure to include the additional init.ora parameters:
db_domain = us.oracle.com
compatible = 10.2.0.4
aq_tm_processes = 1
db_cache_size = 144M
Note: Ensure that the crdb3.sql script is updated to match the script found in
Appendix E, because this loads necessary modules for the OID metadata
repository installation.
Convert Oracle 10g Release 2 Single Instance OID Database to RAC
This part of the document displays how to convert a single instance database to a RAC database with two
instances. The example assumes real filesystems are used to host the shared database files (either a
cluster filesystem or NFS mount points). Additional information can be found in the Oracle Retail 13.2
High Availability Case Study RAC document.
This document assumes the following environment:
Database Name odolr04 (name just created in the previous step)
Datafile paths /u03/oradata/odolr04/*.dbf,
/u04/oradata/odolr04/*.dbf
Archivelog path /arch/odolr04
Dbserver1 Name: dbserver1
Instance1 Name odolr041
Instance1 Undo TS UNDO_TS01
Dbserver2 Name dbserver2
Instance2 Name odolr042
Instance 2 Undo TS UNDO_TS02
The database and instance 1 should already exist.
2 Oracle Retail 13.2 High-Availability Case Study Fusion Middleware Cluster (Part 1)
Configure a Shared spfile
To configure a shared spfile:
1. Create a temporary pfile in the multi-instance format, for editing.
Execute these commands using sqlplus against instance 1:
create spfile='/tmp/spfileretaildb1.ora' from pfile;
create pfile='/tmp/initretaildb1.ora' from spfile='/tmp/spfileretaildb1.ora';
2. Edit the temporary pfile and change the following parameters for instance 1.
*.audit_file_dest='/u00/oracle/admin/odolr041/adump'
*.background_dump_dest='/u00/oracle/admin/odolr041/bdump'
*.core_dump_dest='/u00/oracle/admin/odolr041/cdump'
*.instance_name='odolr041'
*.local_listener='(ADDRESS=(PROTOCOL=TCP)(HOST=localhost)(PORT=1521))'
*.undo_tablespace='undo_ts01'
*.user_dump_dest='/u00/oracle/admin/odolr041/udump'
To these values:
odolr041.audit_file_dest='/u00/oracle/admin/odolr041/adump'
odolr041.background_dump_dest='/u00/oracle/admin/odolr041/bdump'
odolr041.core_dump_dest='/u00/oracle/admin/odolr041/cdump'
odolr041.instance_name='odolr041'
odolr041.local_listener='(DESCRIPTION=(ADDRESS=(PROTOCOL=tcp)(HOST=mspvip53)(PORT=1521))'
odolr041.undo_tablespace='undo_ts01'
odolr041.user_dump_dest='/u00/oracle/admin/odolr041/udump'
3. Edit the temporary pfile and add new parameters for instance 2.
Add these parameters:
*.cluster_database=TRUE
*.cluster_database_instances=2
*.remote_listener= mspdvcl4.us.oracle.com:1521
odolr041.instance_number=1
odolr042.instance_number=2
odolr042.local_listener='(DESCRIPTION=(ADDRESS=(PROTOCOL=tcp)(HOST=mspvip54)(PORT=1521))'
odolr042.undo_tablespace='undo_ts02'
odolr042.audit_file_dest='/u00/oracle/admin/odolr042/adump'
odolr042.background_dump_dest='/u00/oracle/admin/odolr042/bdump'
odolr042.core_dump_dest='/u00/oracle/admin/odolr042/cdump'
odolr042.user_dump_dest='/u00/oracle/admin/odolr042/udump'
odolr042.instance_name='odolr042'
4. Create the spfile
Execute these commands using sqlplus against instance 1:
create spfile='/u03/oradata/retaildb1/spfile.ora' from pfile='/tmp/initretaildb1.ora';
5. Create links to new spfile on dbserver1
Execute these commands as ‘oracle’ on dbserver1:
ln -s /u03/oradata/odolr04/spfile.ora $ORACLE_HOME/dbs/spfileodolr041.orarm
$ORACLE_HOME/dbs/initodolr041.ora
Oracle Retail 13.2 High-Availability Case Study Fusion Middleware Cluster (Part 1) 3
Prepare Database for RAC
To prepare the database for RAC:
1. Restart instance 1 and ensure parameters changed above are in effect.
Execute the following commands from sqlplus against instance 1:
shutdown immediate
startup
show parameter cluster
show parameter instance
show parameter undo
2. Add and enable a second thread of redo:
Execute the following command from sqlplus against instance 1:
alter database add logfile thread 2
group 4 ('/u04/oradata/retaildb1/redo04a.log',
'/u03/oradata/retaildb1/redo04b.log') size 100M,
group 5 ('/u04/oradata/retaildb1/redo05a.log',
'/u03/oradata/retaildb1/redo05b.log') size 100M,
group 6 ('/u04/oradata/retaildb1/redo06a.log',
'/u03/oradata/retaildb1/redo06b.log') size 100M;
alter database enable public thread 2;
3. Create a second undo tablespace:
Execute the following command from sqlplus against instance 1:
create undo tablespace undo_ts02
datafile '/u04/oradata/retaildb1/undo_ts0201.dbf' size 500M;
Prepare dbserver2 for the Second Instance
To prepare dbserver2 for the second instance:
1. Add Instance 2 to the oratab on Host 2
odolr042:/u00/oracle/product/10.2.0.4:Y
2. Create an $ORACLE_BASE/admin structure for Instance 2.
Execute the following commands as ‘oracle’ on host 2:
mkdir $ORACLE_BASE/admin/odolr042
mkdir $ORACLE_BASE/admin/odolr042/adhoc
mkdir $ORACLE_BASE/admin/odolr042/adump
mkdir $ORACLE_BASE/admin/odolr042/bdump
mkdir $ORACLE_BASE/admin/odolr042/cdump
mkdir $ORACLE_BASE/admin/odolr042/create
mkdir $ORACLE_BASE/admin/odolr042/pfile
mkdir $ORACLE_BASE/admin/odolr042/udump
3. Create file links.
Execute the following commands as ‘oracle’ on host 2:
ln -s /u03/oradata/odolr04/spfile.ora $ORACLE_HOME/dbs/spfileodolr042.ora
4 Oracle Retail 13.2 High-Availability Case Study Fusion Middleware Cluster (Part 1)
Startup Instance 2
To startup instance2:
1. Start up instance 2 and ensure parameters are in effect.
Execute the following commands from sqlplus against instance 2:
startup
show parameter cluster
show parameter instance
show parameter undo
2. Verify v$active_instances shows both instances.
Execute the following query in sqlplus against each instance:
select * from v$active_instances;
Configure SRVCTL
To configure SRVCTL:
1. Add the database and both instances to the srvctl registry.
Execute the following commands as ‘oracle’ on either host:
srvctl add database -d odolr04 -o /u00/oracle/product/10.2.0.4
srvctl add instance -d odolr04 -i odolr041 -n mspdev53
srvctl add instance -d odolr04 -i odolr042 -n mspdev54
2. Verify the instances have been added as CRS resources.
Execute the following command as ‘oracle’ on either host:
export ORA_CRS_HOME=/u00/crs/oracle/product/11.2.0
crs_stat -t
Crsstat should show output similar to this:
HA Resource Target State
ora.odolr04.db ONLINE ONLINE on mspdev54
ora.odolr04.odolr041.ins ONLINE ONLINE on mspdev53
ora.odolr04.odolr042.inst ONLINE ONLINE on mspdev54
ora.mspdev53.LISTENER_MSPDEV53.lsnr ONLINE ONLINE on mspdev53
ora.mspdev53.gsd ONLINE ONLINE on mspdev53
ora.mspdev53.ons ONLINE ONLINE on mspdev53
ora.mspdev53.vip ONLINE ONLINE on mspdev53
ora.mspdev54.LISTENER_MSPDEV54.lsnr ONLINE ONLINE on mspdev54
ora.mspdev54.gsd ONLINE ONLINE on mspdev54
ora.mspdev54.ons ONLINE ONLINE on mspdev54
ora.mspdev54.vip ONLINE ONLINE on mspdev54
Oracle Retail 13.2 High-Availability Case Study Fusion Middleware Cluster (Part 1) 5
If the output doesn’t state that the target & state are online, then shutdown both instances manually,
and restart the database using srvctl:
Example: srvctl start database –d odolr04
If after the restart all targets aren’t online, wait a minute. Sometimes it takes a couple of minutes for
the target to reflect the correct online status.
Configure TNSNAMES.ora
To configure TNSNAMES.ora:
1. The following tnsnames entries should be put into $ORACLE_HOME/network/admin and can
be used to connect to the RAC database (load-balanced across both instances).
Note: Scan.domain should be replaced with the scan name used during CRS
installation.
odolr04 =
(DESCRIPTION =
(ADDRESS_LIST =
(LOAD_BALANCE = yes)
(ADDRESS = (PROTOCOL = TCP)(HOST = scan.domain)(PORT = 1521))
)
(CONNECT_DATA = (SERVICE_NAME = odolr04))
)
2. The following tnsnames entries can be used to connect to a specific instance.
odolr041 =
(DESCRIPTION =
(ADDRESS_LIST =
(ADDRESS = (PROTOCOL = TCP)(HOST = scan.domain)(PORT = 1521))
)
(CONNECT_DATA =
(SERVICE_NAME = odolr04)
(INSTANCE_NAME= odolr041)
)
)
odolr042 =
(DESCRIPTION =
(ADDRESS_LIST =
(ADDRESS = (PROTOCOL = TCP)(HOST = scan.domain)(PORT = 1521))
)
(CONNECT_DATA =
(SERVICE_NAME = odolr04)
(INSTANCE_NAME= odolr042)
)
)
6 Oracle Retail 13.2 High-Availability Case Study Fusion Middleware Cluster (Part 1)
Populate Metadata Repository Schemas Using REPCA
This section describes how to propulate metadata repository schemas using REPCA.
Create a Password File for the OID Database
To create a password file for the OID database:
1. Log into UNIX as oracle and set $ORACLE_HOME.
2. change directories to $ORACLE_HOME/bin.
3. Type the following to create a password file:
orapwd file=/u05/oradata/odolr04/orapwodolr04 password=<SYS DB password>
4. Set the remote_login_passwordfile parameter in the spfile by connecting to the database and
issuing the following command:
alter system set remote_login_passwordfile=exclusive scope=spfile;
5. Shutdown the database by issuing the following command: shutdown immediate.
6. On DBServer1, create links to the password file:
cd to $ORACLE_HOME/dbs
ln –s <db passwordfile location>/orapw<dbname> orapw<instance name>
Example:
ln -s /u00/oradata/odolr04/orapw<dbname> orapw<instance number>
7. Start the database by issuing the following command:
startup;
8. Test connectivity: sqlplus “sys/syspassword@sid as sysdba”.
Running the OracleAS Metadata Repository Creation Assistant
This case study assumes that the Metadata Repository Creation Assistant has already been installed on
an existing server in your environment. If not, download and install the software before proceeding.
1. Export your Display variable.
2. Change directories to $ORACLE_HOME/repca.
3. Ensure the listener for the target database is up and running.
4. Start repca by issuing the following command in $ORACLE_HOME/repca.
% ./runRepca
Oracle Retail 13.2 High-Availability Case Study Fusion Middleware Cluster (Part 1) 7
5. The Welcome window appears.
Click Next.
6. The OracleAS RepCAwindow appears. For Step 1 of 2, specify the Oracle Home Path.
Oracle Home Path = <$ORACLE_HOME on db server>
Log File Directory: /u00/webadmin/product/10.1.4.1/repca/assistants/repca/log
Click Next.
8 Oracle Retail 13.2 High-Availability Case Study Fusion Middleware Cluster (Part 1)
7. The OracleAS RepCA window appears. For Step 2 of 2, select the operation Load.
Click Next.
8. The OracleAS RepCA window appears. For Step 1 of 4, specify the Database Connection
Information:
Enter the SYS password.
Select the Real Application Clusters Database option.
Hostname and Port: dbserver1:1521,dbserver2:1521
Service Name: <db_name>.us.oracle.com
Click Next.
Oracle Retail 13.2 High-Availability Case Study Fusion Middleware Cluster (Part 1) 9
9. The Database Validations window opens.
The RepCA will display the following status window. Wait until it is finished before you continue. If the
database does not meet the requirements, the RepCA will display an error message.
10. The OracleAS RepCA window opens. For Step 2 of 4, specify the storage option. Select Regular or
Cluster File System.
Click Next.
11. The OracleAS RepCA window opens.
For Step 3 of 4, specify the tablespace information as Use Same Directory for All Tablespaces. Then
change the location of the database files to a shared filesystem location.
10 Oracle Retail 13.2 High-Availability Case Study Fusion Middleware Cluster (Part 1)
Click Next.
12. The Running Tablespace Validations status window opens. Wait until it is finished before you
continue.
13. Click Yes to confirm the Tablespace AutoExtensible Requirements.
14. The Running Tablespace Validations status window opens again.
Wait until it is finished before you continue.
Oracle Retail 13.2 High-Availability Case Study Fusion Middleware Cluster (Part 1) 11
15. The OracleAS RepCA window opens.
For Step 4 of 4, the RepCA starts loading the repository. Wait for the status to complete.
16. The Summary window opens.
The installation is complete.
Click OK.
$ORACLE_HOME/dcm/bin/dcmctl joincluster –cl linux_1014_cluster1
12 Oracle Retail 13.2 High-Availability Case Study Fusion Middleware Cluster (Part 1)
Install Oracle Application Server 10.1.4
Identity Management Software
This section describes how to install the Oracle Application Server 10.1.4 Identity Management Software.
Preparation work for OAS 10.1.4.0.1 Cluster Install
To prepare the work for OAS 10.1.4.0.1 cluster install:
1. As the UNIX user who will be owning the Identity management 10.1.4 installation:
a. On appserver1 and appserver2 that will make up the Identity Management cluster
b. Ceate the 10.1.4 directory.
c. Change directories to /u00/webadmin/product.
d. Make the 10.1.4 directory using the following command:
mkdir 10.1.4.
e. Change directories to /u00/webadmin/product/10.1.4.
f. Make the oidinfra directory using the following command:
mkdir oidinfra
g. Synchronize Clocks on both the nodes.
h. Set up /etc/hosts on both nodes as IP host.domain alias.
2. Configure the Load Balancer to direct all traffic to appserver1 initially.
3. Set up cookie persitance for on the Load Balancer.
4. As the UNIX user who will be owning the OAS 10.1.4 installation:
a. On appserver1, change directories to the directory where the OAS 10.1.4 software has been
downloaded and untarred to.
b. Set your environment to point to the desired ORACLE_HOME.
c. Eport DISPLAY variable.
d. Run linux32 bash command as OAS 10.1.4 installs must be done in 32-bit mode.
Oracle Retail 13.2 High-Availability Case Study Fusion Middleware Cluster (Part 1) 13
Installing OAS 10.1.4.0.1 Identity Management on appserver1
To install OAS 10.1.4.0.1 IM on appserver1:
1. Run the Installer:
./runInstaller
2. The Welcome screen opens.
Click Next.
3. The Specify the file locations window opens.
Name = 1014_OIDINFRA
Path = /u00/webadmin/product/10.1.4/oidinfra
Click Next.
14 Oracle Retail 13.2 High-Availability Case Study Fusion Middleware Cluster (Part 1)
4. The Select a Product to Install window opens.
Select Oracle Application Server Infrastructure 10g 10.1.4.
Click Product Languages.
5. The Language Selection window opens.
Move all the languages to Selected Languages.
Click OK.
Click Next.
Oracle Retail 13.2 High-Availability Case Study Fusion Middleware Cluster (Part 1) 15
6. The Select Installation Type window opens.
Select Identity Management.
Click Next.
7. The Product-Specific Prerequisite Checks window opens.
The Installer will run through a series of checks. Verify all of the checks have passed. If all of the checks
have passed.
Click Next.
If there are any failures, resolve the issues before continuing the installation.
16 Oracle Retail 13.2 High-Availability Case Study Fusion Middleware Cluster (Part 1)
8. The Confirm Pre-Installation Requirements window opens.
Verify you will have access to the root user.
Select the Root Privileges checkbox.
Click Next.
9. The Select Configuration Options window opens.
Select the following components to install:
a. Oracle Internet Directory.
b. Oracle Application Server Single Sign-on.
c. Oracle Application Server Delegated Administration.
d. Oracle Application Server Directory Integration.
Oracle Retail 13.2 High-Availability Case Study Fusion Middleware Cluster (Part 1) 17
e. High Availability and Replication.
Click Next.
10. The Specify Port Configuration Options window opens.
Select Automatic.
Click Next.
11. The Specify Repository window opens.
Set the following variables:
a. Username = SYS
b. Password = <SYS db password>
c. Hostname = dbvip1:1521^dbvip2:1521
18 Oracle Retail 13.2 High-Availability Case Study Fusion Middleware Cluster (Part 1)
d. Service Name = odolr04.us.oracle.com
Click Next.
12. The Select High Availability or Replication Option window opens.
Select Oracle AS Cluster (Identity Management).
Click Next.
13. The Specify New Oracle Application Server Cluster Name window opens.
Enter the new cluster name.
Note: The cluster name as it will be required when the 10.1.4.0.1 install
occurs on appserver2.
Oracle Retail 13.2 High-Availability Case Study Fusion Middleware Cluster (Part 1) 19
Click Next.
14. The Specify Namespace in Internet Directory window opens.
Select Suggested Namespace.
Click Next.
15. The Specify LDAP Virtual Host and Ports window opens.
Set the following values:
a. Hostname: appserver12vip.us.oracle.com
b. SSL Port:11636
Click Next.
20 Oracle Retail 13.2 High-Availability Case Study Fusion Middleware Cluster (Part 1)
16. The Specify HTTP Listen Port, Load Balancer Host and Port window opens.
Set the following values:
a. HTTP Listener Port: 7777
b. HTTP Load Balancer Hostname: appserver12vip.us.oracle.com
c. HTTP Load Balancer Port: 7777
Click Next.
17. The Specify Instance Name and ias_admin password window opens.
Set the following values:
a. Instance Name: 1014_OIDINFRA
b. IAS Admin Password: < iasadmin password>
Oracle Retail 13.2 High-Availability Case Study Fusion Middleware Cluster (Part 1) 21
c. Confirm Password: <iasadmin password>
Click Next.
18. The Summary window opens.
Verify the installation information
Click Install.
19. The Install window opens.
22 Oracle Retail 13.2 High-Availability Case Study Fusion Middleware Cluster (Part 1)
20. Run root.sh.
21. The Configuration Assistant window opens.
Click Next.
22. You have now completed the installation.
Click Exit.
Installing OAS 10.1.4.0.1 IM on appserver2
To isntall the OAS 10.1.4.0.1 IM on the appserver2:
As the UNIX user who will be doing owning the OAS 10.1.4 installation:
a. On appserver2, cd to the directory where the OAS 10.1.4 software has been downloaded and
untarred to.
b. Set your environment to point to the desired ORACLE_HOME
c. Export DISPLAY variable
d. Run “linux32 bash” command as OAS 10.1.4 installs must be done in 32-bit mode
1. Run the Installer:
a. % ./runInstaller
Oracle Retail 13.2 High-Availability Case Study Fusion Middleware Cluster (Part 1) 23
2. The Welcome screen opens.
Click Next.
3. The Specifiy File Locations window opens.
Set the following values:
a. Name = 1014_OIDINFRA
b. Path = /u00/webadmin/product/10.1.4/oidinfra
Click Next.
24 Oracle Retail 13.2 High-Availability Case Study Fusion Middleware Cluster (Part 1)
4. The Select a Product to Install window opens.
Select Oracle Application Server Infrastructure 10g.
Click Product Languages.
5. The Languages Selection widow opens.
Move all languages to Selected Languages.
Click OK.
Click Next when returned to the Select a Product to Install screen.
Oracle Retail 13.2 High-Availability Case Study Fusion Middleware Cluster (Part 1) 25
6. The Select Installation Type window opens.
Select Identity Management.
Click Next.
7. The Product-specific Prerequisite Checks window opens.
The Installer will run through a series of checks.
Verify all of the checks have passed.
If all checks have passed, then click Next. If there are any failures, resolve the issues before continuing
the installation.
26 Oracle Retail 13.2 High-Availability Case Study Fusion Middleware Cluster (Part 1)
8. The Confirm Pre-Installation Requirements window opens.
.
Verify you will have access to the root user.
Select the Root Privileges checkbox
Click Next.
9. The Select Configuration Options window opens.
Select the following components to install:
a. Oracle Internet Directory.
b. Oracle Application Server Single Sign-on.
c. Oracle Application Server Delegated Administration.
d. Oracle Application Server Directory Integration.
Oracle Retail 13.2 High-Availability Case Study Fusion Middleware Cluster (Part 1) 27
e. High Availability and Replication.
Click Next.
10. The Specify Port Configuration Options window opens.
Select Automatic.
Click Next.
11. The Specify Repository window opens.
Set the following values:
a. Username = SYS
b. Password = <SYS db password>
c. Hostname = dbvip1:1521^dbvip2:1521
28 Oracle Retail 13.2 High-Availability Case Study Fusion Middleware Cluster (Part 1)
d. Service Name = odolr04.us.oracle.com
Click Next.
12. The Select High Availability or Replication Option window opens.
Select Oracle AS Cluster (Identity Management).
Click Next.
13. A Warning widow may open at this point.
If this screen appears, click OK and contact the System Administrators after the installation to sync up
the system clocks across the two nodes.
Oracle Retail 13.2 High-Availability Case Study Fusion Middleware Cluster (Part 1) 29
14. The Specify New Oracle Application Server Cluster Name window opens.
Enter the cluster name used during the appserver1 install.
Click Next.
15. The Specify ODS Password window opens.
Specify the password for ias_admin.
Note: By default, the ODS password is the same as the ias_admin password
(the password that you entered in the Specify Instance Name and ias_admin
Password screen).
Click Next.
30 Oracle Retail 13.2 High-Availability Case Study Fusion Middleware Cluster (Part 1)
16. The Specify LDAP Virtual Host and Port window opens.
Set the following variables:
a. Hostname: appserver12vip.us.oracle.com
b. SSL Port:11636
Click Next.
17. A warning window opens.
Click OK.
Oracle Retail 13.2 High-Availability Case Study Fusion Middleware Cluster (Part 1) 31
18. The Specify Oracle Internet Directory Login window opens.
Enter username cn=orcladmin.
Enter the password configured during appserver1 install.
Click Next.
19. The Specify HTTP Listen Port, Load Balancer Host and Port window opens.
Set the following variables:
a. HTTP Listener Port: 7777
b. HTTP Load Balancer Hostname: appserver12vip.us.oracle.com
c. HTTP Load Balancer Port: 7777
Click Next.
32 Oracle Retail 13.2 High-Availability Case Study Fusion Middleware Cluster (Part 1)
20. The Specify Instance Name and ias_admin password window opens.
Set the following values:
a. Instance Name: 1014_OIDINFRA
b. IAS Admin Password
c. Confirm Password
Click Next.
21. The Summary window opens.
Verify the installation information.
Click Install.
22. The Configuration Assistant window opens.
Oracle Retail 13.2 High-Availability Case Study Fusion Middleware Cluster (Part 1) 33
Click Next.
23. The installation is now complete.
Click Exit.
Upgrade to Release 10.1.4.3.0
This section describes the requirements and procedures for performing the upgrade.
Pre-Installation Requirements
The following are pre-installation requirements for this patch set:
Ensure that the system configuration meets the recommendations described in the installation guide
and other manuals.
When applying the patch, use the same login credentials that you used for installation of the
products.
Using different credentials can result in unexpected behavior, for example, several error messages can
be displayed.
Make a backup before applying the patch.
1. Issue the following command on appserver1:
% dcmctl listinstances -cl linux_1014_cluster1
The command output is similar to the following:
Instance name: 1014_OIDINFRA.appserver1.us.oracle.com
Cluster: linux_1014_cluster1
Hostname: appserver1.us.oracle.com
Oracle Home: /u00/webadmin/product/10.1.4/oidinfra
Instance name: 1014_OIDINFRA.appserver2.us.oracle.com
Cluster: linux_1014_cluster1
Hostname: appserver2.us.oracle.com
Oracle Home: /u00/webadmin/product/10.1.4/oidinfra
2. Ensure that the dcm-daemon is alive in both the Single Sign-On and Oracle Delegated
Administration Services instances.
3. Enter the following command:
% $ORACLE_HOME/dcm/bin/dcmctl leavecluster
-i 1014_OIDINFRA.appserver2.us.oracle.com
Note: After running the leave cluster command, the second instance is not
shown as follows:
% $ORACLE_HOME/dcm/bin/dcmctl listinstances -cl linux_1014_cluster1
Instance name: 1014_OIDINFRA.appserver1.us.oracle.com
Cluster: linux_1014_cluster1
Hostname: appserver1.us.oracle.com
Oracle Home: /u00/webadmin/product/10.1.4/oidinfra
4. Stop the second Identity Management instance, and patch the first Identity Management instance to
10.1.4.3.
34 Oracle Retail 13.2 High-Availability Case Study Fusion Middleware Cluster (Part 1)
Installing the OAS 10.1.4.3 Patch on appserver1
To install the OAS 10.1.4.3 patch on the appserver1:
1. As the UNIX user who will own the IM 10.1.4.3 installation: On appserver1, cd to the directory
the where the OAS 10.1.4.3 software has been downloaded and untarred to.
Set your environment to point to the desired ORACLE_HOME.
Export DISPLAY variable
Run linux32 bash command as OAS 10.1.4.3 installs must be done in 32-bit mode.
2. Run the Installer:
% ./runInstaller
3. The Welcome window opens.
Click Next.
Oracle Retail 13.2 High-Availability Case Study Fusion Middleware Cluster (Part 1) 35
4. The Specify File Locations window opens.
Set the following values:
a. Name = 1014_OIDINFRA
b. Path = /u00/webadmin/product/10.1.4/oidinfra
Click Next.
5. The login window opens.
The Metalink login is used to receive security updates. For this case study it has been unchecked.
Click Next.
36 Oracle Retail 13.2 High-Availability Case Study Fusion Middleware Cluster (Part 1)
6. The warning window opens. Warning: Email Address Not Specified.
Click Yes.
7. The Application Server instance Password window opens.
Specify the password for ias_admin, given during 10.1.4.0.1 installation.
Click Next.
Oracle Retail 13.2 High-Availability Case Study Fusion Middleware Cluster (Part 1) 37
8. The Oracle internet Directory Login window opens.
Specify Username and Password of super user login.
Click Next.
9. The Enter Metadata repository Sys Password window opens.
Specify SYS user password of the database where metadata repository exist.
Click Next.
38 Oracle Retail 13.2 High-Availability Case Study Fusion Middleware Cluster (Part 1)
10. The Warning window opens.
Verify the checklist.
Click OK.
11. The Summary window opens.
Verify the installation information.
Click Install.
Oracle Retail 13.2 High-Availability Case Study Fusion Middleware Cluster (Part 1) 39
12. The Setup Privileges window opens. Execute root.sh.
Click OK.
13. The Configuration Assistants window opens.
Click Next.
40 Oracle Retail 13.2 High-Availability Case Study Fusion Middleware Cluster (Part 1)
14. The End of Installation window opens.
Click Exit.
Installing the OAS 10.1.4.3 Patch on appserver2
To install the OAS 10.1.4.3 patch on appserver2:
1. As the UNIX user who will be doing owning the IM 10.1.4.3 installation: On appserver2, cd to the
directory the where the OAS 10.1.4.3 software has been downloaded and untarred to.
a. Set your environment to point to the desired ORACLE_HOME.
b. Export DISPLAY variable.
c. Run linux32 bash command as OAS 10.1.4.3 installs must be done in 32-bit mode.
2. Run the Installer:
% ./runInstaller
Oracle Retail 13.2 High-Availability Case Study Fusion Middleware Cluster (Part 1) 41
3. The Welcome window opens.
Click Next.
4. The Specify File Locations window opens.
Set the following values:
a. Name = 1014_OIDINFRA
b. Path = /u00/webadmin/product/10.1.4/oidinfra
Click Next.
42 Oracle Retail 13.2 High-Availability Case Study Fusion Middleware Cluster (Part 1)
5. The login window opens.
The Metalink login is to receive security update. For this case study it has been unchecked.
Click Next.
6. The warning window opens.
Click Yes.
Oracle Retail 13.2 High-Availability Case Study Fusion Middleware Cluster (Part 1) 43
7. The Application Server Instance Password window opens.
Specify the password for ias_admin given during 10.1.4.0.1 installation.
Click Next.
8. The Oracle Internet Directory Login window opens.
Specify Username and Password of super user login.
Click Next.
44 Oracle Retail 13.2 High-Availability Case Study Fusion Middleware Cluster (Part 1)
9. The Enter Metadata repository Sys Password window opens.
Specify the SYS user password of the metadata repository database.
Click Next.
10. The Summary window opens.
Verify the installation information.
Click Next.
Oracle Retail 13.2 High-Availability Case Study Fusion Middleware Cluster (Part 1) 45
11. The End of Installation window opens.
Click Exit.
12. Join the second node to the cluster, as follows :
$ORACLE_HOME/dcm/bin/dcmctl joincluster –cl linux_1014_cluster1
46 Oracle Retail 13.2 High-Availability Case Study Fusion Middleware Cluster (Part 1)
Install Oracle Application Server 10.1.2.3
Identity Management Software Only
This section describes the install of the Oracle Application Server 10.1.2.3 Identity Management Software.
Preparation for Oracle Application Server 10.1.2.3 Cluster Install
This section describes how to apply 10.1.2.3 Software only patch to an Oracle Application Server Cluster
(Identity Management) environment. Before applying the patch set:
1. LDAP traffic can be directed to a node as soon as it has been patched to OracleAS 10g Patch Set 3
(10.1.2.3.0)
2. On appserver1 leave the cluster
$ORACLE_HOME/dcm/bin/dcmctl leavecluster
3. Bring IM at node appserver2 down
$ORACLE_HOME/opmn/bin/opmnctl shutdown
Apply 10.1.2.3 Patch to appserver1
To apply 10.1.2.3 patch to appserver1:
1. As the UNIX user who will be doing owning the OAS 10.1.2.3 installation: On appserver1, cd to
the directory the where the OAS 10.1.2.3 software has been downloaded and untarred to.
a. Set your environment to point to the desired ORACLE_HOME
b. Export DISPLAY variable
c. Run “linux32 bash” command as OAS 10.1.2.3 installs must be done in 32-bit mode.
2. Run the Installer:
% ./runInstaller
3. The Welcome window opens.
Click Next.
Oracle Retail 13.2 High-Availability Case Study Fusion Middleware Cluster (Part 1) 47
4. The Specify File Locations window opens.
Set the following values:
a. Name = 1014_OIDINFRA
b. Path = /u00/webadmin/product/10.1.4/oidinfra
Click Next.
5. The Select a Product to Install window opens.
Select Oracle Application Server and Developer Suite 10g Rel2 Software Update.
Click Next.
48 Oracle Retail 13.2 High-Availability Case Study Fusion Middleware Cluster (Part 1)
6. The Error window opens.
Click Retry.
7. The Summary window opens.
Verify the installation information.
Click Install.
8. The Setup Priviledges window opens.
Click OK to run root.sh.
Oracle Retail 13.2 High-Availability Case Study Fusion Middleware Cluster (Part 1) 49
9. The End of Installation window opens.
The installation is complete.
Click Exit.
Apply 10.1.2.3 Patch on appserver2
To apply the 10.1.2.3 patch on the appserver2:
1. As the UNIX user who will be doing owning the OAS 10.1.2.3 installation: On appserver2, cd to
the directory the where the OAS 10.1.2.3 software has been downloaded and untarred.
a. Set your environment to point to the desired ORACLE_HOME.
b. Export DISPLAY variable.
c. Run “linux32 bash” command as OAS 10.1.2.3 installs must be done in 32-bit mode.
2. Run the Installer:
% ./runInstaller
50 Oracle Retail 13.2 High-Availability Case Study Fusion Middleware Cluster (Part 1)
3. The Welcome window opens.
Click Next.
4. The Specify File Locations window opens.
Set the following values:
a. Name = 1014_OIDINFRA
b. Path = /u00/webadmin/product/10.1.4/oidinfra
Click Next.
Oracle Retail 13.2 High-Availability Case Study Fusion Middleware Cluster (Part 1) 51
5. Select a Product to Install window opens.
Select Oracle Application Server and Developer Suite 10g Rel2 Software Update.
Click Next.
6. The Error window opens.
Click Retry.
52 Oracle Retail 13.2 High-Availability Case Study Fusion Middleware Cluster (Part 1)
7. The Summary window opens.
Verify the Installation information.
Click Install.
8. The Setup Privileges window opens.
Click OK to run root.sh.
Oracle Retail 13.2 High-Availability Case Study Fusion Middleware Cluster (Part 1) 53
9. The End of Installation window opens.
The installation is complete.
Click Exit.
10. Join cluster nodes to the linux_1014_cluster1
a. Execute this command on appserver1
$ORACLE_HOME/dcm/bin/dcmctl joincluster –cl linux_1014_cluster1
11. Start OPMN on both the nodes, using
$ORACLE_HOME/opmn/bin/opmnctlstartall
12. Enable traffic to both the nodes from Load balancer.
54 Oracle Retail 13.2 High-Availability Case Study Fusion Middleware Cluster (Part 1)
Upgrade Oracle Internet Directory Database
to 11g Release 2
After OAS has been upgraded to 10.1.4.3 and 10.1.2.3, upgrade the OID database to 11.2.0.1 following
steps listed in the My Oracle Support document, Complete Checklist for Manual Upgrades to 11gR2
Note 837570.1.
Oracle Retail 13.2 High-Availability Case Study Fusion Middleware Cluster (Part 1) 55
high availability case study fusion middleware cluster1
Appendix A – Steps to Create a 10g
Release2 OID Database
It is assumed that Oracle 10g release 2 (10.2.0.4) has already been installed.
Create the database as follows:
1. Log in to UNIX as the oracle user; typically the user that owns the Oracle Database software.
2. Create the Oracle recommended OFA directory structure for the database (datafile directories,
adump, bdump, cdump, arch, create, exp, pfile, udump, utl_file_dir).
3. Place an entry in the oratab file for the database and execute oraenv to set the ORACLE_SID and
ORACLE_HOME environment variables.
4. Copy the contents of Appendix B to create the init${ORACLE_SID}.ora file and place in the
directory $ORACLE_BASE/admin/<sid>/pfile. Modify the parameters according to the
requirements of your enviornment.
5. Create a symbolic link from $ORACLE_BASE/admin/<sid>/pfile/init${ORACLE_SID}.ora to
$ORACLE_HOME/dbs/init${ORACLE_SID}.ora.
6. Copy the contents on Appendix C to create the crdb1.sql script. Modify the directory pathes on
the file according to your environement. Login to SQL*Plus as SYSDBA and execute crdb1.sql.
Review the log file for any errors and correct as needed.
7. Copy the contents on Appendix D to create the crdb2.sql script. Log in to SQL*Plus as SYSDBA
and execute crdb2.sql.
8. Copy the contents on Appendix E to create the crdb3.sql script. Log in to SQL*Plus as SYSDBA
and execute crdb3.sql.
Oracle Retail 13.2 High-Availability Case Study Fusion Middleware Cluster (Part 1) 57
high availability case study fusion middleware cluster1
Appendix B – init102.ora
#####################################################################
# File: initDBNAME.ora
#
# History: pfile for 10g OID
#
# DATE WHO PARAMETER OLD NEW
# -------- --- ------------------------- --------------- ---------------
#
#####################################################################
db_cache_size = 144M
java_pool_size = 150M # 150M for initial db creation
log_buffer = 10485760
shared_pool_size = 192M # 350M for initial db creation
shared_pool_reserved_size = 20M # 10% of shared_pool_size
sga_target = 700M
# --------------------------------------------------------------------------------
# The following parameters do not affect SGA size;
# --------------------------------------------------------------------------------
aq_tm_processes = 1
audit_file_dest = <admin_path>/adump
background_dump_dest = <admin_path>/bdump
compatible = 10.2.0.4
control_files = (<datafile_path>/control01.ctl
,<datafile_path>/control02.ctl)
core_dump_dest = <admin_path>/cdump
db_block_size = 8192 # Default is 2k; adjust before db creation, cannot change
after db is created
db_domain = us.oracle.com
db_file_multiblock_read_count = 16 # Platform specific (max io size)/(block size)
db_name = SID
job_queue_processes = 5 # Oracle Retail required; number of cpu's + 1
local_listener = "(ADDRESS=(PROTOCOL=TCP)(HOST=<hostname>)(PORT=1521))"
nls_calendar = GREGORIAN
nls_date_format = DD-MON-RR #
nls_language = AMERICAN # Default
nls_numeric_characters = ".," # Should be explicitly set to ensure all users/batch
get the same results
nls_sort = BINARY # Should be explicitly set to ensure all sessions get the same
order
nls_territory = AMERICA # Default
open_cursors = 900 # Oracle Retail required (minimum=900); default is 50
optimizer_features_enable = 10.2.0.1
optimizer_mode = CHOOSE # Oracle Retail required
pga_aggregate_target = 100M
plsql_optimize_level = 2 # 10g change; use this setting to optimize plsql
performance
plsql_debug = false # 10g change; use this setting to optimize plsql
peformance
processes = 500 # Max number of OS processes that can connect to the db
query_rewrite_enabled = TRUE # Oracle Retail required for function-based indexes
session_cached_cursors = 900 # Oracle Retail required; 10g uses to cache sql
cursors in pl/sql
undo_management = AUTO
undo_retention = 1800 # Currently set for 30 minutes; set to avg length of
transactions in sec
undo_tablespace = undo_ts01
user_dump_dest = <admin_path>/udump
utl_file_dir = <utl_file_path>
workarea_size_policy = auto # Should be set to auto when
pga_aggregate_target is set
#
# *** Archive Logging, set if needed ***
#log_archive_dest_1 = 'location=<admin_path>/arch/'
Oracle Retail 13.2 High-Availability Case Study Fusion Middleware Cluster (Part 1) 59
#log_archive_format = SIDarch_%r_%s_%t.log
#log_archive_max_processes = 1 # Default:1
#log_archive_min_succeed_dest = 1 # Default:1
#log_buffer = 262144 # Set to (512K or 128K)*CPUs
#log_checkpoint_interval = 51200 # Default:0 - unlimited
#log_checkpoint_timeout = 7200 # Default:1800 seconds
60 Oracle Retail 13.2 High-Availability Case Study Fusion Middleware Cluster (Part 1)
Appendix C - crdb1.sql
REM OID Database Creation Script Part 1
spool ${ORACLE_SID}1.log
STARTUP NOMOUNT pfile=${ORACLE_HOME}/dbs/initSID.ora
CREATE DATABASE "SID"
MAXDATAFILES 1000
CHARACTER SET UTF8
DATAFILE
'<datafile_path>/system01.dbf' SIZE 500M AUTOEXTEND ON NEXT 100M MAXSIZE 2000M
LOGFILE
GROUP 1 ('<datafile_path>/redo1a.log') SIZE 1000M,
GROUP 2 ('<datafile_path>/redo2a.log') SIZE 1000M,
GROUP 3 ('<datafile_path>/redo3a.log') SIZE 1000M
DEFAULT TEMPORARY TABLESPACE temp TEMPFILE '<datafile_path>/temp01.dbf' SIZE 5000M EXTENT
MANAGEMENT LOCAL UNIFORM SIZE 1M
UNDO TABLESPACE undo_ts01 DATAFILE '<datafile_path>/undo_ts01_01.dbf' SIZE 5000M
SYSAUX DATAFILE '<datafile_path>/sysaux01.dbf' SIZE 500M AUTOEXTEND ON NEXT 100M MAXSIZE 2000M
create tablespace users datafile ‘<datafile_path>/users01.dbf’ size 100M autoextend on maxsize
500M;
exit
spool off
Oracle Retail 13.2 High-Availability Case Study Fusion Middleware Cluster (Part 1) 61
high availability case study fusion middleware cluster1
Appendix D – crdb2.sql
-- OID Database Creation Script Part 2
--
-- Run this script as sysdba
-- use only in 10.1.0.2 databases or higher
-- Note: This script installs the data dictionary views in addition to
-- granting necessary privileges to public.
spool crdb2.log
REM # install data dictionary views:
PROMPT Running catalog.sql
@$ORACLE_HOME/rdbms/admin/catalog.sql;
PROMPT Running catblock.sql
@$ORACLE_HOME/rdbms/admin/catblock.sql;
PROMPT Running catproc.sql
@$ORACLE_HOME/rdbms/admin/catproc.sql;
PROMPT Running catoctk.sql
@$ORACLE_HOME/rdbms/admin/catoctk.sql;
PROMPT Running catrep.sql
@$ORACLE_HOME/rdbms/admin/catrep.sql;
PROMPT Running owminst.plb
@$ORACLE_HOME/rdbms/admin/owminst.plb;
REM * These privs needed for users to run proper grant code when creating users.
grant select on dba_jobs to public with grant option;
grant select on dba_roles to public with grant option;
grant select on dba_role_privs to public with grant option;
grant execute on dbms_rls to public with grant option;
grant execute on dbms_alert to public;
grant select_catalog_role to public;
grant execute_catalog_role to public;
grant execute on dbms_lock to public;
grant execute on dbms_rls to public;
grant execute on dbms_crypto to public;
grant select on dba_sys_privs to public with grant option;
REM * query rewrite privilege needed to create function-based indexes
grant query rewrite to public;
REM * dbms_system is needed for tracing
grant execute on sys.dbms_system to public;
PROMPT Creating PLAN table owned by SYSTEM
@$ORACLE_HOME/rdbms/admin/utlxplan.sql
PROMPT Creating public synonyn for the plan table
create public synonym PLAN_TABLE for SYSTEM.PLAN_TABLE;
connect SYSTEM/manager
@$ORACLE_HOME/sqlplus/admin/pupbld.sql;
@$ORACLE_HOME/sqlplus/admin/help/hlpbld.sql helpus.sql;
spool off
exit
Oracle Retail 13.2 High-Availability Case Study Fusion Middleware Cluster (Part 1) 63
high availability case study fusion middleware cluster1
Appendix E – crdb3.sql
-- OID Database Creation Script Part 3
--
-- Run this script as sys;
-- This script should not be used in databases less than 10.1.0.2
spool JServer.log
@$ORACLE_HOME/javavm/install/initjvm.sql;
@$ORACLE_HOME/xdk/admin/initxml.sql;
@$ORACLE_HOME/xdk/admin/xmlja.sql;
@$ORACLE_HOME/rdbms/admin/catjava.sql;
@$ORACLE_HOME/rdbms/admin/catexf.sql;
spool off
spool DataMining.log
@?/rdbms/admin/dminst.sql SYSAUX TEMP
spool off
spool context.log
@$ORACLE_HOME/ctx/admin/catctx change_on_install SYSAUX TEMP NOLOCK;
connect CTXSYS/change_on_install
@$ORACLE_HOME/ctx/admin/defaults/drdefus.sql
spool off
spool xdb_protocol.log
connect / as sysdba
@$ORACLE_HOME/rdbms/admin/catqm.sql change_on_install SYSAUX TEMP;
spool off
spool Intermedia.log
@?/ord/admin/ordinst.sql SYSAUX SYSAUX
@?/ord/im/admin/iminst.sql
spool off
spool Spatial.log
@?/md/admin/mdinst.sql
spool off
spool UltraSearch.log
host echo "define OH = $ORACLE_HOME" > /tmp/oh.sql
@/tmp/oh.sql
host rm /tmp/oh.sql
@?/ultrasearch/admin/wk0setup.sql &OH '' SYS change_on_install 'as sysdba'
change_on_install SYSAUX TEMP PORTAL false DATABASE ':' '&OH/jdbc/lib/classes12.zip'
'&OH/jdbc/lib/orai18n.jar' '&OH/jdk/bin/java' '&OH/ctx/bin/ctxhx' NOT_INITIALIZED
NOT_INITIALIZED &OH
@?/ultrasearch/admin/wk0cfg.sql change_on_install '' 'false' '' &OH
'&OH/jdbc/lib/classes12.zip' '&OH/jdbc/lib/orai18n.jar' '&OH/jdk/jre/'
'&OH/jdk/bin/java' ':' '&OH/ctx/bin/ctxhx'
spool off
@$ORACLE_HOME/rdbms/admin/utlrp.sql
65 Oracle Retail 13.2 High-Availability Case Study Fusion Middleware Cluster (Part 1)
Copyright © 2011, Oracle and/or its affiliates. All rights reserved. This document is provided for information purposes only and the contents hereof are subject to change without
notice. This document is not warranted to be error-free, nor subject to any other warranties or conditions, whether expressed orally or implied in law, including implied warranties and
conditions of merchantability or fitness for a particular purpose. We specifically disclaim any liability with respect to this document and no contractual obligations are formed either
directly or indirectly by this document. This document may not be reproduced or transmitted in any form or by any means, electronic or mechanical, for any purpose, without our prior
written permission.
Oracle is a registered trademark of Oracle Corporation and/or its affiliates. Other names may be trademarks of their respective owners.
Author: Amandeep Bhatti
Oracle Corporation
World Headquarters
500 Oracle Parkway
Redwood Shores, CA 94065
U.S.A.
Worldwide Inquiries:
Phone: +1.650.506.7000
Fax: +1.650.506.7200
oracle.com
Copyright © 2011, Oracle. All rights reserved.
This document is provided for information purposes only and the
contents hereof are subject to change without notice.
This document is not warranted to be error-free, nor subject to any
other warranties or conditions, whether expressed orally or implied
in law, including implied warranties and conditions of merchantability
or fitness for a particular purpose. We specifically disclaim any
liability with respect to this document and no contractual obligations
are formed either directly or indirectly by this document. This document
may not be reproduced or transmitted in any form or by any means,
electronic or mechanical, for any purpose, without our prior written permission.
Oracle is a registered trademark of Oracle Corporation and/or its affiliates.
Other names may be trademarks of their respective owners.

More Related Content

What's hot (18)

PDF
Post-Install_Actions_and_Considerations_for_Oracle_WebLogic_Server_Patch_Set_...
Ivan Hui
 
PDF
Developing with oracle enterprise scheduler service for fusion applications
Chandrakant Wanare ☁
 
PPTX
Data archival tool
Soumendu Gorai
 
PDF
Oracle e-business suite R12 step by step Installation
OraERP
 
PDF
security-checklist-database
Mohsen B
 
PDF
Ascp
Maruthi k
 
PDF
Performance in the Oracle Cloud
Kellyn Pot'Vin-Gorman
 
PDF
120cioig
Charan Reddy
 
PDF
120posig
vinodchun
 
PDF
Sca bpel-1.1-spec
Vibhor Rastogi
 
PDF
Using backlog-management
rani0028
 
PDF
Oracle ebs r12_architecture
srinivas sunkara
 
PDF
Con11257 schifano con11257-best practices for deploying highly scalable virtu...
Berry Clemens
 
PDF
Otn siebel obrm integration
Kasi Viswanathan
 
PDF
As novidades do Java EE 7: do HTML5 ao JMS 2.0
Bruno Borges
 
PPTX
Presentation upgrade, migrate &amp; consolidate to oracle database 12c &amp...
solarisyougood
 
PDF
R12 opm api
Dheeraj Thapa
 
PPT
Ugf9796 weblogic for ebs and obiee
Berry Clemens
 
Post-Install_Actions_and_Considerations_for_Oracle_WebLogic_Server_Patch_Set_...
Ivan Hui
 
Developing with oracle enterprise scheduler service for fusion applications
Chandrakant Wanare ☁
 
Data archival tool
Soumendu Gorai
 
Oracle e-business suite R12 step by step Installation
OraERP
 
security-checklist-database
Mohsen B
 
Ascp
Maruthi k
 
Performance in the Oracle Cloud
Kellyn Pot'Vin-Gorman
 
120cioig
Charan Reddy
 
120posig
vinodchun
 
Sca bpel-1.1-spec
Vibhor Rastogi
 
Using backlog-management
rani0028
 
Oracle ebs r12_architecture
srinivas sunkara
 
Con11257 schifano con11257-best practices for deploying highly scalable virtu...
Berry Clemens
 
Otn siebel obrm integration
Kasi Viswanathan
 
As novidades do Java EE 7: do HTML5 ao JMS 2.0
Bruno Borges
 
Presentation upgrade, migrate &amp; consolidate to oracle database 12c &amp...
solarisyougood
 
R12 opm api
Dheeraj Thapa
 
Ugf9796 weblogic for ebs and obiee
Berry Clemens
 

Viewers also liked (20)

PPTX
OAuth2介紹
升煌 黃
 
PDF
High Availability with Novell Cluster Services for Novell Open Enterprise Ser...
Novell
 
PPTX
Docker集群管理 工具篇
Guangya Liu
 
PDF
Cluster in linux
Nguyen Hoang
 
PPTX
Docker - 30秒生出100台伺服器
升煌 黃
 
PDF
VMware HA deep Dive
Eric Sloof
 
PDF
Building High Availability Clusters with SUSE Linux Enterprise High Availabil...
Novell
 
PPT
Pacemaker+DRBD
Dan Frincu
 
PDF
linux-enterprise-cluster
Kurtuluş Karasu
 
PDF
SLE12 SP2 : High Availability et Geo Cluster
SUSE
 
PPTX
Maria DB Galera Cluster for High Availability
OSSCube
 
PPTX
Metro Cluster High Availability or SRM Disaster Recovery?
David Pasek
 
PPTX
KubeCon EU 2016: Secure, Cloud-Native Networking with Project Calico
KubeAcademy
 
PDF
Why SaltStack ?
SUSE
 
PDF
SUSE OpenStack Cloud 7
SUSE
 
PDF
Introduction - vSphere 5 High Availability (HA)
Eric Sloof
 
PDF
Docker home ted
Layne Peng
 
PPT
Cluster Computers
shopnil786
 
PDF
認識那條鯨魚 Docker 初探
仲昀 王
 
PDF
Docker應用
Jui An Huang (黃瑞安)
 
OAuth2介紹
升煌 黃
 
High Availability with Novell Cluster Services for Novell Open Enterprise Ser...
Novell
 
Docker集群管理 工具篇
Guangya Liu
 
Cluster in linux
Nguyen Hoang
 
Docker - 30秒生出100台伺服器
升煌 黃
 
VMware HA deep Dive
Eric Sloof
 
Building High Availability Clusters with SUSE Linux Enterprise High Availabil...
Novell
 
Pacemaker+DRBD
Dan Frincu
 
linux-enterprise-cluster
Kurtuluş Karasu
 
SLE12 SP2 : High Availability et Geo Cluster
SUSE
 
Maria DB Galera Cluster for High Availability
OSSCube
 
Metro Cluster High Availability or SRM Disaster Recovery?
David Pasek
 
KubeCon EU 2016: Secure, Cloud-Native Networking with Project Calico
KubeAcademy
 
Why SaltStack ?
SUSE
 
SUSE OpenStack Cloud 7
SUSE
 
Introduction - vSphere 5 High Availability (HA)
Eric Sloof
 
Docker home ted
Layne Peng
 
Cluster Computers
shopnil786
 
認識那條鯨魚 Docker 初探
仲昀 王
 
Ad

Similar to high availability case study fusion middleware cluster1 (20)

PDF
Oracle Database 12c with RAC High Availability Best Practices
Markus Michalewicz
 
DOC
Migrating from Single Instance to RAC Data guard
Fuad Arshad
 
PPT
Oracle 10g Application Server
Mark J. Feldman
 
PDF
Oracle RAC 12c Overview
Markus Michalewicz
 
PDF
MIgrating to RAC using Dataguard
Fuad Arshad
 
PPTX
Oracle Database Appliance
vkv_vkv
 
PDF
Infrastruttura Scalabile Per Applicazioni Aziendali Oracle - Virtualise wit...
Walter Moriconi
 
PDF
1 Pdfsam
Emanuel Mateus
 
PDF
1 Rac
Emanuel Mateus
 
PDF
Running the Grid on Linux
Dan Tervo
 
PPT
Delivering Business Value with the Next Generation Data Center
George Demarest
 
PPT
Grid Economics for the Next Generation Data Center
George Demarest
 
PDF
Oracle RAC - Customer Proven Scalability
Markus Michalewicz
 
PDF
The Oracle RAC Family of Solutions - Presentation
Markus Michalewicz
 
PDF
41 Rac
Emanuel Mateus
 
PDF
41 Pdfsam
Emanuel Mateus
 
PDF
Oracle RAC and Your Way to the Cloud by Angelo Pruscino
Markus Michalewicz
 
PDF
Oracle Database Appliance - Introduction in Cyprus
Andy Panayiotou
 
PDF
PDoolan Oracle Overview
Peter Doolan
 
PPTX
AMIS Oracle OpenWorld en Code One Review 2018 - Pillar 2: SaaS
Getting value from IoT, Integration and Data Analytics
 
Oracle Database 12c with RAC High Availability Best Practices
Markus Michalewicz
 
Migrating from Single Instance to RAC Data guard
Fuad Arshad
 
Oracle 10g Application Server
Mark J. Feldman
 
Oracle RAC 12c Overview
Markus Michalewicz
 
MIgrating to RAC using Dataguard
Fuad Arshad
 
Oracle Database Appliance
vkv_vkv
 
Infrastruttura Scalabile Per Applicazioni Aziendali Oracle - Virtualise wit...
Walter Moriconi
 
1 Pdfsam
Emanuel Mateus
 
Running the Grid on Linux
Dan Tervo
 
Delivering Business Value with the Next Generation Data Center
George Demarest
 
Grid Economics for the Next Generation Data Center
George Demarest
 
Oracle RAC - Customer Proven Scalability
Markus Michalewicz
 
The Oracle RAC Family of Solutions - Presentation
Markus Michalewicz
 
41 Pdfsam
Emanuel Mateus
 
Oracle RAC and Your Way to the Cloud by Angelo Pruscino
Markus Michalewicz
 
Oracle Database Appliance - Introduction in Cyprus
Andy Panayiotou
 
PDoolan Oracle Overview
Peter Doolan
 
AMIS Oracle OpenWorld en Code One Review 2018 - Pillar 2: SaaS
Getting value from IoT, Integration and Data Analytics
 
Ad

Recently uploaded (20)

PDF
community health nursing question paper 2.pdf
Prince kumar
 
PPTX
How to Handle Salesperson Commision in Odoo 18 Sales
Celine George
 
PDF
Biological Bilingual Glossary Hindi and English Medium
World of Wisdom
 
PDF
CONCURSO DE POESIA “POETUFAS – PASSOS SUAVES PELO VERSO.pdf
Colégio Santa Teresinha
 
PPTX
How to Convert an Opportunity into a Quotation in Odoo 18 CRM
Celine George
 
PDF
DIGESTION OF CARBOHYDRATES,PROTEINS,LIPIDS
raviralanaresh2
 
PDF
0725.WHITEPAPER-UNIQUEWAYSOFPROTOTYPINGANDUXNOW.pdf
Thomas GIRARD, MA, CDP
 
PPTX
I AM MALALA The Girl Who Stood Up for Education and was Shot by the Taliban...
Beena E S
 
PDF
QNL June Edition hosted by Pragya the official Quiz Club of the University of...
Pragya - UEM Kolkata Quiz Club
 
PPTX
MENINGITIS: NURSING MANAGEMENT, BACTERIAL MENINGITIS, VIRAL MENINGITIS.pptx
PRADEEP ABOTHU
 
PPTX
A PPT on Alfred Lord Tennyson's Ulysses.
Beena E S
 
PPTX
Neurodivergent Friendly Schools - Slides from training session
Pooky Knightsmith
 
PDF
The History of Phone Numbers in Stoke Newington by Billy Thomas
History of Stoke Newington
 
PDF
Chapter-V-DED-Entrepreneurship: Institutions Facilitating Entrepreneurship
Dayanand Huded
 
PDF
BÀI TẬP BỔ TRỢ TIẾNG ANH 8 - GLOBAL SUCCESS - CẢ NĂM - NĂM 2024 (VOCABULARY, ...
Nguyen Thanh Tu Collection
 
PDF
The-Ever-Evolving-World-of-Science (1).pdf/7TH CLASS CURIOSITY /1ST CHAPTER/B...
Sandeep Swamy
 
PDF
Generative AI: it's STILL not a robot (CIJ Summer 2025)
Paul Bradshaw
 
PDF
ARAL_Orientation_Day-2-Sessions_ARAL-Readung ARAL-Mathematics ARAL-Sciencev2.pdf
JoelVilloso1
 
PDF
The dynastic history of the Chahmana.pdf
PrachiSontakke5
 
PPTX
How to Manage Large Scrollbar in Odoo 18 POS
Celine George
 
community health nursing question paper 2.pdf
Prince kumar
 
How to Handle Salesperson Commision in Odoo 18 Sales
Celine George
 
Biological Bilingual Glossary Hindi and English Medium
World of Wisdom
 
CONCURSO DE POESIA “POETUFAS – PASSOS SUAVES PELO VERSO.pdf
Colégio Santa Teresinha
 
How to Convert an Opportunity into a Quotation in Odoo 18 CRM
Celine George
 
DIGESTION OF CARBOHYDRATES,PROTEINS,LIPIDS
raviralanaresh2
 
0725.WHITEPAPER-UNIQUEWAYSOFPROTOTYPINGANDUXNOW.pdf
Thomas GIRARD, MA, CDP
 
I AM MALALA The Girl Who Stood Up for Education and was Shot by the Taliban...
Beena E S
 
QNL June Edition hosted by Pragya the official Quiz Club of the University of...
Pragya - UEM Kolkata Quiz Club
 
MENINGITIS: NURSING MANAGEMENT, BACTERIAL MENINGITIS, VIRAL MENINGITIS.pptx
PRADEEP ABOTHU
 
A PPT on Alfred Lord Tennyson's Ulysses.
Beena E S
 
Neurodivergent Friendly Schools - Slides from training session
Pooky Knightsmith
 
The History of Phone Numbers in Stoke Newington by Billy Thomas
History of Stoke Newington
 
Chapter-V-DED-Entrepreneurship: Institutions Facilitating Entrepreneurship
Dayanand Huded
 
BÀI TẬP BỔ TRỢ TIẾNG ANH 8 - GLOBAL SUCCESS - CẢ NĂM - NĂM 2024 (VOCABULARY, ...
Nguyen Thanh Tu Collection
 
The-Ever-Evolving-World-of-Science (1).pdf/7TH CLASS CURIOSITY /1ST CHAPTER/B...
Sandeep Swamy
 
Generative AI: it's STILL not a robot (CIJ Summer 2025)
Paul Bradshaw
 
ARAL_Orientation_Day-2-Sessions_ARAL-Readung ARAL-Mathematics ARAL-Sciencev2.pdf
JoelVilloso1
 
The dynastic history of the Chahmana.pdf
PrachiSontakke5
 
How to Manage Large Scrollbar in Odoo 18 POS
Celine George
 

high availability case study fusion middleware cluster1

  • 1. Oracle Retail 13.2 High- Availability Case Study Fusion Middleware Cluster (Part 1) An Oracle Case Study April 2011 Copyright © 2011, Oracle and/or its affiliates. All rights reserved. This document is provided for information purposes only and the contents hereof are subject to change without notice. This document is not warranted to be error-free, nor subject to any other warranties or conditions, whether expressed orally or implied in law, including implied warranties and conditions of merchantability or fitness for a particular purpose. We specifically disclaim any liability with respect to this document and no contractual obligations are formed either directly or indirectly by this document. This document may not be reproduced or transmitted in any form or by any means, electronic or mechanical, for any purpose, without our prior written permission. Oracle is a registered trademark of Oracle Corporation and/or its affiliates. Other names may be trademarks of their respective owners.
  • 2. Note: The following is intended to outline our general product direction. It is intended for information purposes only, and may not be incorporated into any contract. It is not a commitment to deliver any material, code, or functionality, and should not be relied upon in making purchasing decisions. The development, release, and timing of any features or functionality described for Oracle’s products remains at the sole discretion of Oracle. Copyright © 2011, Oracle and/or its affiliates. All rights reserved. This document is provided for information purposes only and the contents hereof are subject to change without notice. This document is not warranted to be error-free, nor subject to any other warranties or conditions, whether expressed orally or implied in law, including implied warranties and conditions of merchantability or fitness for a particular purpose. We specifically disclaim any liability with respect to this document and no contractual obligations are formed either directly or indirectly by this document. This document may not be reproduced or transmitted in any form or by any means, electronic or mechanical, for any purpose, without our prior written permission. Oracle is a registered trademark of Oracle Corporation and/or its affiliates. Other names may be trademarks of their respective owners.
  • 3. Contents Installation Overview...............................................................................................................1 Create Metadata Repository RAC Database .........................................................................2 Create Oracle 10g Release 2 Single Instance Oracle Internet Directory Database...................2 Convert Oracle 10g Release 2 Single Instance OID Database to RAC.......................................2 Configure a Shared spfile .............................................................................................................3 Prepare Database for RAC............................................................................................................4 Prepare dbserver2 for the Second Instance ................................................................................4 Startup Instance 2...........................................................................................................................5 Configure SRVCTL........................................................................................................................5 Configure TNSNAMES.ora..........................................................................................................6 Populate Metadata Repository Schemas Using REPCA .............................................................7 Create a Password File for the OID Database............................................................................7 Running the OracleAS Metadata Repository Creation Assistant ...........................................7 Install Oracle Application Server 10.1.4 Identity Management Software.........................13 Preparation work for OAS 10.1.4.0.1 Cluster Install..................................................................13 Installing OAS 10.1.4.0.1 Identity Management on appserver1...............................................14 Installing OAS 10.1.4.0.1 IM on appserver2................................................................................23 Upgrade to Release 10.1.4.3.0........................................................................................................34 Installing the OAS 10.1.4.3 Patch on appserver1........................................................................35 Installing the OAS 10.1.4.3 Patch on appserver2........................................................................41 Install Oracle Application Server 10.1.2.3 Identity Management Software Only.............47 Preparation for Oracle Application Server 10.1.2.3 Cluster Install..........................................47 Apply 10.1.2.3 Patch to appserver1..............................................................................................47 Apply 10.1.2.3 Patch on appserver2.............................................................................................50 Upgrade Oracle Internet Directory Database to 11g Release 2 ........................................55 Appendix A – Steps to Create a 10g Release2 OID Database...........................................57 Appendix B – init102.ora.......................................................................................................59 Appendix C - crdb1.sql..........................................................................................................61 Appendix D – crdb2.sql.........................................................................................................63 Appendix E – crdb3.sql .........................................................................................................65 Copyright © 2011, Oracle and/or its affiliates. All rights reserved. This document is provided for information purposes only and the contents hereof are subject to change without notice. This document is not warranted to be error-free, nor subject to any other warranties or conditions, whether expressed orally or implied in law, including implied warranties and conditions of merchantability or fitness for a particular purpose. We specifically disclaim any liability with respect to this document and no contractual obligations are formed either directly or indirectly by this document. This document may not be reproduced or transmitted in any form or by any means, electronic or mechanical, for any purpose, without our prior written permission. Oracle is a registered trademark of Oracle Corporation and/or its affiliates. Other names may be trademarks of their respective owners.
  • 4. Installation Overview Oracle Retail applications can be deployed in a grid computing environment, using Oracle Fusion Middleware active-active clustering and Oracle Real Application Cluster (RAC) databases to provide high availability and scalability. This configuration allows lower-cost commodity systems to be combined into a single scalable, fault-tolerant computing environment. There are many options to configure an Oracle grid computing environment, and these options can have a significant impact on how the environment is configured and built. The intent of this case study is not to provide exhaustive documentation on all possible ways to configure a suitable grid computing environment for Oracle Retail, but rather to document a specific configuration that was used for verification purposes. Because of this, the specific installation steps documented in this case study only apply in their entirety to the exact hardware and software configuration described in this case study. This portion of the case study details the steps needed to create the high-availability Oracle Internet Directory (OID) RAC database and Oracle Application Server (OAS) 10.1.4.3 cluster used for Oracle Retail development: Create Metadata Repository RAC database – Create Oracle 10g Release 2 single instance Oracle Internet Directory database. – Convert Oracle 10gRelease 2 single instance OID database to RAC. – Populate Metadata Repository schemas using REPCA (Oracle Application Server Metadata Repository Creation Assistant) Install OAS 10.1.4.0.1 Identity Management cluster Upgrade OAS 10.1.4.0.1 Identity Management cluster installation to 10.1.4.3.0 Upgrade OAS 10.1.4.3.0 Identity Management cluster installation with 10.1.2.3 software only. This (10.1.2.3) updates different components than 10.1.4.3.0. Upgrade Oracle Internet Directory database to 11g Release 2 Note: This document uses the hostnames appserver1, appserver2, and appserver12vip.us.oracle.com for different systems in the cluster. You should substitute the appropriate names of the hosts for your installation. In some cases, the screenshots show redevlv0123, redevlv0124 and redevlv0123-0124-vip.us.oracle.com which are appserver1, appserver2, and appserver12vip.us.oracle.com respectively. It also uses dbserver1 and dbserver2 for different db systems in the cluster. You should substitute the appropriate names of the hosts for your installation. In some cases text and screen shots show mspdev53 and mspdev54, which are dbserver1 and dbserver2 respectively. Oracle Retail 13.2 High-Availability Case Study Fusion Middleware Cluster (Part 1) 1
  • 5. Create Metadata Repository RAC Database This section describes how to create a metadata repository RAC database. Create Oracle 10g Release 2 Single Instance Oracle Internet Directory Database To create an Oracle 10g Release 2 single instance Oracle Internet Directory database: 1. If a single-instance 10g Release 2 OID doesn’t already exists, create one on dbserver1 following the instructions as per Appendix A – Steps to Create a 10gR2 OID database. Be sure to include the additional init.ora parameters: db_domain = us.oracle.com compatible = 10.2.0.4 aq_tm_processes = 1 db_cache_size = 144M Note: Ensure that the crdb3.sql script is updated to match the script found in Appendix E, because this loads necessary modules for the OID metadata repository installation. Convert Oracle 10g Release 2 Single Instance OID Database to RAC This part of the document displays how to convert a single instance database to a RAC database with two instances. The example assumes real filesystems are used to host the shared database files (either a cluster filesystem or NFS mount points). Additional information can be found in the Oracle Retail 13.2 High Availability Case Study RAC document. This document assumes the following environment: Database Name odolr04 (name just created in the previous step) Datafile paths /u03/oradata/odolr04/*.dbf, /u04/oradata/odolr04/*.dbf Archivelog path /arch/odolr04 Dbserver1 Name: dbserver1 Instance1 Name odolr041 Instance1 Undo TS UNDO_TS01 Dbserver2 Name dbserver2 Instance2 Name odolr042 Instance 2 Undo TS UNDO_TS02 The database and instance 1 should already exist. 2 Oracle Retail 13.2 High-Availability Case Study Fusion Middleware Cluster (Part 1)
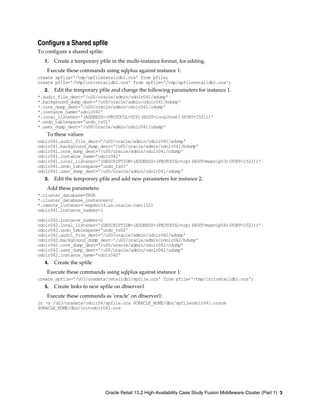
  • 6. Configure a Shared spfile To configure a shared spfile: 1. Create a temporary pfile in the multi-instance format, for editing. Execute these commands using sqlplus against instance 1: create spfile='/tmp/spfileretaildb1.ora' from pfile; create pfile='/tmp/initretaildb1.ora' from spfile='/tmp/spfileretaildb1.ora'; 2. Edit the temporary pfile and change the following parameters for instance 1. *.audit_file_dest='/u00/oracle/admin/odolr041/adump' *.background_dump_dest='/u00/oracle/admin/odolr041/bdump' *.core_dump_dest='/u00/oracle/admin/odolr041/cdump' *.instance_name='odolr041' *.local_listener='(ADDRESS=(PROTOCOL=TCP)(HOST=localhost)(PORT=1521))' *.undo_tablespace='undo_ts01' *.user_dump_dest='/u00/oracle/admin/odolr041/udump' To these values: odolr041.audit_file_dest='/u00/oracle/admin/odolr041/adump' odolr041.background_dump_dest='/u00/oracle/admin/odolr041/bdump' odolr041.core_dump_dest='/u00/oracle/admin/odolr041/cdump' odolr041.instance_name='odolr041' odolr041.local_listener='(DESCRIPTION=(ADDRESS=(PROTOCOL=tcp)(HOST=mspvip53)(PORT=1521))' odolr041.undo_tablespace='undo_ts01' odolr041.user_dump_dest='/u00/oracle/admin/odolr041/udump' 3. Edit the temporary pfile and add new parameters for instance 2. Add these parameters: *.cluster_database=TRUE *.cluster_database_instances=2 *.remote_listener= mspdvcl4.us.oracle.com:1521 odolr041.instance_number=1 odolr042.instance_number=2 odolr042.local_listener='(DESCRIPTION=(ADDRESS=(PROTOCOL=tcp)(HOST=mspvip54)(PORT=1521))' odolr042.undo_tablespace='undo_ts02' odolr042.audit_file_dest='/u00/oracle/admin/odolr042/adump' odolr042.background_dump_dest='/u00/oracle/admin/odolr042/bdump' odolr042.core_dump_dest='/u00/oracle/admin/odolr042/cdump' odolr042.user_dump_dest='/u00/oracle/admin/odolr042/udump' odolr042.instance_name='odolr042' 4. Create the spfile Execute these commands using sqlplus against instance 1: create spfile='/u03/oradata/retaildb1/spfile.ora' from pfile='/tmp/initretaildb1.ora'; 5. Create links to new spfile on dbserver1 Execute these commands as ‘oracle’ on dbserver1: ln -s /u03/oradata/odolr04/spfile.ora $ORACLE_HOME/dbs/spfileodolr041.orarm $ORACLE_HOME/dbs/initodolr041.ora Oracle Retail 13.2 High-Availability Case Study Fusion Middleware Cluster (Part 1) 3
  • 7. Prepare Database for RAC To prepare the database for RAC: 1. Restart instance 1 and ensure parameters changed above are in effect. Execute the following commands from sqlplus against instance 1: shutdown immediate startup show parameter cluster show parameter instance show parameter undo 2. Add and enable a second thread of redo: Execute the following command from sqlplus against instance 1: alter database add logfile thread 2 group 4 ('/u04/oradata/retaildb1/redo04a.log', '/u03/oradata/retaildb1/redo04b.log') size 100M, group 5 ('/u04/oradata/retaildb1/redo05a.log', '/u03/oradata/retaildb1/redo05b.log') size 100M, group 6 ('/u04/oradata/retaildb1/redo06a.log', '/u03/oradata/retaildb1/redo06b.log') size 100M; alter database enable public thread 2; 3. Create a second undo tablespace: Execute the following command from sqlplus against instance 1: create undo tablespace undo_ts02 datafile '/u04/oradata/retaildb1/undo_ts0201.dbf' size 500M; Prepare dbserver2 for the Second Instance To prepare dbserver2 for the second instance: 1. Add Instance 2 to the oratab on Host 2 odolr042:/u00/oracle/product/10.2.0.4:Y 2. Create an $ORACLE_BASE/admin structure for Instance 2. Execute the following commands as ‘oracle’ on host 2: mkdir $ORACLE_BASE/admin/odolr042 mkdir $ORACLE_BASE/admin/odolr042/adhoc mkdir $ORACLE_BASE/admin/odolr042/adump mkdir $ORACLE_BASE/admin/odolr042/bdump mkdir $ORACLE_BASE/admin/odolr042/cdump mkdir $ORACLE_BASE/admin/odolr042/create mkdir $ORACLE_BASE/admin/odolr042/pfile mkdir $ORACLE_BASE/admin/odolr042/udump 3. Create file links. Execute the following commands as ‘oracle’ on host 2: ln -s /u03/oradata/odolr04/spfile.ora $ORACLE_HOME/dbs/spfileodolr042.ora 4 Oracle Retail 13.2 High-Availability Case Study Fusion Middleware Cluster (Part 1)
  • 8. Startup Instance 2 To startup instance2: 1. Start up instance 2 and ensure parameters are in effect. Execute the following commands from sqlplus against instance 2: startup show parameter cluster show parameter instance show parameter undo 2. Verify v$active_instances shows both instances. Execute the following query in sqlplus against each instance: select * from v$active_instances; Configure SRVCTL To configure SRVCTL: 1. Add the database and both instances to the srvctl registry. Execute the following commands as ‘oracle’ on either host: srvctl add database -d odolr04 -o /u00/oracle/product/10.2.0.4 srvctl add instance -d odolr04 -i odolr041 -n mspdev53 srvctl add instance -d odolr04 -i odolr042 -n mspdev54 2. Verify the instances have been added as CRS resources. Execute the following command as ‘oracle’ on either host: export ORA_CRS_HOME=/u00/crs/oracle/product/11.2.0 crs_stat -t Crsstat should show output similar to this: HA Resource Target State ora.odolr04.db ONLINE ONLINE on mspdev54 ora.odolr04.odolr041.ins ONLINE ONLINE on mspdev53 ora.odolr04.odolr042.inst ONLINE ONLINE on mspdev54 ora.mspdev53.LISTENER_MSPDEV53.lsnr ONLINE ONLINE on mspdev53 ora.mspdev53.gsd ONLINE ONLINE on mspdev53 ora.mspdev53.ons ONLINE ONLINE on mspdev53 ora.mspdev53.vip ONLINE ONLINE on mspdev53 ora.mspdev54.LISTENER_MSPDEV54.lsnr ONLINE ONLINE on mspdev54 ora.mspdev54.gsd ONLINE ONLINE on mspdev54 ora.mspdev54.ons ONLINE ONLINE on mspdev54 ora.mspdev54.vip ONLINE ONLINE on mspdev54 Oracle Retail 13.2 High-Availability Case Study Fusion Middleware Cluster (Part 1) 5
  • 9. If the output doesn’t state that the target & state are online, then shutdown both instances manually, and restart the database using srvctl: Example: srvctl start database –d odolr04 If after the restart all targets aren’t online, wait a minute. Sometimes it takes a couple of minutes for the target to reflect the correct online status. Configure TNSNAMES.ora To configure TNSNAMES.ora: 1. The following tnsnames entries should be put into $ORACLE_HOME/network/admin and can be used to connect to the RAC database (load-balanced across both instances). Note: Scan.domain should be replaced with the scan name used during CRS installation. odolr04 = (DESCRIPTION = (ADDRESS_LIST = (LOAD_BALANCE = yes) (ADDRESS = (PROTOCOL = TCP)(HOST = scan.domain)(PORT = 1521)) ) (CONNECT_DATA = (SERVICE_NAME = odolr04)) ) 2. The following tnsnames entries can be used to connect to a specific instance. odolr041 = (DESCRIPTION = (ADDRESS_LIST = (ADDRESS = (PROTOCOL = TCP)(HOST = scan.domain)(PORT = 1521)) ) (CONNECT_DATA = (SERVICE_NAME = odolr04) (INSTANCE_NAME= odolr041) ) ) odolr042 = (DESCRIPTION = (ADDRESS_LIST = (ADDRESS = (PROTOCOL = TCP)(HOST = scan.domain)(PORT = 1521)) ) (CONNECT_DATA = (SERVICE_NAME = odolr04) (INSTANCE_NAME= odolr042) ) ) 6 Oracle Retail 13.2 High-Availability Case Study Fusion Middleware Cluster (Part 1)
  • 10. Populate Metadata Repository Schemas Using REPCA This section describes how to propulate metadata repository schemas using REPCA. Create a Password File for the OID Database To create a password file for the OID database: 1. Log into UNIX as oracle and set $ORACLE_HOME. 2. change directories to $ORACLE_HOME/bin. 3. Type the following to create a password file: orapwd file=/u05/oradata/odolr04/orapwodolr04 password=<SYS DB password> 4. Set the remote_login_passwordfile parameter in the spfile by connecting to the database and issuing the following command: alter system set remote_login_passwordfile=exclusive scope=spfile; 5. Shutdown the database by issuing the following command: shutdown immediate. 6. On DBServer1, create links to the password file: cd to $ORACLE_HOME/dbs ln –s <db passwordfile location>/orapw<dbname> orapw<instance name> Example: ln -s /u00/oradata/odolr04/orapw<dbname> orapw<instance number> 7. Start the database by issuing the following command: startup; 8. Test connectivity: sqlplus “sys/syspassword@sid as sysdba”. Running the OracleAS Metadata Repository Creation Assistant This case study assumes that the Metadata Repository Creation Assistant has already been installed on an existing server in your environment. If not, download and install the software before proceeding. 1. Export your Display variable. 2. Change directories to $ORACLE_HOME/repca. 3. Ensure the listener for the target database is up and running. 4. Start repca by issuing the following command in $ORACLE_HOME/repca. % ./runRepca Oracle Retail 13.2 High-Availability Case Study Fusion Middleware Cluster (Part 1) 7
  • 11. 5. The Welcome window appears. Click Next. 6. The OracleAS RepCAwindow appears. For Step 1 of 2, specify the Oracle Home Path. Oracle Home Path = <$ORACLE_HOME on db server> Log File Directory: /u00/webadmin/product/10.1.4.1/repca/assistants/repca/log Click Next. 8 Oracle Retail 13.2 High-Availability Case Study Fusion Middleware Cluster (Part 1)
  • 12. 7. The OracleAS RepCA window appears. For Step 2 of 2, select the operation Load. Click Next. 8. The OracleAS RepCA window appears. For Step 1 of 4, specify the Database Connection Information: Enter the SYS password. Select the Real Application Clusters Database option. Hostname and Port: dbserver1:1521,dbserver2:1521 Service Name: <db_name>.us.oracle.com Click Next. Oracle Retail 13.2 High-Availability Case Study Fusion Middleware Cluster (Part 1) 9
  • 13. 9. The Database Validations window opens. The RepCA will display the following status window. Wait until it is finished before you continue. If the database does not meet the requirements, the RepCA will display an error message. 10. The OracleAS RepCA window opens. For Step 2 of 4, specify the storage option. Select Regular or Cluster File System. Click Next. 11. The OracleAS RepCA window opens. For Step 3 of 4, specify the tablespace information as Use Same Directory for All Tablespaces. Then change the location of the database files to a shared filesystem location. 10 Oracle Retail 13.2 High-Availability Case Study Fusion Middleware Cluster (Part 1)
  • 14. Click Next. 12. The Running Tablespace Validations status window opens. Wait until it is finished before you continue. 13. Click Yes to confirm the Tablespace AutoExtensible Requirements. 14. The Running Tablespace Validations status window opens again. Wait until it is finished before you continue. Oracle Retail 13.2 High-Availability Case Study Fusion Middleware Cluster (Part 1) 11
  • 15. 15. The OracleAS RepCA window opens. For Step 4 of 4, the RepCA starts loading the repository. Wait for the status to complete. 16. The Summary window opens. The installation is complete. Click OK. $ORACLE_HOME/dcm/bin/dcmctl joincluster –cl linux_1014_cluster1 12 Oracle Retail 13.2 High-Availability Case Study Fusion Middleware Cluster (Part 1)
  • 16. Install Oracle Application Server 10.1.4 Identity Management Software This section describes how to install the Oracle Application Server 10.1.4 Identity Management Software. Preparation work for OAS 10.1.4.0.1 Cluster Install To prepare the work for OAS 10.1.4.0.1 cluster install: 1. As the UNIX user who will be owning the Identity management 10.1.4 installation: a. On appserver1 and appserver2 that will make up the Identity Management cluster b. Ceate the 10.1.4 directory. c. Change directories to /u00/webadmin/product. d. Make the 10.1.4 directory using the following command: mkdir 10.1.4. e. Change directories to /u00/webadmin/product/10.1.4. f. Make the oidinfra directory using the following command: mkdir oidinfra g. Synchronize Clocks on both the nodes. h. Set up /etc/hosts on both nodes as IP host.domain alias. 2. Configure the Load Balancer to direct all traffic to appserver1 initially. 3. Set up cookie persitance for on the Load Balancer. 4. As the UNIX user who will be owning the OAS 10.1.4 installation: a. On appserver1, change directories to the directory where the OAS 10.1.4 software has been downloaded and untarred to. b. Set your environment to point to the desired ORACLE_HOME. c. Eport DISPLAY variable. d. Run linux32 bash command as OAS 10.1.4 installs must be done in 32-bit mode. Oracle Retail 13.2 High-Availability Case Study Fusion Middleware Cluster (Part 1) 13
  • 17. Installing OAS 10.1.4.0.1 Identity Management on appserver1 To install OAS 10.1.4.0.1 IM on appserver1: 1. Run the Installer: ./runInstaller 2. The Welcome screen opens. Click Next. 3. The Specify the file locations window opens. Name = 1014_OIDINFRA Path = /u00/webadmin/product/10.1.4/oidinfra Click Next. 14 Oracle Retail 13.2 High-Availability Case Study Fusion Middleware Cluster (Part 1)
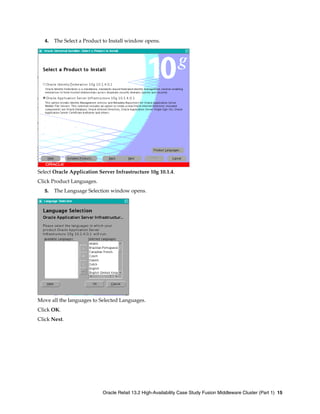
  • 18. 4. The Select a Product to Install window opens. Select Oracle Application Server Infrastructure 10g 10.1.4. Click Product Languages. 5. The Language Selection window opens. Move all the languages to Selected Languages. Click OK. Click Next. Oracle Retail 13.2 High-Availability Case Study Fusion Middleware Cluster (Part 1) 15
  • 19. 6. The Select Installation Type window opens. Select Identity Management. Click Next. 7. The Product-Specific Prerequisite Checks window opens. The Installer will run through a series of checks. Verify all of the checks have passed. If all of the checks have passed. Click Next. If there are any failures, resolve the issues before continuing the installation. 16 Oracle Retail 13.2 High-Availability Case Study Fusion Middleware Cluster (Part 1)
  • 20. 8. The Confirm Pre-Installation Requirements window opens. Verify you will have access to the root user. Select the Root Privileges checkbox. Click Next. 9. The Select Configuration Options window opens. Select the following components to install: a. Oracle Internet Directory. b. Oracle Application Server Single Sign-on. c. Oracle Application Server Delegated Administration. d. Oracle Application Server Directory Integration. Oracle Retail 13.2 High-Availability Case Study Fusion Middleware Cluster (Part 1) 17
  • 21. e. High Availability and Replication. Click Next. 10. The Specify Port Configuration Options window opens. Select Automatic. Click Next. 11. The Specify Repository window opens. Set the following variables: a. Username = SYS b. Password = <SYS db password> c. Hostname = dbvip1:1521^dbvip2:1521 18 Oracle Retail 13.2 High-Availability Case Study Fusion Middleware Cluster (Part 1)
  • 22. d. Service Name = odolr04.us.oracle.com Click Next. 12. The Select High Availability or Replication Option window opens. Select Oracle AS Cluster (Identity Management). Click Next. 13. The Specify New Oracle Application Server Cluster Name window opens. Enter the new cluster name. Note: The cluster name as it will be required when the 10.1.4.0.1 install occurs on appserver2. Oracle Retail 13.2 High-Availability Case Study Fusion Middleware Cluster (Part 1) 19
  • 23. Click Next. 14. The Specify Namespace in Internet Directory window opens. Select Suggested Namespace. Click Next. 15. The Specify LDAP Virtual Host and Ports window opens. Set the following values: a. Hostname: appserver12vip.us.oracle.com b. SSL Port:11636 Click Next. 20 Oracle Retail 13.2 High-Availability Case Study Fusion Middleware Cluster (Part 1)
  • 24. 16. The Specify HTTP Listen Port, Load Balancer Host and Port window opens. Set the following values: a. HTTP Listener Port: 7777 b. HTTP Load Balancer Hostname: appserver12vip.us.oracle.com c. HTTP Load Balancer Port: 7777 Click Next. 17. The Specify Instance Name and ias_admin password window opens. Set the following values: a. Instance Name: 1014_OIDINFRA b. IAS Admin Password: < iasadmin password> Oracle Retail 13.2 High-Availability Case Study Fusion Middleware Cluster (Part 1) 21
  • 25. c. Confirm Password: <iasadmin password> Click Next. 18. The Summary window opens. Verify the installation information Click Install. 19. The Install window opens. 22 Oracle Retail 13.2 High-Availability Case Study Fusion Middleware Cluster (Part 1)
  • 26. 20. Run root.sh. 21. The Configuration Assistant window opens. Click Next. 22. You have now completed the installation. Click Exit. Installing OAS 10.1.4.0.1 IM on appserver2 To isntall the OAS 10.1.4.0.1 IM on the appserver2: As the UNIX user who will be doing owning the OAS 10.1.4 installation: a. On appserver2, cd to the directory where the OAS 10.1.4 software has been downloaded and untarred to. b. Set your environment to point to the desired ORACLE_HOME c. Export DISPLAY variable d. Run “linux32 bash” command as OAS 10.1.4 installs must be done in 32-bit mode 1. Run the Installer: a. % ./runInstaller Oracle Retail 13.2 High-Availability Case Study Fusion Middleware Cluster (Part 1) 23
  • 27. 2. The Welcome screen opens. Click Next. 3. The Specifiy File Locations window opens. Set the following values: a. Name = 1014_OIDINFRA b. Path = /u00/webadmin/product/10.1.4/oidinfra Click Next. 24 Oracle Retail 13.2 High-Availability Case Study Fusion Middleware Cluster (Part 1)
  • 28. 4. The Select a Product to Install window opens. Select Oracle Application Server Infrastructure 10g. Click Product Languages. 5. The Languages Selection widow opens. Move all languages to Selected Languages. Click OK. Click Next when returned to the Select a Product to Install screen. Oracle Retail 13.2 High-Availability Case Study Fusion Middleware Cluster (Part 1) 25
  • 29. 6. The Select Installation Type window opens. Select Identity Management. Click Next. 7. The Product-specific Prerequisite Checks window opens. The Installer will run through a series of checks. Verify all of the checks have passed. If all checks have passed, then click Next. If there are any failures, resolve the issues before continuing the installation. 26 Oracle Retail 13.2 High-Availability Case Study Fusion Middleware Cluster (Part 1)
  • 30. 8. The Confirm Pre-Installation Requirements window opens. . Verify you will have access to the root user. Select the Root Privileges checkbox Click Next. 9. The Select Configuration Options window opens. Select the following components to install: a. Oracle Internet Directory. b. Oracle Application Server Single Sign-on. c. Oracle Application Server Delegated Administration. d. Oracle Application Server Directory Integration. Oracle Retail 13.2 High-Availability Case Study Fusion Middleware Cluster (Part 1) 27
  • 31. e. High Availability and Replication. Click Next. 10. The Specify Port Configuration Options window opens. Select Automatic. Click Next. 11. The Specify Repository window opens. Set the following values: a. Username = SYS b. Password = <SYS db password> c. Hostname = dbvip1:1521^dbvip2:1521 28 Oracle Retail 13.2 High-Availability Case Study Fusion Middleware Cluster (Part 1)
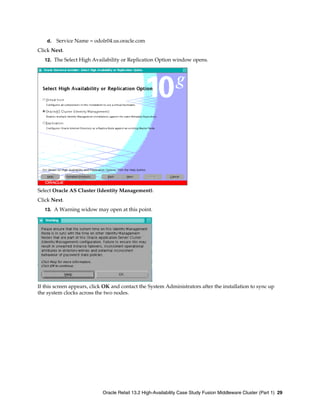
  • 32. d. Service Name = odolr04.us.oracle.com Click Next. 12. The Select High Availability or Replication Option window opens. Select Oracle AS Cluster (Identity Management). Click Next. 13. A Warning widow may open at this point. If this screen appears, click OK and contact the System Administrators after the installation to sync up the system clocks across the two nodes. Oracle Retail 13.2 High-Availability Case Study Fusion Middleware Cluster (Part 1) 29
  • 33. 14. The Specify New Oracle Application Server Cluster Name window opens. Enter the cluster name used during the appserver1 install. Click Next. 15. The Specify ODS Password window opens. Specify the password for ias_admin. Note: By default, the ODS password is the same as the ias_admin password (the password that you entered in the Specify Instance Name and ias_admin Password screen). Click Next. 30 Oracle Retail 13.2 High-Availability Case Study Fusion Middleware Cluster (Part 1)
  • 34. 16. The Specify LDAP Virtual Host and Port window opens. Set the following variables: a. Hostname: appserver12vip.us.oracle.com b. SSL Port:11636 Click Next. 17. A warning window opens. Click OK. Oracle Retail 13.2 High-Availability Case Study Fusion Middleware Cluster (Part 1) 31
  • 35. 18. The Specify Oracle Internet Directory Login window opens. Enter username cn=orcladmin. Enter the password configured during appserver1 install. Click Next. 19. The Specify HTTP Listen Port, Load Balancer Host and Port window opens. Set the following variables: a. HTTP Listener Port: 7777 b. HTTP Load Balancer Hostname: appserver12vip.us.oracle.com c. HTTP Load Balancer Port: 7777 Click Next. 32 Oracle Retail 13.2 High-Availability Case Study Fusion Middleware Cluster (Part 1)
  • 36. 20. The Specify Instance Name and ias_admin password window opens. Set the following values: a. Instance Name: 1014_OIDINFRA b. IAS Admin Password c. Confirm Password Click Next. 21. The Summary window opens. Verify the installation information. Click Install. 22. The Configuration Assistant window opens. Oracle Retail 13.2 High-Availability Case Study Fusion Middleware Cluster (Part 1) 33
  • 37. Click Next. 23. The installation is now complete. Click Exit. Upgrade to Release 10.1.4.3.0 This section describes the requirements and procedures for performing the upgrade. Pre-Installation Requirements The following are pre-installation requirements for this patch set: Ensure that the system configuration meets the recommendations described in the installation guide and other manuals. When applying the patch, use the same login credentials that you used for installation of the products. Using different credentials can result in unexpected behavior, for example, several error messages can be displayed. Make a backup before applying the patch. 1. Issue the following command on appserver1: % dcmctl listinstances -cl linux_1014_cluster1 The command output is similar to the following: Instance name: 1014_OIDINFRA.appserver1.us.oracle.com Cluster: linux_1014_cluster1 Hostname: appserver1.us.oracle.com Oracle Home: /u00/webadmin/product/10.1.4/oidinfra Instance name: 1014_OIDINFRA.appserver2.us.oracle.com Cluster: linux_1014_cluster1 Hostname: appserver2.us.oracle.com Oracle Home: /u00/webadmin/product/10.1.4/oidinfra 2. Ensure that the dcm-daemon is alive in both the Single Sign-On and Oracle Delegated Administration Services instances. 3. Enter the following command: % $ORACLE_HOME/dcm/bin/dcmctl leavecluster -i 1014_OIDINFRA.appserver2.us.oracle.com Note: After running the leave cluster command, the second instance is not shown as follows: % $ORACLE_HOME/dcm/bin/dcmctl listinstances -cl linux_1014_cluster1 Instance name: 1014_OIDINFRA.appserver1.us.oracle.com Cluster: linux_1014_cluster1 Hostname: appserver1.us.oracle.com Oracle Home: /u00/webadmin/product/10.1.4/oidinfra 4. Stop the second Identity Management instance, and patch the first Identity Management instance to 10.1.4.3. 34 Oracle Retail 13.2 High-Availability Case Study Fusion Middleware Cluster (Part 1)
  • 38. Installing the OAS 10.1.4.3 Patch on appserver1 To install the OAS 10.1.4.3 patch on the appserver1: 1. As the UNIX user who will own the IM 10.1.4.3 installation: On appserver1, cd to the directory the where the OAS 10.1.4.3 software has been downloaded and untarred to. Set your environment to point to the desired ORACLE_HOME. Export DISPLAY variable Run linux32 bash command as OAS 10.1.4.3 installs must be done in 32-bit mode. 2. Run the Installer: % ./runInstaller 3. The Welcome window opens. Click Next. Oracle Retail 13.2 High-Availability Case Study Fusion Middleware Cluster (Part 1) 35
  • 39. 4. The Specify File Locations window opens. Set the following values: a. Name = 1014_OIDINFRA b. Path = /u00/webadmin/product/10.1.4/oidinfra Click Next. 5. The login window opens. The Metalink login is used to receive security updates. For this case study it has been unchecked. Click Next. 36 Oracle Retail 13.2 High-Availability Case Study Fusion Middleware Cluster (Part 1)
  • 40. 6. The warning window opens. Warning: Email Address Not Specified. Click Yes. 7. The Application Server instance Password window opens. Specify the password for ias_admin, given during 10.1.4.0.1 installation. Click Next. Oracle Retail 13.2 High-Availability Case Study Fusion Middleware Cluster (Part 1) 37
  • 41. 8. The Oracle internet Directory Login window opens. Specify Username and Password of super user login. Click Next. 9. The Enter Metadata repository Sys Password window opens. Specify SYS user password of the database where metadata repository exist. Click Next. 38 Oracle Retail 13.2 High-Availability Case Study Fusion Middleware Cluster (Part 1)
  • 42. 10. The Warning window opens. Verify the checklist. Click OK. 11. The Summary window opens. Verify the installation information. Click Install. Oracle Retail 13.2 High-Availability Case Study Fusion Middleware Cluster (Part 1) 39
  • 43. 12. The Setup Privileges window opens. Execute root.sh. Click OK. 13. The Configuration Assistants window opens. Click Next. 40 Oracle Retail 13.2 High-Availability Case Study Fusion Middleware Cluster (Part 1)
  • 44. 14. The End of Installation window opens. Click Exit. Installing the OAS 10.1.4.3 Patch on appserver2 To install the OAS 10.1.4.3 patch on appserver2: 1. As the UNIX user who will be doing owning the IM 10.1.4.3 installation: On appserver2, cd to the directory the where the OAS 10.1.4.3 software has been downloaded and untarred to. a. Set your environment to point to the desired ORACLE_HOME. b. Export DISPLAY variable. c. Run linux32 bash command as OAS 10.1.4.3 installs must be done in 32-bit mode. 2. Run the Installer: % ./runInstaller Oracle Retail 13.2 High-Availability Case Study Fusion Middleware Cluster (Part 1) 41
  • 45. 3. The Welcome window opens. Click Next. 4. The Specify File Locations window opens. Set the following values: a. Name = 1014_OIDINFRA b. Path = /u00/webadmin/product/10.1.4/oidinfra Click Next. 42 Oracle Retail 13.2 High-Availability Case Study Fusion Middleware Cluster (Part 1)
  • 46. 5. The login window opens. The Metalink login is to receive security update. For this case study it has been unchecked. Click Next. 6. The warning window opens. Click Yes. Oracle Retail 13.2 High-Availability Case Study Fusion Middleware Cluster (Part 1) 43
  • 47. 7. The Application Server Instance Password window opens. Specify the password for ias_admin given during 10.1.4.0.1 installation. Click Next. 8. The Oracle Internet Directory Login window opens. Specify Username and Password of super user login. Click Next. 44 Oracle Retail 13.2 High-Availability Case Study Fusion Middleware Cluster (Part 1)
  • 48. 9. The Enter Metadata repository Sys Password window opens. Specify the SYS user password of the metadata repository database. Click Next. 10. The Summary window opens. Verify the installation information. Click Next. Oracle Retail 13.2 High-Availability Case Study Fusion Middleware Cluster (Part 1) 45
  • 49. 11. The End of Installation window opens. Click Exit. 12. Join the second node to the cluster, as follows : $ORACLE_HOME/dcm/bin/dcmctl joincluster –cl linux_1014_cluster1 46 Oracle Retail 13.2 High-Availability Case Study Fusion Middleware Cluster (Part 1)
  • 50. Install Oracle Application Server 10.1.2.3 Identity Management Software Only This section describes the install of the Oracle Application Server 10.1.2.3 Identity Management Software. Preparation for Oracle Application Server 10.1.2.3 Cluster Install This section describes how to apply 10.1.2.3 Software only patch to an Oracle Application Server Cluster (Identity Management) environment. Before applying the patch set: 1. LDAP traffic can be directed to a node as soon as it has been patched to OracleAS 10g Patch Set 3 (10.1.2.3.0) 2. On appserver1 leave the cluster $ORACLE_HOME/dcm/bin/dcmctl leavecluster 3. Bring IM at node appserver2 down $ORACLE_HOME/opmn/bin/opmnctl shutdown Apply 10.1.2.3 Patch to appserver1 To apply 10.1.2.3 patch to appserver1: 1. As the UNIX user who will be doing owning the OAS 10.1.2.3 installation: On appserver1, cd to the directory the where the OAS 10.1.2.3 software has been downloaded and untarred to. a. Set your environment to point to the desired ORACLE_HOME b. Export DISPLAY variable c. Run “linux32 bash” command as OAS 10.1.2.3 installs must be done in 32-bit mode. 2. Run the Installer: % ./runInstaller 3. The Welcome window opens. Click Next. Oracle Retail 13.2 High-Availability Case Study Fusion Middleware Cluster (Part 1) 47
  • 51. 4. The Specify File Locations window opens. Set the following values: a. Name = 1014_OIDINFRA b. Path = /u00/webadmin/product/10.1.4/oidinfra Click Next. 5. The Select a Product to Install window opens. Select Oracle Application Server and Developer Suite 10g Rel2 Software Update. Click Next. 48 Oracle Retail 13.2 High-Availability Case Study Fusion Middleware Cluster (Part 1)
  • 52. 6. The Error window opens. Click Retry. 7. The Summary window opens. Verify the installation information. Click Install. 8. The Setup Priviledges window opens. Click OK to run root.sh. Oracle Retail 13.2 High-Availability Case Study Fusion Middleware Cluster (Part 1) 49
  • 53. 9. The End of Installation window opens. The installation is complete. Click Exit. Apply 10.1.2.3 Patch on appserver2 To apply the 10.1.2.3 patch on the appserver2: 1. As the UNIX user who will be doing owning the OAS 10.1.2.3 installation: On appserver2, cd to the directory the where the OAS 10.1.2.3 software has been downloaded and untarred. a. Set your environment to point to the desired ORACLE_HOME. b. Export DISPLAY variable. c. Run “linux32 bash” command as OAS 10.1.2.3 installs must be done in 32-bit mode. 2. Run the Installer: % ./runInstaller 50 Oracle Retail 13.2 High-Availability Case Study Fusion Middleware Cluster (Part 1)
  • 54. 3. The Welcome window opens. Click Next. 4. The Specify File Locations window opens. Set the following values: a. Name = 1014_OIDINFRA b. Path = /u00/webadmin/product/10.1.4/oidinfra Click Next. Oracle Retail 13.2 High-Availability Case Study Fusion Middleware Cluster (Part 1) 51
  • 55. 5. Select a Product to Install window opens. Select Oracle Application Server and Developer Suite 10g Rel2 Software Update. Click Next. 6. The Error window opens. Click Retry. 52 Oracle Retail 13.2 High-Availability Case Study Fusion Middleware Cluster (Part 1)
  • 56. 7. The Summary window opens. Verify the Installation information. Click Install. 8. The Setup Privileges window opens. Click OK to run root.sh. Oracle Retail 13.2 High-Availability Case Study Fusion Middleware Cluster (Part 1) 53
  • 57. 9. The End of Installation window opens. The installation is complete. Click Exit. 10. Join cluster nodes to the linux_1014_cluster1 a. Execute this command on appserver1 $ORACLE_HOME/dcm/bin/dcmctl joincluster –cl linux_1014_cluster1 11. Start OPMN on both the nodes, using $ORACLE_HOME/opmn/bin/opmnctlstartall 12. Enable traffic to both the nodes from Load balancer. 54 Oracle Retail 13.2 High-Availability Case Study Fusion Middleware Cluster (Part 1)
  • 58. Upgrade Oracle Internet Directory Database to 11g Release 2 After OAS has been upgraded to 10.1.4.3 and 10.1.2.3, upgrade the OID database to 11.2.0.1 following steps listed in the My Oracle Support document, Complete Checklist for Manual Upgrades to 11gR2 Note 837570.1. Oracle Retail 13.2 High-Availability Case Study Fusion Middleware Cluster (Part 1) 55
  • 60. Appendix A – Steps to Create a 10g Release2 OID Database It is assumed that Oracle 10g release 2 (10.2.0.4) has already been installed. Create the database as follows: 1. Log in to UNIX as the oracle user; typically the user that owns the Oracle Database software. 2. Create the Oracle recommended OFA directory structure for the database (datafile directories, adump, bdump, cdump, arch, create, exp, pfile, udump, utl_file_dir). 3. Place an entry in the oratab file for the database and execute oraenv to set the ORACLE_SID and ORACLE_HOME environment variables. 4. Copy the contents of Appendix B to create the init${ORACLE_SID}.ora file and place in the directory $ORACLE_BASE/admin/<sid>/pfile. Modify the parameters according to the requirements of your enviornment. 5. Create a symbolic link from $ORACLE_BASE/admin/<sid>/pfile/init${ORACLE_SID}.ora to $ORACLE_HOME/dbs/init${ORACLE_SID}.ora. 6. Copy the contents on Appendix C to create the crdb1.sql script. Modify the directory pathes on the file according to your environement. Login to SQL*Plus as SYSDBA and execute crdb1.sql. Review the log file for any errors and correct as needed. 7. Copy the contents on Appendix D to create the crdb2.sql script. Log in to SQL*Plus as SYSDBA and execute crdb2.sql. 8. Copy the contents on Appendix E to create the crdb3.sql script. Log in to SQL*Plus as SYSDBA and execute crdb3.sql. Oracle Retail 13.2 High-Availability Case Study Fusion Middleware Cluster (Part 1) 57
  • 62. Appendix B – init102.ora ##################################################################### # File: initDBNAME.ora # # History: pfile for 10g OID # # DATE WHO PARAMETER OLD NEW # -------- --- ------------------------- --------------- --------------- # ##################################################################### db_cache_size = 144M java_pool_size = 150M # 150M for initial db creation log_buffer = 10485760 shared_pool_size = 192M # 350M for initial db creation shared_pool_reserved_size = 20M # 10% of shared_pool_size sga_target = 700M # -------------------------------------------------------------------------------- # The following parameters do not affect SGA size; # -------------------------------------------------------------------------------- aq_tm_processes = 1 audit_file_dest = <admin_path>/adump background_dump_dest = <admin_path>/bdump compatible = 10.2.0.4 control_files = (<datafile_path>/control01.ctl ,<datafile_path>/control02.ctl) core_dump_dest = <admin_path>/cdump db_block_size = 8192 # Default is 2k; adjust before db creation, cannot change after db is created db_domain = us.oracle.com db_file_multiblock_read_count = 16 # Platform specific (max io size)/(block size) db_name = SID job_queue_processes = 5 # Oracle Retail required; number of cpu's + 1 local_listener = "(ADDRESS=(PROTOCOL=TCP)(HOST=<hostname>)(PORT=1521))" nls_calendar = GREGORIAN nls_date_format = DD-MON-RR # nls_language = AMERICAN # Default nls_numeric_characters = ".," # Should be explicitly set to ensure all users/batch get the same results nls_sort = BINARY # Should be explicitly set to ensure all sessions get the same order nls_territory = AMERICA # Default open_cursors = 900 # Oracle Retail required (minimum=900); default is 50 optimizer_features_enable = 10.2.0.1 optimizer_mode = CHOOSE # Oracle Retail required pga_aggregate_target = 100M plsql_optimize_level = 2 # 10g change; use this setting to optimize plsql performance plsql_debug = false # 10g change; use this setting to optimize plsql peformance processes = 500 # Max number of OS processes that can connect to the db query_rewrite_enabled = TRUE # Oracle Retail required for function-based indexes session_cached_cursors = 900 # Oracle Retail required; 10g uses to cache sql cursors in pl/sql undo_management = AUTO undo_retention = 1800 # Currently set for 30 minutes; set to avg length of transactions in sec undo_tablespace = undo_ts01 user_dump_dest = <admin_path>/udump utl_file_dir = <utl_file_path> workarea_size_policy = auto # Should be set to auto when pga_aggregate_target is set # # *** Archive Logging, set if needed *** #log_archive_dest_1 = 'location=<admin_path>/arch/' Oracle Retail 13.2 High-Availability Case Study Fusion Middleware Cluster (Part 1) 59
  • 63. #log_archive_format = SIDarch_%r_%s_%t.log #log_archive_max_processes = 1 # Default:1 #log_archive_min_succeed_dest = 1 # Default:1 #log_buffer = 262144 # Set to (512K or 128K)*CPUs #log_checkpoint_interval = 51200 # Default:0 - unlimited #log_checkpoint_timeout = 7200 # Default:1800 seconds 60 Oracle Retail 13.2 High-Availability Case Study Fusion Middleware Cluster (Part 1)
  • 64. Appendix C - crdb1.sql REM OID Database Creation Script Part 1 spool ${ORACLE_SID}1.log STARTUP NOMOUNT pfile=${ORACLE_HOME}/dbs/initSID.ora CREATE DATABASE "SID" MAXDATAFILES 1000 CHARACTER SET UTF8 DATAFILE '<datafile_path>/system01.dbf' SIZE 500M AUTOEXTEND ON NEXT 100M MAXSIZE 2000M LOGFILE GROUP 1 ('<datafile_path>/redo1a.log') SIZE 1000M, GROUP 2 ('<datafile_path>/redo2a.log') SIZE 1000M, GROUP 3 ('<datafile_path>/redo3a.log') SIZE 1000M DEFAULT TEMPORARY TABLESPACE temp TEMPFILE '<datafile_path>/temp01.dbf' SIZE 5000M EXTENT MANAGEMENT LOCAL UNIFORM SIZE 1M UNDO TABLESPACE undo_ts01 DATAFILE '<datafile_path>/undo_ts01_01.dbf' SIZE 5000M SYSAUX DATAFILE '<datafile_path>/sysaux01.dbf' SIZE 500M AUTOEXTEND ON NEXT 100M MAXSIZE 2000M create tablespace users datafile ‘<datafile_path>/users01.dbf’ size 100M autoextend on maxsize 500M; exit spool off Oracle Retail 13.2 High-Availability Case Study Fusion Middleware Cluster (Part 1) 61
  • 66. Appendix D – crdb2.sql -- OID Database Creation Script Part 2 -- -- Run this script as sysdba -- use only in 10.1.0.2 databases or higher -- Note: This script installs the data dictionary views in addition to -- granting necessary privileges to public. spool crdb2.log REM # install data dictionary views: PROMPT Running catalog.sql @$ORACLE_HOME/rdbms/admin/catalog.sql; PROMPT Running catblock.sql @$ORACLE_HOME/rdbms/admin/catblock.sql; PROMPT Running catproc.sql @$ORACLE_HOME/rdbms/admin/catproc.sql; PROMPT Running catoctk.sql @$ORACLE_HOME/rdbms/admin/catoctk.sql; PROMPT Running catrep.sql @$ORACLE_HOME/rdbms/admin/catrep.sql; PROMPT Running owminst.plb @$ORACLE_HOME/rdbms/admin/owminst.plb; REM * These privs needed for users to run proper grant code when creating users. grant select on dba_jobs to public with grant option; grant select on dba_roles to public with grant option; grant select on dba_role_privs to public with grant option; grant execute on dbms_rls to public with grant option; grant execute on dbms_alert to public; grant select_catalog_role to public; grant execute_catalog_role to public; grant execute on dbms_lock to public; grant execute on dbms_rls to public; grant execute on dbms_crypto to public; grant select on dba_sys_privs to public with grant option; REM * query rewrite privilege needed to create function-based indexes grant query rewrite to public; REM * dbms_system is needed for tracing grant execute on sys.dbms_system to public; PROMPT Creating PLAN table owned by SYSTEM @$ORACLE_HOME/rdbms/admin/utlxplan.sql PROMPT Creating public synonyn for the plan table create public synonym PLAN_TABLE for SYSTEM.PLAN_TABLE; connect SYSTEM/manager @$ORACLE_HOME/sqlplus/admin/pupbld.sql; @$ORACLE_HOME/sqlplus/admin/help/hlpbld.sql helpus.sql; spool off exit Oracle Retail 13.2 High-Availability Case Study Fusion Middleware Cluster (Part 1) 63
  • 68. Appendix E – crdb3.sql -- OID Database Creation Script Part 3 -- -- Run this script as sys; -- This script should not be used in databases less than 10.1.0.2 spool JServer.log @$ORACLE_HOME/javavm/install/initjvm.sql; @$ORACLE_HOME/xdk/admin/initxml.sql; @$ORACLE_HOME/xdk/admin/xmlja.sql; @$ORACLE_HOME/rdbms/admin/catjava.sql; @$ORACLE_HOME/rdbms/admin/catexf.sql; spool off spool DataMining.log @?/rdbms/admin/dminst.sql SYSAUX TEMP spool off spool context.log @$ORACLE_HOME/ctx/admin/catctx change_on_install SYSAUX TEMP NOLOCK; connect CTXSYS/change_on_install @$ORACLE_HOME/ctx/admin/defaults/drdefus.sql spool off spool xdb_protocol.log connect / as sysdba @$ORACLE_HOME/rdbms/admin/catqm.sql change_on_install SYSAUX TEMP; spool off spool Intermedia.log @?/ord/admin/ordinst.sql SYSAUX SYSAUX @?/ord/im/admin/iminst.sql spool off spool Spatial.log @?/md/admin/mdinst.sql spool off spool UltraSearch.log host echo "define OH = $ORACLE_HOME" > /tmp/oh.sql @/tmp/oh.sql host rm /tmp/oh.sql @?/ultrasearch/admin/wk0setup.sql &OH '' SYS change_on_install 'as sysdba' change_on_install SYSAUX TEMP PORTAL false DATABASE ':' '&OH/jdbc/lib/classes12.zip' '&OH/jdbc/lib/orai18n.jar' '&OH/jdk/bin/java' '&OH/ctx/bin/ctxhx' NOT_INITIALIZED NOT_INITIALIZED &OH @?/ultrasearch/admin/wk0cfg.sql change_on_install '' 'false' '' &OH '&OH/jdbc/lib/classes12.zip' '&OH/jdbc/lib/orai18n.jar' '&OH/jdk/jre/' '&OH/jdk/bin/java' ':' '&OH/ctx/bin/ctxhx' spool off @$ORACLE_HOME/rdbms/admin/utlrp.sql 65 Oracle Retail 13.2 High-Availability Case Study Fusion Middleware Cluster (Part 1) Copyright © 2011, Oracle and/or its affiliates. All rights reserved. This document is provided for information purposes only and the contents hereof are subject to change without notice. This document is not warranted to be error-free, nor subject to any other warranties or conditions, whether expressed orally or implied in law, including implied warranties and conditions of merchantability or fitness for a particular purpose. We specifically disclaim any liability with respect to this document and no contractual obligations are formed either directly or indirectly by this document. This document may not be reproduced or transmitted in any form or by any means, electronic or mechanical, for any purpose, without our prior written permission. Oracle is a registered trademark of Oracle Corporation and/or its affiliates. Other names may be trademarks of their respective owners.
  • 69. Author: Amandeep Bhatti Oracle Corporation World Headquarters 500 Oracle Parkway Redwood Shores, CA 94065 U.S.A. Worldwide Inquiries: Phone: +1.650.506.7000 Fax: +1.650.506.7200 oracle.com Copyright © 2011, Oracle. All rights reserved. This document is provided for information purposes only and the contents hereof are subject to change without notice. This document is not warranted to be error-free, nor subject to any other warranties or conditions, whether expressed orally or implied in law, including implied warranties and conditions of merchantability or fitness for a particular purpose. We specifically disclaim any liability with respect to this document and no contractual obligations are formed either directly or indirectly by this document. This document may not be reproduced or transmitted in any form or by any means, electronic or mechanical, for any purpose, without our prior written permission. Oracle is a registered trademark of Oracle Corporation and/or its affiliates. Other names may be trademarks of their respective owners.