SlideShare a Scribd company logo
2
Most read
5
Most read
13
Most read
Presentation on
Assembling a Computer
Presenting By:
Neeraj Dhiman
Safety Procedures
 Clean work area free of dust and food
 Never open a monitor
 Remove jewelry and watches
 Turn power off and remove power plug
 Fire extinguisher available
 Use anti static mat and wrist strap
 Hold cards by edges/avoid touching chips
 Put components on non conductive surface
 Do not use magnetized screw drivers
Electrostatic Discharge
 If you notice it, it’s at least 2000 volts
 Charge of 200 volts can damage components
 Keep all components in anti-static bags
 Humidity above 50%
 Use grounded mats (workbench and floor)
 Use wrist straps
 Periodically touch unpainted grounded metal
computer parts to lower the body’s static
energy
Keeping an Inventory
 Document all components, parts purchased
 Use an inventory checklist
 May be difficult to recall later
 Will be helpful in locating and downloading
device drivers
 Note specific warranty info
 Save specifics about installation and
maintenance requirements so warranties will be
valid
 Use small box to hold all manuals and disks
 Label box for specific computer
 Store in secure place
Choosing a computer case and
system unit
 Case
 Allows easy access to
internal components
 Provides room for expansion
 ATX form factor
 Available desk top space
 LED indicators on front
 Dust filters if area where
computer to be used is dusty
 Power supply
 Minimum 250
watts
 ATX
 Single 20 pin
 Fan pulls air
through case
from front to
back
Preparing to install
Motherboard
 Review the motherboard location map
 Configure the motherboard
 Install the CPU, heat sink and fan, RAM
 Connect power supply cables to
motherboard power connectors and misc.
connectors to correct switches and lights
 Set the system BIOS
Configuring the processor
 Set jumper settings
for appropriate
frequency
 Ensure the CPU
used supports the
BUS speed and the
CPU clock speed of
Motherboard
Installing the CPU
 ZIF (Zero Insertion Force) trait on nearly all socket 7 and
similar types
 Inspect pins for damage
 Locate pin 1 on both chip and socket
 Open the ZIF socket (raise lever)
 Insert processor (should easily slide on)
 Make sure there is not a gap between bottom of chip and
socket
 Push lever down
 Set CPU voltage jumper settings if necessary (Pentium II
and later CPU’s adjust automatically to voltage)
Install Heat Sink and Fan
 Attach fan to heat sink if not already
attached
 Apply thin layer of compound to chip
surface
 Attach heat sink by placing squarely
on top of processor and press down
gently
 Bend clips in place to hold sink
 Make sure there is good contact
between sink and Chip surface
 Wipe off any excess compound
 Plug power cord from fan to fan
power pins on motherboard
Install RAM
 Two types RAM used on
most PC’s
 DDR1
 DDR2
 Look at motherboard map to
determine which bank to
place DIMM 1 module in
 Orient the Dimm chip over
the slot (keyed) and insert
into slot
 Lock in place by closing
levers
Installing the Motherboard
 Position case for easy access, locate holes on
motherboard and corresponding holes on case
 Insert spacers that came with motherboard into
holes on case and install plastic standoffs into holes
on motherboard
 Carefully slide the board into the case, lining up
holes
 Tighten board to case with screws
 Verify that the back of the motherboard is not
touching the case, all slots and connectors line up
properly, board is securely held in place, and board
does not bend when pressed
Attaching LEDs, key lock and
speaker
 Use motherboard manual as a guide for
proper placement
 Turbo LED (mainly legacy item)
 Power LED
 Hard drive activity LED
 Key lock switch (common with older
systems, rare now; prevented BIOS
meddling)
 PC speaker
Connect power supply cables
 AT motherboard
 Locate two large wire leads from power supply
(P8 and P9)
 Locate 12 pin power connector on motherboard
 Plug P8 and P9 into connector
 Be sure black wires are in the middle beside one
another
 ATX motherboard
 Attach the connector that is keyed to fit only one
way into the motherboard connector
Attach hard drive and CD-ROM
 Use separate IDE cables if possible and set both jumpers to
Master (or single on the hard drive if available)
 If sharing an IDE cable, set the hard drive to Master and the CD-
ROM to slave
 Install hard drive away from power supply which can act like a
magnet and destroy data
 Keep hard drive near front of case to benefit from air drawn into
case and keep away from other hardware
 Slide drive into selected drive rail and screw drive into place
 Attach ribbon cable to the primary controller of the motherboard
and attach power cord
 Follow with CD-ROM installation and attach to secondary
controller of the motherboard
Installing a video card
 Use AGP expansion slot if
available, otherwise use PCI or ISA
 Remove slot insert and insert
video card by aligning pins and
gently applying pressure
 Secure to case with a screw
 Some motherboards have built-in
video. If you want to install an
external card then you must
disable the built in video in the
CMOS
AGP VIDEO CARD
Post Assembly Checklist
 All expansion cards are fully inserted
 CPU fan is attached to power
 The 110/220 volt switch is configured properly
 Drives are connected to power
 Ribbon cables are attached correctly
 Fans are free from interference from wires
 CPU voltage settings are correctly configured
 Power switch is off and power supply connectors are
connected properly to motherboard
 All connections are tight
 Pins are properly aligned
 Close the case before booting
 Connect keyboard, mouse and monitor and plug in AC power
We've successfully assembled
a computer
THANK YOU
ANY QUERY

More Related Content

What's hot (20)

PPT
Bios
Kapil Sinha
 
PPTX
2.2. factor de forma de placa madre
oscariparraguirre19
 
PDF
CSS LO6 - PREPARING AND INSTALLING OPERATING SYSTEM
Marvin Bronoso
 
PPTX
A+ computer hardware slide
Rajendra Tete
 
PPT
Assembling and deassembling
Online
 
PPT
Bios
Sajan Sahu
 
PPT
Motherboard components and their functions
BESOR ACADEMY
 
PPT
Pc Assembling
Dr.Ramasubramanian Perumal
 
PPTX
Bios
Evans Lampi
 
PPTX
Installing Windows-10
YvannAdolfo
 
PPT
Bios and cmos
Online
 
PPTX
Ict 9 module 3, lesson 2.4.2 installing operating system (windows 7)
Yonel Cadapan
 
PDF
motherboard
akki_hearts
 
PPT
Partitioning a Hard Drive
Jamaica Olazo
 
PPTX
How to build up a Desktop Computer.pptx
Minhazul Abedin Munna
 
PPTX
Motherboard
Kenneth Sarboda
 
PPTX
PC Assembly and Disassembly.pptx
ErwinIruma
 
PPTX
How to prepare a portable bootable devices
iankeithsomoza
 
PPTX
Introduction to computer hardware
Elike Ikechukwu
 
PPT
Bios y set up
alejandra
 
2.2. factor de forma de placa madre
oscariparraguirre19
 
CSS LO6 - PREPARING AND INSTALLING OPERATING SYSTEM
Marvin Bronoso
 
A+ computer hardware slide
Rajendra Tete
 
Assembling and deassembling
Online
 
Motherboard components and their functions
BESOR ACADEMY
 
Installing Windows-10
YvannAdolfo
 
Bios and cmos
Online
 
Ict 9 module 3, lesson 2.4.2 installing operating system (windows 7)
Yonel Cadapan
 
motherboard
akki_hearts
 
Partitioning a Hard Drive
Jamaica Olazo
 
How to build up a Desktop Computer.pptx
Minhazul Abedin Munna
 
Motherboard
Kenneth Sarboda
 
PC Assembly and Disassembly.pptx
ErwinIruma
 
How to prepare a portable bootable devices
iankeithsomoza
 
Introduction to computer hardware
Elike Ikechukwu
 
Bios y set up
alejandra
 

Viewers also liked (10)

PPTX
Chapter 5 Questions
guest1689620
 
PPT
7th ed ppt ch06
Gene Carboni
 
PPT
7th ed ppt ch05
Gene Carboni
 
PPT
P.C motherboard
Self Employer
 
PPTX
Installing and Troubleshooting the Basic Components
Amir Villas
 
PPT
Chap1 chipset
Faiq Ali Sayed
 
PPT
Chapter 5 Processors
Patty Ramsey
 
PPT
Chapter 2: Microprocessors
Best of Learning Technologies
 
PPT
Chapter 4 Microprocessor CPU
askme
 
Chapter 5 Questions
guest1689620
 
7th ed ppt ch06
Gene Carboni
 
7th ed ppt ch05
Gene Carboni
 
P.C motherboard
Self Employer
 
Installing and Troubleshooting the Basic Components
Amir Villas
 
Chap1 chipset
Faiq Ali Sayed
 
Chapter 5 Processors
Patty Ramsey
 
Chapter 2: Microprocessors
Best of Learning Technologies
 
Chapter 4 Microprocessor CPU
askme
 
Ad

Similar to Assembling a computer (20)

PPT
Assembling_a_Computer.ppt
rafi266513
 
PPTX
Pc assembly
Ruchika Sinha
 
PPTX
Pc assembly
Mansoor Shar
 
PPTX
pc-assembly (1).pptx
TerrenceRamirez1
 
PPTX
pc-assembly parts and functions ppt . docx
aimeearenggomez24
 
PPTX
Pc_assembly.pptx 32145678912345678912346789
PraveenMalachpure2
 
PPTX
ICT-BASIC-COM..._1.pptx information communication technology
arloschristianroy27
 
PPTX
Computer Assembly.pptx
Andrew_Braza
 
PDF
Css grade 11 week 4
Danilo Anos
 
PPTX
3rd quarter quiz on module 1-2 & pc assembly.pptx
alcan9071
 
PDF
CSS L05 - Computer System Assembly
Marvin Bronoso
 
PPTX
ASSEMBLY-AND-DISASSEMBLY.pptx
Virgilio Paglingayen
 
PPTX
ASSEMBLY-AND-DISASSEMBLY (1).pptx
Virgilio Paglingayen
 
PPTX
ASSEMBLY-AND-DISASSEMBLY.pptx
Virgilio Paglingayen
 
PPTX
Ch 2 computer assembly disassembly
mekashaw tizazu
 
PPT
Assembling
Magline Pereira
 
PPTX
pc assembly 1111111pc assembly 1111111- Copy.pptx
CarloCimacio
 
PPTX
PPT10.pptx motherboard part 2 for css pt
WooiButag
 
PPTX
Install computer system,devices and peripherals
Raiza Janelle
 
PPTX
2.3
Frya Lora
 
Assembling_a_Computer.ppt
rafi266513
 
Pc assembly
Ruchika Sinha
 
Pc assembly
Mansoor Shar
 
pc-assembly (1).pptx
TerrenceRamirez1
 
pc-assembly parts and functions ppt . docx
aimeearenggomez24
 
Pc_assembly.pptx 32145678912345678912346789
PraveenMalachpure2
 
ICT-BASIC-COM..._1.pptx information communication technology
arloschristianroy27
 
Computer Assembly.pptx
Andrew_Braza
 
Css grade 11 week 4
Danilo Anos
 
3rd quarter quiz on module 1-2 & pc assembly.pptx
alcan9071
 
CSS L05 - Computer System Assembly
Marvin Bronoso
 
ASSEMBLY-AND-DISASSEMBLY.pptx
Virgilio Paglingayen
 
ASSEMBLY-AND-DISASSEMBLY (1).pptx
Virgilio Paglingayen
 
ASSEMBLY-AND-DISASSEMBLY.pptx
Virgilio Paglingayen
 
Ch 2 computer assembly disassembly
mekashaw tizazu
 
Assembling
Magline Pereira
 
pc assembly 1111111pc assembly 1111111- Copy.pptx
CarloCimacio
 
PPT10.pptx motherboard part 2 for css pt
WooiButag
 
Install computer system,devices and peripherals
Raiza Janelle
 
Ad

Recently uploaded (20)

PPT
Interview paper part 3, It is based on Interview Prep
SoumyadeepGhosh39
 
PDF
LLMs.txt: Easily Control How AI Crawls Your Site
Keploy
 
PDF
How Startups Are Growing Faster with App Developers in Australia.pdf
India App Developer
 
PDF
Predicting the unpredictable: re-engineering recommendation algorithms for fr...
Speck&Tech
 
PPTX
✨Unleashing Collaboration: Salesforce Channels & Community Power in Patna!✨
SanjeetMishra29
 
PDF
Windsurf Meetup Ottawa 2025-07-12 - Planning Mode at Reliza.pdf
Pavel Shukhman
 
PDF
Meetup Kickoff & Welcome - Rohit Yadav, CSIUG Chairman
ShapeBlue
 
PDF
SWEBOK Guide and Software Services Engineering Education
Hironori Washizaki
 
PDF
Wojciech Ciemski for Top Cyber News MAGAZINE. June 2025
Dr. Ludmila Morozova-Buss
 
PPTX
Top iOS App Development Company in the USA for Innovative Apps
SynapseIndia
 
PDF
Rethinking Security Operations - SOC Evolution Journey.pdf
Haris Chughtai
 
PDF
Building Resilience with Digital Twins : Lessons from Korea
SANGHEE SHIN
 
PDF
CloudStack GPU Integration - Rohit Yadav
ShapeBlue
 
PPTX
Building a Production-Ready Barts Health Secure Data Environment Tooling, Acc...
Barts Health
 
PDF
HCIP-Data Center Facility Deployment V2.0 Training Material (Without Remarks ...
mcastillo49
 
PDF
CIFDAQ Token Spotlight for 9th July 2025
CIFDAQ
 
PPTX
Building and Operating a Private Cloud with CloudStack and LINBIT CloudStack ...
ShapeBlue
 
PDF
Complete JavaScript Notes: From Basics to Advanced Concepts.pdf
haydendavispro
 
PDF
The Builder’s Playbook - 2025 State of AI Report.pdf
jeroen339954
 
PDF
Impact of IEEE Computer Society in Advancing Emerging Technologies including ...
Hironori Washizaki
 
Interview paper part 3, It is based on Interview Prep
SoumyadeepGhosh39
 
LLMs.txt: Easily Control How AI Crawls Your Site
Keploy
 
How Startups Are Growing Faster with App Developers in Australia.pdf
India App Developer
 
Predicting the unpredictable: re-engineering recommendation algorithms for fr...
Speck&Tech
 
✨Unleashing Collaboration: Salesforce Channels & Community Power in Patna!✨
SanjeetMishra29
 
Windsurf Meetup Ottawa 2025-07-12 - Planning Mode at Reliza.pdf
Pavel Shukhman
 
Meetup Kickoff & Welcome - Rohit Yadav, CSIUG Chairman
ShapeBlue
 
SWEBOK Guide and Software Services Engineering Education
Hironori Washizaki
 
Wojciech Ciemski for Top Cyber News MAGAZINE. June 2025
Dr. Ludmila Morozova-Buss
 
Top iOS App Development Company in the USA for Innovative Apps
SynapseIndia
 
Rethinking Security Operations - SOC Evolution Journey.pdf
Haris Chughtai
 
Building Resilience with Digital Twins : Lessons from Korea
SANGHEE SHIN
 
CloudStack GPU Integration - Rohit Yadav
ShapeBlue
 
Building a Production-Ready Barts Health Secure Data Environment Tooling, Acc...
Barts Health
 
HCIP-Data Center Facility Deployment V2.0 Training Material (Without Remarks ...
mcastillo49
 
CIFDAQ Token Spotlight for 9th July 2025
CIFDAQ
 
Building and Operating a Private Cloud with CloudStack and LINBIT CloudStack ...
ShapeBlue
 
Complete JavaScript Notes: From Basics to Advanced Concepts.pdf
haydendavispro
 
The Builder’s Playbook - 2025 State of AI Report.pdf
jeroen339954
 
Impact of IEEE Computer Society in Advancing Emerging Technologies including ...
Hironori Washizaki
 

Assembling a computer

  • 1. Presentation on Assembling a Computer Presenting By: Neeraj Dhiman
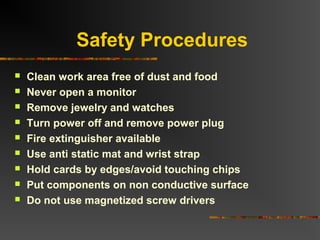
  • 2. Safety Procedures  Clean work area free of dust and food  Never open a monitor  Remove jewelry and watches  Turn power off and remove power plug  Fire extinguisher available  Use anti static mat and wrist strap  Hold cards by edges/avoid touching chips  Put components on non conductive surface  Do not use magnetized screw drivers
  • 3. Electrostatic Discharge  If you notice it, it’s at least 2000 volts  Charge of 200 volts can damage components  Keep all components in anti-static bags  Humidity above 50%  Use grounded mats (workbench and floor)  Use wrist straps  Periodically touch unpainted grounded metal computer parts to lower the body’s static energy
  • 4. Keeping an Inventory  Document all components, parts purchased  Use an inventory checklist  May be difficult to recall later  Will be helpful in locating and downloading device drivers  Note specific warranty info  Save specifics about installation and maintenance requirements so warranties will be valid  Use small box to hold all manuals and disks  Label box for specific computer  Store in secure place
  • 5. Choosing a computer case and system unit  Case  Allows easy access to internal components  Provides room for expansion  ATX form factor  Available desk top space  LED indicators on front  Dust filters if area where computer to be used is dusty  Power supply  Minimum 250 watts  ATX  Single 20 pin  Fan pulls air through case from front to back
  • 6. Preparing to install Motherboard  Review the motherboard location map  Configure the motherboard  Install the CPU, heat sink and fan, RAM  Connect power supply cables to motherboard power connectors and misc. connectors to correct switches and lights  Set the system BIOS
  • 7. Configuring the processor  Set jumper settings for appropriate frequency  Ensure the CPU used supports the BUS speed and the CPU clock speed of Motherboard
  • 8. Installing the CPU  ZIF (Zero Insertion Force) trait on nearly all socket 7 and similar types  Inspect pins for damage  Locate pin 1 on both chip and socket  Open the ZIF socket (raise lever)  Insert processor (should easily slide on)  Make sure there is not a gap between bottom of chip and socket  Push lever down  Set CPU voltage jumper settings if necessary (Pentium II and later CPU’s adjust automatically to voltage)
  • 9. Install Heat Sink and Fan  Attach fan to heat sink if not already attached  Apply thin layer of compound to chip surface  Attach heat sink by placing squarely on top of processor and press down gently  Bend clips in place to hold sink  Make sure there is good contact between sink and Chip surface  Wipe off any excess compound  Plug power cord from fan to fan power pins on motherboard
  • 10. Install RAM  Two types RAM used on most PC’s  DDR1  DDR2  Look at motherboard map to determine which bank to place DIMM 1 module in  Orient the Dimm chip over the slot (keyed) and insert into slot  Lock in place by closing levers
  • 11. Installing the Motherboard  Position case for easy access, locate holes on motherboard and corresponding holes on case  Insert spacers that came with motherboard into holes on case and install plastic standoffs into holes on motherboard  Carefully slide the board into the case, lining up holes  Tighten board to case with screws  Verify that the back of the motherboard is not touching the case, all slots and connectors line up properly, board is securely held in place, and board does not bend when pressed
  • 12. Attaching LEDs, key lock and speaker  Use motherboard manual as a guide for proper placement  Turbo LED (mainly legacy item)  Power LED  Hard drive activity LED  Key lock switch (common with older systems, rare now; prevented BIOS meddling)  PC speaker
  • 13. Connect power supply cables  AT motherboard  Locate two large wire leads from power supply (P8 and P9)  Locate 12 pin power connector on motherboard  Plug P8 and P9 into connector  Be sure black wires are in the middle beside one another  ATX motherboard  Attach the connector that is keyed to fit only one way into the motherboard connector
  • 14. Attach hard drive and CD-ROM  Use separate IDE cables if possible and set both jumpers to Master (or single on the hard drive if available)  If sharing an IDE cable, set the hard drive to Master and the CD- ROM to slave  Install hard drive away from power supply which can act like a magnet and destroy data  Keep hard drive near front of case to benefit from air drawn into case and keep away from other hardware  Slide drive into selected drive rail and screw drive into place  Attach ribbon cable to the primary controller of the motherboard and attach power cord  Follow with CD-ROM installation and attach to secondary controller of the motherboard
  • 15. Installing a video card  Use AGP expansion slot if available, otherwise use PCI or ISA  Remove slot insert and insert video card by aligning pins and gently applying pressure  Secure to case with a screw  Some motherboards have built-in video. If you want to install an external card then you must disable the built in video in the CMOS AGP VIDEO CARD
  • 16. Post Assembly Checklist  All expansion cards are fully inserted  CPU fan is attached to power  The 110/220 volt switch is configured properly  Drives are connected to power  Ribbon cables are attached correctly  Fans are free from interference from wires  CPU voltage settings are correctly configured  Power switch is off and power supply connectors are connected properly to motherboard  All connections are tight  Pins are properly aligned  Close the case before booting  Connect keyboard, mouse and monitor and plug in AC power
  • 17. We've successfully assembled a computer THANK YOU ANY QUERY