SlideShare a Scribd company logo
Workshop India
» Information that defines what is drawn on the
  screen.
   ˃ stored as XML files in the /res/layout resource
   ˃ Simply a template for a User Interface on the screen.

» A type of View class that can display other child
  controls or components.
   ˃ text controls
   ˃ buttons
   ˃ images
What is a control?
                                                       Any component that forms part of
                                                       the screen.


» Linear Layout
   ˃ It organizes controls linearly in either a vertical or horizontal fashion

» Relative Layout,
   ˃ It organizes controls relative to one another, or to the parent control’s
     edges itself.

» Table Layout
   ˃ A grid of made up of rows and columns, where a cell can display a
     view control

» Frame Layout
   ˃ Frame layouts are the normal layout of choice when you want to
     overlap different views stacked on on top the other.
» XML definitions are used for controlling how
             these layouts are

           » res/layout/main.xml is the layout definition for
             the main view.

           » setContentView(R.layout.main); for loading
             and displaying the selected layout.
What is XML?
eXtended Markup Language is a popular data exchange format
» To separate Design from Development
   ˃ UI Designers (who concern themselves more with layout)
   ˃ Application Developers (who know Java and implement application
     functionality).


» Complex controls (Also called views), like
  ListView or GridView, are usually populated
  with data programmatically

» Recommended Practice:
   ˃ Creating an XML layout file for every screen that your application has
   ˃ Tying each screen to a specific activity
XML and HTML?
                             XML and HTML differ only in
                             implementation as browser
                             standards, XML is for arbitrary data
                             and HTML is for Web Pages


<name_of_tag property=“value”>
     <view01 android:property1=“val1”>
     </child01>
     <view02 android:property2=“val2”>
     </child02>
     <view03 android:property3=“val3”>
     </child03>
</name_of_tag >
03   layouts & ui design - Android
» Set up Controls with properties that are known
  at build time set in the XML layout files.
   ˃ All properties can be changed programmatically for dynamic
     application behaviour


» Set up listeners for the controls: Views allow
  clients to set listeners that will be notified when
  something interesting happens to the view.
   ˃ Button exposes a listener to notify clients when the button is clicked.
» Controls are child elements that can be presented
  to the user for Input/Output/Fanciness.
» These controls are also called Widgets.
» The design and initial values for the layout can be
  placed in the view.xml file in the /res/layout folder.

     <TextView android:text="RED"
             android:id="@+id/TextView01"
             android:layout_height="wrap_content"
             android:background="#f00"
             android:layout_width="fill_parent"
             android:layout_weight=".14"
             android:gravity="center"
             android:textColor="#000"></TextView>
The following example adds two images to a relativelayout view.


RelativeLayout rl = (RelativeLayout) findViewById(R.id.main);
ImageView iv;
RelativeLayout.LayoutParams params;
iv = new ImageView(this);
iv.setBackgroundColor(Color.YELLOW);
params = new RelativeLayout.LayoutParams(30, 40);
params.leftMargin = 50;
params.topMargin = 60;
rl.addView(iv, params);
iv = new ImageView(this);
iv.setBackgroundColor(Color.RED);
params = new RelativeLayout.LayoutParams(30, 40);
params.leftMargin = 80;
params.topMargin = 90;
rl.addView(iv, params);
Generate
Button


                                 Property editor
 Tree View                       window
 Of
 Child
 Controls


             Preview
                         Generated XML layout
             Of Layout
» Separate Application to help design layouts and
  modify controls easily

» Once done designing, click on generate and
  past the xml code into the required xml file.

» All external resources other than layout.xml can
  also be generated here.
» The linear layout works much as its name
  implies.
   ˃ it organizes controls linearly in either a vertical or horizontal fashion


» Linear layouts can be defined within XML layout
  resources or programmatically in the
  application’s Java code.

» DEMO : How to create the following layout in
  Droid Draw
» In DroidDraw’s Widget Control Box, select text
  view and drop to the screen.
» Change root-layout to LinearLayout.
» In properties window, make the following
  changes and click apply:
   ˃ Id: @+id/text01
   ˃ Width: fill_parent
   ˃ Height: 60dp
   ˃ Background color: Blue
   ˃ Padding: 5dp
   ˃ FontSize: 20sp
   ˃ Text: alignment: center
» Make 4 such text views
  like this
<?xml version="1.0" encoding="utf-8"?>
<LinearLayout
              android:id="@+id/widget32"
              android:layout_width="fill_parent"
              android:layout_height="fill_parent"
              android:orientation="vertical"
              xmlns:android="http://schemas.android.com/apk/
res/android">
<TextView
              android:id="@+id/widget41_copy"
              android:layout_width="fill_parent"
              android:layout_height="60dp"
              android:background="#ff3333ff"
              android:padding="5dp"
              android:text="TextView"
              android:hint="0"
              android:textSize="20sp"
              android:typeface="monospace"
              android:gravity="center" />
<TextView
              android:id="@+id/widget41_copy"
…..
[continues]
»    To any one text view if the property control
     android:layout_weight=“1”
Is given, that property with the highest value will
take up all remaining space in the screen.
1 = 100% of remaining space.
0.5 = 50% of remaining space.
0.25 = 25% of remaining space.

» android:layout_width="fill_parent”
Makes that property all available space remaining
in its parent container.

» android:layout_width="wrap_content“
Makes that property just as big as the content
inside it
The layout weight property is used to
give relative weights to the child
controls of the Linear-Layout.
I have 5 controls, 1/5 = 0.2
So if I give 0.2 to all of themThey’ll all
be the same height!

» And this behaviour will be the same
  in all android devices of different
  screen sizes.

» Once you’ve made this layout in
  droid designer, click generate and
  copy the xml.
» Make a new project

» Open the main.xml file in /res/layout and paste the
  markup there.

» See if the same thing Is generated in the dynamic
  preview.

» Hit Run and open an AVD to see the application
  running.
03   layouts & ui design - Android
» The text for the UI layouts is
  stored seperately in a
  strings.xml file.

» Enter a string identifier. (not
  the contents of the string,
  just something to identify it)
» This is a recommended practice
  for android applications,

» because it allows your
  application to be translated to
  different languages more easily!
» The orientation attribute (required), which can be set to vertical or
  horizontal (class: LinearLayout)

» The layout_weight attribute (optional, applied to each child control)
  specifies each child control’s relative importance within the parent linear
  layout (class: LinearLayout.LayoutParams)

» Generic Layout Parameters such as layout_height (required) and
  layout_width (required) (class: ViewGroup.LayoutParams)

» Margin Layout Parameters such as margin_top, margin_left, margin_right
  and margin_bottom (class: ViewGroup. MarginLayoutParams)

» Layout Parameters such as layout_height and layout_width (class:
  ViewGroup.LayoutParams)
03   layouts & ui design - Android
» Now, we move on to
  programming things in the
  .java file

» On the right side, we see the
  src/…/something.java

» This is the main file that we
  have to edit.
This indicates that the project is part of com.example. All
                       code files part of this project should declare this on top.
package com.example;
                               All imports required by code goes here
import android.app.Activity;
import android.os.Bundle;                      Each activity has its own class,
                                               some applications may not
                                               need this class depending
public class MyActivity extends Activity       upon implementation
{
  /** Called when the activity is first created. */
  @Override
  public void onCreate(Bundle savedInstanceState)              This function is the entry point.
                                                               in case the application was
  {
                                                               interrupted last time, the
    super.onCreate(savedInstanceState);                        previous state is sent as a Bundle
    setContentView(R.layout.main);                             to the application
  }     Loads the layout from
}       main.xml and displays it on the
       screen
» All syntax rules are that of Java!
» We implement a java class inherited from
  activity and override any functions required as
  per our requirements.
» “extends activity” means activity is our base
  class.
» If we want to insert our own functions, they
  have to be public to be handled by the android
  engine.
» To be able to “listen” to clicks on various objects/views in out UI
   ˃ Maybe buttons, textviews, radioclicks.. Etc.
   First,
» public class Tabtest01 extends Activity implements OnClickListener { .. }
   ˃ This allows us to use the OnClickListener interface in the rest of our
      code.

» Then we write a public onclick() function that handles all click events in
  our activity.

» Then we attach the view that we want to be clicked to this function in
  the oncreate() function
TextView clickMe;                                           •   First, we need to identify the view using the
                                                                    findViewById() and typecasting it to what we
    @Override                                                       know our result should be.
    public void onCreate(Bundle savedInstanceState)             •   clickMe is an object of the exact type of view
        {                                                           that’s going to be returned.
        super.onCreate(savedInstanceState);                     •   setOnClickListener() attaches the interface to
        setContentView(R.layout.main);                              the click listener to the textview with
        clickMe = (TextView)findViewById(R.id.widget02);            id:widget02
        clickMe.setOnClickListener(this);
    }

@Override                                                                    •   This method is called whenever a
 public void onClick(View v) {                                                   click is called. The argument “V”
      if(v==clickMe) {                                                           contains details of the view that
        Toast.makeText(this, “ Clicked! ”,Toast.LENGTH_SHORT).show();            was clicked.
        clickMe.setBackgroundResource(R.color.green);                        •   Since both functions are part of
        clickMe.setText("ABCDEFG")                                               the same class, if v==clickMe, then
      }                                                                          we know that id:widget02 was
 }                                                                               clicked.
                                                                             •   Then we can perform
                                                                                 manipulations on the required
                                                                                 object!
» Make a new xml file in res/values/color.xml

» Put this inside it:

<resources>
  <color name="white">#ffffffff</color>
  <color name="black">#ff000000</color>
  <color name="red">#ffff0000</color>
  <color name="green">#ff00ff00</color>
  <color name="blue">#ff0000ff</color>
</resources>

Any number of custom colors that you want can be inserted here and
accessed via R.color.name
» Apart from clicking a control/view, in android
  phones, long pressing on any element performs a
  secondary function
   ˃ Serves the purpose of doubleclick which is not recommended.

» First in oncreate(), after finding the element, we
  need to register for context menu.

» Then we write two handler functions
  onCreateContextMenu() and
  onContextItemSelected() to implement the
  behaviour we require.
TextView clickMe;

 @Override                                                 •   First, like we need to identify the view using
 public void onCreate(Bundle savedInstanceState)               the findViewById() and typecasting it and
     {                                                         saving it in a object of same type as the view.
     super.onCreate(savedInstanceState);
     setContentView(R.layout.main);                        •   registerForContextMenu() takes a view as
     clickMe = (TextView)findViewById(R.id.widget02);          parameter and registers that view for the
     clickMe.setOnClickListener(this);                         longpress to context menu.
     registerForContextMenu(clickMe);
 }


@Override
  public void onCreateContextMenu(ContextMenu menu, View
v,ContextMenuInfo menuInfo) {
    super.onCreateContextMenu(menu, v, menuInfo);               •   This method creates the required
    menu.setHeaderTitle("Context Menu");                            context menu and populates its entries.
    menu.add(0, v.getId(), 0, "Action 1");                      •   menu.setHeaderTitle() sets the title of
    menu.add(0, v.getId(), 0, "Action 2");                          the context menu.
  }                                                             •   And the menu.add() function can set up
                                                                    all the actions possible in that menu.
@Override
 public boolean onContextItemSelected(MenuItem item) {
   if(item.getTitle()=="Action 1"){
      Toast.makeText(this, "function 1 called", Toast.LENGTH_SHORT).show();
   }
   else if(item.getTitle()=="Action 2"){
      Toast.makeText(this, "function 1 called", Toast.LENGTH_SHORT).show();
   }
   else {return false;}
   return true;                             • This onContextItemSelected() function is called when a
 }                                               menu item is pressed from the previous function.
                                          •   The data (as always) comes as argument to the function
                                              call..
                                          •    using item.getTitle()=="Action 1") we can identify which
                                              menu item was pressed and do actions accordingly..
                                          •   this function must return true if a valid menu item was
                                              processed so that the system can remove the context
                                              menu.
03   layouts & ui design - Android
» A little more flexible than linear layouts.

» Allow you to specify views position in relation t
  each other and their container.

» Nested views increase the performance
  overhead required for application.
03   layouts & ui design - Android
<?xml version="1.0" encoding="utf-8"?>
<RelativeLayout
    xmlns:android="http://schemas.android.com/apk/res/android"
    android:layout_height="fill_parent"
    android:layout_width="fill_parent">


  <TextView
      android:text="RED"
      android:id="@+id/TextView01"
      android:layout_height="wrap_content"
      android:background="#f00"
      android:gravity="center"
      android:textColor="#000"
      android:layout_width="wrap_content"
      android:padding="25dp"></TextView>


</RelativeLayout>
[…]
<TextView

      android:text="ORANGE"
      android:layout_height="wrap_content"
      android:background="#ffa500"
      android:gravity="center"
      android:textColor="#000"
      android:id="@+id/TextView02"
      android:layout_width="wrap_content"
      android:layout_centerHorizontal="true"
      android:padding="25dp">

</TextView>


[…]
[…]
<TextView

      android:text="YELLOW"
      android:layout_height="wrap_content"
      android:background="#ffff00"
      android:gravity="center"
      android:textColor="#000"
      android:id="@+id/TextView03"
      android:layout_width="wrap_content"
      android:layout_alignParentRight="true"
      android:padding="25dp">

</TextView>

[…]
[…]
<TextView

      <TextView
      android:text="GREEN"
      android:layout_height="wrap_content"
      android:background="#0f0"
      android:gravity="center"
      android:textColor="#000"
      android:id="@+id/TextView04"
      android:layout_width="wrap_content"
      android:layout_toLeftOf="@+id/TextView05"
      android:padding="25dp"
      android:layout_centerVertical="true">
</TextView>


[…]
[…]
<TextView

      <TextView
      android:text="BLUE"
      android:layout_height="wrap_content"
      android:background="#00f"
      android:gravity="center"
      android:textColor="#fff"
      android:id="@+id/TextView05"
      android:layout_width="wrap_content"
      android:layout_centerInParent="true"
      android:layout_margin="10dp"
      android:padding="25dp">

</TextView>

[…]
[…]
<TextView
      android:text="INDIGO"
      android:layout_height="wrap_content"
      android:gravity="center"
      android:textColor="#fff"
      android:id="@+id/TextView06"
      android:layout_width="wrap_content"
      android:layout_toRightOf="@+id/TextView05"
      android:background="#4b0082"
      android:padding="25dp"
      android:layout_centerVertical="true">


</TextView>
[…]
[…]

<TextView
      android:text="VIOLET"
      android:layout_height="wrap_content"
      android:background="#ee82ee"
      android:gravity="center"
      android:textColor="#000"
      android:id="@+id/TextView07"
      android:layout_alignParentBottom="true"
      android:layout_width="fill_parent"
      android:padding="25dp">


</TextView>
[…]
03   layouts & ui design - Android

More Related Content

What's hot (20)

PPTX
The Magic of WPF & MVVM
Abhishek Sur
 
PPTX
Asp.net mvc training
icubesystem
 
PPTX
React - An Introduction
Tyler Johnston
 
PPTX
Introduction to XAML and its features
Abhishek Sur
 
PPT
Metamorphosis from Forms to Java: A technical lead's perspective, part II
Michael Fons
 
PDF
Introducing Rendr: Run your Backbone.js apps on the client and server
Spike Brehm
 
PDF
Oracle ADF 11g Skinning Tutorial
Rakesh Gujjarlapudi
 
ODP
Session 2- day 3
Vivek Bhusal
 
PDF
Data binding 入門淺談
awonwon
 
PPTX
Angular js 1.3 presentation for fed nov 2014
Sarah Hudson
 
ODP
Day seven
Vivek Bhusal
 
PPTX
Getting Started with Angular JS
Akshay Mathur
 
PDF
A comprehensive guide on developing responsive and common react filter component
Katy Slemon
 
PPTX
Unit2
DevaKumari Vijay
 
PPTX
Angular js
Behind D Walls
 
PDF
Programming with JavaFX
Fulvio Corno
 
PDF
Rc085 010d-vaadin7
Cosmina Ivan
 
PPT
WPF Fundamentals
Our Community Exchange LLC
 
PPTX
iOS app dev Training - Session1
Hussain Behestee
 
PPTX
Angular JS
John Temoty Roca
 
The Magic of WPF & MVVM
Abhishek Sur
 
Asp.net mvc training
icubesystem
 
React - An Introduction
Tyler Johnston
 
Introduction to XAML and its features
Abhishek Sur
 
Metamorphosis from Forms to Java: A technical lead's perspective, part II
Michael Fons
 
Introducing Rendr: Run your Backbone.js apps on the client and server
Spike Brehm
 
Oracle ADF 11g Skinning Tutorial
Rakesh Gujjarlapudi
 
Session 2- day 3
Vivek Bhusal
 
Data binding 入門淺談
awonwon
 
Angular js 1.3 presentation for fed nov 2014
Sarah Hudson
 
Day seven
Vivek Bhusal
 
Getting Started with Angular JS
Akshay Mathur
 
A comprehensive guide on developing responsive and common react filter component
Katy Slemon
 
Angular js
Behind D Walls
 
Programming with JavaFX
Fulvio Corno
 
Rc085 010d-vaadin7
Cosmina Ivan
 
WPF Fundamentals
Our Community Exchange LLC
 
iOS app dev Training - Session1
Hussain Behestee
 
Angular JS
John Temoty Roca
 

Similar to 03 layouts & ui design - Android (20)

DOCX
How to create ui using droid draw
info_zybotech
 
PPT
View groups containers
Mani Selvaraj
 
DOCX
Android xml-based layouts-chapter5
Dr. Ramkumar Lakshminarayanan
 
PDF
Android Application Development - Level 1
Isham Rashik
 
PPTX
Unit 2 part for information technology1 4.pptx
shambelworku8
 
PPTX
Android Layout.pptx
vishal choudhary
 
PDF
Ch4 creating user interfaces
Shih-Hsiang Lin
 
PDF
04 user interfaces
C.o. Nieto
 
PPTX
Ui 5
Michael Shrove
 
PDF
Android UI Fundamentals part 1
Marcos Paulo Souza Damasceno
 
PDF
Mobile Application Development -Lecture 07 & 08.pdf
AbdullahMunir32
 
PDF
Android developers use the term layout to mean one of two things. Bo.pdf
himanshukausik409
 
PPTX
mobile application development -unit-3-
TejamFandat
 
PPTX
Android Training (Android UI)
Khaled Anaqwa
 
PDF
Android UI Development
Jussi Pohjolainen
 
PPTX
Introduction to android
Shrijan Tiwari
 
PPTX
UNIT5newpart2pptx__2024_11_13_09_52_11 (1).pptx
LeeroyMugadza
 
PPTX
Android Study Jam 2
DSC GVP
 
PDF
Android ui layout
Krazy Koder
 
DOCX
Android views and layouts-chapter4
Dr. Ramkumar Lakshminarayanan
 
How to create ui using droid draw
info_zybotech
 
View groups containers
Mani Selvaraj
 
Android xml-based layouts-chapter5
Dr. Ramkumar Lakshminarayanan
 
Android Application Development - Level 1
Isham Rashik
 
Unit 2 part for information technology1 4.pptx
shambelworku8
 
Android Layout.pptx
vishal choudhary
 
Ch4 creating user interfaces
Shih-Hsiang Lin
 
04 user interfaces
C.o. Nieto
 
Android UI Fundamentals part 1
Marcos Paulo Souza Damasceno
 
Mobile Application Development -Lecture 07 & 08.pdf
AbdullahMunir32
 
Android developers use the term layout to mean one of two things. Bo.pdf
himanshukausik409
 
mobile application development -unit-3-
TejamFandat
 
Android Training (Android UI)
Khaled Anaqwa
 
Android UI Development
Jussi Pohjolainen
 
Introduction to android
Shrijan Tiwari
 
UNIT5newpart2pptx__2024_11_13_09_52_11 (1).pptx
LeeroyMugadza
 
Android Study Jam 2
DSC GVP
 
Android ui layout
Krazy Koder
 
Android views and layouts-chapter4
Dr. Ramkumar Lakshminarayanan
 
Ad

More from Wingston (20)

PPTX
OpenCV @ Droidcon 2012
Wingston
 
PPTX
05 content providers - Android
Wingston
 
PPTX
04 activities - Android
Wingston
 
PPTX
02 hello world - Android
Wingston
 
PPTX
01 introduction & setup - Android
Wingston
 
PPTX
OpenCV with android
Wingston
 
PPTX
C game programming - SDL
Wingston
 
PPTX
C programming - Pointers
Wingston
 
PPTX
Introduction to Basic C programming 02
Wingston
 
PPT
Introduction to Basic C programming 01
Wingston
 
PPTX
Linux – an introduction
Wingston
 
PPTX
Embedded linux
Wingston
 
PPTX
04 Arduino Peripheral Interfacing
Wingston
 
PPTX
03 analogue anrduino fundamentals
Wingston
 
PPTX
02 General Purpose Input - Output on the Arduino
Wingston
 
PPTX
Introduction to the Arduino
Wingston
 
PPTX
4.content mgmt
Wingston
 
PPTX
8 Web Practices for Drupal
Wingston
 
PPTX
7 Theming in Drupal
Wingston
 
PPTX
6 Special Howtos for Drupal
Wingston
 
OpenCV @ Droidcon 2012
Wingston
 
05 content providers - Android
Wingston
 
04 activities - Android
Wingston
 
02 hello world - Android
Wingston
 
01 introduction & setup - Android
Wingston
 
OpenCV with android
Wingston
 
C game programming - SDL
Wingston
 
C programming - Pointers
Wingston
 
Introduction to Basic C programming 02
Wingston
 
Introduction to Basic C programming 01
Wingston
 
Linux – an introduction
Wingston
 
Embedded linux
Wingston
 
04 Arduino Peripheral Interfacing
Wingston
 
03 analogue anrduino fundamentals
Wingston
 
02 General Purpose Input - Output on the Arduino
Wingston
 
Introduction to the Arduino
Wingston
 
4.content mgmt
Wingston
 
8 Web Practices for Drupal
Wingston
 
7 Theming in Drupal
Wingston
 
6 Special Howtos for Drupal
Wingston
 
Ad

Recently uploaded (20)

PPTX
How to Set Maximum Difference Odoo 18 POS
Celine George
 
PDF
CONCURSO DE POESIA “POETUFAS – PASSOS SUAVES PELO VERSO.pdf
Colégio Santa Teresinha
 
PPTX
HYDROCEPHALUS: NURSING MANAGEMENT .pptx
PRADEEP ABOTHU
 
PPTX
How to Manage Large Scrollbar in Odoo 18 POS
Celine George
 
PPT
Talk on Critical Theory, Part One, Philosophy of Social Sciences
Soraj Hongladarom
 
PPSX
Health Planning in india - Unit 03 - CHN 2 - GNM 3RD YEAR.ppsx
Priyanshu Anand
 
PDF
IMP NAAC-Reforms-Stakeholder-Consultation-Presentation-on-Draft-Metrics-Unive...
BHARTIWADEKAR
 
PDF
People & Earth's Ecosystem -Lesson 2: People & Population
marvinnbustamante1
 
PPTX
2025 Winter SWAYAM NPTEL & A Student.pptx
Utsav Yagnik
 
PPSX
HEALTH ASSESSMENT (Community Health Nursing) - GNM 1st Year
Priyanshu Anand
 
PPTX
Pyhton with Mysql to perform CRUD operations.pptx
Ramakrishna Reddy Bijjam
 
PPTX
How to Create Rental Orders in Odoo 18 Rental
Celine George
 
PDF
1, 2, 3… E MAIS UM CICLO CHEGA AO FIM!.pdf
Colégio Santa Teresinha
 
PPTX
How to Manage Promotions in Odoo 18 Sales
Celine George
 
PPT
Talk on Critical Theory, Part II, Philosophy of Social Sciences
Soraj Hongladarom
 
PDF
DIGESTION OF CARBOHYDRATES,PROTEINS,LIPIDS
raviralanaresh2
 
PPTX
BANDHA (BANDAGES) PPT.pptx ayurveda shalya tantra
rakhan78619
 
PPTX
A PPT on Alfred Lord Tennyson's Ulysses.
Beena E S
 
PDF
IMP NAAC REFORMS 2024 - 10 Attributes.pdf
BHARTIWADEKAR
 
PPTX
Views on Education of Indian Thinkers J.Krishnamurthy..pptx
ShrutiMahanta1
 
How to Set Maximum Difference Odoo 18 POS
Celine George
 
CONCURSO DE POESIA “POETUFAS – PASSOS SUAVES PELO VERSO.pdf
Colégio Santa Teresinha
 
HYDROCEPHALUS: NURSING MANAGEMENT .pptx
PRADEEP ABOTHU
 
How to Manage Large Scrollbar in Odoo 18 POS
Celine George
 
Talk on Critical Theory, Part One, Philosophy of Social Sciences
Soraj Hongladarom
 
Health Planning in india - Unit 03 - CHN 2 - GNM 3RD YEAR.ppsx
Priyanshu Anand
 
IMP NAAC-Reforms-Stakeholder-Consultation-Presentation-on-Draft-Metrics-Unive...
BHARTIWADEKAR
 
People & Earth's Ecosystem -Lesson 2: People & Population
marvinnbustamante1
 
2025 Winter SWAYAM NPTEL & A Student.pptx
Utsav Yagnik
 
HEALTH ASSESSMENT (Community Health Nursing) - GNM 1st Year
Priyanshu Anand
 
Pyhton with Mysql to perform CRUD operations.pptx
Ramakrishna Reddy Bijjam
 
How to Create Rental Orders in Odoo 18 Rental
Celine George
 
1, 2, 3… E MAIS UM CICLO CHEGA AO FIM!.pdf
Colégio Santa Teresinha
 
How to Manage Promotions in Odoo 18 Sales
Celine George
 
Talk on Critical Theory, Part II, Philosophy of Social Sciences
Soraj Hongladarom
 
DIGESTION OF CARBOHYDRATES,PROTEINS,LIPIDS
raviralanaresh2
 
BANDHA (BANDAGES) PPT.pptx ayurveda shalya tantra
rakhan78619
 
A PPT on Alfred Lord Tennyson's Ulysses.
Beena E S
 
IMP NAAC REFORMS 2024 - 10 Attributes.pdf
BHARTIWADEKAR
 
Views on Education of Indian Thinkers J.Krishnamurthy..pptx
ShrutiMahanta1
 

03 layouts & ui design - Android

  • 2. » Information that defines what is drawn on the screen. ˃ stored as XML files in the /res/layout resource ˃ Simply a template for a User Interface on the screen. » A type of View class that can display other child controls or components. ˃ text controls ˃ buttons ˃ images
  • 3. What is a control? Any component that forms part of the screen. » Linear Layout ˃ It organizes controls linearly in either a vertical or horizontal fashion » Relative Layout, ˃ It organizes controls relative to one another, or to the parent control’s edges itself. » Table Layout ˃ A grid of made up of rows and columns, where a cell can display a view control » Frame Layout ˃ Frame layouts are the normal layout of choice when you want to overlap different views stacked on on top the other.
  • 4. » XML definitions are used for controlling how these layouts are » res/layout/main.xml is the layout definition for the main view. » setContentView(R.layout.main); for loading and displaying the selected layout. What is XML? eXtended Markup Language is a popular data exchange format
  • 5. » To separate Design from Development ˃ UI Designers (who concern themselves more with layout) ˃ Application Developers (who know Java and implement application functionality). » Complex controls (Also called views), like ListView or GridView, are usually populated with data programmatically » Recommended Practice: ˃ Creating an XML layout file for every screen that your application has ˃ Tying each screen to a specific activity
  • 6. XML and HTML? XML and HTML differ only in implementation as browser standards, XML is for arbitrary data and HTML is for Web Pages <name_of_tag property=“value”> <view01 android:property1=“val1”> </child01> <view02 android:property2=“val2”> </child02> <view03 android:property3=“val3”> </child03> </name_of_tag >
  • 8. » Set up Controls with properties that are known at build time set in the XML layout files. ˃ All properties can be changed programmatically for dynamic application behaviour » Set up listeners for the controls: Views allow clients to set listeners that will be notified when something interesting happens to the view. ˃ Button exposes a listener to notify clients when the button is clicked.
  • 9. » Controls are child elements that can be presented to the user for Input/Output/Fanciness. » These controls are also called Widgets. » The design and initial values for the layout can be placed in the view.xml file in the /res/layout folder. <TextView android:text="RED" android:id="@+id/TextView01" android:layout_height="wrap_content" android:background="#f00" android:layout_width="fill_parent" android:layout_weight=".14" android:gravity="center" android:textColor="#000"></TextView>
  • 10. The following example adds two images to a relativelayout view. RelativeLayout rl = (RelativeLayout) findViewById(R.id.main); ImageView iv; RelativeLayout.LayoutParams params; iv = new ImageView(this); iv.setBackgroundColor(Color.YELLOW); params = new RelativeLayout.LayoutParams(30, 40); params.leftMargin = 50; params.topMargin = 60; rl.addView(iv, params); iv = new ImageView(this); iv.setBackgroundColor(Color.RED); params = new RelativeLayout.LayoutParams(30, 40); params.leftMargin = 80; params.topMargin = 90; rl.addView(iv, params);
  • 11. Generate Button Property editor Tree View window Of Child Controls Preview Generated XML layout Of Layout
  • 12. » Separate Application to help design layouts and modify controls easily » Once done designing, click on generate and past the xml code into the required xml file. » All external resources other than layout.xml can also be generated here.
  • 13. » The linear layout works much as its name implies. ˃ it organizes controls linearly in either a vertical or horizontal fashion » Linear layouts can be defined within XML layout resources or programmatically in the application’s Java code. » DEMO : How to create the following layout in Droid Draw
  • 14. » In DroidDraw’s Widget Control Box, select text view and drop to the screen. » Change root-layout to LinearLayout. » In properties window, make the following changes and click apply: ˃ Id: @+id/text01 ˃ Width: fill_parent ˃ Height: 60dp ˃ Background color: Blue ˃ Padding: 5dp ˃ FontSize: 20sp ˃ Text: alignment: center
  • 15. » Make 4 such text views like this <?xml version="1.0" encoding="utf-8"?> <LinearLayout android:id="@+id/widget32" android:layout_width="fill_parent" android:layout_height="fill_parent" android:orientation="vertical" xmlns:android="http://schemas.android.com/apk/ res/android"> <TextView android:id="@+id/widget41_copy" android:layout_width="fill_parent" android:layout_height="60dp" android:background="#ff3333ff" android:padding="5dp" android:text="TextView" android:hint="0" android:textSize="20sp" android:typeface="monospace" android:gravity="center" /> <TextView android:id="@+id/widget41_copy" ….. [continues]
  • 16. » To any one text view if the property control android:layout_weight=“1” Is given, that property with the highest value will take up all remaining space in the screen. 1 = 100% of remaining space. 0.5 = 50% of remaining space. 0.25 = 25% of remaining space. » android:layout_width="fill_parent” Makes that property all available space remaining in its parent container. » android:layout_width="wrap_content“ Makes that property just as big as the content inside it
  • 17. The layout weight property is used to give relative weights to the child controls of the Linear-Layout. I have 5 controls, 1/5 = 0.2 So if I give 0.2 to all of themThey’ll all be the same height! » And this behaviour will be the same in all android devices of different screen sizes. » Once you’ve made this layout in droid designer, click generate and copy the xml.
  • 18. » Make a new project » Open the main.xml file in /res/layout and paste the markup there. » See if the same thing Is generated in the dynamic preview. » Hit Run and open an AVD to see the application running.
  • 20. » The text for the UI layouts is stored seperately in a strings.xml file. » Enter a string identifier. (not the contents of the string, just something to identify it)
  • 21. » This is a recommended practice for android applications, » because it allows your application to be translated to different languages more easily!
  • 22. » The orientation attribute (required), which can be set to vertical or horizontal (class: LinearLayout) » The layout_weight attribute (optional, applied to each child control) specifies each child control’s relative importance within the parent linear layout (class: LinearLayout.LayoutParams) » Generic Layout Parameters such as layout_height (required) and layout_width (required) (class: ViewGroup.LayoutParams) » Margin Layout Parameters such as margin_top, margin_left, margin_right and margin_bottom (class: ViewGroup. MarginLayoutParams) » Layout Parameters such as layout_height and layout_width (class: ViewGroup.LayoutParams)
  • 24. » Now, we move on to programming things in the .java file » On the right side, we see the src/…/something.java » This is the main file that we have to edit.
  • 25. This indicates that the project is part of com.example. All code files part of this project should declare this on top. package com.example; All imports required by code goes here import android.app.Activity; import android.os.Bundle; Each activity has its own class, some applications may not need this class depending public class MyActivity extends Activity upon implementation { /** Called when the activity is first created. */ @Override public void onCreate(Bundle savedInstanceState) This function is the entry point. in case the application was { interrupted last time, the super.onCreate(savedInstanceState); previous state is sent as a Bundle setContentView(R.layout.main); to the application } Loads the layout from } main.xml and displays it on the screen
  • 26. » All syntax rules are that of Java! » We implement a java class inherited from activity and override any functions required as per our requirements. » “extends activity” means activity is our base class. » If we want to insert our own functions, they have to be public to be handled by the android engine.
  • 27. » To be able to “listen” to clicks on various objects/views in out UI ˃ Maybe buttons, textviews, radioclicks.. Etc. First, » public class Tabtest01 extends Activity implements OnClickListener { .. } ˃ This allows us to use the OnClickListener interface in the rest of our code. » Then we write a public onclick() function that handles all click events in our activity. » Then we attach the view that we want to be clicked to this function in the oncreate() function
  • 28. TextView clickMe; • First, we need to identify the view using the findViewById() and typecasting it to what we @Override know our result should be. public void onCreate(Bundle savedInstanceState) • clickMe is an object of the exact type of view { that’s going to be returned. super.onCreate(savedInstanceState); • setOnClickListener() attaches the interface to setContentView(R.layout.main); the click listener to the textview with clickMe = (TextView)findViewById(R.id.widget02); id:widget02 clickMe.setOnClickListener(this); } @Override • This method is called whenever a public void onClick(View v) { click is called. The argument “V” if(v==clickMe) { contains details of the view that Toast.makeText(this, “ Clicked! ”,Toast.LENGTH_SHORT).show(); was clicked. clickMe.setBackgroundResource(R.color.green); • Since both functions are part of clickMe.setText("ABCDEFG") the same class, if v==clickMe, then } we know that id:widget02 was } clicked. • Then we can perform manipulations on the required object!
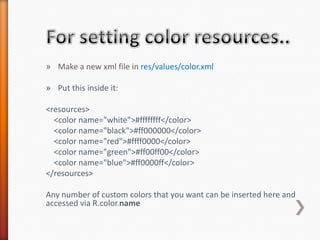
  • 29. » Make a new xml file in res/values/color.xml » Put this inside it: <resources> <color name="white">#ffffffff</color> <color name="black">#ff000000</color> <color name="red">#ffff0000</color> <color name="green">#ff00ff00</color> <color name="blue">#ff0000ff</color> </resources> Any number of custom colors that you want can be inserted here and accessed via R.color.name
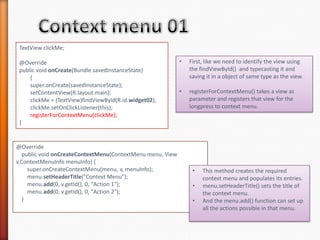
  • 30. » Apart from clicking a control/view, in android phones, long pressing on any element performs a secondary function ˃ Serves the purpose of doubleclick which is not recommended. » First in oncreate(), after finding the element, we need to register for context menu. » Then we write two handler functions onCreateContextMenu() and onContextItemSelected() to implement the behaviour we require.
  • 31. TextView clickMe; @Override • First, like we need to identify the view using public void onCreate(Bundle savedInstanceState) the findViewById() and typecasting it and { saving it in a object of same type as the view. super.onCreate(savedInstanceState); setContentView(R.layout.main); • registerForContextMenu() takes a view as clickMe = (TextView)findViewById(R.id.widget02); parameter and registers that view for the clickMe.setOnClickListener(this); longpress to context menu. registerForContextMenu(clickMe); } @Override public void onCreateContextMenu(ContextMenu menu, View v,ContextMenuInfo menuInfo) { super.onCreateContextMenu(menu, v, menuInfo); • This method creates the required menu.setHeaderTitle("Context Menu"); context menu and populates its entries. menu.add(0, v.getId(), 0, "Action 1"); • menu.setHeaderTitle() sets the title of menu.add(0, v.getId(), 0, "Action 2"); the context menu. } • And the menu.add() function can set up all the actions possible in that menu.
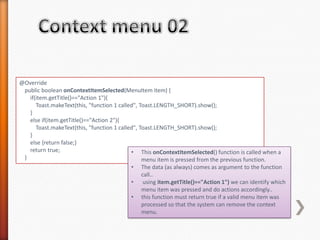
  • 32. @Override public boolean onContextItemSelected(MenuItem item) { if(item.getTitle()=="Action 1"){ Toast.makeText(this, "function 1 called", Toast.LENGTH_SHORT).show(); } else if(item.getTitle()=="Action 2"){ Toast.makeText(this, "function 1 called", Toast.LENGTH_SHORT).show(); } else {return false;} return true; • This onContextItemSelected() function is called when a } menu item is pressed from the previous function. • The data (as always) comes as argument to the function call.. • using item.getTitle()=="Action 1") we can identify which menu item was pressed and do actions accordingly.. • this function must return true if a valid menu item was processed so that the system can remove the context menu.
  • 34. » A little more flexible than linear layouts. » Allow you to specify views position in relation t each other and their container. » Nested views increase the performance overhead required for application.
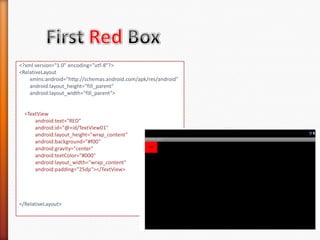
  • 36. <?xml version="1.0" encoding="utf-8"?> <RelativeLayout xmlns:android="http://schemas.android.com/apk/res/android" android:layout_height="fill_parent" android:layout_width="fill_parent"> <TextView android:text="RED" android:id="@+id/TextView01" android:layout_height="wrap_content" android:background="#f00" android:gravity="center" android:textColor="#000" android:layout_width="wrap_content" android:padding="25dp"></TextView> </RelativeLayout>
  • 37. […] <TextView android:text="ORANGE" android:layout_height="wrap_content" android:background="#ffa500" android:gravity="center" android:textColor="#000" android:id="@+id/TextView02" android:layout_width="wrap_content" android:layout_centerHorizontal="true" android:padding="25dp"> </TextView> […]
  • 38. […] <TextView android:text="YELLOW" android:layout_height="wrap_content" android:background="#ffff00" android:gravity="center" android:textColor="#000" android:id="@+id/TextView03" android:layout_width="wrap_content" android:layout_alignParentRight="true" android:padding="25dp"> </TextView> […]
  • 39. […] <TextView <TextView android:text="GREEN" android:layout_height="wrap_content" android:background="#0f0" android:gravity="center" android:textColor="#000" android:id="@+id/TextView04" android:layout_width="wrap_content" android:layout_toLeftOf="@+id/TextView05" android:padding="25dp" android:layout_centerVertical="true"> </TextView> […]
  • 40. […] <TextView <TextView android:text="BLUE" android:layout_height="wrap_content" android:background="#00f" android:gravity="center" android:textColor="#fff" android:id="@+id/TextView05" android:layout_width="wrap_content" android:layout_centerInParent="true" android:layout_margin="10dp" android:padding="25dp"> </TextView> […]
  • 41. […] <TextView android:text="INDIGO" android:layout_height="wrap_content" android:gravity="center" android:textColor="#fff" android:id="@+id/TextView06" android:layout_width="wrap_content" android:layout_toRightOf="@+id/TextView05" android:background="#4b0082" android:padding="25dp" android:layout_centerVertical="true"> </TextView> […]
  • 42. […] <TextView android:text="VIOLET" android:layout_height="wrap_content" android:background="#ee82ee" android:gravity="center" android:textColor="#000" android:id="@+id/TextView07" android:layout_alignParentBottom="true" android:layout_width="fill_parent" android:padding="25dp"> </TextView> […]