Ame implementation-guide
0 likes2,133 views

Oracle Approvals Management (AME) is a web application that allows users to define business rules for approving transactions in Oracle Applications without custom coding. It manages approvals by communicating with applications once rules are defined. AME enables self-service definition of approval processes based on attributes, conditions, actions, groups, rules, classes and parallel processes. This chapter introduces AME and provides an overview of its key components and runtime functionality.


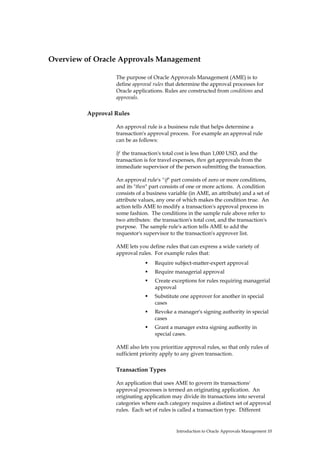


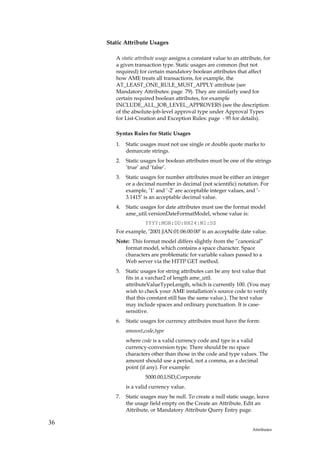


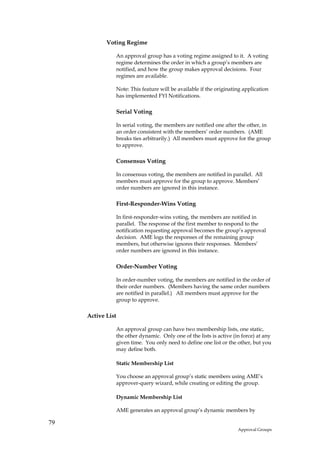
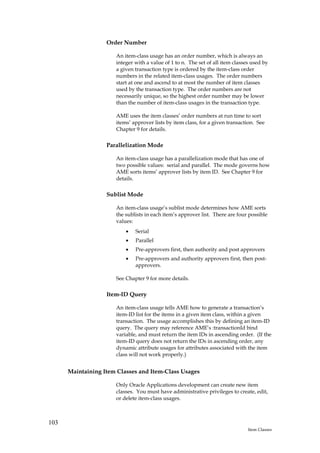
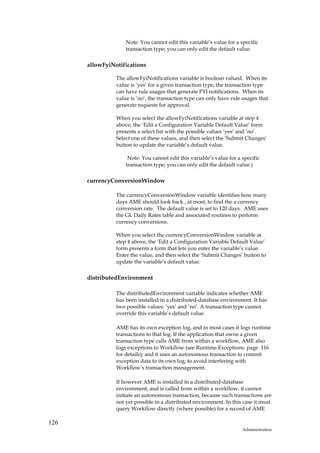
![4. Choose the attribute.
5. Edit the condition's key, if desired. [Note: Condition
Key should be a string that you can easily identify the
condition with.]
6. If the attribute is of type number, and is associated with
an approver type, query for and select an approver of the
type associated with the attribute.
7. If the attribute is of type date or currency, or is a number
attribute not associated with an approver type, enter the
condition's lower and upper limits, and indicate whether
each should be included in the condition's set of allowed
values. (If you leave a lower or upper limit blank, the
range of allowed values is unbounded on that side.) If
the attribute is of type currency, also choose the
denomination of the lower and upper limits. (The limits
must be in the same denomination.)
8. If the attribute is of type boolean, select the condition's
allowed value.
9. If the attribute is of type string, iteratively enter the
condition's allowed values.
10. Select the 'Create Condition' button.
55
Conditions](https://image.slidesharecdn.com/ame-implementation-guide-110124040506-phpapp01/85/Ame-implementation-guide-55-320.jpg)


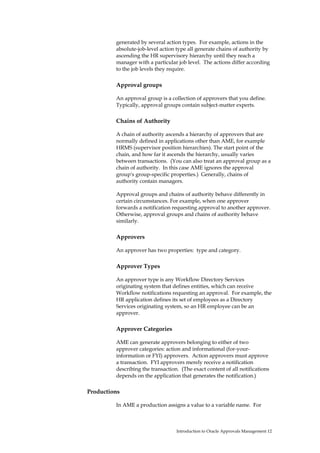
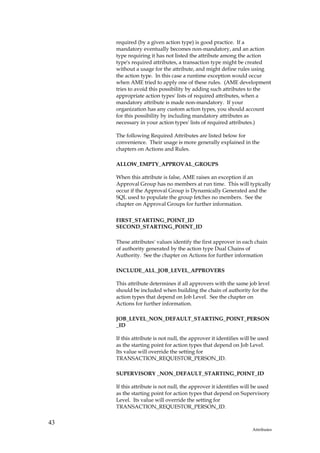
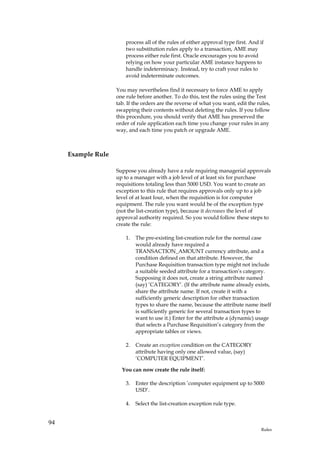
![n[-]
where n is a positive integer indicating how many approvers the
chain should contain, and the optional minus sign makes the
action an at-most action when present.
Action Types for the HR Position Hierarchy
There are two action types for the HR position hierarchy
(residing in per_pos_structure_elements,
per_pos_structure_versions, and per_position_structures). The
difference between them is how they decide where to end a chain
of authority.
hr position level action type requires the TOP_POSITION_ID
attribute, which is wholly analogous to the
TOP_SUPERVISOR_PERSON_ID attribute for the action types
that ascend the HR supervisory hierarchy.
Both action types also require the
NON_DEFAULT_POSITION_STRUCTURE_ID attribute. By
default, the chain of authority ascends the primary position
structure of the business group of the transaction requestor.
However, if NON_DEFAULT_POSITION_STRUCTURE_ID is
non-null, the chain will follow the position structure identified
by the value instead.
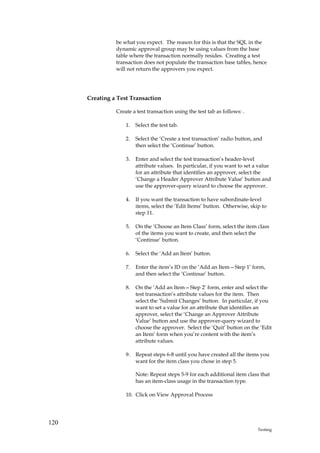
‘hr position’ Action Type
The ‘hr position’ action type generates a chain of authority
ending with a specified position. Note that position actions have
dynamic descriptions.
First Approver
By default, a position chain of authority starts with the position
above the position identified by the required attribute
TRANSACTION_REQUESTOR_POSITION_ID. If however the
required attribute
NON_DEFAULT_STARTING_POINT_POSITION_ID is non-
null, the chain starts with this position instead.
Final Approver
The final approver is the position specified by the action's
parameter.
Action Parameters
A position action's parameter is the wf_roles.name value of the
position at which the chain should end. Currently positions in
wf_roles have name values such as 'POS:471', where the positive
integer following the colon is a position ID.
69
Actions](https://image.slidesharecdn.com/ame-implementation-guide-110124040506-phpapp01/85/Ame-implementation-guide-69-320.jpg)


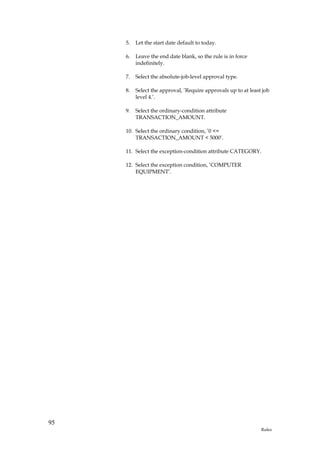


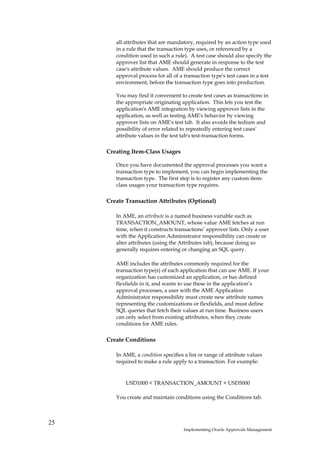
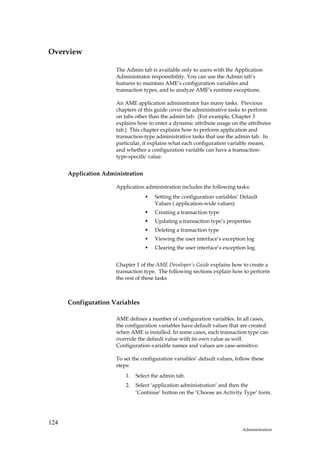
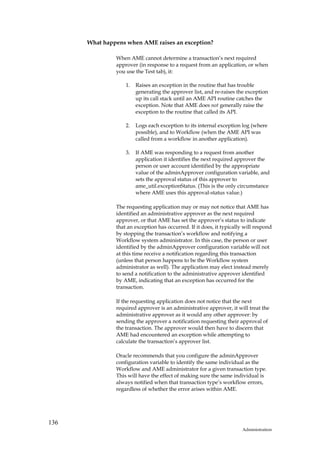
![transaction approver list
item class
header
header
pre-approver-group sublist
pre-approver-group action type
Travel Expenses approver group
Jane Doe
John Smith
chain-of-authority sublist
absolute-job-level action type
chain #1
Bill Right
Laura Lightheart
Fred Flintstone
post-approver-group sublist
[none]
line items
line item 1
pre-approver-group sublist
[none]
chain-of-authority sublist
relative-job-level action type
chain #1
Bill Right
Laura Lightheart
post-approver-group sublist
[none]
line item 2
pre-approver-group sublist
[none]
chain-of-authority sublist
relative-job-level action type
chain #1
Bill Right
Laura Lightheart
Fred Flintstone
post-approver-group sublist
[none]
cost centers
cost center A083
pre-approver-group sublist
[none]
chain-of-authority sublist
[none]
post-approver-group sublist
post-approver-group action type
US Marketing Materials approver group
Barny Rubble
cost center B66
pre-approver-group sublist
[none]
chain-of-authority sublist
[none]
post-approver-group sublist
post-approver-group action type
EMEA Marketing Materials approver group
Jeannette LeBlanc
109
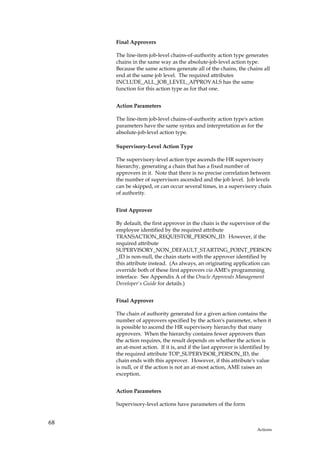
Parallel Approval Process](https://image.slidesharecdn.com/ame-implementation-guide-110124040506-phpapp01/85/Ame-implementation-guide-109-320.jpg)


Ame implementation-guide
- 1. Implementing Oracle Approvals Management RELEASE 11i10/AME.A January 20th, 2005
- 2. Oracle Approvals Management Release R11i Copyright © 2001, 2002, 2003, 2004, 2005 Oracle Corporation. All rights reserved. Contributors: Todd Morley, Alison Chambers, Bill Kerr The Programs (which include both the software and documentation) contain proprietary information of Oracle Corporation; they are provided under a license agreement containing restrictions on use and disclosure and are also protected by copyright, patent and other intellectual property law. Reverse engineering, disassembly or decompilation of the Programs, except to the extent required to obtain interoperability with other independently created software or as specified by law, is prohibited. Program Documentation is licensed for use solely to support the deployment of the Programs and not for any other purpose. The information contained in this document is subject to change without notice. If you find any problems in the documentation, please report them to us in writing. Oracle Corporation does not warrant that this document is error free. Except as may be expressly permitted in your license agreement for these Programs, no part of these Programs may be reproduced or transmitted in any form or by any means, electronic or mechanical, for any purpose, without the express written permission of Oracle Corporation. If the Programs are delivered to the US Government or anyone licensing or using the Programs on behalf of the US Government, the following notice is applicable: RESTRICTED RIGHTS NOTICE Programs delivered subject to the DOD FAR Supplement are ”commercial computer software” and use, duplication and disclosure of the Programs, including documentation, shall be subject to the licensing restrictions set forth in the applicable Oracle license agreement. Otherwise, Programs delivered subject to the Federal Acquisition Regulations are ”restricted computer software” and use, duplication, and disclosure of the Programs shall be subject to the restrictions in FAR 52.227-19, Commercial Computer Software - Restricted Rights (June, 1987). Oracle Corporation, 500 Oracle Parkway, Redwood City, CA 94065. The Programs are not intended for use in any nuclear, aviation, mass transit, medical, or other inherently dangerous applications. It shall be licensee’s responsibility to take all appropriate fail-safe, back up, redundancy and other measures to ensure the safe use of such applications if the Programs are used for such purposes, and Oracle disclaims liability for any damages caused by such use of the Programs. The Programs may provide links to Web sites and access to content, products, and services from third parties. Oracle is not responsible for the availability of, or any content provided on, third-party Web sites. You bear all risks associated with the use of such content. If you choose to purchase any products or services from a third party, the relationship is directly between you and the third party. Oracle is not responsible for: (a) the quality of third-party products or services; or (b) fulfilling any of the terms of the agreement with the third party, including delivery of products or services and warranty obligation related to purchased products or services. Oracle is not responsible for any loss or damage of any sort that you may incur from dealing with any third party. Oracle is a registered trademark and ConText, Enabling the Information Age, Oracle7, Oracle8, Oracle8i, Oracle Access, Oracle Application Object Library, Oracle HRMS, Oracle Discoverer, Oracle Web Customers, Oracle Web Employees, Oracle Workflow, Oracle Work in Introduction to Oracle Approvals Management 2
- 3. Progress, PL/SQL, Pro*C, SmartClient, SQL*, SQL*Forms, SQL*Loader, SQL*Menu, SQL*Net, SQL*Plus, and SQL*Reports are trademarks or registered trademarks of Oracle Corporation. Other names may be trademarks of their respective owners. Introduction to Oracle Approvals Management 3
- 4. Table of Contents 1 Introduction to Oracle Approvals Management .................................................7 Oracle Approvals Management..............................................................................8 Overview of Oracle Approvals Management ......................................................10 What Happens at Run Time .................................................................................13 2 Implementing Oracle Approvals Management.................................................17 Implementing Oracle Approvals Management...................................................18 Expense Category ................................................................................................23 Total .....................................................................................................................23 Action...................................................................................................................23 3 Attributes ............................................................................................................29 Overview .................................................................................................................30 How does AME use Attributes? ..........................................................................46 Maintaining Attributes .........................................................................................47 4 Conditions...........................................................................................................51 Overview .................................................................................................................52 5 Actions ................................................................................................................57 Overview .................................................................................................................58 Required Attributes..............................................................................................60 Action Type ...........................................................................................................62 Approval Types for List-Creation and Exception Rules......................................63 6 Approval Groups ................................................................................................75 Overview .................................................................................................................76 7 Rules ...................................................................................................................83 Overview .................................................................................................................84 How AME Handles Multiple Requirements for an Approver .............................93 How AME Sorts Rules at Run Time....................................................................93 Example Rule.......................................................................................................94 Maintaining Rules................................................................................................96 8 Item Classes......................................................................................................101 Overview ...............................................................................................................102 9 Parallel Approval Processes ............................................................................107 Overview ...............................................................................................................108 10 Testing ..........................................................................................................117 Overview ...............................................................................................................118 11 Administration......................................................................................................123 Overview ...............................................................................................................124 Configuration Variables.....................................................................................124 Transaction Types..............................................................................................130 Introduction to Oracle Approvals Management 4
- 5. Runtime Exceptions ...........................................................................................135 Introduction to Oracle Approvals Management 5
- 7. 1 Introduction to Oracle Approvals Management Introduction to Oracle Approvals Management 7
- 8. Oracle Approvals Management Oracle Approvals Management (AME) is a self-service Web application that enables users to define business rules governing the process for approving transactions in Oracle Applications where AME has been integrated. What are the advantages of using Oracle Approvals Management? Oracle Approvals Management enables business users to specify the approval rules for an application without having to write code or customize the application. Once you define the rules for an application, that application communicates directly with AME to manage the approvals for the application’s transactions. Are all the AME features mentioned in this guide available within integrating applications such as iExpenses, SSHR, etc? You should review the product documentation to see if a particular feature such as parallel approvers has been made available in the integrating application you are interested in. AME delivers new features in each release; therefore it is possible that there will be a time lag between delivery and implementation by any given development team. What kind of approval hierarchies are supported? You can define approvals by job or supervisor hierarchy, or by lists of individuals created either at the time you set up the approval rule or generated dynamically when the rule is invoked. You can link different approval methods together, resulting in an extremely flexible approval process. Can you use the same rules for different applications? Yes. You can define rules to be specific to one application or shared between different applications. How can you ensure that the rules you create are valid? AME has built-in testing features that enable you to confirm the behavior of new or edited business rules before live execution. How is a transaction in progress affected by changes in your organization? Because AME recalculates the chain of approvals after each approval, a transaction is assured to be approved under the latest Introduction to Oracle Approvals Management 8
- 9. conditions, regardless of organizational changes, changes to transaction values, rule changes, or currency conversions. My customer does not have Oracle HR, but has licensed the financials suite and wants to use AME. Can they? First, customers using any of the financials products but not Oracle HR also install "Shared HR," which is a "lite" version of the HR product that includes the common entities that are needed by all applications. These include organizations, locations, jobs, positions, and people. AME will work with Shared HR. Customers do not need to apply the HR Family Pack if they do not install any of the HRMS applications. They will need to set up the people, jobs, or positions that they want to include in their approval rules. Second, customers can use AME without either the full HR product or the Shared HR module, by using only FND users as approvers. Such customers would typically create AME approval groups, populate them with FND users, and reference the approval groups in rule using one of the approval-group approval types. Introduction to Oracle Approvals Management 9
- 10. Overview of Oracle Approvals Management The purpose of Oracle Approvals Management (AME) is to define approval rules that determine the approval processes for Oracle applications. Rules are constructed from conditions and approvals. Approval Rules An approval rule is a business rule that helps determine a transaction's approval process. For example an approval rule can be as follows: If the transaction's total cost is less than 1,000 USD, and the transaction is for travel expenses, then get approvals from the immediate supervisor of the person submitting the transaction. An approval rule's "if" part consists of zero or more conditions, and its "then" part consists of one or more actions. A condition consists of a business variable (in AME, an attribute) and a set of attribute values, any one of which makes the condition true. An action tells AME to modify a transaction's approval process in some fashion. The conditions in the sample rule above refer to two attributes: the transaction's total cost, and the transaction's purpose. The sample rule's action tells AME to add the requestor's supervisor to the transaction's approver list. AME lets you define rules that can express a wide variety of approval rules. For example rules that: Require subject-matter-expert approval Require managerial approval Create exceptions for rules requiring managerial approval Substitute one approver for another in special cases Revoke a manager's signing authority in special cases Grant a manager extra signing authority in special cases. AME also lets you prioritize approval rules, so that only rules of sufficient priority apply to any given transaction. Transaction Types An application that uses AME to govern its transactions' approval processes is termed an originating application. An originating application may divide its transactions into several categories where each category requires a distinct set of approval rules. Each set of rules is called a transaction type. Different Introduction to Oracle Approvals Management 10
- 11. transaction types can use the same attribute name to represent values that are calculated in different ways or fetched from different places. This allows several transaction types to share approval rules (thereby implementing a uniform approval policy across multiple transaction types). A rule usage occurs when a transaction type uses a particular rule for a given time period, optionally at a given priority level. Approval Processes A transaction's approval process can have two components: • List of approvers, • Set of productions. Approver Lists A transaction's approver list has a hierarchical structure. The transaction's approver list may contain several items' approver lists. Each item's approver list may have three sub-lists. Each sub-list can have approval groups or chains of authority generated by one or more action types. Each approval group or chain of authority can contain multiple approvers. Items AME can generate an approver list for a transaction's header, and a separate approver list for each item in the transaction. A transaction type can define multiple item classes. For example, a transaction type might generate separate approver lists for each transaction's header, line items, and cost centers. All transaction types include a header item class, which always has one item (the transaction's header). All other item classes are optional. Sub-Lists An item's approver list may contain three sub-lists: • Pre-chain-of-authority • Authority • Post-chain-of-authority. The pre- and post-chain sub-lists contain zero or more approval groups; the authority sub-list contains zero or more chains of authority. Action Types An action type is a set of actions having a common purpose. Each sub-list can contain approval groups or chains of authority Introduction to Oracle Approvals Management 11
- 12. generated by several action types. For example, actions in the absolute-job-level action type all generate chains of authority by ascending the HR supervisory hierarchy until they reach a manager with a particular job level. The actions differ according to the job levels they require. Approval groups An approval group is a collection of approvers that you define. Typically, approval groups contain subject-matter experts. Chains of Authority A chain of authority ascends a hierarchy of approvers that are normally defined in applications other than AME, for example HRMS (supervisor position hierarchies). The start point of the chain, and how far it ascends the hierarchy, usually varies between transactions. (You can also treat an approval group as a chain of authority. In this case AME ignores the approval group's group-specific properties.) Generally, chains of authority contain managers. Approval groups and chains of authority behave differently in certain circumstances. For example, when one approver forwards a notification requesting approval to another approver. Otherwise, approval groups and chains of authority behave similarly. Approvers An approver has two properties: type and category. Approver Types An approver type is any Workflow Directory Services originating system that defines entities, which can receive Workflow notifications requesting an approval. For example, the HR application defines its set of employees as a Directory Services originating system, so an HR employee can be an approver. Approver Categories AME can generate approvers belonging to either of two approver categories: action and informational (for-your- information or FYI) approvers. Action approvers must approve a transaction. FYI approvers merely receive a notification describing the transaction. (The exact content of all notifications depends on the application that generates the notification.) Productions In AME a production assigns a value to a variable name. For Introduction to Oracle Approvals Management 12
- 13. example, AME might generate a production that assigns the value 'digital certificate' to the variable name 'eSignature'. AME does not interpret the productions it generates. In fact, AME does not even define any standard production variable names. Rather, it leaves these tasks to originating applications and their transaction types. AME generates two kinds of productions. • Transaction-level productions that are variable name/value pairs associated with a whole transaction. • Approver-level productions are associated with specific approvers within a transaction’s approver list. What Happens at Run Time Once you have defined a set of rules for a transaction type, and the application associated with the transaction type is configured to use AME, the application communicates directly with AME to manage the transaction type’s approval processes. Typically the application communicates with AME when a transaction is initiated in the application, and then each time an approver responds to the application’s request for approval of the transaction, until all approvers have approved the transaction. AME records each approval, and recalculates the approver list for a transaction each time an approver responds to a request for approval of the transaction. See How AME Sorts Rules at Run Time (page 93) for further details. The reason why AME recalculates the approver list each time an approver responds is to account for several possible circumstances that can affect a transaction’s approver list: • An attribute value changes, thereby affecting which conditions are true and so which rules apply to the transaction. • A condition or rule is added, changed, or deleted, again affecting which rules apply to the transaction. • A change occurs in the organizational hierarchy used by the transaction type’s set of rules, thereby changing the membership of the applicable chain of authority. • Currency exchange rates change, thereby affecting which conditions on currency attributes are true and so which rules apply to the transaction. By accounting for such changes, AME guarantees that transactions are always approved according to the most current business data possible. Introduction to Oracle Approvals Management 13
- 14. Approval-Process Execution Originating applications can communicate with AME in many different ways. For example, an originating application can ask AME for a transaction's entire approver list, for the rules satisfied, or for the set of approvers the application should notify next. The Standard Algorithm Typically, an originating application follows a simple procedure for managing a transaction's approval process: 1. Ask AME for a transaction's entire approver list. 2. Display the approver list to the requestor, optionally prompting them to suppress or add approvers. 3. Communicate any approver suppressions or additions to AME. 4. Ask AME whether the transaction's approval process is complete, and if not, what approvers (if any) to notify. 5. If AME indicates that no further approvals are required, stop. 6. Notify any approvers identified by AME in step 5. 7. Wait until an approver responds to a notification. 8. Communicate the response to AME. 9. Go to step 4. Approver-Notification Order The order in which AME presents approvers for notification at step 4 of the standard algorithm depends on a variety of ordering modes and order numbers that together determine a unique ordering of the approvers in a transaction's approver list. AME waits for all approvers at a given place in the ordering to approve, before instructing the originating application to notify any approvers that come later in the ordering. Ordering Modes An ordering mode tells AME how to order the collections of approvers at a given level of the hierarchy constituting a transaction's approver list. For example, the sub-list ordering mode basically tells AME whether to notify pre-approvers at the same time as authority approvers, all other things being equal. AME typically uses ordering modes, before a transaction is submitted to AME for approval, where the number of things to be ordered is unknown. For example the Approvers generated by a particular Action type maybe notified sequentially or in parallel. Introduction to Oracle Approvals Management 14
- 15. Order Numbers Order numbers establish a fixed ordering of a collection of approvers at a given level of the hierarchy constituting a transaction's approver list, for example, the approvers in an approval group are assigned order numbers. Order numbers are not necessarily unique. Thus several approvers in an approval group can have the same order number. AME typically uses order numbers where you know the number of things to be ordered before a transaction is submitted to AME for approval. Introduction to Oracle Approvals Management 15
- 17. 2 Implementing Oracle Approvals Management 17 Implementing Oracle Approvals Management
- 18. Implementing Oracle Approvals Management Overview AME is a powerful application that gives you a great deal of flexibility, so that you can create the approvals processes your organization needs without writing programming code. AME's power and flexibility require that you attend carefully to detail during implementation, to make sure your approvals processes function as planned. This chapter explains each step in AME's implementation process. Depending on your organization's requirements, you may be able to skip some of the steps. Please make sure you understand them all, even if you expect to skip some of them. To implement AME, you need to carry out the following steps: 1. Installing the Application AME’s installation routines and administration features determine which applications can use AME. Installation and administration are typically jobs for a technical specialist. Installation is generally done only once, and administrative tasks (using AME’s Admin tab) are usually only necessary to enable a new application to use AME, or to access or clear a transaction’s error log. Note: You should create a scheduled job that executes the ame_util.purgeOldTempData procedure daily. Failure to perform this task will eventually result in performance degradation and unlimited growth of the size of certain AME database tables. 2. Setting up AME Security An Oracle Applications’ user must have one of three available AME ICX end-user responsibilities to use AME. Two of the responsibilities are for non-technical (business) users; the third is for technical (administrative) users. The remainder of this guide indicates when AME user-interface functionality requires administrative privileges. Otherwise, you may assume that the business-user responsibilities can access the functionality that this guide describes. Assign Users AME ICX Responsibilities and Secured Attributes AME defines three ICX responsibilities: • AME Application Administrator • AME General Business User • AME Limited Business User 18 Implementing Oracle Approvals Management
- 19. It also defines one secured attribute: • ame_internal_trans_type_id (”AME” is the Oracle Applications prefix for Oracle Approvals Management.) Application-Administration Responsibility The AME Application Administrator has full access to AME's user interface. You typically must grant at least one user administrative privileges in AME, to perform technical tasks such as setting AME's configuration variables Business-User Responsibilities The AME General Business User and AME Limited Business User responsibilities can access areas s of the user interface that do not require expertise in SQL or PL/SQL programming, or technical knowledge of Oracle Applications. AME users that just need to create and test conditions and rules should have one of these responsibilities. The general-business-user responsibility can access all transaction types. The limited-business-user responsibility can only access transaction types to which it has been granted access via a secured attribute. AME Secured Attribute You grant a user with the limited-business-user responsibility access to a transaction type by assigning them the ame_internal_trans_type_id secured attribute, with the transaction type's AME-internal ID as its value. The application- administrator responsibility can view a transaction type's AME- internal ID by selecting the Admin tab, choosing ‘Maintain transaction types’, and then selecting the desired transaction type from the list of transaction types. (The AME-internal ID can be a positive or negative integer.) Remaining Steps Some of the remaining setup steps require the Application Administrator responsibility. If your job is to install, configure, or otherwise administer AME, make sure you have the Application Administrator responsibility before continuing to set up AME. 3. Configuring Transaction Types An application administrator should review AME's configuration-variable values as soon as AME is installed and its security has been set up. AME has two kinds of configuration variables: single-valued and transaction-type-specific. 19 Implementing Oracle Approvals Management
- 20. Single-Valued Configuration Variables Some of AME's configuration variables only have a single value for the entire application. They are distributedEnvironment helpPath htmlPath imagePath portalUrl. These variables describe various aspects of AME's computing environment. Their values must be set for AME to function properly. 4. Transaction-Type-Specific Variables Other AME configuration variables can have a default value, as well as a value for each transaction type. These variables are adminApprover allowAllApproverTypes allowAllItemClassRules allowFyiNotifications currencyConversionWindow forwardingBehaviors productionFunctionality purgeFrequency repeatedApprovers rulePriorityModes These variables determine many aspects of how AME generates a transaction type's approval processes. (In this way they are similar to the mandatory attributes. The difference is, their values are always constant for all transactions in the transaction type.) Make sure you are satisfied with these variables' default values before using AME. Planning your Organization's Approval Processes Before you begin using an AME transaction type, you should document the approvals processes that the transaction type must implement. A transaction type's requirements document should specify three things: A set of business cases A set of configuration-variable values, item-class usages, mandatory-attribute values, approval groups, and rule usages sufficient to express each business case 20 Implementing Oracle Approvals Management
- 21. A representative test case for each business case. Business Cases A transaction type's requirements document should account for four types of business cases: Transactions having similarly structured approval processes. Transactions whose default approver lists include repeated approvers. Transactions whose approver’s forward approval requests in unusual ways. Transactions whose approval processes should have similar parallelization. Approvals Cases The first type of business case accounts for approvals requirements proper. Such cases should specify informally what kinds of approvals are required for a set of transactions having attribute values that your organization deems similar. For example, a business case might say, All expense reports for travel having totals above $1,000 and not exceeding $5,000 should be approved by the submitter's two immediate supervisors. Approvals business cases typically translate directly into a combination of rule usages, values for the rulePriorityModes configuration variable, and mandatory-attribute usages. If a business case requires approvals from a group of approvers, rather than a chain of authority, the translation can involve defining approval groups as well. Parallelization Cases A parallelization case indicates how AME should treat approvers in the same subset of approvers, at the same level in the hierarchy of approvers that constitutes an approver list. There are six levels: Item class Item Sublist Action type Group or chain Approver Your requirements document should specify whether approvers in the same subset at each level should be ordered serially or in parallel. For example, it might say that, other things being equal, 21 Implementing Oracle Approvals Management
- 22. approvers generated by the same action type should be ordered in parallel. Repeated-Approvers Case A repeated-approvers case indicates how AME should behave when the approval rules require that an approver appear several times in a single transaction's approver list. (AME can suppress repeated approvers in specified cases.) This business case translates directly to a single transaction-type-specific value for the repeatedApprovers configuration variable. Special Forwarding Cases A special case of forwarding occurs, for example, when an approver forwards to someone preceding them in the approver list, or to a subordinate not already in the list. There are eight special cases that translate into eight transaction-type-specific values for the forwardingBehaviors configuration variable. Representation of Business Cases in AME There are often several ways to translate your approvals business cases into a transaction type. For example, you can sometimes use fewer or simpler rules by using rule priorities. In general, translating your approvals business cases into a transaction type involves setting values for several transaction-type-specific configuration variables, creating item-class usages, defining usages for several mandatory attributes, defining approval groups, and then creating rules and rule usages. Configuration Variables The configuration variables you should consider when implementing approvals business cases are currencyConversionWindow rulePriorityModes Item-Class Usages You may wish to use item classes other than those that came with a given transaction type, when implementing your business cases. There are two possible reasons to do so. First, you may wish to define attributes that have a distinct value for each item in the new item class. This would let you define conditions on these attributes, so your rules could account for per-item variations. Second, you may want AME to generate an approver list for each item in the item class. An application administrator must register an item-class usage for the new item class using the admin tab's 'Maintain item classes' feature on the transaction- type-administration menu. 22 Implementing Oracle Approvals Management
- 23. Mandatory Attributes The mandatory attributes related to implementing approvals business cases are ALLOW_REQUESTOR_APPROVAL AT_LEAST_ONE_RULE_MUST_APPLY EFFECTIVE_RULE_DATE EVALUATE_PRIORITIES_PER_ITEM REJECTION_RESPONSE USE_RESTRICTIVE_ITEM_EVALUATION Approval groups If a business case requires approvals from a group of approvers that does not exist as a chain of authority in an approver hierarchy supported by AME, you must define an approval group containing the approvers. When you do, AME automatically creates the related approval-group actions in all of the action types that come with AME. It can be convenient to list in your requirements document the approval groups required by the business cases, for ease of reference during implementation. The list should contain for each group a name, description, and membership list. The members should be ordered, but their order numbers do not need to be unique. (For example, if you assign all of a group's members the order number one, the group will typically be notified in parallel.) Rules and Rule Usages If your organization has more than a few approvals rules, it can be useful to represent the rules in an approvals matrix or a decision tree. An approvals matrix is just a table that had one row per rule. The rightmost column contains one or more actions; the other columns contain sets of allowed values for a given attribute. Here's a fragment of an approvals matrix for expense reports, where the rules only depend on the expense category and the expense-report total: Expense Category Total Action Travel up to $1,000 one supervisor Travel over $1,000 and not over two supervisors $5,000 Office supplies up to $100 one supervisor Office supplies over $100 and not over two supervisors $1,000 (This table is a fragment because it does not account for important business cases. For example, it does not account for expense reports for travel totaling over $5,000. A real approvals matrix should generally be enumerating the business cases 23 Implementing Oracle Approvals Management
- 24. exhaustively, even when some of them require no approval, or merely require requestor approval.) A decision tree typically has one column of nodes for each attribute, with each branch leaving a node representing a set of allowed values for the attribute represented by the node. The final (leaf) nodes represent actions, and a path from the root node to a leaf node represents a rule. The following decision tree is equivalent to the above approvals-matrix fragment: 0 to 1000 One supervisor Travel 1000 to 5000 Two supervisors Expense Category 0 to 100 One supervisor Office Supplies 100 to 1000 Two supervisors Decision trees are more flexible than approvals matrixes because they do not have to have the same attributes in the same order along all of the paths from the root node to the leaf nodes. This makes decision trees appropriate where your approval rules' conditions will not all be defined on the same set of attributes. It also complicates verifying that the decision tree represents all of your business cases. When you use a decision tree to represent your set of rules, make sure there is a one-to-one correspondence between your business cases and the tree's paths from the root node to the leaf nodes. Whatever representation you choose for your sets of rules, keep in mind the following suggestions: Make sure your rules capture every business case requiring approval Make sure your rules do not express conflicting outcomes for any given business case Minimize the number of rules that apply to any given transaction Minimize the total number of rules in a transaction type Test Cases A test case should represent a business case. It should specify a value for each of the transaction type's active attributes (that is, 24 Implementing Oracle Approvals Management
- 25. all attributes that are mandatory, required by an action type used in a rule that the transaction type uses, or referenced by a condition used in such a rule). A test case should also specify the approver list that AME should generate in response to the test case's attribute values. AME should produce the correct approval process for all of a transaction type's test cases in a test environment, before the transaction type goes into production. You may find it convenient to create test cases as transactions in the appropriate originating application. This lets you test the application's AME integration by viewing approver lists in the application, as well as testing AME's behavior by viewing approver lists on AME's test tab. It also avoids the tedium and possibility of error related to repeatedly entering test cases' attribute values in the test tab's test-transaction forms. Creating Item-Class Usages Once you have documented the approval processes you want a transaction type to implement, you can begin implementing the transaction type. The first step is to register any custom item- class usages your transaction type requires. Create Transaction Attributes (Optional) In AME, an attribute is a named business variable such as TRANSACTION_AMOUNT, whose value AME fetches at run time, when it constructs transactions’ approver lists. Only a user with the Application Administrator responsibility can create or alter attributes (using the Attributes tab), because doing so generally requires entering or changing an SQL query. AME includes the attributes commonly required for the transaction type(s) of each application that can use AME. If your organization has customized an application, or has defined flexfields in it, and wants to use these in the application’s approval processes, a user with the AME Application Administrator responsibility must create new attribute names representing the customizations or flexfields, and must define SQL queries that fetch their values at run time. Business users can only select from existing attributes, when they create conditions for AME rules. Create Conditions In AME, a condition specifies a list or range of attribute values required to make a rule apply to a transaction. For example: USD1000 < TRANSACTION_AMOUNT < USD5000 You create and maintain conditions using the Conditions tab. 25 Implementing Oracle Approvals Management
- 26. Create Approval Groups (Optional) An AME approval group is an ordered list of persons and/or user IDs. You can create AME rules to include one or more approval groups in a transaction’s approver list. You create and maintain approval groups using the Groups tab. You must create an approval group before using it in an approval-group rule. Prepare to use the Action Types Seeded Action and Approver types AME comes with many "seeded" action types and actions for them. The seeded action types currently support three types of approvers: HR employees (in the HR supervisory hierarchy), HR positions (in the HR position hierarchy), and Oracle Applications (FND) users. The seeded action types ascend the HR hierarchies in many different ways. An action determines which approvers are included in a transaction’s approver list. Typically an action type represents a way to ascend a certain organizational hierarchy, including in a transaction’s approver list an appropriate chain of authority from the hierarchy; and an approval specifies where the chain starts and ends. If your organization wishes to require approvals from an organizational hierarchy that none of AME’s seeded action types ascend, you need to use a custom action type. The procedure to create a custom action type is detailed within the AME Developers guide. Custom Action and Approver Types AME can support approvers from any originating system registered with Workflow Directory Services (that is, any entity that can function in Workflow as an approver). If your organization requires chains of authority structured differently than those generated by AME's seeded action types, or approvals from approvers in an originating system that AME does not yet support, you may elect to code a custom action type. This requires a significant programming effort (a typical action-type "handler" PL/SQL package is several hundred lines of code), and an application administrator must register the resulting PL/SQL package with AME. You may also have to register the non- seeded approver type with AME. Currently there is no user interface to register an approver type; one must do so from the SQL*Plus command line. We encourage you to request that AME development release a patch supporting the approver type your organization requires, rather than registering the approver type yourself. Adding Approvals to Existing Approval Types Your organization may plan to use AME's seeded action types, but may require additional actions. For example, the 26 Implementing Oracle Approvals Management
- 27. supervisory-level action type comes with actions for a supervisory hierarchy having at most 10 levels. If your organization has 15 levels, you must create supervisory-level actions for levels 11-15. An application administrator can add these action types using the actions tab. Preparing to use the Job-Level Approval Types If your organization plans to use one of the job-level action types, it must first assign a job level to each job defined in HRMS (that is, it must first populate the approval_authority column of the HRMS table per_jobs). Your organization should also have a business process for maintaining job levels. See ”Defining a Job” in Using Oracle HRMS - The Fundamentals for details. Define Approval Rules With your item-class usages, attributes, conditions, approval groups, action types, and actions prepared, you can create your approval rules using the rules tab. Again, an approvals matrix or decision tree may serve as a convenient checklist. In AME, an approval rule associates one or more conditions with an approval action. The rule applies to a transaction if and only if all of the rule’s conditions are true for the transaction. Each application that can use AME defines one or more transaction types. Each transaction type has its own set of approval rules. Several transaction types can share attribute names, while defining separate usages for those attribute names. This makes it possible for several transaction types to share conditions and rules. See Attribute Usages: page - 75. Test Approval Rules Once a transaction type has a set of rules, it is critical to test the rules, to make sure they apply to the proper cases and do not contain logical gaps or inconsistencies. There are three ways to test a transaction type: - Create a transaction in the originating application, and use the application's user interface to view the transaction's approver list Create a transaction in the originating application, and use AME's test tab to view the transaction's approver list Create a test transaction and view its approver list using AME's test tab We recommend you translate your test cases into transactions in the originating application, and then compare the transactions' approver lists in the application and on AME's test tab. Doing so will avoid several sources of error during testing, and will 27 Implementing Oracle Approvals Management
- 28. reduce the amount of time required to test your transaction type thoroughly. It can also reveal problems that can arise because of differences between the security privileges used to execute a dynamic attribute usage in AME and in an originating application. And it can suggest whether an unexpected behavior originates in AME, or in an originating application's AME integration. Creating Custom Transaction Types It is possible to create a custom transaction type from scratch, for instance to use AME as the approvals engine for a custom application. Transaction-type creation is beyond the scope of this guide. If your organization wants to create a custom transaction type, contact Oracle Support and request the Oracle Approvals Management Developer Guide. Configure Oracle Applications to use AME An Oracle Application should be configured to use AME only after thoroughly testing the set(s) of rules defined for that application’s transaction type(s) in AME. Consult the application’s user or technical documentation to learn how to configure the application to use AME. 28 Implementing Oracle Approvals Management
- 29. 3 Attributes 29 Attributes
- 30. Overview Creating attribute names and defining attribute usages are two important steps in the implementation process for a transaction type. Often a transaction type will seed all of the attribute names and attribute usages your organization requires. This chapter explains: - What an attribute is How to decide whether the existing attribute names and usages are satisfactory How to create, edit, and delete attribute names and usages What is an Attribute? In AME an attribute is a variable that has exactly one value per item, for a given transaction. Common attributes are things like a transaction’s total amount, a percent discount, an item’s category, a person’s salary, and so on. In AME, attribute names always appear uppercased, for example TRANSACTION_AMOUNT. Attribute Properties Attributes have several properties. Attribute Names An attribute name is a string that represents a decision variable. An attribute name can be at most 50 bytes long (50 characters long when your Oracle Applications are configured to use a single-byte character set). It is always in upper case (if you enter an attribute name in lower or mixed case, AME converts it to upper case before storing it). An attribute name is available for use in all transaction types, once the name has been created. All attribute names, including those you create, are shareable. When you create an attribute name, make sure its level of generality reflects your intentions. For example, if you want to create an attribute specific to the Web Expenses transaction type, you might begin your attribute name with the prefix ‘WEB_EXPENSES_’. If you want the attribute name to be shared across several transaction types owned by a single originating application, give the name a prefix that refers to the originating application. Finally, if you want the attribute name to be useful in all transaction types, avoid in it any references to originating applications. 30 Attributes
- 31. Attribute Item Classes An attribute item class determines what class of items have a value for the attribute. For a given transaction, each of the items in an attribute's item class has its own value for the attribute. An attribute always has the same item class, regardless of the transaction type. Attributes belonging to the header item class are sometimes termed header-level attributes. Attributes belonging to subordinate item classes are sometimes termed line- item-level attributes, cost-center-level attributes, etc. Attribute Usages An attribute usage tells AME how to get the attribute's value for a given item and transaction, in a given transaction type. Every transaction type can define its own usage for a given attribute. This means several transaction types can share conditions and rules, so that an organization can define a single set of rules that applies to several transaction types, thereby implementing a uniform approvals policy across several applications. It also means an attribute name can exist without a given transaction type having access to it, or to conditions defined on it, because the transaction type has not yet defined a usage for it. Attribute usages can be static or dynamic. 31 Attributes
- 32. Static Attribute Usages A static usage specifies a fixed value for the attribute, for all items and transactions. A static usage always stores an attribute value as a string, regardless of the attribute's data type. The string form of the attribute value should not exceed 100 bytes. Static usages should not use either single or double quote marks to demarcate strings. Static usages may be null. To create a null static usage, leave the usage field empty on the ‘Create an Attribute’, ‘Edit an Attribute’, or ‘Mandatory Attribute Query Entry’ form. It is common practice to give static usages to most or all of the mandatory attributes. One reason is that static usages require less runtime overhead than dynamic usages. Another is that static usages express uniform business policies for all transactions in a given transaction type. Dynamic Attribute Usages A dynamic usage specifies an SQL query that AME executes at run time to fetch the attribute's value for each item in the attribute's item class, for a given transaction. Dynamic usages can be up to 4000 bytes long. (You can avoid the length constraint by encapsulating a longer query in a function, and then selecting the function’s value from dual in the corresponding dynamic usage.) They should not end with a semicolon. A dynamic usage can reference a transaction's ID by using the bind variable ':transactionId'. Dynamic usages for header-level attributes must return one row per transaction. Dynamic usages for attributes belonging to subordinate-level item classes must return one row for each item in the item class, for a given transaction. The rows must be ordered so that the ith row returned by the dynamic usage is the value for the ith item ID returned by the transaction type's item- class usage for the attribute's item class. Typically this means the dynamic usage will include an order-by clause that references a column containing the item ID. For example, the query: - select item_quantity from some_application_table where transaction_id = :transaction_id order by line_item_id might be a dynamic usage for a line-item-level attribute named ITEM_QUANTITY. The execution of dynamic attribute usages constitues the majority of AME’s run time overhead. Therefore, optimizing your dynamic usages can have a big impact on AME’s performance. Make sure you optimize these queries thoroughly, 32 Attributes
- 33. especially if the transaction type that owns them processes a high volume of transactions. Attribute Types An attribute type indicates the datatype of the attribute's values. An attribute's type is always the same, regardless of the transaction type; and it cannot change after the attribute name has been created. AME distinguishes five attribute types: • Number • Date • String • Boolean • Currency Boolean Attributes Boolean attributes have one of two allowed values at run time: 'true' and 'false'. These strings are case-sensitive. AME define constants for them: ame_util.booleanAttributeTrue and ame_util.booleanAttributeFalse. Use the constants in dynamic attribute usages (or the source code generating them); use the actual values (without quote marks) in static usages. Number Attributes Number attributes can take on any numeric value allowed in PL/SQL. Static usages for number attributes should either be integers or decimal numbers using the decimal-point character required by the user's character set. For example, ‘1’ and ‘-2’ are acceptable integer values, and ‘-3.1415’ is an acceptable decimal value. Dynamic usages for number attributes should convert a number column to canonical form using the function fnd_number.number_to_canonical. For example the following could be a dynamic usage for the TRANSACTION_REQUESTOR_PERSON_ID attribute:- select fnd_number.number_to_canonical(requestor_person_id) from some_application_table where transaction_id = :transactionId A number attribute can represent an approver. If you want this to be the case, you must choose the attribute's approver type when you create the attribute. A number attribute's approver type is not editable after the attribute is created. 33 Attributes
- 34. String Attributes String attributes can have any text value up to 100 bytes long. The text value may include spaces and ordinary punctuation, and is case-sensitive. AME removes any return characters from attribute usages. This has two implications. First, a static usage for a string attribute cannot contain any return characters (or, if it does, AME will remove them at run time). Second, a string attribute's dynamic usage can technically have a value that includes a return character (AME only removes return characters from the query, not from the query results). Because of the discrepancy between the behavior or static and dynamic usages with respect to return characters, and because return characters do not display well, we encourage you to avoid non-printable characters such as return characters in string-attribute values. Date Attributes Date attributes can have any value represented as a date variable in PL/SQL. This means AME distinguishes dates down to the second. Date-attribute values must conform to the format model ame_util.versionDateFormatModel , which currently has the value 'YYYY:MON:DD:HH24:MI:SS' (and this value is unlikely to change). For example, '2001:JAN:01:06:00:00' is an acceptable date value. Note that AME's format model for dates differs slightly from the "canonical" format model. The canonical format model contains a space character, which creates certain technical difficulties. Make sure your dynamic usages for attribute dates convert date columns to strings using ame_util.versionDateFormatModel, like this: - select to_char(sysdate, ame_util.versionDateFormatModel) from dual Currency Attributes Currency attributes represent monetary amounts. The reason AME defines a currency attribute type, rather than treating currency values as number attributes, is to allow for conversion between currency denominations when evaluating a condition defined on a currency attribute. This has two implications. First, currency attributes have three components: amount, denomination, and conversion method. Second, your Oracle Applications instance must use Oracle General Ledger’s currency conversion functionality. For example, suppose TRANSACTION_AMOUNT is a currency attribute. At run time, AME might need to evaluate the condition TRANSACTION_AMOUNT < 500 USD Upon fetching the attribute’s value, AME finds that the amount is in British pounds (not U.S. dollars), and that the attribute 34 Attributes
- 35. requires the 'Daily' conversion method. AME would use General Ledger’s currency-conversion functionality to convert the attribute’s value into U.S. dollars, using the 'Daily' conversion method. Then it would evaluate the condition using the converted dollar amount. If your organization only uses one currency denomination, you can use number attributes rather than currency attributes to represent monetary values. Currency-attribute values must have the form: - amount,code,type where code is a valid currency code and type is a valid currency- conversion type. There should be no space characters other than those in the code and type values. For example, ‘5000.00,USD,Corporate’ might be a valid static currency value. The amount component of a currency value must be in canonical form. Dynamic currency usages should use the function fnd_number.number_to_canonical to return a number value in canonical form. For example: - select fnd_number.number_to_canonical(transaction_amount), currency_code, currency_conversion_type from some_application_table where transaction_id = :transactionId could be a dynamic usage for a TRANSACTION_TOTAL attribute. Attribute Usages All transaction types in AME can share an attribute name, while defining their own method of determining the attribute’s value at run time (an attribute usage). This makes it possible for several transaction types to share conditions and rules, so that an organization can define a single set of rules that applies to several transaction types (a uniform approvals policy). It also means that an attribute name can be defined in AME, while a given transaction type may not have yet defined a usage for the attribute. A transaction type only has access to conditions defined on attributes for which the transaction type has defined usages. Only users with the System Administrator responsibility can create and edit attribute usages (using the Attributes tab). There are two kinds of attribute usages: static and dynamic. 35 Attributes
- 36. Static Attribute Usages A static attribute usage assigns a constant value to an attribute, for a given transaction type. Static usages are common (but not required) for certain mandatory boolean attributes that affect how AME treats all transactions, for example, the AT_LEAST_ONE_RULE_MUST_APPLY attribute (see Mandatory Attributes: page 79). They are similarly used for certain required boolean attributes, for example INCLUDE_ALL_JOB_LEVEL_APPROVERS (see the description of the absolute-job-level approval type under Approval Types for List-Creation and Exception Rules: page - 95 for details). Syntax Rules for Static Usages 1. Static usages must not use single or double quote marks to demarcate strings. 2. Static usages for boolean attributes must be one of the strings ’true’ and ’false’. 3. Static usages for number attributes must be either an integer or a decimal number in decimal (not scientific) notation. For example, ’1’ and ’-2’ are acceptable integer values, and ’- 3.1415’ is an acceptable decimal value. 4. Static usages for date attributes must use the format model ame_util.versionDateFormatModel, whose value is: YYYY:MON:DD:HH24:MI:SS For example, ’2001:JAN:01:06:00:00’ is an acceptable date value. Note: This format model differs slightly from the ”canonical” format model, which contains a space character. Space characters are problematic for variable values passed to a Web server via the HTTP GET method. 5. Static usages for string attributes can be any text value that fits in a varchar2 of length ame_util. attributeValueTypeLength, which is currently 100. (You may wish to check your AME installation’s source code to verify that this constant still has the same value.). The text value may include spaces and ordinary punctuation. It is case- sensitive. 6. Static usages for currency attributes must have the form: amount,code,type where code is a valid currency code and type is a valid currency-conversion type. There should be no space characters other than those in the code and type values. The amount should use a period, not a comma, as a decimal point (if any). For example: 5000.00,USD,Corporate is a valid currency value. 7. Static usages may be null. To create a null static usage, leave the usage field empty on the Create an Attribute, Edit an Attribute, or Mandatory Attribute Query Entry page. 36 Attributes
- 37. Dynamic Attribute Usages A dynamic attribute usage assigns an SQL query to an attribute, for a given transaction type. The query must follow certain syntax rules. AME executes the query at run time to determine the attribute’s value. Dynamic usages are common for all attributes other than the two classes of boolean attributes described above. The execution of dynamic attribute usages’ queries represents the majority of AME’s runtime overhead. Therefore, optimizing your dynamic-usage queries can have a big impact on AME’s performance. Make sure you optimize these queries thoroughly, especially if the transaction type that owns them processes a high volume of transactions. Syntax Rules for Dynamic-usage Queries 1. The query must fit in the column ame_attribute_usages.query_string, which is a varchar2(2000). If your query is long, you may wish to compare its length with the current table definition in your applications instance. (You can avoid the length constraint by encapsulating your query in a function that you compile on the database, and then selecting the function’s value from dual in your query.) 2. The queries for all data types other than currency must select one column; queries for the currency data type must select three columns. 3. Each selected column must convert to a value that fits in a varchar2 of length ame_util. attributeValueTypeLength, which is currently 100. (You may wish to check your AME installation’s source code to verify that this constant still has the same value.) 4. Queries for boolean attributes must select one of two possible values, ame_util.booleanAttributeTrue and ame_util.booleanAttributeFalse. 5. Queries for date attributes must convert a date value into a varchar2 using the ame_util.versionDateToString function, to guarantee that AME stores the date value using the ame_util.versionDateFormatModel. AME can only evaluate conditions defined on a date attribute correctly when that attribute’s dynamic usage converts the attribute’s date value using this format model, because AME stores the date as a varchar2, and attempts to convert the stored value back to a date using the same format model. For example the following is a correct dynamic usage for a date attribute: - Select ame_util.versionDateToString(sysdate) from dual 6. Queries for number and currency attributes must select the number or currency amount converted to a varchar2 by: fnd_number.number_to_canonical. 7. Queries for header-level attributes may (but are not required 37 Attributes
- 38. to) contain the transaction-ID placeholder ame_util.transactionIdPlaceholder, which is ’:transactionId’. The transaction-ID placeholder is a true dynamic PL/SQL bind variable. That is, at run time, AME binds a transaction- ID value to this variable before dynamically executing the query. A condition of a where clause referencing this bind variable must have the form: transaction ID = :transactionId where transaction ID is a column that contains the transaction ID passed to AME at run time by the application whose transaction type uses the query. 8. Queries for attributes belonging to subordinate-level item classes must return one row for each item in the item class, for a given transaction. For example for OIE Expenses the Item Class line item ID query string is as follows: - select distribution_line_number from ap_expense_report_lines_all where report_header_id = :transactionId order by distribution_line_number Therefore a corresponding line level attribute must match this query string, in respect of the number and the ordering of the line item Ids. So for example for the attribute LINE_COST_CENTRE the SQL is as follows: - select flex_concatenated from ap_expense_report_lines_all where report_header_id = :transactionId and distribution_line_number in (select distribution_line_number from ap_expense_report_lines_all where report_header_id = :transactionId ) order by distribution_line_number Attribute Classifications AME classifies attributes not only according to their data type, but also according to whether they are mandatory, required, and active. Mandatory Attributes A mandatory attribute must have a usage in all transaction types. Mandatory attributes determine various facets of AME runtime behavior. The mandatory attributes are listed at the top of the 38 Attributes
- 39. attributes tab's attributes list, which appears as soon as you select the attributes tab. Following are brief explanations of each mandatory attribute. ALLOW_DELETING_RULE_GENERATED_APPROVERS This is a boolean attribute. It determines whether AME lets the originating application suppress from a transaction’s approver list approvers required by the transaction type’s rules. ALLOW_REQUESTOR_APPROVAL This is a boolean attribute. It determines whether AME lets a requestor approve their own transaction, if they have sufficient signing authority. When this attribute is true, and a requestor has sufficient authority, the relevant action type make the requestor the only approver in their chain of authority, and assigns the requestor the initial approval status ame_util.approvedStatus (approved). When the attribute is false, the relevant action type does not include the requestor in the chain of authority. Instead, the action type includes in the chain of authority at least one of the requestor's superiors. In previous versions of AME, the AME engine proper evaluated ALLOW_REQUESTOR_APPROVAL, so that it was appropriate for the attribute to be mandatory. Now the following action types require the action type instead: Absolute job level Final approver only Manager then final approver HR position HR position level Supervisory level It is likely that ALLOW_REQUESTOR_APPROVAL will be removed from the set of mandatory attributes, and treated instead as a required attribute for the above action types (and any others that come to require the attribute). AT_LEAST_ONE_RULE_MUST_APPLY This is a boolean attribute determining whether AME raises an exception when no rules apply to a transaction at run time. REJECTION_RESPONSE This is a string attribute. It determined how AME responds when an approver rejects an item. The attribute has three allowed values: ame_util.continueAllOtherItems currently has the value 'CONTINUE_ALL_OTHER_ITEMS'. When REJECTION_RESPONSE has this value, AME continues the 39 Attributes
- 40. approval processes of all items other than the item(s) that were rejected. ame_util.continueOtherSubItems currently has the value 'CONTINUE_OTHER_SUBORDINATE_ITEMS'. When REJECTION_RESPONSE has this value, AME continues the approval processes of all subordinate-level items other than the item(s) that were rejected, but stops the approval process of the header and the rejected item(s). 40 Attributes
- 41. ame_util.stopAllItems currently has the value 'STOP_ALL_ITEMS'. When REJECTION_RESPONSE has this value, AME stops the approval processes of all of the transaction's items, including the header. Remember to use the actual value in a static usage, and the ame_util constant in the code executed by a dynamic usage. USE_RESTRICTIVE_ITEM_EVALUATION This is a boolean attribute. It indicates whether AME requires that a single subordinate-level item satisfy all conditions on attributes belonging to the subordinate item class, in a given rule, for the rule to apply. If the attribute is true, a rule containing conditions on a subordinate-level item class' attributes only applies if one of the transaction’s items in that class satisfies all of the rule’s conditions on attributes of that item class. If the attribute is false, different items may satisfy different conditions on the subordinate item class' attributes. For example, consider the rule: - If LINE_ITEM_CATEGORY in {office furniture, office supplies} and LINE_ITEM_TOTAL < 1,000 USD then require approvals up to the first three superiors,at most. Suppose a transaction has two line items with the following attribute values: Line-Item ID Attribute Attribute Value 1 LINE_ITEM_CATEGORY office furniture 1 LINE_ITEM_TOTAL 1,100 USD 2 LINE_ITEM_CATEGORY travel 2 LINE_ITEM_TOTAL 900 USD If USE_RESTRICTIVE_ITEM_EVALUATION is false, the rule applies, because line-item one satisfies the first condition, while line-item two satisfies the second. If the attribute is true, however, neither line item satisfies both conditions, so the rule does not apply. EFFECTIVE_RULE_DATE This is the date that determines which rules are active for a given transaction, in the following sense. When AME begins to process a transaction, it first determines which rules have start dates that precede the effective date; and that have end dates which are either null or which follow the effective date. These rules are active for the transaction. AME then evaluates each active rule’s conditions to see whether the rule actually applies to the transaction. 41 Attributes
- 42. For most transaction types, sysdate is the appropriate EFFECTIVE_RULE_DATE value. To use this value, give EFFECTIVE_RULE_DATE a static null (empty) usage. (This will be more efficient at run time than giving it a dynamic usage that selects sysdate from dual.) EVALUATE_PRIORITIES_PER_ITEM This is a boolean attribute. It determines whether AME evaluates the priorities of the usages of applicable rules per item. Per-item evaluation is only relevant when for relative rule- priority modes. When the attribute is true, the usages of the rules that apply to each item have their priorities evaluated as a group. When the attribute is false, the usages of all rules applying to the transaction have their priorities evaluated together. USE_WORKFLOW USE_WORKFLOW is a boolean attribute. It indicates whether AME should log the transaction type's exceptions to the Workflow exception stack. Ordinarily this attribute should have a static usage. WORKFLOW_ITEM_KEY This is a string attribute. It is a transaction's item key in the originating application's workflow. The item key is typically also the AME transaction ID, and in this case, the attribute's dynamic usage can simply select :transactionId from dual. AME uses this attribute's value when it logs exceptions in Workflow's exception stack. If the originating application does not use Oracle Workflow (if USE_WORKFLOW is false), this attribute should have a static-null usage. WORKFLOW_ITEM_TYPE This is the item type of the originating application's workflow. AME uses this attribute's value when it logs exceptions to Workflow's exception stack. If the originating application does not use Oracle Workflow, this attribute should have a static-null usage. Required Attributes An action type may rely on the values of one or more attributes to govern various aspects of the action type's runtime behavior. Such attributes are the action type's required attributes. The attributes must have usages in a given transaction type, for the action type to be available in the transaction type. Mandatory attributes can be required attributes; even though the fact that they are mandatory means that they always have a usage in all transaction types. Making a mandatory attribute 42 Attributes
- 43. required (by a given action type) is good practice. If a mandatory eventually becomes non-mandatory, and an action type requiring it has not listed the attribute among the action type's required attributes, a transaction type might be created without a usage for the attribute, and might define rules using the action type. In this case a runtime exception would occur when AME tried to apply one of these rules. (AME development tries to avoid this possibility by adding such attributes to the appropriate action types' lists of required attributes, when a mandatory attribute is made non-mandatory. If your organization has any custom action types, you should account for this possibility by including mandatory attributes as necessary in your action types' lists of required attributes.) The following Required Attributes are listed below for convenience. Their usage is more generally explained in the chapters on Actions and Rules. ALLOW_EMPTY_APPROVAL_GROUPS When this attribute is false, AME raises an exception if an Approval Group has no members at run time. This will typically occur if the Approval Group is Dynamically Generated and the SQL used to populate the group fetches no members. See the chapter on Approval Groups for further information. FIRST_STARTING_POINT_ID SECOND_STARTING_POINT_ID These attributes' values identify the first approver in each chain of authority generated by the action type Dual Chains of Authority. See the chapter on Actions for further information INCLUDE_ALL_JOB_LEVEL_APPROVERS This attribute determines if all approvers with the same job level should be included when building the chain of authority for the action types that depend on Job Level. See the chapter on Actions for further information. JOB_LEVEL_NON_DEFAULT_STARTING_POINT_PERSON _ID If this attribute is not null, the approver it identifies will be used as the starting point for action types that depend on Job Level. Its value will override the setting for TRANSACTION_REQUESTOR_PERSON_ID. SUPERVISORY _NON_DEFAULT_STARTING_POINT_ID If this attribute is not null, the approver it identifies will be used as the starting point for action types that depend on Supervisory Level. Its value will override the setting for TRANSACTION_REQUESTOR_PERSON_ID. 43 Attributes
- 44. TOP_POSITION_ID Similar to the explanation below for TOP_SUPERVISOR_PERSON_ID, it represents the top of the position hierarchy. TOP_SUPERVISOR_PERSON_ID This attribute should be assigned to the person ID of the employee at the top of the hierarchy (typically the CEO of a corporation). This is used in Action Types that climb the supervisor hierarchy and is needed to determine if AME has reached the top of the hierarchy as opposed to reaching a gap in the hierarchy setup. TRANSACTION_DATE This is the date a transaction was first submitted. Note that AME always fetches a transaction’s current attribute values, and then applies the appropriate transaction type’s rules active as of EFFECTIVE_RULE_DATE, to (re)generate the transaction’s approver list. It does not use the attribute values or rules existing at the transaction date. You may however wish to sort your transactions according to, for example, the financial-reporting period in which they originate, in your rules. This attribute gives you a convenient way to do so. TRANSACTION_GROUP_ID This is the ID of the business group in which a transaction originates. (Throughout AME, a business-group ID is a value from the business_group_id column of the HRMS table per_business_groups.) This attribute may have a null value at run time. AME uses this attribute to evaluate rule constraints at run time. TRANSACTION_ORG_ID This is the ID of the organization in which a transaction originates. (Throughout AME, an organization ID is a value from the organization_id column of the HRMS table hr_all_organization_units.) This attribute may have a null value at run time. AME uses this attribute to evaluate rule constraints at run time (see Constraints: page - 133). TRANSACTION_REQUESTOR_PERSON_ID This attribute should be assigned to the ID of person requesting the transaction. Several of the defined Action Types will use this as the starting point for traversing the hierarchy. 44 Attributes
- 45. TRANSACTION_REQUESTOR_USER_ID This is the user ID of the user submitting a transaction. This attribute may have a null value at run time. TRANSACTION_SET_OF_BOOKS_ID This is the ID of the set of books that owns a transaction. (Throughout AME, a set-of-books ID is a value from the set_of_books_id column of the General Ledger table gl_sets_of_books.) This attribute may have a null value at run time. Business-Variable Attributes Non-mandatory attributes that are not required attributes represent business variables used in approval rules. In AME, these are the attributes that appear in conditions. (You can also use required attributes in conditions, though doing so is uncommon. You cannot use mandatory attributes in conditions.) Active Attributes An attribute is active for a rule if one or more of the rule’s conditions is defined on the attribute, or if one of the action types of the rule’s actions requires the attribute. An attribute is active for a transaction type (or simply active) if the attribute is either mandatory or active for at least one of the transaction type’s rules. AME only fetches the values of active attributes at run time. It lists all attributes on the test tab, even if they are not active. Deciding Whether to Create or Edit Attributes Ideally a transaction type delivered with AME will include ("seed") all of the attribute names and usages your organization requires. Often however you need to add attributes (and usages for them), or change seeded usages. Even if it turns out that you don't need to change the seeded attributes or their usages, you still must verify that this is the case. Here is the general procedure for deciding which attributes and attribute usages need to be created or edited, adding or editing them as needed, and testing the results: 1. Consult the originating application's documentation to determine the purpose and meaning of each seeded attribute. 2. Compare the seeded attributes' usages with those your transaction type's implementation document specifies. (See the "Mandatory Attributes" subsection of the 45 Attributes
- 46. "Representation of Business Cases in AME" section of Chapter 2 for details.) 3. Edit any usages that don't match your requirements. 4. Create any attribute names (and usages for them) of attributes that your implementation requires, and which are not seeded. 5. Use the test tab to compare the attribute values of your test cases defined with their expected values. 6. Execute your dynamic attribute usages from the SQL*Plus command line (using the apps account) for enough of your test cases to verify that the attributes have the same values in SQL*Plus as on the test tab. How does AME use Attributes? When AME starts to calculate a transaction’s approver list at run time, the first thing it does is fetch the values of each attribute that is active for the transaction type. (To do this, AME either fetches the constant value assigned to the attribute, or fetches the attribute’s query and then executes it.) If an attribute having a dynamic usage is a header-level attribute, AME executes the query once for the entire transaction. If the attribute is a line- item-level attribute, AME executes the query once for each of the transaction’s line items. After fetching all of the active attributes’ values, AME checks whether each of a transaction type’s rules applies to the transaction. It does this by determining whether each of the rule’s conditions is true. For conditions defined on header-level attributes, the condition is true if the attribute’s value lies within the list or range of values that the condition defines. For conditions defined on line-item-level attributes, the condition is true if the value of the attribute for any one line item lies within the list or range of values that the condition defines. 46 Attributes
- 47. Maintaining Attributes You can view, create, edit and delete attributes using the Attributes tab. This tab is available only to users with the Application Administrator responsibility. If you have the General or Limited Business responsibility, AME presents you with an appropriate attribute list whenever you need to select an attribute in the process of creating a condition or rule. If you need to have a custom attribute created or edited, you must ask a user with the Application Administrator responsibility to perform that task. To display the list of attributes for a transaction type: 1. Choose the Attributes tab. 2. Select the transaction type whose attributes you want to view, then choose the Continue button. The attributes list appears. The list is subdivided into mandatory attributes, non-mandatory header attributes, and non-mandatory line-item attributes. Note: If the transaction type does not have a line item ID query string defined, references to attribute level in the following text should be ignored. To create an attribute: 1. Display the list of attributes. 2. Choose the Add Attribute button. This starts the Create an Attribute wizard. 3. Select the attribute’s level (header or line-item) if the transaction type has enabled line-item attributes. 4. Select a pre-existing attribute name, or enter a new attribute name. If you plan to create one or more rules referencing the attribute, and to share the rule(s) across several transaction types, you just need to create the attribute’s name for the first transaction type, and then select it from the list of shareable attribute names for all remaining transaction types. (You must enter a distinct usage for the attribute name, for each transaction type.) All attribute names, including those you create, are shareable; so make sure that your attribute name’s degree of generality reflects your intentions. For example, if you want to create an attribute specific to the Web Expenses transaction type, you might begin your attribute name with the prefix ’WEB_EXPENSES_’. Note: If you enter an attribute name in lower or mixed case, AME changes it to all upper case when it saves your work. 47 Attributes
- 48. The names of attributes whose values will be person IDs or user IDs should end in ’PERSON_ID’ or ’USER_ID’, respectively; for example, ’HR_MANAGER_PERSON_ID’ and ’EMPLOYEE_STOCK_ANALYST_USER_ID’. This convention signals the Test tab’s test-transaction functionality to let the end user query for persons and users by name, and then to display a user-friendly description of the person or account selected by the end user. 5. Select an attribute type. Remember to use the currency type for attributes reflecting monetary values. 6. Select the radio button indicating the type of attribute usage you want to use. 7. Enter the attribute usage. (See Attribute Usages: page 75 for details of the syntax rules for attribute usages.) 8. Choose the Create Attribute button. Your new attribute appears in the appropriate section of the attributes list. To edit an attribute: 1. Display the list of attributes. 2. Select the name of the attribute that you want to edit. 3. Make your changes on the Edit an Attribute page. 4. Choose the Submit Changes button to save your changes. When you are satisfied with your changes, you can choose the Quit button to return to the attribute list. When you change an attribute’s name, type, or description, your changes apply for all transaction types. Changes to attribute usages only apply to the transaction type for which you make the change. You cannot change the name, type, or description of seeded attributes. You must instead create a new attribute with the name, type, and description that you want. In some cases, you can create or edit a seeded attribute’s usage. (If the usage is editable, it will appear that way on the Edit an Attribute page.) If you change an attribute’s type, make sure you also change its usage (for every transaction type that uses the attribute name) to provide data of the appropriate type. If you change a usage’s type from static to dynamic, make sure you change the usage accordingly. 48 Attributes
- 49. To delete an attribute: 1. Display the list of attributes. 2. Select the check box next to the attribute name, in the Delete column. 3. Choose the Delete Checked Attributes button. 4. Confirm the deletion when prompted. You can delete several attributes at once. Note: You cannot delete seeded attributes or attributes that have a usage within a condition. Can a dynamic attribute usage reference the value of another attribute? For example: Attribute1: select column1 from table1 where column2 = :transactionId Attribute2: select column3 from table2 where column4 = :Attribute1 Dynamic attribute usages cannot reference other attributes' values. To implement the above example, the second attribute's dynamic usage would be: select column3 from table2 where column4 = (select column1 from table1 where column2 = :transactionId) AME does not allow references to attribute values within dynamic usages for two reasons: 1. It is not practical for AME to guarantee that a transaction type's active attributes (those attributes whose values the engine and/or rules require to determine which rules apply to a transaction of that type) will always be fetched in a fixed order. As a result, AME may not have fetched the value of Attribute1 before it tries to fetch the value of attribute2. Even if AME were to guarantee an attribute-fetching order, that would not solve the general problem. It would only solve the problem for attributes that come after the ones they depend on, in the order. 2. Were AME to allow this sort of dependency among attributes, cycles could occur. Attribute1 could depend on Attribute2, and Attribute2 could depend on Attribute3, which in turn could depend on Attribute1. There would be no way in logic to resolve these attributes' values. 49 Attributes
- 51. 4 Conditions 51 Conditions
- 52. Overview The “if” part of an approval rule consists of zero or more conditions. A condition can be either true or false. For the rule to apply to a transaction, all of its conditions must be true for the transaction. You need to create conditions before you can define your rules. A condition is a statement that is either true or false, for a given transaction. A condition has a unique key, an arbitrary string up to 100 bytes long. The key identifies the condition so you can download it from one AME instance (such as a test environment) and upload it into another (such as a production instance). The condition key does not change with database and is used purely for uploading/downloading of condition across databases. Condition Types There are three types of conditions: • Ordinary • Exception • List-modification Ordinary Conditions An ordinary condition associates an attribute with a set of allowed values or range. Such a condition is true when the attribute has one of the allowed values. We then say that the attribute's value satisfies the condition. Ordinary conditions have one of three forms. Conditions on Date, Number, and Currency Attributes Conditions on number attributes associated with an approver type have the form attribute_name = approver_name That is, the condition is true when the attribute's value is the ID of a specified approver of the type associated with the attribute. Conditions on date and currency attributes, and number attributes not associated with an approver type, have the form, lower_limit <{=} attribute_name <{=} upper_limit When you create or edit this kind of condition, you decide whether to include each equals sign in the condition by selecting the appropriate values for the ‘Include Lower Limit’ and ‘Include Upper Limit’ radio buttons on the condition-creation and 52 Conditions
- 53. condition-editing forms. If you create a set of conditions of this form on the same attribute, make sure each lower or upper limit is only included in one condition. For example, the conditions 1,000 <= TRANSACTION_AMOUNT < 2,000 2,000 <= TRANSACTION_AMOUNT < 3,000 have successive ranges of values that avoid overlapping at 2,000. In this way, at most one of the conditions will ever be true for any given transaction, which is typically the desired behavior. Conditions on Boolean Attributes Conditions on boolean attributes have the form, attribute_name is {true, false} Make sure you understand the logic of your boolean conditions. Consider the following truth table: Attribute Value Allowed Value Condition Value true true true true false false false true false false false true That is, there are two ways a condition on a boolean attribute can be true. (Some AME users forget the italicized case in the above truth table.) Conditions on String Attributes Conditions on string attributes have the form, attribute_name in {value_1, value_2, . . . } The allowed values are case-sensitive, so 'allowed value' and 'ALLOWED value' are different allowed values. If you want a condition on a number or date, but you want the condition to have a list of allowed values, define a string attribute representing the textual representation of the number or date, and then define a condition on the string attribute. Exception Conditions Exception conditions have the same forms as ordinary conditions. The difference is, an exception condition can only appear in exception rules. See Chapter 7 for details. 53 Conditions
- 54. List-Modification Conditions A list-modification condition checks for the presence of a given target approver at a specific set of allowed locations in the default approver list. When the target approver is present in an allowed location, we say that the default approver list satisfies the condition. There are two types of allowed location. When the condition specifies that the target approver must be the final approver, the target approver must be the last approver in a chain of authority. When the condition specifies that the target approver may be any approver, whether the approver must be in a chain of authority depends on the action type used by the rule that contains the list- modification condition. Action types for list-modification rules limit their scope to chains of authority. Substitution rules using an any-approver list-modification condition apply to all occurrences of the target approver throughout an approver list. Condition Scope and Availability An ordinary or exception condition is available in any transaction type that defines a usage for the attribute that the condition references. List-modification conditions are always available in all transaction types. This sharing of conditions simplifies rule sharing among transactions. It also means that when you edit a condition, the change affects all rules that use the condition; and when you delete a condition, the condition is no longer available in any transaction types. To help you avoid unintended side effects, the conditions list flags with an asterisk those conditions used by several transaction types. Maintaining Conditions Viewing Conditions The list of conditions that are available to the current transaction type appears when you select the conditions tab. The conditions list sorts the ordinary and exception conditions first by the item classes of their attributes, then by the conditions' types. The list of list-modification conditions appears below the other lists. Creating a Condition Creating an Ordinary or Exception Condition To create an ordinary or exception condition, follow these steps: 1. Select the conditions tab. 2. Select the ‘Add a Condition’ button (which starts the condition-creation wizard). 3. Choose the condition type and the item class of the attribute that the condition will reference. 54 Conditions
- 55. 4. Choose the attribute. 5. Edit the condition's key, if desired. [Note: Condition Key should be a string that you can easily identify the condition with.] 6. If the attribute is of type number, and is associated with an approver type, query for and select an approver of the type associated with the attribute. 7. If the attribute is of type date or currency, or is a number attribute not associated with an approver type, enter the condition's lower and upper limits, and indicate whether each should be included in the condition's set of allowed values. (If you leave a lower or upper limit blank, the range of allowed values is unbounded on that side.) If the attribute is of type currency, also choose the denomination of the lower and upper limits. (The limits must be in the same denomination.) 8. If the attribute is of type boolean, select the condition's allowed value. 9. If the attribute is of type string, iteratively enter the condition's allowed values. 10. Select the 'Create Condition' button. 55 Conditions
- 56. Creating a List-Modification Condition To create a list-modification condition, follow these steps: 1. Select the conditions tab. 2. Select the ‘Add a Condition’ button (which starts the condition-creation wizard). 3. Choose the list-modification condition type (ignore the select list of attribute item classes). 4. Choose the type of the condition's target approver. 5. Query for and select the target approver. 6. Select the target approver's allowed locations. 7. Select the 'Create Condition' button. Editing Conditions To edit a condition, go to the conditions list and click the condition you want to edit. The condition-editing wizards closely parallel the condition-creation wizards described above. Deleting Conditions To delete one or more conditions, follow these steps: 1. Select the conditions tab. 2. Select the checkboxes next to the conditions you want to delete. 3. Select the ‘Delete Checked Conditions’ button. 4. Confirm your choice when prompted. 56 Conditions
- 57. 5 Actions 57 Actions
- 58. Overview Typically AME provides all of the action types and actions your implementation will require. There are many action types to choose from, so even if you don't expect to create a new action type or action, you should review this chapter's descriptions of the action types, to make sure you understand how to translate your business rules into appropriate actions. This chapter explains: 1. What an action is 2. How to choose an action 3. What each action type does 4. How to create, edit, and delete action types and actions. What is an Action? An action is an instruction to AME to modify a transaction's approval process in some fashion. An approval rule's "then" part (its "consequent") consists of one or more actions. Actions that modify a transaction's approver list are approval actions or simply approvals. Actions that generate a production (a variable-name/value pair) are production actions. Action Types Every action belongs to an action type. An action type is a collection of actions having similar functionality. For example, actions in the absolute-job-level action type all require approvals up to a certain job level in the HR supervisory hierarchy. The main difference among the actions are the job level they require. AME includes a set of seeded action types, many of which enable you to ascend commonly used organizational hierarchies. If none of the seeded action types meets your organization's requirements, you need a custom action type. An AME user with administrative privileges must use the actions tab to define a new action type. See Chapter 2 of the Oracle Approvals Management Developer's Guide for details. Action-Type Handlers An action-type handler is a PL/SQL package that implements the action type's functionality. AME calls the package's procedures at run time to determine how to process applicable actions of the corresponding action type. All action types have handlers specified which is used at runtime except production action types. Production action types require a handler name to be specified but is not used at runtime. AME does not use the handler name. 58 Actions
- 59. See Chapter 2 of the Oracle Approvals Management Developer's Guide for more details about action-type handlers. Action-Type Descriptions An action-type description is a string up to 100 bytes in length. It describes the functionality shared by the action type's actions. Allowed Rule Types An action type's allowed rule type is the type of rule that can use the action type's actions. Every action type has exactly one allowed rule type. Allowed Approver Types Action types with an allowed rule type other than substitution or production have one or more allowed approver types. These are the types of approvers that the action type can generate. Some action types (such as the action types that use approval groups) allow all approver types. Order Numbers An action type has an order number, which is always a counting number. The set of all action types for a given allowed rule type is ordered by the action types' order numbers. The order numbers start at one and ascend to at most the number of action types for the allowed rule type. Order numbers are not necessarily unique, so the highest order number may be lower than the number of action types. AME uses the action types' order numbers to decide the order in which the action types of the applicable rules of a given rule type are processed at run time. This affects the order in which approvers are notified. See Chapter 9 for details. Chain-of-Authority Ordering Modes Action types that have the chain-of-authority allowed rule type specify an ordering mode for the chains of authority generated by the action type's actions. When a single action type generates several chains of authority for a single transaction, the ordering mode tells AME how to order the chains of authority. This affects the notification order of the approvers in the chains of authority. See Chapter 9 for details. Voting Regimes Action types that have the chain-of-authority allowed rule type specify a voting regime for the chains of authority generated by the action type's actions. This affects the notification order of the approvers in the chains of authority, and how AME treats their 59 Actions
- 60. responses. See Chapter 9 for details. Required Attributes Some action types require that a transaction type define usages for one or more attributes, to use actions of that type in its rules. These attributes are the action type's required attributes. An action type typically uses the values of its required attributes to calculate how the action type's actions should contribute to a transaction's approval processThe Approvals tab lists each approval type’s required attributes. Note: If a seeded attribute is already a mandatory attribute, AME does not include it among an action type’s required attributes, even if the action type uses the attribute’s value at run time. Action Descriptions An action description is a string at most 100 bytes long. It should have the form of a complete imperative sentence expressing the action's effect on a transaction's approval process. When you create an action for a seeded action type, the new description should resemble as much as possible those of existing actions of the same type. For example, a supervisory-level action that requires the chain of authority to ascend the supervisory hierarchy exactly 15 approvers should have the description 'Require approvals up to the first 15 superiors.' Static Action Descriptions A static action description is a fixed string that AME provides for a seeded action, or that you enter upon creating an action. Most seeded actions have static descriptions. Dynamic Action Descriptions A few action types must generate descriptions for their actions at the moment the description is displayed. These actions have dynamic action descriptions. An action type that produces dynamic action descriptions does so by executing an SQL query that is registered with AME when the action type is first created. The query must return a single row that is a string at most 100 bytes long. It may use either or both of the bind variables ':parameterOne' and ':parameterTwo'. AME will assign these variables the values of the action's parameters. See "Action Parameters" below and Chapter 2 of the Oracle Approvals Management Developer's Guide for details. Action Parameters An action's parameters tell the action type's handler how to 60 Actions
- 61. process the action. Each action type has its own approval- parameter syntax rules. You must adhere carefully to these rules when you create a new action for a seeded action type. (You can check your understanding of an action type's syntax rules by reviewing the parameters of some of the action type's seeded actions, using the actions tab.) Choosing an Action Choosing the right action for a rule requires three choices. The subsections below explain them. Choosing a Rule Type See Chapter 7 for a complete explanation of the rule types. Here are brief explanations of when to use each: Use list-creation rules to generate chains of authority. Avoid using list-creation exceptions. Use list- creation rules and rule-usage priorities instead. (See Chapter 7 for details about rule-usage priorities.) Use pre- and post-chain-of-authority rules to let groups of subject-matter experts approve a transaction before or after management. Use list-modification rules to grant unusual signing authority, or to revoke usual signing authority, in special cases. Use substitution rules to replace one approver with another in special cases, or for short periods of time (such as vacations or leaves of absence). Use combination rules when several of your business rules apply to exactly the same cases. There are two kinds of combination rules: those combining multiple list-creation, pre-chain, and/or post-chain actions; and those combining multiple list-modification and/or substitution actions. Use production rules when an originating application uses AME productions. Consult your originating application's documentation to learn whether the application uses productions. Choosing an Approver Type Most of the rule types have just one seeded action type available to them. There are two action types available to list-modification rules; which to use depends on whether you want to grant or 61 Actions
- 62. revoke signing authority. List-creation rules have many action types available to them. Before you can choose one of them, you must decide which approver type should occur in the chains of authority your list-creation rule will generate. AME current supports three approver types: HR employees (sometimes called persons/HR people in the AME UI), HR positions, and FND (Oracle Applications) users. Choosing an Action Type Once you have chosen an approver type for your list-creation rule, you can choose an action type that generates a chain of authority containing that approver type, and having the structure you want. The following tables list the action types that generate chains of authority, sorting them by approver type, and indicating the structure of the chains of authority they generate. Action Type Chain Structure for HR Employee (Person) Approver Type absolute job level The chain ends with one or more approvers at, just under, or above a fixed job level. relative job level The chain ends with one or more approvers at, just under, or above a job level a fixed number of levels above the requestor's job level. manager then final The chain includes the first and last approvers in the chain that approver would be generated by a similar absolute or relative-job-level action. final approver only The chain includes just the last approver in the chain that would be generated by a similar absolute or relative-job-level action. dual chains of authority There are two chains of authority, each with its own first approver, and each having an absolute- or relative-job-level structure. line-item job-level chains There is one chain of authority per line item. All of the chains of authority are in the header item's approver list. To generate line-item- specific chains of authority within the line items' approver lists, use one of the other action types for HR employees, and associate your rule with the line-item item class. See Chapter 7 for details. supervisory level The chain contains a fixed number of HR employees. Action Type Chain Structure for HR Position Approver Type hr position The chain ends with an approver having a fixed position. hr position level The chain contains a fixed number of positions. Action Type Chain Structure for FND User Approver Type approval-group chain of The chain contains a fixed approval group. authority See "Action Types" below for details about each action type. 62 Actions
- 63. Action Types This section provides the following information about each action type: What approver type(s) the action type uses What attributes it requires How the action type works The syntax and semantics of the action's parameters The action types are sorted by allowed rule type. Approval Types for List-Creation and Exception Rules Use the following seeded approval types in list-creation and exception rules: Chain-of-Authority (List Creation and List-Creation Exception) Action Types The seeded action types that generate chains of authority do so by ascending the HR supervisory hierarchy or HR position hierarchy, or by treating an approval group as a chain of authority. In most cases one or more required attributes determine the first approver in the chain, and the particular action determines where the chain ends. Action Types for the HR Supervisory Hierarchy All of the action types that ascend the HR supervisory hierarchy require the TOP_SUPERVISOR_PERSON_ID attribute. This attribute's value should be the person ID of the employee at the top of the hierarchy (typically the CEO of a corporation). When this attribute has the appropriate value, a chain of authority can end with the top supervisor without AME's raising an exception, even if the rules require a longer chain. If however the TOP_SUPERVISOR_PERSON_ID attribute does not identify the top supervisor, or if an employee is not the top supervisor but has no supervisor assigned to them, AME will raise an exception if it needs to generate a longer chain than the hierarchy allows. Absolute-Job-Level Action Type The absolute-job-level action type generates a chain of authority by ascending the HR supervisory hierarchy starting at a given approver and continuing until an approver with a sufficient job level is found. (The supervisory hierarchy is defined by the HRMS per_all_assignments_f, per_jobs, and per_all_people_f tables and views.) 63 Actions
- 64. First Approver By default, the first approver (starting point) in an absolute-job- level chain is the supervisor of the person identified by the required number attribute TRANSACTION_REQUESTOR_PERSON_ID. If the required number attribute JOB_LEVEL_NON_DEFAULT_STARTING_POINT_PERSON_I D has a non-null value, however, the value identifies the first approver in the chain. (An originating application can override both of these first approvers via AME's programming interface. See Appendix A of the Oracle Approvals Management Developer's Guide for details.) Final Approver The absolute-job-level action type's ascent up the supervisory hierarchy stops when it reaches one or more approvers having a sufficient job level. (A job level is a value in the authority_level column of the HRMS table per_jobs.) What "sufficient" means varies according to following: The job level required by the action (AME seeds actions for job levels one through 10.) Whether the action is an at-most action or an at- least action The value of the required attribute INCLUDE_ALL_JOB_LEVEL_APPROVERS If one or more approvers in the appropriate supervisory chain have the required job level, the chain's final approver does not depend on whether the action is an at-most action or an at-least action. In this case, if INCLUDE_ALL_JOB_LEVEL_APPROVERS is false, the chain includes and ends with the first approver with the required job level. And if INCLUDE_ALL_JOB_LEVEL_APPROVERS is true, the chain includes and ends with the last approver with the required job level. If no approver in the appropriate supervisory chain has the required job level, and the action is an at-most action, the chain includes and ends with the last job level before the first approver having a job level exceeding the required job level. If the action is an at-least action, the chain instead ends with the first job level exceeding the required job level. In either case, whether the action type includes all of the approvers at the final job level depends on the value of INCLUDE_ALL_JOB_LEVEL_APPROVERS. Two job-level actions may combine in an interesting way. Suppose, for example, that one rule requires approvers up to at least job level five, and another requires approvers up to at most job level six. If the hierarchy skips from job level four to job level seven, AME can only satisfy both rules by including in the chain 64 Actions
- 65. of authority one or all of the approvers with job level seven (depending on the value of INCLUDE_ALL_JOB_LEVEL_APPROVERS). In this case, the at- least action is more stringent than the at-most action, even though the at-most action requires a higher nominal job level. AME always satisfies the most stringent action, so be aware that job-level gaps can have surprising consequences. Action Parameters The parameters of absolute-job-level actions have the syntax n{+,-} where n is a positive integer representing the job level, a plus sign indicates an at-least action, and a minus sign indicates an at- most action. For example, the action with the description 'Require approvals up to at least level 1.' has the parameter '1+'. Difference between At Least and At Most “At most” specifies an action that has to be satisfied so that ascending the hierarchy requires an approver to be returned with a value “at most” to the level specified. For instance if the hierarchy has approvers with job level 2,3,5,6 and the rule stated Absolute job level require approver s up to at-most level 4 then the approvers with job level 2 & 3 would be returned but not the approver at level 5 even though at most level 4 was specified. However if the action is defined as “at-least” level 4 then approver 2,3,5 would be returned since we require an approver to at least level 4 and since this job level didn’t exist the approver with level 5 was returned. A similar notion exists for Supervisory Level. The difference between the two depends on if there are enough supervisors in the hierarchy to satisfy the more stringent action of “Require approvals up to the first four superiors”. Assuming a hierarchy of ‘n’ levels, if AME fails to return an approver as a result of this Action an exception will be raised. This will be the case despite the setting for TOP_SUPERVISOR_PERSON_ID. Whereas “Require Approvals up to the first four superiors at Most” will climb the hierarchy as high as it can up to the action specified but not beyond the top supervisor. Relative-Job-Level Action Type The relative-job-level action type behaves exactly like the absolute-job-level action type, except its actions' parameters represent the difference between an approver's job level and the requestor's job level. For example, the relative-job-level action with the parameter '3+' ascends the chain of authority until it reaches a job level at least three levels higher than the requestor's job level. If the requestor has a job level of two, the action would 65 Actions
- 66. ascend at least to job level five. The action type has the same required attributes as the absolute-job-level action type, and uses them in the same way. The action parameters have the same syntax, with the integer value described as explained above. Manager-then-Final-Approver Action Type The manager-then-final-approver action type is another variant of the absolute-job-level action type. Instead of requiring approval from every person in an ascent up the supervisory hierarchy, this action type only includes the first and final approvers. The action type's required attributes and action- parameter-syntax rules are the same as those of the absolute-job- level action type. Final-Approver-Only Action Type The final-approver-only action type is also a variant of the absolute-job-level action type. Instead of requiring approval from every person in an ascent up the supervisory hierarchy, this action type only includes the final approver. The final-approver-only action type's required attributes are the same as those of the absolute-job-level action type. The action type’s action-parameter-syntax rules are similar. The syntax is {A,R}n{+,-} For example, ‘A3+’ means the final approver should have an absolute job level at least three levels above the requestor’s. Dual-Chains-of-Authority Action Type Some transactions require approval from two chains of authority, each starting with a different approver in the supervisory hierarchy. For example, an employee transfer may require approval from chains of authority starting at the employee's old and new supervisors. In such cases, use the dual- chains-of-authority action type. First Approvers The dual-chains-of-authority action type requires two attributes: FIRST_STARTING_POINT_PERSON_ID and SECOND_STARTING_POINT_PERSON_ID. These attributes' values identify the first approver in each chain of authority generated by the action type, so they must always have non-null values when rules using the action type apply to a transaction. At Least One Action per Chain The dual-chains-of-authority action type is unique in requiring that multiple actions apply to a transaction, at least one for each chain of authority generated by the action type. Typically dual- 66 Actions
- 67. chains actions apply to a transaction in pairs, with one action in the pair for the first chain and the other for the second chain. In such cases, make each pair of actions part of the same rule. For example: If TRANSACTION_CATEGORY in {TRANSFER} then Require approvals at most 3 levels up in the first chain. Require approvals at least 2 levels up in the second chain. Final Approvers As usual, when multiple dual-chains actions for the same chain apply, AME determines which has the most stringent requirement for that sub chain, and enforces that requirement. Action Parameters The parameters of dual-chains-of-authority approvals have the syntax: {1,2}{A,R}n{+,-} The first integer (a one or a two) identifies the (first or second) chain. The letter (an 'A' or an 'R') indicates whether n (a positive integer) should be interpreted as an absolute or a relative job level. The plus or minus sign is interpreted as it would be for the absolute- or relative-job-level action type, as appropriate. For example, the action with the description 'Require approvals at most 8 levels up in the second chain.' has the parameter '2R8-'. Line-Item Job-Level Chains-of-Authority Action Type The line-item job-level chains-of-authority action type is included in the current version of AME for backwards compatibility. It generates one chain of authority for each line item. These chains of authority are associated with the header item (as in previous versions of AME, which did not generate separate approver lists for items in subordinate item classes), not with the line items, in the transaction's approver list. First Approvers The line-item-level required attribute LINE_ITEM_STARTING_POINT_PERSON_ID identifies the first approver in each chain of authority. Because this attribute has a distinct value for each line item, each chain can be unique, and can start at a distinct job level. 67 Actions
- 68. Final Approvers The line-item job-level chains-of-authority action type generates chains in the same way as the absolute-job-level action type. Because the same actions generate all of the chains, the chains all end at the same job level. The required attributes INCLUDE_ALL_JOB_LEVEL_APPROVALS has the same function for this action type as for that one. Action Parameters The line-item job-level chains-of-authority action type's action parameters have the same syntax and interpretation as for the absolute-job-level action type. Supervisory-Level Action Type The supervisory-level action type ascends the HR supervisory hierarchy, generating a chain that has a fixed number of approvers in it. Note that there is no precise correlation between the number of supervisors ascended and the job level. Job levels can be skipped, or can occur several times, in a supervisory chain of authority. First Approver By default, the first approver in the chain is the supervisor of the employee identified by the required attribute TRANSACTION_REQUESTOR_PERSON_ID. However, if the required attribute SUPERVISORY_NON_DEFAULT_STARTING_POINT_PERSON _ID is non-null, the chain starts with the approver identified by this attribute instead. (As always, an originating application can override both of these first approvers via AME's programming interface. See Appendix A of the Oracle Approvals Management Developer's Guide for details.) Final Approver The chain of authority generated for a given action contains the number of approvers specified by the action's parameter, when it is possible to ascend the HR supervisory hierarchy that many approvers. When the hierarchy contains fewer approvers than the action requires, the result depends on whether the action is an at-most action. If it is, and if the last approver is identified by the required attribute TOP_SUPERVISOR_PERSON_ID, the chain ends with this approver. However, if this attribute's value is null, or if the action is not an at-most action, AME raises an exception. Action Parameters Supervisory-level actions have parameters of the form 68 Actions
- 69. n[-] where n is a positive integer indicating how many approvers the chain should contain, and the optional minus sign makes the action an at-most action when present. Action Types for the HR Position Hierarchy There are two action types for the HR position hierarchy (residing in per_pos_structure_elements, per_pos_structure_versions, and per_position_structures). The difference between them is how they decide where to end a chain of authority. hr position level action type requires the TOP_POSITION_ID attribute, which is wholly analogous to the TOP_SUPERVISOR_PERSON_ID attribute for the action types that ascend the HR supervisory hierarchy. Both action types also require the NON_DEFAULT_POSITION_STRUCTURE_ID attribute. By default, the chain of authority ascends the primary position structure of the business group of the transaction requestor. However, if NON_DEFAULT_POSITION_STRUCTURE_ID is non-null, the chain will follow the position structure identified by the value instead. ‘hr position’ Action Type The ‘hr position’ action type generates a chain of authority ending with a specified position. Note that position actions have dynamic descriptions. First Approver By default, a position chain of authority starts with the position above the position identified by the required attribute TRANSACTION_REQUESTOR_POSITION_ID. If however the required attribute NON_DEFAULT_STARTING_POINT_POSITION_ID is non- null, the chain starts with this position instead. Final Approver The final approver is the position specified by the action's parameter. Action Parameters A position action's parameter is the wf_roles.name value of the position at which the chain should end. Currently positions in wf_roles have name values such as 'POS:471', where the positive integer following the colon is a position ID. 69 Actions
- 70. Position-Level Action Type The position action type generates a chain of authority having a specific length. First Approver The position-level action type starts its chains the same way the position action type does. Final Approver The position-level action type ascends the position hierarchy a fixed number of positions (in analogy with the supervisory-level action type for the HR supervisory hierarchy). Action Parameters A position-level action parameter is a positive integer representing the number of positions the action requires. Actions Types for Approval groups There are three seeded action types that use approval groups, one for each sub-list in an item's approver list. All three approval-group action types require the ALLOW_EMPTY_APPROVAL_GROUPS attribute. When this attribute is false, AME raises an exception if a group's has no members at run time. Approver-Group Chain-of-Authority Action Type The approver-group chain-of-authority action type treats an approval group as a chain of authority. AME ignores the approval group's voting regime and uses the action type's instead. When the action type uses the serial voting regime, the serial order is consistent with the group members' order numbers. Pre- and Post-Chain-of-Authority Action Types The pre-chain-of-authority action type inserts approval groups before the authority sub-list of an item's approver list. The post- chain-of-authority action type inserts approval groups after the authority sub-list of an item's approver list. (The notification order is not necessarily the same as the order in the approver list. See Chapter 9 for details.) Both use approval groups' voting regimes. List-Modification Action Types There are two seeded list-modification action types, and they have opposite effects. One grants signing authority to someone 70 Actions
- 71. who normally lacks it; the other revokes the signing authority of someone who normally has it. Final-Authority Action Type The final-authority action type effectively grants a target approver signing authority in contexts where they usually lack. It does so by truncating each chain of authority containing the target approver, after the approver. (If the target approver forwards without approving, the action type truncates the chain of authority after the last forwardee following the target approver.) The action type has only one action, which has a null parameter. Non-Final-Authority Action Type The non-final-authority action type effectively revokes a target approver's signing authority in contexts where they normally have it. It does so by extending a chain of authority ending with the target approver beyond the target approver, up to some absolute or relative job level, depending on the particular action's requirement. Because the actions depend on job levels, the target approver must be an HR employee, and the HR implementation must use job levels. Non-final authority actions' parameters have the syntax {A,R}n{+,-} The 'A' or 'R' indicates whether n (a positive integer) represents an absolute or relative job level. The plus or minus sign is interpreted as for the job-level action types. For example, the action having the description 'Require approvals at most 2 levels up.' has the parameter 'R2-'. Substitution Action Type There is just one seeded substitution action type. It replaces the target approver with the approver identified by the substitution action. The parameters for substitution approvals are wf_roles.name values. When you create or edit a substitution action, the AME user interface lets you select an approver type and then query for an approver, so you don't have to create or edit the parameter or action-description directly. Production Action Type There is just one seeded production action type. Each production action causes AME to output to the originating application the variable-name/value pair in the action's parameters. The variable name and value are strings up to 50 bytes long. 71 Actions
- 72. Production Levels If a production action is used by a rule that also has one or more approver-generating actions, the production is associated with each approver generated by the rule's approver-generating actions. Such actions are approver-level productions. Production actions in production rules are associated with the transaction as a whole, and so are transaction-level productions. Creating an Action Type Creating an action type involves a significant programming exercise, as well as registering the new action type with AME. These tasks are beyond the scope of this guide. See Chapter 2 of the Oracle Approvals Management Developer's Guide for details. Editing an Action Type To edit an action type, follow these steps: 1. Select the actions tab. 2. Select the name of the action type you want to edit. 3. Change the action type's properties as appropriate. 4. Select the 'Submit Changes' button. You can now select the 'Quit' button to return to the list of action types. You cannot edit seeded action types' properties; you can only add and delete non-seeded actions. Deleting an Action Type To delete an action type, follow these steps: 1. Select the approvals tab. 2. Select the checkbox next to the action type you want to delete, in the 'Delete' column. 3. Select the 'Delete Checked Action Types' button. 4. Confirm the deletion when prompted. You can delete several action types at once. You cannot delete seeded action types. Creating an Action To create an action for an existing action type, follow these steps: 1. Review the action type's parameter syntax and semantics rules. 2. Select the actions tab. 72 Actions
- 73. 3. Select the name of the action type to which you want to add actions. 4. Select the 'Add Action' button. 5. Enter the new action's parameter(s) and description. 6. Select the 'Create Action' button. You can now select the 'Quit' button to return to the list of action types. You never need to add actions to the approver-group action types. AME creates these actions automatically when an approval group is created. Editing an Action To edit an action, follow these steps: 1. Select the actions tab. 2. Select the name of the action type whose action you want to edit. 3. Select the description of the action you want to edit. 4. Change the action's properties as appropriate. 5. Select the 'Update Action' button. You can now select the 'Quit' button to return to the edit-an- action-type form. You cannot edit seeded actions, or approver-group actions. AME maintains approver-group actions automatically. Deleting an Action To delete an action, follow these steps: 1. Select the actions tab. 2. Select the name of the action type whose action you want to delete. 3. Select the checkbox(es) next to the action(s) you want to delete, in the 'Delete' column. 4. Select the 'Submit Changes' button. 5. Confirm the deletion when prompted. You can delete several actions at once. You cannot delete a seeded action, but you can delete an action that has been added to a seeded action type. Also, you cannot delete approver-group actions. AME deletes these automatically when the approval group is deleted. 73 Actions
- 75. 6 Approval Groups 75 Approval Groups
- 76. Overview An approval group can either be an ordered set of one or more approvers (persons and/or user accounts) or it can be a list, which is dynamically generated at rule evaluation time. A typical pre- or post-approval rule adds an approval group’s members (in order) to a transaction’s approver list. Typically approval groups represent functional approvers outside a transaction’s chain of authority, such as human-resource management and internal legal counsel, that must approve a transaction before or after management has done so. However, it is possible to insert an approval group into a chain of authority if required. When you create an approval group, AME creates for you the corresponding approvals of the pre- and post-approval approval types automatically. These approvals are available to all transaction types. Approval groups can now be nested or in other works it is possible to make one approval group a member of another approval group. For example, a purchasing department might define the following groups to handle post-approvals of computer-hardware purchases: COMP_APP_1 = {Jim Small} COMP_APP_2 = {COM_APP_1, Jane Smith} COMP_APP_3 = {COMP_APP_2, Liz Large} AME would evaluate the membership of COMP_APP_3 to be (Jim Small, Jane Smith, Liz Large}, in that order. You nest one approval group in another by going to the edit- group form on the groups tab and clicking the Add Nested Group button. The select list that appears on the Choose a Nested Group form only includes a group under three conditions: It is not the target group itself. It does not contain the target group (either explicitly or implicitly). It is not contained in the target group already. The first two of these requirements prevent an infinite loop in the resolution of nested groups. The third prevents redundant group members only in the narrow sense that if group A already contains group B as a member, you cannot add group B to A again. However, if group A contains B, and group C also contains group B, you can add C to A. In this case, the ordering of A's members would place B's members before C's members other than those in B, in A's membership list. Thus: B = {1, 2} 76 Approval Groups
- 77. C = {3, 4, B} A = {B, C} = {{1, 2}, {3, 4, B}} = {{1, 2}, {3, 4, {1, 2}}} = {1, 2, 3, 4} Nested approval groups let you build an approvals matrix using AME approval groups. For example, the purchasing department defining the computer-hardware approval groups above might define three corresponding post-approval rules: If ITEM_CATEGORY in {COMPUTER_HARDWARE} and ITEM_AMOUNT <= 1,000 USD then require post-approval from the COMP_APP_1 group. If ITEM_CATEGORY in {COMPUTER_HARDWARE} and 1,000 USD < ITEM_AMOUNT <= 10,000 USD then require post-approval from the COMP _APP_2 group. If ITEM_CATEGORY in {COMPUTER_HARDWARE} and 10,000 USD < ITEM_AMOUNT then require post-approval from the COMP_APP_3 group. These rules effectively define a hierarchy of per-item dollar- amount signing authorities for three subject-matter approvers. You can seed a hierarchy of nested approval groups containing no members other than nested groups, along with a set of approval rules like those above; and your customers can easily populate the groups with person or user approvers upon installation. It is possible to nest a dynamic group in a static group, but it is not possible to nest either a dynamic or static group in a dynamic group. Dynamic groups can only include persons and users. AME maintains a non-recursive approver list for each approval group, so that the engine does not need to evaluate group nestings at run time. Rather, the engine fetches all static members and all dynamic members' queries in a single query, and then executes the dynamic members' queries in turn, substituting the results into the membership list. This means you can nest groups to arbitrary depth without impacting AME performance adversely, but you should take care to limit the number of dynamic groups nested in a single group. Empty Approval groups The action types that use approval groups share the required boolean attribute ALLOW_EMPTY_APPROVAL_GROUPS. When this attribute has the value 'true', AME allows an approval group not to have any members at run time. When the attribute has the value 'false', AME raises an exception if an approval group does not have any members. Deciding when to use an Approval group There are action types that let you use approval groups for pre- approvals, chain-of-authority approvals, and post-approvals. 77 Approval Groups
- 78. (See Chapter 5 for details.) Using Approval groups for Pre- and Post-Approvals Typically approval groups represent functional or subject- matter-expert approvers outside a transaction’s managerial chain of authority, such as human-resource management and internal legal counsel that must approve a transaction before or after management has done so. Using Approval groups for Chain-of-Authority Approvals Sometimes you need AME to generate chains of authority containing several approver types, or containing an approver type that lacks a hierarchical structure. In these cases you can use nested approval groups to construct an approver hierarchy, and then use the hierarchy with the approver-group chain-of- authority action type. Approval groups have several properties Name An approval group’s name can be up to 50 bytes long. Typically an approval group’s name should avoid referring to a specific transaction type or approver sub-list (pre-approval, chain of authority, post-approval). This is because an approval group can be used in any transaction type and any sub-list, even if it was originally created for a specific transaction type or sub-list. Likewise, an approval group’s name should avoid indicating whether the group’s membership is (currently) dynamic or static, because this property might change. Instead, an approval group’s name should reflect the group’s position or function in the organization. For example, ‘Office-Furniture Purchasing’ is better than ‘Office Furniture Requisitions Dynamic Pre- Approvers’. Description An approval group’s description can be up to 100 bytes long. The same caveats that apply to approval groups’ names apply to their descriptions. Order Number Every approval group has an order number. Approver-group order numbers determine how the approval groups in the same sub-list are ordered. (See Chapter 9 for details.) Do not confuse an approval group’s order number with the order numbers of the group’s members. (See “Membership” below.) 78 Approval Groups
- 79. Voting Regime An approval group has a voting regime assigned to it. A voting regime determines the order in which a group’s members are notified, and how the group makes approval decisions. Four regimes are available. Note: This feature will be available if the originating application has implemented FYI Notifications. Serial Voting In serial voting, the members are notified one after the other, in an order consistent with the members’ order numbers. (AME breaks ties arbitrarily.) All members must approve for the group to approve. Consensus Voting In consensus voting, the members are notified in parallel. All members must approve for the group to approve. Members’ order numbers are ignored in this instance. First-Responder-Wins Voting In first-responder-wins voting, the members are notified in parallel. The response of the first member to respond to the notification requesting approval becomes the group’s approval decision. AME logs the responses of the remaining group members, but otherwise ignores their responses. Members’ order numbers are ignored in this instance. Order-Number Voting In order-number voting, the members are notified in the order of their order numbers. (Members having the same order numbers are notified in parallel.) All members must approve for the group to approve. Active List An approval group can have two membership lists, one static, the other dynamic. Only one of the lists is active (in force) at any given time. You only need to define one list or the other, but you may define both. Static Membership List You choose an approval group’s static members using AME’s approver-query wizard, while creating or editing the group. Dynamic Membership List AME generates an approval group’s dynamic members by 79 Approval Groups
- 80. executing an SQL query you enter while creating or editing the group. Each row fetched by the query must have one of two forms. First, it can consist of one of the approver-type labels ‘person_id’ and ‘user_id’, followed by a colon, followed by a valid ID for an appropriate approver type. Second, it can consist of wf_roles role type (orig_system), followed by a colon, followed a valid wf_roles.orig_system_id. The order of the rows returned by the query determines the dynamic members’ order numbers, at run time. The query can reference the transaction-ID placeholder :transactionId. Maintaining Approval groups You create, edit and delete approval groups using the groups tab. Creating Approval groups To create an approval group, follow these steps: 1. Select the groups tab. 2. Select the ‘Add Group’ button. 3. Enter the group’s properties on the ‘Create an Approval group’ page. 4. Select the ‘CreateGroup’ button. 5. On the ‘Edit an Approval group’ page, add static members as necessary using the ‘Add Approver’ and ‘Add Nested Group’ buttons. (See “Editing an Approval group” below for details.) You can now select the ‘Quit’ button to return to the list of approval groups. The new approval group will appear on the list in the order of its approver-group order number. Note that when you create an approval group, AME creates for you the corresponding approver-group actions automatically. Editing an approval group There are several kinds of changes you can make to an approval group. You can change the name and/or description of an approval group, and delete group members, in a single submission of the ‘Edit an Approval group’ form. Changing an Approval group’s Properties To change one or more of an approval group’s properties, follow these steps: 1. Select the group’s tab. 80 Approval Groups
- 81. 2. Select the approval group you want to edit. 3. Change the properties of interest. 4. Select the ‘Submit Changes’ button. You can now select the ‘Quit’ button to return to the approver- group list. Adding Members to an Approval group’s Static Membership To add members to an approval group, follow these steps: 1. Select the group’s tab. 2. Select the approval group whose membership you want to modify. 3. Select the ‘Add Approver’ button on the ‘Edit an Approval group’ form. 4. Select the type of the approver you want to add, and then select the ‘Search’ button, on the ‘Search for an Approver’ form. 5. Enter your query criteria, and then select ‘Continue’, on the ‘Query for an Approver’ form. 6. Select the approver of interest, and then select ‘Continue’, on the ‘Search Results’ form. 7. On the ‘Select Order Number’ form, select the new approver’s approver order number. If you want the order number to be unique (incrementing the order numbers of all approvers in the group already at or above the order number, if an approver already exists having the order number), select ‘unique’; otherwise, select ‘not unique’. Then select ‘Create Member’. The new member will now appear on the approval group’s static-membership list. Adding Nested Groups to an Approval group’s Static Membership To nest one group within another (target) group, follow these steps: 1. Select the groups tab. 2. Select the target approval group. 3. Select the ‘Add Nested Group’ button. 4. Select the group you want to nest, and then select the ‘Add Nested Group’ button, on the ‘Choose a Nested Group’ form. 5. On the ‘Select Order Number’ form, select the nested group’s approver order number. If you want the order number to be unique (incrementing the order numbers of all approvers in the group already at or above the order number, if an approver already exists having the 81 Approval Groups
- 82. order number), select ‘unique’; otherwise, select ‘not unique’. Then select ‘Create Member’. The nested group will now appear on the approval group’s static-membership list. Deleting a Static Member To delete one or more members of an approval group’s static membership, follow these steps: 1. Select the groups tab. 2. Select the approval group whose static member(s) you want to delete. 3. Select the ‘Delete’ checkbox(es) next to the approver(s) you want to delete, on the ‘Edit an Approval group’ form’s static-membership list. 4. Select the ‘Submit Changes’ button. 5. Confirm the deletion(s) when prompted. You can now select the ‘Quit’ button to return to the approver- group list. Deleting an Approval group To delete one or more approval groups, follow these steps: 1. Select the groups tab. 2. Select the ‘Delete’ checkbox(es) next to the approval group(s) you want to delete. 3. Select the ‘Delete Checked Groups’ button. 4. Confirm the deletion(s) when prompted. 82 Approval Groups
- 83. 7 Rules 83 Rules
- 84. Overview Creating rules and rule usages is the main step in the AME implementation process. Rarely will an organization’s business rules match any rules that are seeded with a transaction type. Instead, you must translate the business rules you documented into AME rules yourself. Rule associate one or more conditions with an approval in an if- then statement. Before you can create rules, you must create conditions for the rules to use. You may need to create (or have a system administrator create) some custom attributes and/or approvals. You may also need to create some approval groups. Thus, while creating rules is your ultimate goal, it is also the last thing you do when you set up AME. Rule Types There are eight rule types in AME. Seven of them provide rules that participate in generating transactions’ approver lists; these are the approver-generating rule types. The eighth generates productions. (See Chapter 1 for an explanation of productions.) • List-creation rules • List-creation exceptions • List-modification rules • Substitutions • Pre-list approval-group rules • Post-list approval-group rules • Combination Rules • Production Rules Different rule types use different condition and approval types, and have different effects on a transaction’s approver list. Rule Priorities The purpose of rule priorities is to prioritize a transaction type's rules and, at run time, remove from the set of rules that would otherwise apply to a transaction, those rules of insufficient priority. A rule priority is a positive integer associated with a rule within a transaction type. (Each transaction type that uses a rule can assign the rule a different priority.) Note that priority increases as the priority value (number) decreases: two has priority over three, etc. When rule priorities are enabled for a given rule type (within a given transaction type), the rules tab and the pop-up rules- details windows display rules' priorities; and one can edit a rule's priorities as one would edit any other rule property. When 84 Rules
- 85. priorities are disabled, they are neither displayed nor editable. The admin tab has a special form for editing the rulePriorityModes configuration variable's value. The value contains a priority mode and threshold for each rule type. There are three possible priority modes: absolute, relative, and disabled. A threshold is a positive integer, and it only has meaning for the first two priority-mode values. Full details of each of these modes is given in the chapter on AME Administration. Rule Usages The deployment of a rule depends upon its usage. It is possible to have multiple usages for a rule, each one spanning a specific data range which allows rules can be switched on/off as required. Rule usage can also span transaction types, effectively sharing rules between them. In both cases, any such usage is marked on the UI to indicate either future dated rules or rules shared across transaction type usages. List-Creation Rules List-creation rules generate chains of authority. They use action types that ascend an organizational hierarchy to generate one or more chains of authority. A required attribute typically identifies the first approver in each chain, and the specific action determines how many approvers are in each chain. List-creation rules can use any of the following approval types: • Absolute job level • Relative Job Level • Dual chains of authority • Final approver only • Manager then final approver, relative job level • Supervisory level • Approval group chain of authority • Line-Item Job-Level chains of authority See Approvals: chapter 5 for descriptions of each approval type. This is an example of a list-creation rule: 85 Rules
- 86. Rule A If TRANSACTION_AMOUNT < 1000 USD then require approvals up to at least job level 2. Rule A has one condition, on the attribute TRANSACTION_AMOUNT. The approval is of the absolute-job- level type. So if the condition is true for a given transaction, AME will extend the transaction’s chain of authority from the transaction requestor’s supervisor up to the first approver in the supervisory hierarchy who has a job level of at least 2. If several list-creation rules of the same approval type apply to a transaction, AME enforces the most stringent approval required by those rules. For example, if two absolute-job-level rules apply to a transaction, the first requiring approvals up to at least job level 2 and the second requiring approvals up to at least job level 3, AME will extend the chain of authority up to the first approver with a job level of at least 3. So, when you want to create an exception to a list-creation rule, and the exception should require extra approval authority of the same type as the list-creation rule, the exception should itself be another list-creation rule. List-Creation Exceptions List-creation exceptions also generate chains of authority. The difference between a list-creation rule and a list-creation exception is that an exception suppresses selected list-creation rules. List-creation exceptions are a deprecated feature of AME; use list-creation rules and rule-usage priorities instead. Sometimes you want to create an exception to a list-creation rule that decreases the level of, or changes the type of, the approval authority that the list-creation rule would otherwise require. In this case, you need a list-creation exception (or simply an exception). An exception contains at least one ordinary condition and at least one exception condition (see Conditions: page 88 for an explanation of condition types), as well as an approval. An exception can use any of the approval types available for list- creation rules. The circumstances under which an exception overrides a list- creation rule are somewhat subtle. The two rules do not have to have the same ordinary conditions. Instead, both rules’ ordinary conditions have to be defined on the same attributes, and both rules’ conditions must all be true (including the exception’s exception conditions). In this case, AME ignores the list-creation rule, and the exception has suppressed the list-creation rule. 86 Rules
- 87. There are several reasons AME does not require that an exception have the same ordinary conditions as a list-creation rule that it suppresses. First, one exception may be designed to suppress several list-creation rules. In this case, the scope of the exception’s ordinary conditions must be broad enough to encompass that of each list-creation rule it suppresses. Second, an exception may be designed to apply to a more narrow set of cases than a list-creation rule. Third, it is sometimes desirable to adjust the scope of either the exception or the list-creation rule(s) that it suppresses, without simultaneously adjusting the scope of the other(s). This is an example of an exception that suppresses Rule A: Rule B If TRANSACTION_AMOUNT < 500 USD and Exception: COST_CENTER is in {0743} Then require approvals up to at least job level 1. (In Rule B, the first condition is an ordinary condition, and the second condition is an exception condition.) Note that the ordinary condition is defined on the same attribute (TRANSACTION_AMOUNT) as the condition in Rule A, but the two conditions are different. Rule B carves out a exception to Rule A for transactions with totals under $500 U.S. for a certain cost center. In this narrow case, the exception requires less approval authority (of the absolute-job-level type) than what Rule A would otherwise require, which is why the rule must be an exception, rather than a list-creation rule. List-Modification Rules Sometimes you want to make exceptions regarding the approval authority granted to specific approvers, rather than the approval authority required for specific kinds of transactions. To do this, you need a list-modification rule. AME applies list-modification rules to modify the default chain of authority generated by all applicable list-creation and exception rules. A list-modification rule can have (but need not have) ordinary conditions. However, it must have exactly one list-modification condition (see Conditions: page 88 for an explanation of condition types). There are two common uses for list-modification rules: reducing an approver’s signing authority, and extending an approver’s signing authority. In the former case, the list-creation rules might effectively grant a certain level of signing authority to managers having a given job level, and you might want not to grant that authority to a certain manager, in spite of their having the requisite job level. To do this, you tell AME to extend the chain of authority past the manager by using the nonfinal-authority approval type. In the latter case, just the opposite is true: the list- creation rules require approvals beyond a given job level, but you nevertheless want to grant a certain manager at that job level 87 Rules
- 88. signing authority. To do this, you tell AME to truncate the chain of authority after the manager by using the final-authority approval type. In both cases, you can limit the scope of the list modification to a broad or narrow set of ordinary conditions. Here are some examples of list-modification rules that illustrate the possibilities: Rule C If PURCHASE_TYPE is in {OFFICE FURNISHINGS, OFFICE SUPPLIES} and Any approver is: Kathy Mawson then Grant the approver final authority. (In Rule C, the third condition is a list-modification condition.) Rule C grants Kathy Mawson final authority for a narrow scope of purchase types. Rule D If TRANSACTION_AMOUNT > 1000 USD and The final approver is: Kathy Mawson then Require approvals at least one level up. (In Rule D, the second condition is a list-modification condition.) Rule D revokes Kathy Mawson’s signing authority for a broad set of transaction amounts. Substitutions Sometimes you want to delegate one approver’s authority to another approver. To do this, you need a substitution rule. AME applies substitution rules to the chain of authority after modifying it by applying any applicable list-modification rules. Like a list-modification rule, a substitution rule can have (but need not have) ordinary conditions. However, it must have exactly one list-modification condition (see Conditions: page 88 for an explanation of condition types). So a substitution rule differs from a list-modification rule only in its use of the substitution approval type. This is a sample substitution rule: Rule E If TRANSACTION_AMOUNT < 500 USD and CATEGORY in {MISCELLANEOUS OFFICE EXENSES} and Any approver is: John Doe then Substitute Jane Smith for the approver. 88 Rules
- 89. (In Rule E, the third condition is a list-modification condition.) Rule E delegates John Doe’s authority to Jane Smith, for the class of transactions defined by the rule’s ordinary conditions. Pre- and Post-List Approval-Group Rules The four rule types described above generate a transaction’s chain of authority. You may want to have one or more groups of functional specialists approve a transaction before or after the chain of authority does. In such cases, you need a pre- or post-list approval-group rule. An approval-group rule must have at least one ordinary condition, and must use either the pre- or post- chain-of-authority-approvals approvals type. For example: Rule F If TRANSACTION_AMOUNT < 1000 USD and CATEGORY_NAME in {Marketing Event} then Require pre-approval from Marketing Approvals Group. Combination Rules Combination rules combine actions from action types having different allowed rule types. There are two kinds of combination rule. One kind allows action types for list-creation rules, list- creation exceptions, pre-chain-of-authority rules, and post-chain- of-authority rules. The other kind allows action types for list- modification and substitution rules. Use a combination rule when several of your business rules apply to exactly the same cases. (Doing so collects the business cases in a single rule for convenience. It also reduces runtime performance overhead.) Production Rules Production rules output productions to the originating application. Each originating application uses productions in its own way. Consult your originating application's documentation for information about what AME productions (if any) the application uses. Actions Each rule must have one or more actions. Generally a rule’s type determines which action types it can use. There are three exceptions: 1. Production rules can only use the production action type. 2. All of the approver-generating rule types can have production actions. (The productions produced by these rules are approver-level productions.) 89 Rules
- 90. 3. Combination rules combine actions from different rule types. (See “Combination Rules” above.) See Chapter 5 for more information about actions. Start and End Dates A rule’s start and end dates determine its lifespan, the period in which the rule can be used. When you select the current date as a rule’s start date, AME sets the start date at the current time as well. When you select a future start or end date, AME sets that date to 12:00 a.m. (the beginning of the day). A rule’s start and end dates are not the same as the start and end dates of a rule usage for the rule. The rule usage’s lifespan determines when the rule is in force for the rule usage’s transaction type, not the rule’s lifespan. (See “What is a Rule Usage” below.) The rule’s lifespan merely determine when the rule is available for use. Give a rule a future start date if you want it only to be available in a future period. Give a rule a null end date if you want it to be available indefinitely, after the rule’s start date. Note: A rule cannot be created with past-date. Description A rule’s description can be up to 100 bytes long. The description should be general enough to make sense in all transaction types that might use the rule. Key A rule’s key can be up to 100 bytes long. The key is a unique identifier for the rule, so you can download rules in one AME instance (such as a test instance) and upload it to another AME instance (such as a production instance), preserving the rule key in the process. Item Class A rule used by a transaction type contributes to the approver lists of the items in the rule’s item class. Note that header-level rules may have conditions on attributes belonging to at most one subordinate item class, and subordinate-item-class rules may have header-level conditions. Thus, the rule If TRANSACTION_TOTAL < 1000 USD and COST_CENTER in {481, 6012} then require approvals up to absolute job level 4. could be either a header-level rule or a cost-center-level rule. In 90 Rules
- 91. the former case, the rule would generate a chain-of-authority up to job-level four for the header item. In the latter case, if the header-level condition were satisfied, the rule would generate a chain of authority for the approver lists of cost centers 481 and 6012. Be careful to use rules assigned to the item classes you intend, when the rules have conditions on multiple item classes. What is a Rule Usage? Once a rule is created, it is available for use in all transaction types. A rule usage tells AME that a given transaction type should use a given rule for a given lifespan. Here are the details. Transaction Type You always create a rule usage within your current transaction type in the AME user interface. This is the transaction type to which the rule usage is assigned. Rule There are two ways to create a rule usage. First, you can create a usage for a rule when you create the rule. Second, you can create a usage for a rule that was created previously. In the second case, you can create a usage for a rule already used by your current transaction type (for a lifespan that does not overlap with those of pre-existing usages for the same rule, in the current transaction type), or for a rule used by another transaction type. Start and End Dates A rule usage’s start and end dates make the rule active for the usage’s lifespan, in the usage’s transaction type. As for rules’ start and end dates, when you select the current date as a rule usage’s start date, AME sets the start date at the current time as well. When you select a future start or end date, AME sets that date to 12:00 a.m. (the beginning of the day). When you create a new rule usage, make sure its lifespan does not overlap the lifespan of another usage for the same rule in your current transaction type. Priority When the current transaction type has enabled rule priorities for the type of the rule in a rule usage, the usage must define a priority for the rule. (See Chapter 11’s description of the rulePiorityModes configuration variable for information about enabling rule priorities.) The priority must be a counting number (positive integer). Each transaction type can enable or disable rule priorities for each rule type, using the rulePriorityModes configuration variable. When this variable enables priorities for a given transaction type and rule type, the configuration variable’s value 91 Rules
- 92. specifies whether AME should interpret priority values as absolute or relative. The configuration variable also specifies a threshold value. How AME interprets the threshold at run time depends on whether the priority mode is absolute or relative. When absolute priorities are enabled, all rule usages with priorities that are numerically higher (larger) than the threshold are suppressed. For example, suppose • The threshold for list-creation rules is one. • The priority mode is absolute. • Two list-creation rules’ conditions are satisfied. • The satisfied rules’ usages have priority one and two, respectively. In this case, only the first rule (whose usage has priority one) applies. The second rule (whose usage has priority two) will be suppressed. When relative priorities are enabled, if the threshold is t, AME determines the t numerically lowest (smallest) priorities among the rules of the relevant rule type that otherwise would apply. All rules of this type having a priority that is numerically higher (larger) than the tth numerically lowest priorities are suppressed. For example, suppose • The threshold for list-creation rules is two. • The priority mode is relative. • Four list-creation rules’ conditions are satisfied. • The satisfied rules’ usages have priorities three, four, three, and seven, respectively. In this case, the first three rules (whose usages all have one of the two lowest priorities) apply. The fourth rule (whose usage has priority seven, which is not one of the two lowest priorities) will be suppressed. Approver Category When for-your-information (FYI) notifications are enabled for a given transaction type, the transaction type’s rule usages for all approver-generating rule types must specify an approver category (FYI or approval). The approver category is assigned to each approver generated by the rule in the usage. This lets a rule generate approval approvers in one transaction type, and FYI- notification recipients in another transaction type. Note: This feature will be available if the originating application has implemented FYI Notifications. 92 Rules
- 93. How AME Handles Multiple Requirements for an Approver Sometimes an approval consisting of several rules of different types may require that a given approver appear in different places in a transaction’s approver list. AME assumes that an approver should only approve a transaction once, so it has to decide which rule(s) requirements prevail. There are two common cases of this problem. Here are brief descriptions of each case, and explanations of how AME handles them: • A list-creation, exception, list-modification, or substitution rule includes the approver in the chain of authority; and a pre- or post-approval rule requires the approver’s pre- or post-approval. In this case, AME only includes the approver in the chain of authority. The reason is that omitting the approver from the chain of authority might change the identity of the approvers that follow the approver, in the chain of authority; and AME assumes that preserving the chain of authority is more important than preserving the default approver order. • Two approval-group rules include the approver in different (pre or post) approval groups. In this case, AME includes the approver in the first approval group in the approver list. AME here assumes that the approver should approve at the earliest opportunity. How AME Sorts Rules at Run Time At run time, AME decides the order in which to apply to a transaction all applicable approval rules according to the following algorithm: 1. Apply all exception rules first, to suppress any appropriate list-creation rules. 2. Apply all remaining list-creation and exception rules. 3. Apply any applicable list-modification rules. 4. Apply any applicable substitution rules. 5. Apply any applicable pre-approval rules. 6. Apply any applicable post-approval rules. Within each step of the algorithm, AME sorts the rules by approval type, and process all rules of a given approval type before processing any rules of another approval type. Note: AME does not guarantee any particular ordering among the approval types, or among rules of a given type. For example, if several list-creation rules of different approval types apply to a single transaction, AME may 93 Rules
- 94. process all of the rules of either approval type first. And if two substitution rules apply to a transaction, AME may process either rule first. Oracle encourages you to avoid relying on how your particular AME instance happens to handle indeterminacy. Instead, try to craft your rules to avoid indeterminate outcomes. You may nevertheless find it necessary to force AME to apply one rule before another. To do this, test the rules using the Test tab. If the orders are the reverse of what you want, edit the rules, swapping their contents without deleting the rules. If you follow this procedure, you should verify that AME has preserved the order of rule application each time you change your rules in any way, and each time you patch or upgrade AME. Example Rule Suppose you already have a rule requiring managerial approvals up to a manager with a job level of at least six for purchase requisitions totaling less than 5000 USD. You want to create an exception to this rule that requires approvals only up to a job level of at least four, when the requisition is for computer equipment. The rule you want would be of the exception type (not the list-creation type), because it decreases the level of approval authority required. So you would follow these steps to create the rule: 1. The pre-existing list-creation rule for the normal case would already have required a TRANSACTION_AMOUNT currency attribute, and a condition defined on that attribute. However, the Purchase Requisition transaction type might not include a suitable seeded attribute for a transaction’s category. Supposing it does not, create a string attribute named (say) ’CATEGORY’. (If the attribute name already exists, share the attribute name. If not, create it with a sufficiently generic description for other transaction types to share the name, because the attribute name itself is sufficiently generic for several transaction types to want to use it.) Enter for the attribute a (dynamic) usage that selects a Purchase Requisition’s category from the appropriate tables or views. 2. Create an exception condition on the CATEGORY attribute having only one allowed value, (say) ’COMPUTER EQUIPMENT’. You can now create the rule itself: 3. Enter the description ’computer equipment up to 5000 USD’. 4. Select the list-creation exception rule type. 94 Rules
- 95. 5. Let the start date default to today. 6. Leave the end date blank, so the rule is in force indefinitely. 7. Select the absolute-job-level approval type. 8. Select the approval, ’Require approvals up to at least job level 4.’. 9. Select the ordinary-condition attribute TRANSACTION_AMOUNT. 10. Select the ordinary condition, ’0 <= TRANSACTION_AMOUNT < 5000’. 11. Select the exception-condition attribute CATEGORY. 12. Select the exception condition, ’COMPUTER EQUIPMENT’. 95 Rules
- 96. Maintaining Rules Creating a Rule You must always create a usage for a rule in the process of creating the rule. To create a rule (and a usage for it), follow these steps: 1. Select the rules tab. 2. Select the ‘Add Rule and Usage’ button. 3. On the ‘Add a Rule—Step 1’ form, enter a rule key and description; and select a rule type, start date, and end date. Then select the ‘Continue’ button. The next steps vary with the rule type you selected in step three above. Creating a List-Creation, Exception, Pre-Approval, or Post-Approval Rule If you’re creating a list-creation, exception, pre-approval, or post- approval rule, continue with these steps: 4. On the ‘Add a Rule—Step 2’ form, select the rule’s item class and the action types of the actions you want the rule to use. Then select the ‘Continue’ button. 5. On the ‘Add a Rule—Step 3’ form, select the actions you want the rule to use. If rule-usage priorities are enabled, enter a priority for the rule usage. If FYI notifications are enabled, select the usage’s approver category. Then select the ‘Continue’ button. Here again the next steps vary with the item class you selected in step four above. Header-Level Rule Follow these steps if you selected the header item class at step five above. 6. If you want the rule to use conditions on attributes of a subordinate item class, select the item class on the ‘Add a Rule—Step 4’ form. Then select the ‘Continue’ button. 7. On the ‘Add a Rule—Step 5’ form, select the attributes in the conditions you want the rule to use. Then select the ‘Continue’ button. 8. Select the conditions you want the rule to use on the ‘Add a Rule—Step 6’ form. Then select the ‘Continue’ button. 96 Rules
- 97. The new rule will now appear on the current transaction type’s rules list. Subordinate-Item-Class Rule Follow these steps if you selected a subordinate item class at step five above. 9. On the ‘Add a Rule—Step 4’ form, select the attributes in the conditions you want the rule to use. Then select the ‘Continue’ button. 10. Select the conditions you want the rule to use on the ‘Add a Rule—Step 5’ form. Then select the ‘Continue’ button. The new rule will now appear on the current transaction type’s rules list. Creating a List-Modification or Substitution Rule If you’re creating a list-modification or substitution rule, continue with these steps: 1. On the ‘Add a Rule—Step 2’ form, select the action types of the actions you want the rule to use. Then select the ‘Continue’ button. 2. On the ‘Add a Rule—Step 3’ form, select the actions you want the rule to use. If rule-usage priorities are enabled, enter a priority for the rule usage. If FYI notifications are enabled, select the usage’s approver category. Then select the ‘Continue’ button. 3. If you want the rule to use conditions on attributes of a subordinate item class, select the subordinate item class on the ‘Add a Rule—Step 4’ form. Then select the ‘Continue’ button. 4. Select the attributes in the ordinary conditions you want the rule to use on the ‘Add a Rule—Step 5’ form. Then select the ‘Continue’ button. 5. Select the ordinary conditions you want the rule to use on the ‘Add a Rule—Step 6’ form. Then select the ‘Continue’ button. 6. Select the list-modification condition you want the rule to use on the ‘Add a Rule—Step 7’ form. Then select the ‘Continue’ button. The new rule will now appear on the current transaction type’s rules list. 97 Rules
- 98. Combination Rule If you’re creating a combination rule, complete the first three steps above. AME will ask you whether your combination rule will use list-modification or substitution actions. Select the ‘Yes’ or ‘No’ button as appropriate. The next steps vary with your choice. If you choose: • ‘Yes’ - the process parallels that for list-modification and substitution rules, as outlined above. • ‘No’, the process instead parallels that for List-Creation etc. rules. Production Rule If you’re creating a production rule, complete the first three steps above and then follow: 1. On the ‘Add a Rule—Step 2’ form, select the action type you want to use. (Typically there will only be one available action type, the production action type.) Select the ‘Continue’ button. 2. On the ‘Add a Rule—Step 3’ form, select the action you want to use. If rule-usage priorities are enabled, enter the usage’s priority. If FYI notifications are enabled, select the usage’s approver category. Select the ‘Continue’ button. 3. If you want the rule to use conditions on attributes of a subordinate item class, select the subordinate item class on the ‘Add a Rule—Step 4’ form. Select the ‘Continue’ button. 4. Select the conditions you want the rule to use on the ‘Add a Rule—Step 5’ form. Select the ‘Continue’ button. The new rule will now appear on the current transaction type’s rules list. Creating a Rule Usage 1. You create a usage for a rule that already exists as follows: 2. Select the rules tab. 3. If the new usage is for a rule already used by the current transaction type. Note the lifespans of all usages for the rule, in the current transaction type. 98 Rules
- 99. 4. Select the ‘Add a Rule Usage’ button. 5. On the ‘Add a Rule—Step 1’ form, indicate whether the usage should be for a rule already in use by the current transaction type. Then select the ‘Continue’ button. Now the steps vary, depending on whether the rule is use in the current transaction type. Rule in the Current Transaction Type 1. Select the rule for the usage on the ‘Add a Rule Usage- Step 2’ form, and then the ‘Continue’ button. 2. On the ‘Add a Rule Usage-Step 3’ form, enter the usage’s start date and end date. Note: Ensure the new usage’s lifespan does not overlap the lifespan you noted in step two above.) 3. If rule-usage priorities are enabled, enter the usage’s priority. 4. If FYI notifications are enabled, select the usage’s approver category. Then select the ‘Create Usage’ button. The new rule usage will now appear on the current transaction type’s rules list, together with the other usage(s) for the same rule. Rule in Another Transaction Type 1. Select a transaction type already using the rule on the ‘Add a Rule Usage—Step 2’ form, and then the ‘Continue’ button. 2. On the ‘Add a Rule Usage-Step 4’ form, enter the usage’s start date and end date. 3. If rule-usage priorities are enabled, enter the usage’s priority. 4. If FYI notifications are enabled, select the usage’s approver category. Then select the ‘Create Usage’ button. The new rule usage will now appear on the current transaction type’s rules list. 99 Rules
- 100. Editing a Rule To edit a rule, follow these steps: 1. Select the rules tab. 2. Select the description of the rule you want to edit. 3. Modify the rule properties of interest, and then select the ‘Submit’ button. (If you want to add a condition or an action, select the ‘Add a Condition’ button or the ‘Add Action’, and complete the wizard in the obvious fashion. When you complete the wizard, you’ll return to the ‘Edit a Rule’ form.) You can now select the ‘Quit’ button to return to the rules list. Editing a Rule Usage To edit a rule usage, follow these steps: 1. Select the rules tab. 2. Select the lifespan, priority, or approver category of the usage you want to edit. 3. Modify the rule-usage properties of interest, and then select the ‘Submit Changes’ button. 4. Select the ‘Quit’ button to return to the rules list. Deleting a Rule To delete a rule, you must delete all of the usages for it. When you delete the last usage for the rule, AME automatically deletes the rule. Deleting a Rule Usage To delete a rule usage, follow these steps: 1. Select the rules tab. 2. Select the delete checkboxes next to the usages you want to delete. 3. Confirm the deletions when AME prompts you to do so. 100 Rules
- 101. 8 Item Classes 101 Item Classes
- 102. Overview Item classes have two uses. First, they let you build header-level rules that are sensitive to item-level business variables such as a line item’s cost or the total amount billed to a given cost center. Second, they let you build subordinate-item-level rules that generate separate approver lists for each subordinate item in a transaction. This chapter explains what item classes, items, and item-class usages are how to create, maintain, and delete item classes and item-class usages What are Item Classes, Items, and Item-Class Usages? Item Classes and Items Item Classes An item class names a type of subordinate items a transaction can have. An item class only has one property, its name, which can be up to 100 bytes long. Items There can be many items of a given item class, in a single transaction. For example, a transaction can have many line items. Each item must have a unique item ID (such as a line-item or cost-center ID) at most 100 bytes long. AME Objects Associated with Item Classes An attribute is always associated with a single item class, and has a separate value for each item in the item class. (See Chapter 3 for details.) An approver-generating rule is always associated with a single item class. It contributes to the approver lists for the items in the item class. (See Chapter 7 for details.) Item-Class Usages An item-class usage enables its use in a transaction type. The header item class is special because all transaction types have a pre defined item class usage for the header. This usage cannot be deleted. Each transaction has exactly one header item, and it always has the transaction ID as its item ID. Item-class usages for all other item classes are optional. 102 Item Classes
- 103. Order Number An item-class usage has an order number, which is always an integer with a value of 1 to n. The set of all item classes used by a given transaction type is ordered by the item-class order numbers in the related item-class usages. The order numbers start at one and ascend to at most the number of item classes used by the transaction type. The order numbers are not necessarily unique, so the highest order number may be lower than the number of item-class usages in the transaction type. AME uses the item classes’ order numbers at run time to sort items’ approver lists by item class, for a given transaction. See Chapter 9 for details. Parallelization Mode An item-class usage has a parallelization mode that has one of two possible values: serial and parallel. The mode governs how AME sorts items’ approver lists by item ID. See Chapter 9 for details. Sublist Mode An item-class usage’s sublist mode determines how AME sorts the sublists in each item’s approver list. There are four possible values: • Serial • Parallel • Pre-approvers first, then authority and post approvers • Pre-approvers and authority approvers first, then post- approvers. See Chapter 9 for more details. Item-ID Query An item-class usage tells AME how to generate a transaction’s item-ID list for the items in a given item class, within a given transaction. The usage accomplishes this by defining an item-ID query. The query may reference AME’s :transactionId bind variable, and must return the item IDs in ascending order. (If the item-ID query does not return the IDs in ascending order, any dynamic attribute usages for attributes associated with the item class will not work properly.) Maintaining Item Classes and Item-Class Usages Only Oracle Applications development can create new item classes. You must have administrative privileges to create, edit, or delete item-class usages. 103 Item Classes
- 104. Creating an Item-Class Usage To create an item-class usage, follow these steps: 1. Select the admin tab. 2. On the ‘Choose an Activity Type’ menu, select the transaction-type administration radio button, and then the ‘Continue’ button. 3. On the ‘Choose an Activity’ menu, select the ‘Maintain item classes’ radio button, and then the ‘Continue’ button. 4. Select the ‘Add Item Class’ button, and then the ‘Continue’ button. 5. Select an item-class name on the ‘Add an Item Class— Step 1’ form, and then select the ‘Use Selected Item Class’ button. 6. Select and enter the item-class usage’s properties on the ‘Create an Item Class—Step 2’ form, and then select ‘Create Item Class’ to create the usage. The usage will now appear on the list of item-class usages for the current transaction type. Editing an Item-Class Usage To edit an item-class usage, follow these steps: 1. Select the admin tab. 2. On the ‘Choose an Activity Type’ menu, select the transaction-type administration radio button, and then the ‘Continue’ button. 3. On the ‘Choose an Activity’ menu, select the ‘Maintain item classes’ radio button, and then the ‘Continue’ button. 4. Edit the item-class usage’s properties as desired, and then select the ‘Submit Changes’ button. You can now select the ‘Quit’ button to return to the list of item- class usages for the current transaction type. Deleting an Item-Class Usage To delete an item-class usage, follow these steps: 1. Select the admin tab. 2. On the ‘Choose an Activity Type’ menu, select the transaction-type administration radio button, and then the ‘Continue’ button. 3. On the ‘Choose an Activity’ menu, select the ‘Maintain item classes’ radio button, and then the ‘Continue’ button. 104 Item Classes
- 105. 4. Select the ‘Delete’ checkboxes of the item-class usages you want to delete, and then select the ‘Delete Checked Item Classes’ button. 5. Confirm the deletions when prompted. The usages will no longer appear on the list of item-class usages for the current transaction type. 105 Item Classes
- 106. 106 Item Classes
- 107. 9 Parallel Approval Processes 107 Parallel Approval Process
- 108. Overview Approval-process parallelization shortens the time that a transaction’s approval process requires. It does this by imposing a hierarchical (tree) structure on the transaction’s approver list, and letting each part of the tree at a given level progress through its notification-approval cycle asynchronously. This chapter explains precisely how approval-process parallelization works, and how you configure AME to achieve the required parallelization. The Approver-List Tree The approver list for a single transaction has a hierarchical (inverted tree) structure with six subordinate levels. Proceeding from the root downward, the levels are: • item class • item • sub-list • action type • group or chain • group or chain member. There can be many objects at a given level for a single object at the next higher level. Here is an example approver-list tree, in outline form: (continued) 108 Parallel Approval Process
- 109. transaction approver list item class header header pre-approver-group sublist pre-approver-group action type Travel Expenses approver group Jane Doe John Smith chain-of-authority sublist absolute-job-level action type chain #1 Bill Right Laura Lightheart Fred Flintstone post-approver-group sublist [none] line items line item 1 pre-approver-group sublist [none] chain-of-authority sublist relative-job-level action type chain #1 Bill Right Laura Lightheart post-approver-group sublist [none] line item 2 pre-approver-group sublist [none] chain-of-authority sublist relative-job-level action type chain #1 Bill Right Laura Lightheart Fred Flintstone post-approver-group sublist [none] cost centers cost center A083 pre-approver-group sublist [none] chain-of-authority sublist [none] post-approver-group sublist post-approver-group action type US Marketing Materials approver group Barny Rubble cost center B66 pre-approver-group sublist [none] chain-of-authority sublist [none] post-approver-group sublist post-approver-group action type EMEA Marketing Materials approver group Jeannette LeBlanc 109 Parallel Approval Process
- 110. The above approver-list tree requires 12 approvals (without suppressing any repeated approvers): 1. Jane Doe 2. John Smith 3. Bill Right 4. Laura Lightheart 5. Fred Flintstone 6. Bill Right 7. Laura Lightheart 8. Bill Right 9. Laura Lightheart 10. Fred Flintstone 11. Barny Rubble 12. Jeannette LeBlanc Suppressing repeated approvers, the tree requires seven approvers: 1. Jane Doe (header) 2. John Smith (header) 3. Bill Right (header, line item 1, line item 2) 4. Laura Lightheart (header, line item 1, line item 2) 5. Fred Flintstone (header, line item 2) 6. Barny Rubble (cost center A083) 7. Jeannette LeBlanc (cost center B66) If these approvers are notified one after the other, seven notification-approval cycles are necessary to complete the transaction’s approval process. If you decided to start the approval processes for each item class and again for each item at the same time then there would be three sub-processes running in parallel. The process for the header (and the repeated approvers it contains) would start with Jane Doe. The processes for line items 1 and 2 would be subsumed in the header’s process (because we suppressed repeated approvers). The process for cost center A083 would 110 Parallel Approval Process
- 111. start (and end) with Barny Rubble. The process for cost center B66 would start (and end) with Jeannette LeBlanc. Therefore the longest process would only include five notification-approval cycles. To shorten the transaction’s approval process further, you could notify all of the approvers in a group or chain at once. Then the process for the header would begin by notifying Jane Doe and John Smith. When both of these approvers approved, the process would continue by notifying Bill Right, Laura Lightheart, and Fred Flintstone for the second step. When these three approvers approved, the process would be complete. Now the longest sub-process of the transaction’s overall approval process would require just two notification-approval cycles. In terms of approver order numbers, the list would be: 1. Jane Doe 1. John Smith 2. Bill Right 2. Laura Lightheart 2. Fred Flintstone 1. Barny Rubble 1. Jeannette LeBlanc Generalizing the above example’s approach, AME assigns order numbers to each subordinate level of a transaction’s approver- list tree. Approvers earlier in the lexicographic order get lower approver order numbers. AME starts a transaction’s approval process by instructing the originating application to notify all approvers with approver order number one. The approval process then waits for all of these approvers to approve. Then AME instructs the originating application to notify all approvers with approver order number two, etc. The degree of parallelization in a transaction’s approval process thus depends on how many levels in the transaction’s approver-list tree have been parallelized, either by explicitly assigning all objects at that level of the tree the same order number, or by selecting an ordering mode that implicitly does the same thing. (A level of the tree can be partially parallelized by assigning the same order number to some but not all objects at that level of the tree.) Returning to the example, the decision to parallelize approvals at the item class and item levels amounts to assigning order- number one to all of the item classes, and setting each item class’ parallelization mode to parallel. Likewise, the decision to parallelize the transaction’s approver groups and chains of authority amounts to choosing consensus voting regimes for the Travel Expenses approver group (at least) and the absolute-job- level action type. Here is the example’s final approver list, which is consistent with the order-number and ordering-mode 111 Parallel Approval Process
- 112. decisions explained above: 1. Jane Doe 1. John Smith 2. Bill Right 2. Laura Lightheart 2. Fred Flintstone 1. Barny Rubble 1. Jeannette LeBlanc In particular, we could choose the serial sub-list parallelization mode for all our item-class usages, to make sure a transaction’s chains of authority were notified after its pre-approvers had approved. How to Parallelize an Approval Process This section explains the approval-process parallelizations options available at each level of the approver-list tree. Please refer to the appropriate chapter in this manual to learn how to choose an option for a given level of the tree. Item Classes Item-class parallelization is controlled explicitly via the item-class order numbers that a transaction type assigns the item classs for which it has item-class usages. 112 Parallel Approval Process
- 113. Items An item-class usage’s parallelization mode determines the item order numbers of the item class’ items. If the mode is serial, the items’ item order numbers are sequential, in ascending order of item ID. If the mode is parallel, all the items are assigned the item order number one. Sub-Lists An item-class’ sub-list mode determines the sub-list order numbers of the sub-lists in the approver lists of the item class’ items. There are four options: • serial mode assigns pre-approvers the sub-list order number one, authority approvers the sub-list order number two, and post-approvers the sub-list order number three. • parallel mode assigns all approvers the sub-list order number one. • pre-approvers first, then authority and post-approvers assigns pre-approvers the sub-list order number one, and other approvers the sub-list order number two. • pre-approvers and authority approvers first, then post- approvers assigns pre-approvers and authority approvers the sub-list order number one, and post- approvers the sub-list order number two. Note that all these modes, except the serial mode are only weakly consistent with the ordering implicit in the pre-approver/authority approver/post-approver nomenclature. That is, a pre-approver never follows an authority or post-approver, and an authority approver never follows a post-approver, under any of the sub-list modes. Action Types Action-type parallelization is controlled explicitly via the action- type order numbers that a transaction type assigns the action types. Approver groups and Chains of Authority Approver groups and chains of authority occur at the same level of the approver-list tree, and so share the group-or-chain order number. Approver groups 113 Parallel Approval Process
- 114. Approver-group parallelization is controlled explicitly via the approver-group order numbers that a transaction type assigns the approver groups. Chains of Authority A transaction type assigns a chain-of-authority ordering mode to each action type that generates a chain of authority. The serial mode gives the chains ascending group-or-chain order numbers, in the order that the chains are generated. The parallel mode gives all chains the group-or-chain order number one. Approver-group and Chain-of-Authority Members Approver-group members and chain-of-authority members occur at the same level of the approver-list tree, and so share the group-or-chain-member order number. 114 Parallel Approval Process
- 115. Approver-group Members An approver group functioning as a pre-approval or post- approval group determines its members’ group-or-chain- member order numbers using the group’s voting regime, and possibly also the member order numbers assigned to static members or generated for dynamic members. (Dynamic members are assigned sequential member order numbers according to the order in which the group’s SQL query returns the members.) Approver-group voting regimes can have any of four values. The values determine not only the group-or-chain- member order numbers, but also whether all group members or one must approve the item. • The serial regime assigns group-or-chain-member order numbers in ascending order of the member order numbers, breaking ties arbitrarily. All group members must approve. • The consensus regime assigns group-or-chain-member order number one to all members. All group members must approve. • The first-responder-wins regime assigns group-or- chain-member order number one to all members. In this case, only the first responder must approve; all other members’ responses are recorded but ignored. • The order number regime sets each member’s group-or- chain-member order number to the member’s member order number. All group members must approve. Chain-of-Authority Members An action type that generates a chain of authority has a voting regime. The voting regime determines the group-or-chain- member order numbers of the approvers in the chains of authority generated by the action type. (This is even true for the chains of authority generated by the approver-group chain-of- authority action type. This action type ignores the approver- group voting regimes of the groups it uses.) An action type’s voting regime can have any of the values allowed for an approver group’s voting regime, other than the order-number regime. 115 Parallel Approval Process
- 117. 10 Testing 117 Testing
- 118. Overview Your implementation document, showing your approval policies, should specify test cases sufficient to verify that your transaction type does the following things according to your business rules: Fetch correct item IDs. Fetch correct attribute values. Evaluate the rule-usages correctly. Process rule-usage priorities correctly. Process production rules and actions correctly. Produce the correct default approver list. For real transactions, handle inserted approvers correctly. For real transactions, handle suppressed approvers correctly. Process repeated approvers correctly. Parallelize a transaction’s approval process correctly. Process forwardings correctly. You can do most of your testing using AME’s User Interface (UI). You may also use SQL*Plus and the originating application to test certain aspects of your implementation. This chapter explains how to do so. Please complete the tests in the order that this chapter presents them. Item IDs To make sure AME uses the correct lists of item IDs for a transaction, compare the lists you see in the originating application and the lists generated by each item-class usage’s item-ID query string. You can view the lists of item IDs generated by the query strings either by executing the query strings in SQL*Plus in the apps account, an account with comparable query privileges, or by using the test tab. To use the test tab, follow these steps: 1. Select the test tab. 2. Select the ‘View a real transaction’s approval process’ radio button, and then select the ‘Continue’ button. 3. Enter the ID of the transaction whose item IDs you want to check, and then select the ‘Fetch Attribute Values’ button. 4. Select the ‘View Item Attribute Values’ button at the bottom of the ‘Attribute Values’ form. 118 Testing
- 119. 5. Select an item class to check from the ‘Item Class’ select list, and then select the ‘Continue’ button. 6. Ensure all of the item class’ item IDs appear in the ‘Item IDs’ select list on the ‘Choose an Item’ form. Then select the ‘Quit’ button. 7. Repeat steps 5-6 above for each item class. Attribute Values To Ensure AME uses the correct attribute values for a transaction, compare the attribute values you see in the originating application and the values displayed on the test tab. Follow these steps to view the attribute values on the test tab: 1. Select the test tab. 2. Select the ‘View a real transaction’s approval process’ radio button, and then select the ‘Continue’ button. 3. Enter the ID of the transaction whose item IDs you want to check, and then select the ‘Fetch Attribute Values’ button. 4. Make sure the header-level attribute values on the ‘Attribute Values’ form are consistent with the values you see in the originating application. 5. Select the ‘View Item Attribute Values’ button at the bottom of the ‘Attribute Values’ form. 6. Select an item class to check from the ‘Item Class’ select list, and then select the ‘Continue’ button. 7. Select an item ID from the ‘Item IDs’ select list on the ‘Choose an Item’ form, and then select the ‘Quit’ button. 8. Make sure the attribute values you see on the ‘Item Attribute Values’ form match those you see in the originating application, for the item; then select the ‘Quit’ button. 9. Repeat steps 6-8 above for each item class and its items. Rule-Usage Evaluation To make sure your transaction type applies appropriate rules to each of your business cases, you create test transactions on AME’s test tab, or “real” transactions in the originating application. The advantage of a test transaction is that you can create exactly the attribute values you want. The disadvantage is that once you exit the test tab’s wizard for a given test transaction, you cannot use it again; you must create another test transaction. You can test a real transaction repeatedly, without re-creating it. Important When creating a test transaction as opposed to testing a real transaction the outcome for dynamic approval groups might not 119 Testing
- 120. be what you expect. The reason for this is that the SQL in the dynamic approval group may be using values from the base table where the transaction normally resides. Creating a test transaction does not populate the transaction base tables, hence will not return the approvers you expect. Creating a Test Transaction Create a test transaction using the test tab as follows: . 1. Select the test tab. 2. Select the ‘Create a test transaction’ radio button, and then select the ‘Continue’ button. 3. Enter and select the test transaction’s header-level attribute values. In particular, if you want to set a value for an attribute that identifies an approver, select the ‘Change a Header Approver Attribute Value’ button and use the approver-query wizard to choose the approver. 4. If you want the transaction to have subordinate-level items, select the ‘Edit Items’ button. Otherwise, skip to step 11. 5. On the ‘Choose an Item Class’ form, select the item class of the items you want to create, and then select the ‘Continue’ button. 6. Select the ‘Add an Item’ button. 7. Enter the item’s ID on the ‘Add an Item—Step 1’ form, and then select the ‘Continue’ button. 8. On the ‘Add an Item—Step 2’ form, enter and select the test transaction’s attribute values for the item. Then select the ‘Submit Changes’ button. In particular, if you want to set a value for an attribute that identifies an approver, select the ‘Change an Approver Attribute Value’ button and use the approver-query wizard to choose the approver. Select the ‘Quit’ button on the ‘Edit an Item’ form when you’re content with the item’s attribute values. 9. Repeat steps 6-8 until you have created all the items you want for the item class you chose in step 5. Note: Repeat steps 5-9 for each additional item class that has an item-class usage in the transaction type. 10. Click on View Approval Process 120 Testing
- 121. Creating a Real Transaction You create a “real” transaction in the originating application. (Presumably you would do this in a test environment.) Then you enter the transaction’s ID on the test tab, following the steps under “Attribute Values” above to start the test-tab wizard for the real transaction. Note: When testing using the ‘Create a Test Transaction’ screen, the attribute values need to be specified on the screen. They are not fetched from the usages that have been specified for them. But testing using ‘Create a Real Transaction’ screen will fetch the value specified for an attribute in its usage. If an attribute has a dynamic usage, then that query is executed and the value is shown on screen when using ‘Real Transaction’ Testing using ‘Real Transactions’ gives a complete picture of the approval process that would happen from an originating system. Viewing a (Test or Real) Transaction’s Default Approval Process Once you have created a test transaction, you view its default approver list by selecting the ‘View Approval Process’ button at the bottom of the ‘Test Transaction Header Attribute Values’ form. Select the ‘Continue’ button at the bottom of the ‘Attribute Values’ form to view a real transaction’s default approval process. In either case, the transaction’s applicable rules (before priority processing) appear. Ensure these are the rules you expect to apply to the transaction before priority processing. Rule-Usage Priorities If your transaction type uses rule-usage priorities, you test these by going to the ‘Applicable Rules Before Priority Processing’ form (see “Viewing a (Test or Real) Transaction’s Default Approval Process” above) and selecting the ‘View Rules after Priority Processing’ button at the bottom of the form. This takes you to the ‘Applicable Rules after Priority Processing’ form. Note: Both forms display the each usage’s priority in parentheses, following the rule’s description. Production Rules and Actions You can view both transaction-level and approver-level productions on the test tab. Transaction-Level Productions When your transaction type enables production rules, the ‘Transaction Productions’ form lists the transaction-level productions for a transaction. You access this by selecting the ‘View Transaction Productions’ button at the bottom of the ‘Applicable Rules after Priority Processing’ form. 121 Testing
- 122. Approver-Level Productions To view the productions associated with a given approver, select the details icon to the left of the approver’s description on any form displaying an approver list. If the approver has approver- level productions assigned to them, they will appear in the approver-details pop-up window. Default Approver List Select the ‘Continue’ button at the bottom of the ‘Transaction Productions’ form to go to the ‘Default Approver List’ form. This is the approver list that your transaction type’s rules generate, without accounting for inserted, deleted, surrogate, or repeated approvers; approval-process parallelization; or forwardings. Inserted Approvers For a real transaction, select the ‘Continue’ button at the bottom of the ‘Default Approver List’ form to view the same list, but accounting for any approver insertions and surrogates. (Surrogates are inserted approvers; but, unlike most approver insertions, AME generates them.) Suppressed Approvers For a real transaction, select the ‘Continue’ button at the bottom of the ‘Approver List with Inserted Approvers and Surrogates’ form to view the approver list, accounting for any suppressed approvers. Repeated Approvers For real transactions, selecting the ‘Continue’ button on the ‘Approver List with Approver Deletions’ form will display the ‘Approver List Suppressing Repeated Approvers’ form. You go to the same form for a test transaction by selecting the ‘Continue’ button at the bottom of the default approver list. Approver-List Parallelization The approver-details icon (notepad like icon) appears to the left of each approver in any test-tab form that presents an approver list. Select the icon to view a variety of technical details about the approver. In particular, the approver-details pop-up window displays each of the approver’s order numbers, their order-number six-tuple, and their approver order number. You can use these data to determine whether AME has ordered the approvers according to your business requirements. It is also useful to process several real transactions through their approval processes by responding to the transactions’ approval- 122 Testing
- 123. required notifications and observing which approvers AME notifies at each step in the process. Forwarding Behaviors AME does not yet have any test functionality that would let you update an approver’s approval status (such as the approver forward). So, to test how AME responds to forwardings, you must do the forwardings by responding the approval-required notifications generated by the originating application, and then viewing the transaction’s approver list on the test tab using Real Transaction. 11 Administration 123 Testing
- 124. Overview The Admin tab is available only to users with the Application Administrator responsibility. You can use the Admin tab’s features to maintain AME’s configuration variables and transaction types, and to analyze AME’s runtime exceptions. An AME application administrator has many tasks. Previous chapters of this guide cover the administrative tasks to perform on tabs other than the admin tab. (For example, Chapter 3 explains how to enter a dynamic attribute usage on the attributes tab.) This chapter explains how to perform application and transaction-type administrative tasks that use the admin tab. In particular, it explains what each configuration variable means, and whether a configuration variable can have a transaction- type-specific value. Application Administration Application administration includes the following tasks: Setting the configuration variables’ Default Values ( application-wide values) Creating a transaction type Updating a transaction type’s properties Deleting a transaction type Viewing the user interface’s exception log Clearing the user interface’s exception log. Chapter 1 of the AME Developer’s Guide explains how to create a transaction type. The following sections explain how to perform the rest of these tasks Configuration Variables AME defines a number of configuration variables. In all cases, the configuration variables have default values that are created when AME is installed. In some cases, each transaction type can override the default value with its own value as well. Configuration-variable names and values are case-sensitive. To set the configuration variables’ default values, follow these steps: 1. Select the admin tab. 2. Select ‘application administration’ and then the ‘Continue’ button on the ‘Choose an Activity Type’ form. 124 Administration
- 125. 3. Select ‘Update the configuration variables’ default values’ on the ‘Choose an Activity’ form, and then select the ‘Continue’ button. 4. Select the configuration variable whose default value(s) you want to set on the ‘Configuration Variables’ form. Here are brief explanations of the configuration variables, indicating in each case whether a transaction type can override the default value. adminApprover The adminApprover variable identifies the person or user account that AME identifies as a transaction’s next required approver to the application requesting the approver’s identity, when AME encounters an exception while generating the transaction’s approver list. A transaction type can override this variable’s default value. A widget is provided to select the person or the user who is the adminApprover. allowAllApproverTypes The allowAllApproverTypes configuration variable is boolean value. When its value is ‘yes’ for a given transaction type, the transaction type can use rules that use all approver types known to AME. When the variable’s value is ‘no’, the transaction type can only use rules that use the HR person (employee) and FND (Oracle Applications) user approver types. When you select the allowAllApproverTypes variable at step 4 above, the ‘Edit a Configuration Variable Default Value’ form presents a ‘yes’ and ‘no list . Select one of these values, and then select the ‘Submit Changes’ button to update the variable’s default value. Note: You cannot edit this variable’s value for a specific transaction type; you can only edit the default value. allowAllItemClassRules The allowAllItemClassRules configuration variable is boolean valued. When its value is ‘yes’ for a given transaction type, the transaction type can use rules pertaining to any item class. When the value is ‘no’, the transaction type can only use header-level rules. When you select the allowAllItemClassRules variable at step 4 above, the ‘Edit a Configuration Variable Default Value’ form presents a select list with the possible values ‘yes’ and ‘no’. Select one of these values, and then select the ‘Submit Changes’ button to update the variable’s default value. 125 Administration
- 126. Note: You cannot edit this variable’s value for a specific transaction type; you can only edit the default value. allowFyiNotifications The allowFyiNotifications variable is boolean valued. When its value is ‘yes’ for a given transaction type, the transaction type can have rule usages that generate FYI notifications. When its value is ‘no’, the transaction type can only have rule usages that generate requests for approval. When you select the allowFyiNotifications variable at step 4 above, the ‘Edit a Configuration Variable Default Value’ form presents a select list with the possible values ‘yes’ and ‘no’. Select one of these values, and then select the ‘Submit Changes’ button to update the variable’s default value. Note: You cannot edit this variable’s value for a specific transaction type; you can only edit the default value.) currencyConversionWindow The currencyConversionWindow variable identifies how many days AME should look back , at most, to find the a currency conversion rate. The default value is set to 120 days. AME uses the GL Daily Rates table and associated routines to perform currency conversions. When you select the currencyConversionWindow variable at step 4 above, the ‘Edit a Configuration Variable Default Value’ form presents a form that lets you enter the variable’s value. Enter the value, and then select the ‘Submit Changes’ button to update the variable’s default value. distributedEnvironment The distributedEnvironment variable indicates whether AME has been installed in a distributed-database environment. It has two possible values: ’yes’ and ’no’. A transaction type cannot override this variable’s default value. AME has its own exception log, and in most cases it logs runtime transactions to that log. If the application that owns a given transaction type calls AME from within a workflow, AME also logs exceptions to Workflow (see Runtime Exceptions: page 116 for details); and it uses an autonomous transaction to commit exception data to its own log, to avoid interfering with Workflow’s transaction management. If however AME is installed in a distributed-database environment, and is called from within a workflow, it cannot initiate an autonomous transaction, because such transactions are not yet possible in a distributed environment. In this case it must query Workflow directly (where possible) for a record of AME 126 Administration
- 127. exceptions. This log is less robust than AME’s own log, and so AME avoids using it where possible. In short, the distributedEnvironment variable is necessary to make sure AME logs exceptions internally whenever possible, while avoiding autonomous transactions where they would produce runtime errors. forwardingBehaviors The forwardingBehaviors screen defines a set of constants, which determines how AME handles forwarding in a number of special cases. The behavior for forwarding to someone not already in the list is always the same: the forwardee is inserted as an approver of the same type, immediately after the forwarder. When the forwarder and forwardee are chain-of-authority approvers, and the forwarder lacks final authority, AME extends the chain of authority starting from the forwarder until it finds someone with final authority. (This would normally be the typical case.). AME will seeds default values that are expected to be the normal usage for each forward type. Oracle Application teams seeding transaction types can override these defaults to ones more suitable for the particular business process. There are a number of different types of forwarding scenario that might occur during the approval process. For each of the listed scenario below, the AME engine can be instructed to amend the approver list in a pre-defined way. Not all possible outcomes are applicable for each forwarding scenario, these all indicated below. • A chain-of-authority approver forwards to a previous approver in the same chain of authority. • A chain-of-authority approver approves and forwards to a previous approver in the same chain of authority. • A chain-of-authority approver forwards to a subordinate in the same approver hierarchy, but not in the same chain of authority. • A chain-of-authority approver approves and forwards to a subordinate in the same approver hierarchy, but not in the same chain of authority. • A chain-of-authority approver forwards to another approver already in the approver list, but not in the same hierarchy. • A chain-of-authority approver approves and forwards to another approver already in the approver list, but not in the same hierarchy. • An ad-hoc approver forwards to an approver already in the approver list. 127 Administration
- 128. • An ad-hoc approver approves and forwards to an approver already in the approver list. Depending on the case, the allowed sub-values may include any of the following: • ignore: Ignore the forwarding (treat it as an approval). • forwardee only: Just add the forwardee to the approver list. • forwardee then forwarder: Add the forwardee and the forwarder to the approver list. • skip forwarder: Extend the chain of authority starting with the forwardee, but skip the forwarder in the extended chain. • repeat fowarder: Extend the chain of authority starting with the forwardee, and include the forwarder in the extended chain. • remand: Add to the approver list all approvers between the forwardee and the forwarder, not including the forwarder. When you select the forwardingBehaviors variable at step 4 above, the ‘Edit a Configuration Variable Default Value’ form presents eight select lists, one for each special case. Select a sub- value on each select list, and then select the ‘Submit Changes’ button to update the variable’s default sub-values. helpPath This configuration variable is no longer used. htmlPath This configuration variable is no longer used. imagePath The imagePath variable identifies the relative virtual path to AME’s image files. The value must start and end with forward slashes. For example: /OA_MEDIA/ is a syntactically valid imagePath value. A transaction type cannot override this variable’s default value. portalUrl The portalUrl variable identifies the absolute URL to which AME’s portal icon is hyperlinked. It must adhere to HTTP’s syntactic requirements for absolute URLs. A transaction type cannot override this variable’s default value. 128 Administration
- 129. productionFunctionality The productionFunctionality variable indicates which kinds of productions are allowed within a given transaction type. The possible values are as follows: No productions Per-approver productions only Transaction productions only Pre-approver and transaction productions When you select the productionFunctionality variable at step 4 above, the ‘Edit a Configuration Variable Default Value’ form presents a radio-button input with these options. Select the one you want, and then select the ‘Submit Changes’ button to save the value. (Note that when you cannot edit this variable’s value for a specific transaction type; you can only edit the default value.) purgeFrequency The purgeFrequency variable indicates how many days AME should preserve temporary data before purging it from AME’s database tables. The value must be a positive integer. When a transaction’s temporary data is purged, its approval process starts over, as if no approver had approved the transaction. Therefore, the purgeFrequency variable’s value should be high enough so that no transaction will require this many days to be approved by all of its approvers. At the same time, the purge frequency should be sufficiently low to avoid unnecessary growth in the size of AME’s temporary-data tables. A transaction type can override this variable’s default value. When a transaction type overrides purgeFrequency, AME preserves that transaction type’s temporary data only for the overriding value. This enables you to set the purge frequency differently for each transaction type, adjusting its value for each to a reasonable upper limit on the number of days required for a transaction of that type to complete its approval process. repeatedApprovers Indicates how many times to require an approver’s approval in the absence of forwarding. An approver may appear many times within the overall approval list. This can be due to a number of factors such as the approver exists as a pre/post approver as well as appearing within a chain of authority. In these circumstances it may be desirable to restrict so that the approver is only required to approve once in the following circumstances. One of the following three options should be selected. 129 Administration
- 130. Once per transaction Once per item class Once per item Once per sublist Once per action type Once per group or chain Each occurrence Thus, you can choose to make an approver occur at most once within any given subtree of the approver-list tree. rulePriorityModes The rulePriorityModes variable has a set of sub-values for each rule type. A rule type’s rulePriorityModes values determine whether AME allows rule-usage priorities for the rule type, within a given transaction type. The values also determine how AME handles priorities, when they are enabled. There are two sub-values for each rule type. The priority mode indicates whether priorities are allowed, and if so, how AME interprets them. The modes that enable priorities use a numerical threshold. If the mode is disabled, AME does not allow the transaction type to use rule-usage priorities for the rule type. If the mode is absolute, rules whose conditions are satisfied, and which have rule-usage priorities that do not exceed the threshold, apply. The relative priority mode is very useful, but it takes more explaining. In general, suppose the threshold is t, and a given transaction satisfies k rules’ conditions. Let P be the set containing the t numerically lowest distinct priorities among the priorities of the satisfied rules’ usages. Then all satisfied rules whose usages are in P apply to the transaction. For example, suppose the threshold is three, and a transaction satisfies the conditions of five rules. Suppose also that these rules’ usages have priorities one, two, two, three, and four. Then the top three priorities are one, two, and three, so all but the last rule apply to the transaction. Transaction Types In AME, a transaction type represents a set of transactions generated by a given application, for which AME maintains a single set of approval rules. A single application can have several transaction types. For example, the Web Expenses self-service application represents one of several possible transaction types for Accounts Payable. 130 Administration
- 131. Deleting a Checked Transaction Type A user with the administrative responsibility can delete only transaction types that are not seeded. To delete a transaction type, follow these steps: 1. Select the admin tab. 2. Select ‘application administration’ on the ‘Choose an Activity Type’ form, and then select the ‘Continue’ button. 3. Select ‘Maintain transaction types’ on the ‘Choose an Activity’ form, and then select the ‘Continue’ button. 4. On the list of transaction types, select the ‘Delete’ checkboxes next to the transaction types you want to delete, and then select the ‘Delete Checked Transaction Types’ button. 5. Confirm the deletions when prompted. Viewing the User Interface’s Exception Log The user interface’s exception log records unhandled exceptions that originate in an AME user-interface operation (as opposed to originating in the AME engine’s processing a transaction’s approval process). The exception log records which AME procedures raised the exception, as well as the exception itself. Oracle Support may find the exception log useful if you report a problem using AME’s UI. To view the UI’s exception log, follow these steps: 1. Select the admin tab. 2. Select ‘application administration’ on the ‘Choose an Activity Type’ form, and then select the ‘Continue’ button. 3. Select ‘View the web interface’s exception log’ on the ‘Choose an Activity’ form, and then select the ‘Continue’ button. The ‘Web-Interface Exception Log’ form appears, listing the exceptions in descending log-ID order (that is, most recent exceptions first). Clearing the User Interface’s Exception Log It can be useful when analyzing a problem to clear the UI exception log, re-create the problem, and then view the exception log (so it only contains exceptions specific to the problem you’re analyzing). It can also be useful to clear the exception log, simply to keep it small enough to display quickly. To clear the user interface’s exception log, follow these steps: 131 Administration
- 132. 1. Select the admin tab. 2. Select ‘application administration’ on the ‘Choose an Activity Type’ form, and then select the ‘Continue’ button. 3. Select ‘Clear the web interface’s exception log’ on the ‘Choose an Activity’ form, and then select the ‘Continue’ button. 4. Confirm the operation when prompted. Transaction-Type Administration Transaction-type administration concerns tasks that affect your current transaction type (without deleting it): Setting the transaction type’s configuration variables’ values Viewing the transaction type’s exception log Clearing the transaction type’s exception log Viewing a specific transaction’s exception log Clearing a specific transaction’s exception log Maintaining the transaction type’s item-class usages. The following sections explain how to perform these tasks. Setting the Transaction Type’s Configuration Variables’ Values You use the same forms to set a transaction type’s configuration- variable values that you use to set the variables’ default values, with two exceptions. First, you cannot edit the values of the allowAllApproverTypes, allowAllItemClassRules, or allowFyiNotifications configuration variables, for seeded transaction types. The edit form simply displays these values as static text. Second, the forms have an extra select list labeled ‘Use Default Value’ or ‘Use Default Values’, with possible values ‘yes’ and ‘no’. When you select ‘yes’ here and submit the form, AME clears any previous transaction-type-specific value for the variable, and uses the default value. To set a non-default value for, set ‘Use Default Value’ to ‘no’ and then set the value of the config variable you desire. To edit a transaction type’s configuration-variable values, follow these steps: 1. Select the admin tab. 2. Select ‘transaction-type administration’ on the ‘Choose an Activity Type’ form, and then select the ‘Continue’ button. 3. Select ‘Update a transaction type’s configuration- variable values’ on the ‘Choose an Activity’ form, and then select the ‘Continue’ button. 132 Administration
- 133. 4. Select the configuration variable whose value you want to set from the list of configuration variables.. 5. Modify the variable’s value(s) per the instructions under ‘Application Administration’ above, and then select the ‘Submit Changes’ button. Config-Variables that can be updated at Transaction Type level The following config variables can be updated at the transaction- type level. adminApprover allowAllApproverTypes allowAllItemClassRules allowFyiNotifications currencyConversionWindow forwardingBehaviors productionFunctionality purgeFrequency repeatedApprovers rulePriorityModes Viewing the Transaction Type’s Exception Log A transaction type’s exception log contains all of the exceptions raised by AME when it processes transactions for the transaction type. It can be useful to check the transaction type’s exception log for patterns of repeated exceptions. To view the log, follow these steps: 1. Select the admin tab. 2. Select ‘transaction-type administration’ on the ‘Choose an Activity Type’ form, and then select the ‘Continue’ button. 3. Select ‘View a transaction type’s exception log’ on the ‘Choose an Activity’ form, and then select the ‘Continue’ button. The transaction type’s exception log appears, sorting the exceptions in descending log-ID order (that is, most recent exceptions first). If you wish, select the ‘Sort by Package, Routine’ button to sort the log in alphabetical package.routine order. Clearing the Transaction Type’s Exception Log To clear a transaction type’s exception log, follow these steps: 1. Select the admin tab. 133 Administration
- 134. 2. Select ‘transaction-type administration’ on the ‘Choose an Activity Type’ form, and then select the ‘Continue’ button. 3. Select ‘Clear the current transaction type’s exception log’ on the Choose an Activity’ form, and then select the ‘Continue’ button. 4. Confirm the operation when prompted. Viewing a Specific Transaction’s Exception Log A transaction’s exception log contains only those exceptions raised by AME when it processes the transaction. It can be useful to view the log to determine exactly why the transaction’s approval process has been interrupted. To view the log, follow these steps: 1. Select the admin tab. 2. Select ‘transaction-type administration’ on the ‘Choose an Activity Type’ form, and then select the ‘Continue’ button. 3. Select ‘View a transaction’s exception log’ on the Choose an Activity’ form, and then select the ‘Continue’ button. 4. Enter the ID of the transaction whose exception log you wish to view on the ‘Enter a Transaction ID’ form; then select the ‘Continue’ button. The exception log appears, sorting the exceptions in descending log-ID order (that is, most recent exceptions first). Clearing a Specific Transaction’s Exception Log To clear a transaction’s exception log, follow these steps: 1. Select the admin tab. 2. Select ‘transaction-type administration’ on the ‘Choose an Activity Type’ form, and then select the ‘Continue’ button. 3. Select ‘Clear a transaction’s exception log’ on the Choose an Activity’ form, and then select the ‘Continue’ button. 4. Enter the ID of the transaction whose exception log you wish to clear on the ‘Enter a Transaction ID’ form; then select the ‘Continue’ button. 5. Confirm the operation when prompted. Maintaining the Transaction Type’s Item-Class Usages. Editing an Item-Class Usage Normally you edit a transaction type’s item-class usages to set the values of parallelization parameters. It is also possible, but 134 Administration
- 135. uncommon, to edit the usage’s item-ID query. To edit an item- class usage, follow these steps: 1. Select the admin tab. 2. Select ‘transaction-type administration’ on the ‘Choose an Activity Type’ form, and then select the ‘Continue’ button. 3. Select ‘Maintain item classes’ on the ‘Choose an Activity’ form, and then select the ‘Continue’ button. 4. Select the item class you wish to edit. 5. On the ‘Edit Item Class’ form, set the parallelization parameters to the values you desire, and edit the item-ID query if necessary; then select the ‘Submit Changes’ button. Adding an Item-Class Usage It is also possible to add an item-class usage. Follow these steps: 1. Select the admin tab. 2. Select ‘transaction-type administration’ on the ‘Choose an Activity Type’ form, and then select the ‘Continue’ button. 3. Select ‘Maintain item classes’ on the ‘Choose an Activity’ form, and then select the ‘Continue’ button. 4. Select the ‘Add Item Class’ button. 5. Select the item class of interest, and then the ‘Continue’ button, on the ‘Add an Item Class—Step 1’ form. 6. Select and enter the item-class usage’s properties on the ‘Add an Item Class—Step 2’ form, and then select the ‘Create Item Class’ button. Runtime Exceptions What Causes Runtime Exceptions in AME? The most common reason AME raises an exception (which typically results in the related application’s stopping a transaction’s workflow) is that AME cannot ascend a hierarchy, either because a slot in the hierarchy is vacant, or because an approver’s level in the hierarchy is indeterminate. For example, in the case of the HRMS supervisory hierarchy, an approver may have a null supervisor or a null job level. In this case, the missing data must be entered into the appropriate application before restarting the offending transaction’s workflow. 135 Administration
- 136. What happens when AME raises an exception? When AME cannot determine a transaction’s next required approver (in response to a request from an application, or when you use the Test tab), it: 1. Raises an exception in the routine that has trouble generating the approver list, and re-raises the exception up its call stack until an AME API routine catches the exception. Note that AME does not generally raise the exception to the routine that called its API. 2. Logs each exception to its internal exception log (where possible), and to Workflow (when the AME API was called from a workflow in another application). 3. If AME was responding to a request from another application it identifies the next required approver the person or user account identified by the appropriate value of the adminApprover configuration variable, and sets the approval status of this approver to ame_util.exceptionStatus. (This is the only circumstance where AME uses this approval-status value.) The requesting application may or may not notice that AME has identified an administrative approver as the next required approver, or that AME has set the approver’s status to indicate that an exception has occurred. If it does, it typically will respond by stopping the transaction’s workflow and notifying a Workflow system administrator. In this case, the person or user identified by the adminApprover configuration variable will not at this time receive a notification regarding this transaction (unless that person happens to be the Workflow system administrator as well). The application may elect instead merely to send a notification to the administrative approver identified by AME, indicating that an exception has occurred for the transaction. If the requesting application does not notice that the next required approver is an administrative approver, it will treat the administrative approver as it would any other approver: by sending the approver a notification requesting their approval of the transaction. The approver would then have to discern that AME had encountered an exception while attempting to calculate the transaction’s approver list. Oracle recommends that you configure the adminApprover configuration variable to identify the same individual as the Workflow and AME administrator for a given transaction type. This will have the effect of making sure the same individual is always notified when that transaction type’s workflow errors, regardless of whether the error arises within AME. 136 Administration
- 137. How Should an Administrator Respond to an AME Exception? However a Workflow system administrator or AME administrative approver becomes aware that AME is having trouble processing a transaction, they should respond to the problem as follows: 1. Check AME’s exception log for the transaction (see Viewing a Specific Transaction’s Exception Log: page 120 for details). 2. Check Workflow’s context log for any other relevant details. 3. Correct the (usually data) problem that caused AME difficulty. 4. Restart the transaction’s workflow. Clear the transaction’s exception log in AME (see Clearing a Specific Transaction’s Exception Log: page 122 for details). Administration, 124 Descriptions AME approvals, 60 advanages of using, 8 Dynamic attribute usages, 37 Approval descriptions, 60 Example rule, 94 Approval groups, 76 List-Modification rules Approval parameters, 60 final authority, 71 Approval types, 63 non-final authority, 71 absolute job level, 63 Maintaining approval groups, 80 dual chains of authority, 66 Parameters manager then final approver, 66 approvals, 60 relative job level, 65 Required attributes, 60 supervisory level, 68 Rule Approvals, 58 example, 94 Attribute classifications, 38 Rule types, 84 Attribute types, 33 list-creation exceptions, 86 Attributes, 33 list-modification rules, 87 dynamic attribute usages, 37 pre- and post-approval group rules, maintaining, 47 89 required, 60 substitutions, 88 static attribute usages, 36 Rules, 84 Condition types, 52 rule types, 84 Conditions, 52 sorts, 93 Conditions, 52 Run time, 13 Configuration variables rules adminApprover, 125, 126, 127 sorts, 93 distributedEnvironment, 126 Runtime exceptions, 135 portalUrl, 128 how to respond, 137 purgeFrequency, 129 what happens, 136 useWorkflow, 129 Static attribute usages, 36 Configuring variables Transaction Types, 130 administration, 124 Types 137 Administration
- 138. transaction, 130 138 Administration