1


                                               Session 1
Activity Life cycle
i) Understanding the Life cycle methods
ii) Working example of life cycle
                                            What is Activity ?
       Activity : In Android, an activity is represent a single screen.
       Most applications have multiple activities to represent different screens.
       Any user interface screen is called as an activity .

                                           Activity Life cycle

Activities in the system are managed as an activity stack. When a new activity is started, it is placed on
the top of the stack and becomes the running activity -- the previous activity always remains below it in
the stack, and will not come to the foreground again until the new activity exits.

An activity has essentially four states:
    If an activity in the foreground of the screen (at the top of the stack), it is active or running.
    If an activity has lost focus but is still visible (that is, a new non-full-sized or transparent activity
        has focus on top of your activity), it is paused. A paused activity is completely alive (it maintains
        all state and member information and remains attached to the window manager), but can be killed
        by the system in extreme low memory situations.
    If an activity is completely obscured by another activity, it is stopped. It still retains all state and
        member information, however, it is no longer visible to the user so its window is hidden and it
        will often be killed by the system when memory is needed elsewhere.
    If an activity is paused or stopped, the system can drop the activity from memory by either asking
        it to finish, or simply killing its process. When it is displayed again to the user, it must be
        completely restarted and restored to its previous state.


The entire lifetime of an activity happens between the first call to onCreate(Bundle) through to a single
final call to onDestroy(). An activity will do all setup of "global" state in onCreate(), and release all
remaining resources in onDestroy().

For example, if it has a thread running in the background to download data from the network, it may
create that thread in onCreate() and then stop the thread in onDestroy().

The visible lifetime of an activity happens between a call to onStart() until a corresponding call to
onStop(). During this time the user can see the activity on-screen, though it may not be in the foreground
and interacting with the user. Between these two methods you can maintain resources that are needed to
show the activity to the user. For example, you can register a BroadcastReceiver in onStart() to monitor
for changes that impact your UI, and unregister it in onStop() when the user no longer sees what you are
displaying. The onStart() and onStop() methods can be called multiple times, as the activity becomes
visible and hidden to the user.

                                    @COPYRIGHTS BY Dhiraj P. karalkar                     Dhiraj P.karalkar
2


   The foreground lifetime of an activity happens between a call to onResume() until a corresponding call
to onPause(). During this time the activity is in front of all other activities and interacting with the user.
An activity can frequently go between the resumed and paused states -- for example when the device goes
to sleep, when an activity result is delivered, when a new intent is delivered -- so the code in these
methods should be fairly lightweight.

The following diagram shows the important state paths of an Activity.


                                    @COPYRIGHTS BY Dhiraj P. karalkar
3


                                           What is context ?
As the name suggests, its the context of current state of the application/object. It lets newly created
objects understand what has been going on. Typically you call it to get information regarding another part
of your program (activity, package/application)
Context is a reference to current object , also context allows access to information about application
environment
                                           What is Bundle ?
Bundle generally use for passing data between various Activities. It depends on you what type of values
you want to pass but bundle can hold all types of values and pass to the new activity.
Budle is to hold the bunch of various objects .

                                  what is AndroidManifest.xml ?
This file contains all the information related to an Application

Every application must have an AndroidManifest.xml file (with precisely that name) in its root directory.
The manifest presents essential information about the application to the Android system, information

some more information regarding Android Manifest,xml

       It names the Java package for the application. The package name serves as a unique identifier for
        the application.
       It describes the components of the application — the activities, services, broadcast receivers, and
        content providers that the application is composed of. It names the classes that implement each of
        the components and publishes their capabilities (for example, which Intent messages they can
        handle). These declarations let the Android system know what the components are and under
        what conditions they can be launched.
       It determines which processes will host application components.
       It declares which permissions the application must have in order to access protected parts of the
        API and interact with other applications.
       It also declares the permissions that others are required to have in order to interact with the
        application's components.
       It lists the Instrumentation classes that provide profiling and other information as the application
        is running. These declarations are present in the manifest only while the application is being
        developed and tested; they're removed before the application is published.
       It declares the minimum level of the Android API that the application requires.
       It lists the libraries that the application must be linked against.


                                   @COPYRIGHTS BY Dhiraj P. karalkar                          Dhiraj P.karalkar
4


                                     Activity Life cycle example
Note : Before starting Life cycle example note Android manifest.xml contains an activity registered into it

1)AndroidManifest.xml
<activity
       android:name=".LifeCycleActivity"
       android:label="@string/title_activity_life_cycle" >
       <intent-filter>
         <action android:name="android.intent.action.MAIN" />
         <category android:name="android.intent.category.LAUNCHER" />
       </intent-filter>
</activity>

Here
android:name: is the Name of an activity registered in the Manifest file
android:label: is the label for an activity
action: Action to be done on an activity
category android:name="android.intent.category.LAUNCHER" making an activity to launch first

2) Now we will start with Activity i.e. LifeCycleActivity in this example
LifeCycleActivity : contains the following overriden methods

       onCreate();
       onStart();
       onResume();
       onPause();
       onStop();
       onDestroy();
       onRestart();

3)When an application starts following methods gets called in order
onCreate() -- onStart()--onResume()

4)As the user clicks on the back Button means an activity getting destroyed and the methods of an
Activity gets called as
onPause()-- Onstop()--onDestroy()

5) Again start an Activity i.e. LifeCycleActivity and press HOME button of your device
onPause() and onStop() method gets called
onPasue() is where user leaving an activity
onStop() is where an activity gets invisible

6) If you start immedietly after pressing home button then this time
onRetart() -- onStart()-OnResume() methos gets called


                                    @COPYRIGHTS BY Dhiraj P. karalkar                     Dhiraj P.karalkar
5


This is because when user clicks HOME button of the Device an LifeCycleActivity wasnt destroyed
Note :so these scenario you must take in the account , whether an Activity is destroyed or stopped

                                             Session 2
Application development (Hello world)

Creating first android application
Save Activity state onSaveInstanceState()
Restore Activity state onRestoreInstanceState()
Debugging an Application
DDMS and log results


                   Creating your First Android Application Hellow World


Here are the following steps to create your first Android Application
1)Go to File >> New >> Android Application Project
show in the following fig below


2)Add the name of an application
3)Add package name to your application
4) Mention an Activity Name (In this example an activity name is MainActivity

shown below


setContentView(R.layout.filename) Set the screen content to an explicit view.


                                   @COPYRIGHTS BY Dhiraj P. karalkar                    Dhiraj P.karalkar
6


Note : In the MainActivity class is extended by the Activity class ,            oncreate (Bundle
savedInstanceState ) is overriden as onCreate method is an entry point to an activity it must be
overridden
Layout : activity_main.xml is a layout xml file for an Activity , here we have added a TextField in a
RelativeLayout shown below


AndroidManifest.xml : Here is the Android Manifest file for an applcation ,


Remember : <action android:name="android.intent.action.MAIN" /> is an action for the Activity
      <category android:name="android.intent.category.LAUNCHER" /> by defining the
     category we are making this activity as a Launcher activity , without adding the launcher to the
     Intent filter you can not launch your activity

Now run this application and your output is waiting for you , its as simple as anybody can do .
Here is your output is wating for you


                                   @COPYRIGHTS BY Dhiraj P. karalkar                       Dhiraj P.karalkar
7


@COPYRIGHTS BY Dhiraj P. karalkar   Dhiraj P.karalkar
8


                                    Debugging an Application
The Debug Perspective in Eclipse gives you access to the following tabs:
       Debug - Displays previously and currently debugged Android applications and its currently
        running threads
     Variables - When breakpoints are set, displays variable values during code execution
     Breakpoints - Displays a list of the set breakpoints in your application code
     LogCat - Allows you to view system log messages in real time. The LogCat tab is also available
        in the DDMS perspective.
You can access the Debug Perspective by clicking Window > Open Perspective > Debug. Refer to the
appropriate documentation for the Eclipse debugger for more information.


                                      The DDMS Perspective
The DDMS Perspective in Eclipse lets you access all of the features of DDMS from within the Eclipse
IDE. The following sections of DDMS are available to you:
       Devices - Shows the list of devices and AVDs that are connected to ADB.
       Emulator Control - Lets you carry out device functions.
       LogCat - Lets you view system log messages in real time.
       Threads - Shows currently running threads within a VM.
       Heap - Shows heap usage for a VM.
       Allocation Tracker - Shows the memory allocation of objects.
       File Explorer - Lets you explore the device's file system.

To access the DDMS perspective, go to Window > Open Perspective > DDMS. If DDMS does not
appear, go to Window > Open Perspective > Other ... and select DDMS from the Open Perspective
window that appears. For more information on using DDMS, see Using the Dalvik Debug Monitor
Server.


                                  @COPYRIGHTS BY Dhiraj P. karalkar                    Dhiraj P.karalkar
9


                                           Session3

                                 Working with Layouts techniques

The different layouts in Android are

1 Linear Layout
2. Relative Layout
3. Table Layout


        Android allows you to create view layouts using simple XML file (we can also create a layout
        using java code). All the layouts must be placed in /res/layout folder.


                                  @COPYRIGHTS BY Dhiraj P. karalkar                  Dhiraj P.karalkar
10


                                             Linear Layout


Linear Layout that arranges its children in a single column or a single row.


To configure a LinearLayout, you have five main areas of control besides the container's contents:
 Orientation –sets the vertical and horizontal orientation
 fill model – fills the layouts accordingly (fill parent , wrap context )
 gravity - top| bottom| center
 padding - The padding is expressed in pixels for the left, top, right and bottom parts of the view
 margin - The margin is expressed in pixels spacing for the left, top, right and bottom of the view

        Please refer layout Example
1)Now that we know the two types of linear layouts, here are the steps you need to follow to create
them
Create a new project File -> New -> Android Project
2. In Package Explorer right click on res/layout folder and create a new Android XML File and name it as
you wish. I am naming it as “linear_layout.xml”


                                   @COPYRIGHTS BY Dhiraj P. karalkar
                                                                                          Dhiraj P.karalkar
11


res/layout -> Right Click -> New -> Android XML File
3. Now open newly created xml file (in my case “linear_layout.xml”) and type the following code.
Here is the linear_layout.xml file


Here is the AndroidLayoutsActivity.java file


4. To set this newly created view as the initial view of your app, Open your MainActivity.java file. You
would see the following line inside the onCreate function setContentView(R.layout.main). Change
R.layout.main to R.layout.yourlinearviewname. In my case its R.layout.linear_layout
5. To run the application, right click on the project -> Run As -> 1. Android Application. You should

                                   @COPYRIGHTS BY Dhiraj P. karalkar                      Dhiraj P.karalkar
12


see your newly created linear layout in the emulator.


                                   @COPYRIGHTS BY Dhiraj P. karalkar   Dhiraj P.karalkar
13


                                          2. Relative Layout
In a relative layout every element arranges itself relative to other elements or a parent element.
As an example, lets consider the layout defined below. The ―Cancel‖ button is placed relatively, to the
right of the ―Login‖ button parallely. Here is the code snippet that achieves the mentioned alignment
(Right of Login button parallely)


                                   @COPYRIGHTS BY Dhiraj P. karalkar                      Dhiraj P.karalkar
14


Here are the steps to create a relative layout
1. Create a new project File -> New -> Android Project
2. In Package Explorer right click on res/layout folder and create a new Android XML File and name it as
you wish. I am naming it as ―relative_layout.xml‖
res/layout -> Right Click -> New -> Android XML File
3. Now open newly created xml file (in my case ―relative_layout.xml‖) and type the following code.


4. Same like before open your MainActivity.java file and set the layout to your newly created relative
layout file. In my case its R.layout.relative_layout
setContentView(R.layout.relative_layout);
5. To run the application, right click on the project -> Run As -> 1. Android Application. You should
see your newly created relative layout in the emulator.


                                   @COPYRIGHTS BY Dhiraj P. karalkar                    Dhiraj P.karalkar
15


@COPYRIGHTS BY Dhiraj P. karalkar   Dhiraj P.karalkar
16


                                              Session 4
Intents understanding
i) Implicit intents
ii) Explicit Intent
iii) Launching native application using Intent
iv) Switch between activities using Explicit Intent
v) Data transferring between activities using Intents
vi) Role of intent Filters
vii) Intent Filters in your manifest


                                         What is an Intent is ??
An Intent is exactly what it describes. It's an "intention" to do an action.
An Intent is basically a message to say you did or want something to happen. Depending on the intent,
apps or the OS might be listening for it and will react accordingly.
An intent is an abstract description of an operation to be performed. It can be used with startActivity to
launch an Activity, broadcastIntent to send it to any interested BroadcastReceiver components, and
startService(Intent) or bindService(Intent, ServiceConnection, int) to communicate with a background
Service
There are two types of an intents
i) Implicit intents
ii)Explicit Intents

                                           i) Implicit intents
Implicit Intents have not specified a component; instead, they must include enough information for the
system to determine which of the available components is best to run for that intent.

To call or use the native Application of an Android a typical Implicit Intents are used
By using an Implicit intents we can call direct to the Contact , we can use a native web application and so
on .
Refer http://developer.android.com/reference/android/content/Intent.html
To have a more action/data pairs
Here is the example to open an Android native contact app


                                   @COPYRIGHTS BY Dhiraj P. karalkar                          Dhiraj P.karalkar
17


Here is the output for the same


                                  @COPYRIGHTS BY Dhiraj P. karalkar   Dhiraj P.karalkar
18


                                          ii)Explicit Intents
In an Explicit intent, you actually specify the activity that is required to respond to the intent. In other
words, you explicitly designate the target component. This is typically used for application internal
messages.
In an Implicit intent (the main power of the android design), you just declare an intent and leave it to the
platform to find an activity that can respond to the intent. Here, you do not declare the target
component and hence is typically used for activating components of other applications seamlessly


This example has 2 activities:
1. FirstActivity
2. SecondActivity

The FirstActivity has a button "Invoke Next Activity" which when clicked explicitly calls the
" SecondActivity " class.

The relevant part of the code is here:


Note : In this scenario do not forget to add the SecondActivity in the manifest as shown
below


                                    @COPYRIGHTS BY Dhiraj P. karalkar                      Dhiraj P.karalkar
19


Intent plays a vital role to send the data across the application ,
Intent is used to send the data from an activity to another Activity , we needs to add the key value pair to
send the data across the Application .
Here we are continuing with the previous example shows how to send the data across an activity , in this
example I have shown how to send the string from FirstActivity to SecondActivity this is the code for the
same


In this example on buttonclick event we are sending the string ―Dhiraj ‖ along with
―Data from first activity‖ , this string data is being collected at the SecondActivity using an Intent
as shown in the following source code


                                   @COPYRIGHTS BY Dhiraj P. karalkar
                                                                                                Dhiraj P.karalkar
20


As the example shown above data is received at the SecondActivity intent object is collected by using the
getIntent() method of an Activity class , these both the string are collected and shown in the textview
shown below at the output


                                  @COPYRIGHTS BY Dhiraj P. karalkar                         Dhiraj P.karalkar
21


                                            Role of intent Filters

To inform the system which implicit intents they can handle, activities, services, and broadcast receivers
can have one or more intent filters. Each filter describes a capability of the component, a set of intents
that the component is willing to receive. It, in effect, filters in intents of a desired type, while filtering out
unwanted intents — but only unwanted implicit intents (those that don't name a target class). An explicit
intent is always delivered to its target, no matter what it contains; the filter is not consulted. But an
implicit intent is delivered to a component only if it can pass through one of the component's filters.

We are continued with the same example of the moving from the FirstActivity to the SecondActivity .
To see the intent filters open the AndroidManifest.xml file of an application and refer an IntentFilter


<action android:name="android.intent.action.MAIN" /> is the standard MAIN action is a main entry point
<category android:name="android.intent.category.LAUNCHER" /> the LAUNCHER category says that
this entry point should be listed in the application launcher
To any activity if you want to make it the launcher activity you need to mention the MAIN and the
LAUNCHER in the Manifest file


                                     @COPYRIGHTS BY Dhiraj P. karalkar                              Dhiraj P.karalkar

More Related Content

PDF
Android development training programme Day 1
PDF
Android dev o_auth
ODP
Anatomy of android application
ODP
Ppt 2 android_basics
PDF
Android Basic Components
PPT
PPT
Android tutorial for beginners-traininginbangalore.com
PPT
Day 4: Android: Getting Active through Activities
Android development training programme Day 1
Android dev o_auth
Anatomy of android application
Ppt 2 android_basics
Android Basic Components
Android tutorial for beginners-traininginbangalore.com
Day 4: Android: Getting Active through Activities

What's hot (20)

PPTX
Android apps development
PDF
Introduction to android
PDF
Android Components
PDF
Marakana android-java developers
PDF
Lecture 3 getting active through activities
PPT
Android应用开发简介
PDF
Android Basic- CMC
PPTX
Android components
PDF
Android UI Fundamentals part 1
PPTX
PPT
Synapseindia android application development tutorial
PPT
Synapseindia android apps development tutorial
PDF
Marakana Android User Interface
PDF
Android session 2
PPTX
Android Study Jam 2
PDF
Android session 1
PDF
Android studio
PDF
Android session 3
PPTX
Development Playbook Application With Adobe AIR 2.5 and QNX SDK
Android apps development
Introduction to android
Android Components
Marakana android-java developers
Lecture 3 getting active through activities
Android应用开发简介
Android Basic- CMC
Android components
Android UI Fundamentals part 1
Synapseindia android application development tutorial
Synapseindia android apps development tutorial
Marakana Android User Interface
Android session 2
Android Study Jam 2
Android session 1
Android studio
Android session 3
Development Playbook Application With Adobe AIR 2.5 and QNX SDK
Ad

Similar to Android development Training Programme Day 2 (20)

DOCX
Android building blocks and application life cycle-chapter3
ODP
Android App Development - 02 Activity and intent
PPTX
Unit 5 Activity and Activity Life Cycle.pptx
PDF
Android activity
PDF
Android activity
PPTX
Android activity
PPT
android activity
PDF
MAD Unit - 2 Activity and Fragment Management in Android (Diploma IT)
PPTX
App Fundamentals and Activity life cycle.pptx
PDF
Mad textbook 63-116
PPTX
04 activities and activity life cycle
PDF
android_mod_3.useful for bca students for their last sem
PPT
Android lifecycle
DOCX
Android Application Components with Implementation & Examples
PPTX
Android application componenets for android app development
PDF
Android activities & views
DOCX
Activity
DOCX
Activity
DOCX
Activity
DOCX
Activity
Android building blocks and application life cycle-chapter3
Android App Development - 02 Activity and intent
Unit 5 Activity and Activity Life Cycle.pptx
Android activity
Android activity
Android activity
android activity
MAD Unit - 2 Activity and Fragment Management in Android (Diploma IT)
App Fundamentals and Activity life cycle.pptx
Mad textbook 63-116
04 activities and activity life cycle
android_mod_3.useful for bca students for their last sem
Android lifecycle
Android Application Components with Implementation & Examples
Android application componenets for android app development
Android activities & views
Activity
Activity
Activity
Activity
Ad

Android development Training Programme Day 2

  • 1. 1 Session 1 Activity Life cycle i) Understanding the Life cycle methods ii) Working example of life cycle What is Activity ?  Activity : In Android, an activity is represent a single screen.  Most applications have multiple activities to represent different screens.  Any user interface screen is called as an activity . Activity Life cycle Activities in the system are managed as an activity stack. When a new activity is started, it is placed on the top of the stack and becomes the running activity -- the previous activity always remains below it in the stack, and will not come to the foreground again until the new activity exits. An activity has essentially four states:  If an activity in the foreground of the screen (at the top of the stack), it is active or running.  If an activity has lost focus but is still visible (that is, a new non-full-sized or transparent activity has focus on top of your activity), it is paused. A paused activity is completely alive (it maintains all state and member information and remains attached to the window manager), but can be killed by the system in extreme low memory situations.  If an activity is completely obscured by another activity, it is stopped. It still retains all state and member information, however, it is no longer visible to the user so its window is hidden and it will often be killed by the system when memory is needed elsewhere.  If an activity is paused or stopped, the system can drop the activity from memory by either asking it to finish, or simply killing its process. When it is displayed again to the user, it must be completely restarted and restored to its previous state. The entire lifetime of an activity happens between the first call to onCreate(Bundle) through to a single final call to onDestroy(). An activity will do all setup of "global" state in onCreate(), and release all remaining resources in onDestroy(). For example, if it has a thread running in the background to download data from the network, it may create that thread in onCreate() and then stop the thread in onDestroy(). The visible lifetime of an activity happens between a call to onStart() until a corresponding call to onStop(). During this time the user can see the activity on-screen, though it may not be in the foreground and interacting with the user. Between these two methods you can maintain resources that are needed to show the activity to the user. For example, you can register a BroadcastReceiver in onStart() to monitor for changes that impact your UI, and unregister it in onStop() when the user no longer sees what you are displaying. The onStart() and onStop() methods can be called multiple times, as the activity becomes visible and hidden to the user. @COPYRIGHTS BY Dhiraj P. karalkar Dhiraj P.karalkar
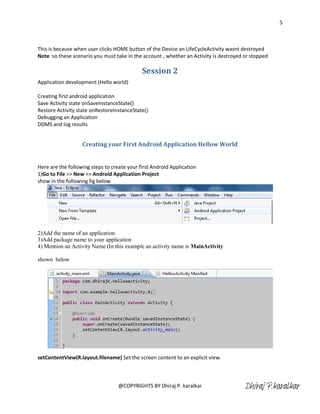
  • 2. 2 The foreground lifetime of an activity happens between a call to onResume() until a corresponding call to onPause(). During this time the activity is in front of all other activities and interacting with the user. An activity can frequently go between the resumed and paused states -- for example when the device goes to sleep, when an activity result is delivered, when a new intent is delivered -- so the code in these methods should be fairly lightweight. The following diagram shows the important state paths of an Activity. @COPYRIGHTS BY Dhiraj P. karalkar
  • 3. 3 What is context ? As the name suggests, its the context of current state of the application/object. It lets newly created objects understand what has been going on. Typically you call it to get information regarding another part of your program (activity, package/application) Context is a reference to current object , also context allows access to information about application environment What is Bundle ? Bundle generally use for passing data between various Activities. It depends on you what type of values you want to pass but bundle can hold all types of values and pass to the new activity. Budle is to hold the bunch of various objects . what is AndroidManifest.xml ? This file contains all the information related to an Application Every application must have an AndroidManifest.xml file (with precisely that name) in its root directory. The manifest presents essential information about the application to the Android system, information some more information regarding Android Manifest,xml  It names the Java package for the application. The package name serves as a unique identifier for the application.  It describes the components of the application — the activities, services, broadcast receivers, and content providers that the application is composed of. It names the classes that implement each of the components and publishes their capabilities (for example, which Intent messages they can handle). These declarations let the Android system know what the components are and under what conditions they can be launched.  It determines which processes will host application components.  It declares which permissions the application must have in order to access protected parts of the API and interact with other applications.  It also declares the permissions that others are required to have in order to interact with the application's components.  It lists the Instrumentation classes that provide profiling and other information as the application is running. These declarations are present in the manifest only while the application is being developed and tested; they're removed before the application is published.  It declares the minimum level of the Android API that the application requires.  It lists the libraries that the application must be linked against. @COPYRIGHTS BY Dhiraj P. karalkar Dhiraj P.karalkar
  • 4. 4 Activity Life cycle example Note : Before starting Life cycle example note Android manifest.xml contains an activity registered into it 1)AndroidManifest.xml <activity android:name=".LifeCycleActivity" android:label="@string/title_activity_life_cycle" > <intent-filter> <action android:name="android.intent.action.MAIN" /> <category android:name="android.intent.category.LAUNCHER" /> </intent-filter> </activity> Here android:name: is the Name of an activity registered in the Manifest file android:label: is the label for an activity action: Action to be done on an activity category android:name="android.intent.category.LAUNCHER" making an activity to launch first 2) Now we will start with Activity i.e. LifeCycleActivity in this example LifeCycleActivity : contains the following overriden methods  onCreate();  onStart();  onResume();  onPause();  onStop();  onDestroy();  onRestart(); 3)When an application starts following methods gets called in order onCreate() -- onStart()--onResume() 4)As the user clicks on the back Button means an activity getting destroyed and the methods of an Activity gets called as onPause()-- Onstop()--onDestroy() 5) Again start an Activity i.e. LifeCycleActivity and press HOME button of your device onPause() and onStop() method gets called onPasue() is where user leaving an activity onStop() is where an activity gets invisible 6) If you start immedietly after pressing home button then this time onRetart() -- onStart()-OnResume() methos gets called @COPYRIGHTS BY Dhiraj P. karalkar Dhiraj P.karalkar
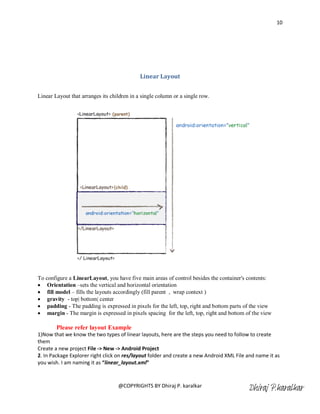
  • 5. 5 This is because when user clicks HOME button of the Device an LifeCycleActivity wasnt destroyed Note :so these scenario you must take in the account , whether an Activity is destroyed or stopped Session 2 Application development (Hello world) Creating first android application Save Activity state onSaveInstanceState() Restore Activity state onRestoreInstanceState() Debugging an Application DDMS and log results Creating your First Android Application Hellow World Here are the following steps to create your first Android Application 1)Go to File >> New >> Android Application Project show in the following fig below 2)Add the name of an application 3)Add package name to your application 4) Mention an Activity Name (In this example an activity name is MainActivity shown below setContentView(R.layout.filename) Set the screen content to an explicit view. @COPYRIGHTS BY Dhiraj P. karalkar Dhiraj P.karalkar
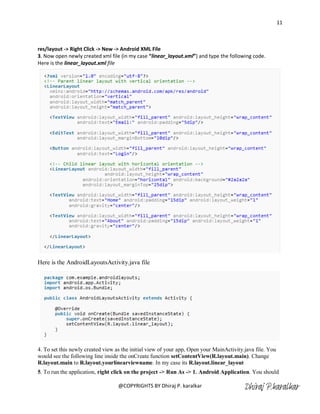
  • 6. 6 Note : In the MainActivity class is extended by the Activity class , oncreate (Bundle savedInstanceState ) is overriden as onCreate method is an entry point to an activity it must be overridden Layout : activity_main.xml is a layout xml file for an Activity , here we have added a TextField in a RelativeLayout shown below AndroidManifest.xml : Here is the Android Manifest file for an applcation , Remember : <action android:name="android.intent.action.MAIN" /> is an action for the Activity <category android:name="android.intent.category.LAUNCHER" /> by defining the category we are making this activity as a Launcher activity , without adding the launcher to the Intent filter you can not launch your activity Now run this application and your output is waiting for you , its as simple as anybody can do . Here is your output is wating for you @COPYRIGHTS BY Dhiraj P. karalkar Dhiraj P.karalkar
  • 7. 7 @COPYRIGHTS BY Dhiraj P. karalkar Dhiraj P.karalkar
  • 8. 8 Debugging an Application The Debug Perspective in Eclipse gives you access to the following tabs:  Debug - Displays previously and currently debugged Android applications and its currently running threads  Variables - When breakpoints are set, displays variable values during code execution  Breakpoints - Displays a list of the set breakpoints in your application code  LogCat - Allows you to view system log messages in real time. The LogCat tab is also available in the DDMS perspective. You can access the Debug Perspective by clicking Window > Open Perspective > Debug. Refer to the appropriate documentation for the Eclipse debugger for more information. The DDMS Perspective The DDMS Perspective in Eclipse lets you access all of the features of DDMS from within the Eclipse IDE. The following sections of DDMS are available to you:  Devices - Shows the list of devices and AVDs that are connected to ADB.  Emulator Control - Lets you carry out device functions.  LogCat - Lets you view system log messages in real time.  Threads - Shows currently running threads within a VM.  Heap - Shows heap usage for a VM.  Allocation Tracker - Shows the memory allocation of objects.  File Explorer - Lets you explore the device's file system. To access the DDMS perspective, go to Window > Open Perspective > DDMS. If DDMS does not appear, go to Window > Open Perspective > Other ... and select DDMS from the Open Perspective window that appears. For more information on using DDMS, see Using the Dalvik Debug Monitor Server. @COPYRIGHTS BY Dhiraj P. karalkar Dhiraj P.karalkar
  • 9. 9 Session3 Working with Layouts techniques The different layouts in Android are 1 Linear Layout 2. Relative Layout 3. Table Layout Android allows you to create view layouts using simple XML file (we can also create a layout using java code). All the layouts must be placed in /res/layout folder. @COPYRIGHTS BY Dhiraj P. karalkar Dhiraj P.karalkar
  • 10. 10 Linear Layout Linear Layout that arranges its children in a single column or a single row. To configure a LinearLayout, you have five main areas of control besides the container's contents:  Orientation –sets the vertical and horizontal orientation  fill model – fills the layouts accordingly (fill parent , wrap context )  gravity - top| bottom| center  padding - The padding is expressed in pixels for the left, top, right and bottom parts of the view  margin - The margin is expressed in pixels spacing for the left, top, right and bottom of the view Please refer layout Example 1)Now that we know the two types of linear layouts, here are the steps you need to follow to create them Create a new project File -> New -> Android Project 2. In Package Explorer right click on res/layout folder and create a new Android XML File and name it as you wish. I am naming it as “linear_layout.xml” @COPYRIGHTS BY Dhiraj P. karalkar Dhiraj P.karalkar
  • 11. 11 res/layout -> Right Click -> New -> Android XML File 3. Now open newly created xml file (in my case “linear_layout.xml”) and type the following code. Here is the linear_layout.xml file Here is the AndroidLayoutsActivity.java file 4. To set this newly created view as the initial view of your app, Open your MainActivity.java file. You would see the following line inside the onCreate function setContentView(R.layout.main). Change R.layout.main to R.layout.yourlinearviewname. In my case its R.layout.linear_layout 5. To run the application, right click on the project -> Run As -> 1. Android Application. You should @COPYRIGHTS BY Dhiraj P. karalkar Dhiraj P.karalkar
  • 12. 12 see your newly created linear layout in the emulator. @COPYRIGHTS BY Dhiraj P. karalkar Dhiraj P.karalkar
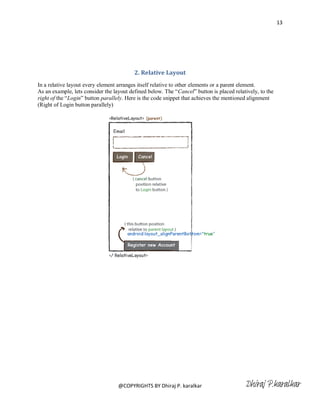
  • 13. 13 2. Relative Layout In a relative layout every element arranges itself relative to other elements or a parent element. As an example, lets consider the layout defined below. The ―Cancel‖ button is placed relatively, to the right of the ―Login‖ button parallely. Here is the code snippet that achieves the mentioned alignment (Right of Login button parallely) @COPYRIGHTS BY Dhiraj P. karalkar Dhiraj P.karalkar
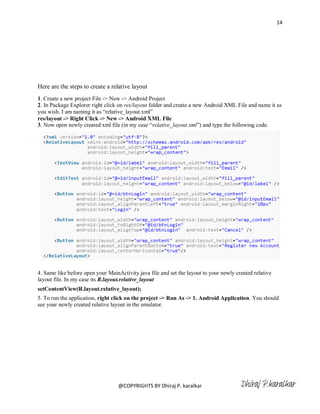
  • 14. 14 Here are the steps to create a relative layout 1. Create a new project File -> New -> Android Project 2. In Package Explorer right click on res/layout folder and create a new Android XML File and name it as you wish. I am naming it as ―relative_layout.xml‖ res/layout -> Right Click -> New -> Android XML File 3. Now open newly created xml file (in my case ―relative_layout.xml‖) and type the following code. 4. Same like before open your MainActivity.java file and set the layout to your newly created relative layout file. In my case its R.layout.relative_layout setContentView(R.layout.relative_layout); 5. To run the application, right click on the project -> Run As -> 1. Android Application. You should see your newly created relative layout in the emulator. @COPYRIGHTS BY Dhiraj P. karalkar Dhiraj P.karalkar
  • 15. 15 @COPYRIGHTS BY Dhiraj P. karalkar Dhiraj P.karalkar
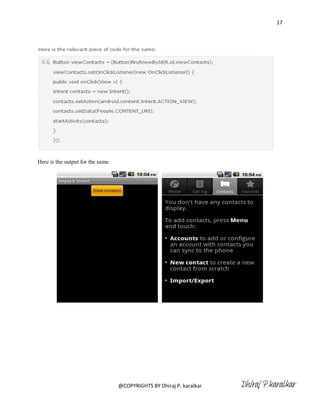
  • 16. 16 Session 4 Intents understanding i) Implicit intents ii) Explicit Intent iii) Launching native application using Intent iv) Switch between activities using Explicit Intent v) Data transferring between activities using Intents vi) Role of intent Filters vii) Intent Filters in your manifest What is an Intent is ?? An Intent is exactly what it describes. It's an "intention" to do an action. An Intent is basically a message to say you did or want something to happen. Depending on the intent, apps or the OS might be listening for it and will react accordingly. An intent is an abstract description of an operation to be performed. It can be used with startActivity to launch an Activity, broadcastIntent to send it to any interested BroadcastReceiver components, and startService(Intent) or bindService(Intent, ServiceConnection, int) to communicate with a background Service There are two types of an intents i) Implicit intents ii)Explicit Intents i) Implicit intents Implicit Intents have not specified a component; instead, they must include enough information for the system to determine which of the available components is best to run for that intent. To call or use the native Application of an Android a typical Implicit Intents are used By using an Implicit intents we can call direct to the Contact , we can use a native web application and so on . Refer http://developer.android.com/reference/android/content/Intent.html To have a more action/data pairs Here is the example to open an Android native contact app @COPYRIGHTS BY Dhiraj P. karalkar Dhiraj P.karalkar
  • 17. 17 Here is the output for the same @COPYRIGHTS BY Dhiraj P. karalkar Dhiraj P.karalkar
  • 18. 18 ii)Explicit Intents In an Explicit intent, you actually specify the activity that is required to respond to the intent. In other words, you explicitly designate the target component. This is typically used for application internal messages. In an Implicit intent (the main power of the android design), you just declare an intent and leave it to the platform to find an activity that can respond to the intent. Here, you do not declare the target component and hence is typically used for activating components of other applications seamlessly This example has 2 activities: 1. FirstActivity 2. SecondActivity The FirstActivity has a button "Invoke Next Activity" which when clicked explicitly calls the " SecondActivity " class. The relevant part of the code is here: Note : In this scenario do not forget to add the SecondActivity in the manifest as shown below @COPYRIGHTS BY Dhiraj P. karalkar Dhiraj P.karalkar
  • 19. 19 Intent plays a vital role to send the data across the application , Intent is used to send the data from an activity to another Activity , we needs to add the key value pair to send the data across the Application . Here we are continuing with the previous example shows how to send the data across an activity , in this example I have shown how to send the string from FirstActivity to SecondActivity this is the code for the same In this example on buttonclick event we are sending the string ―Dhiraj ‖ along with ―Data from first activity‖ , this string data is being collected at the SecondActivity using an Intent as shown in the following source code @COPYRIGHTS BY Dhiraj P. karalkar Dhiraj P.karalkar
  • 20. 20 As the example shown above data is received at the SecondActivity intent object is collected by using the getIntent() method of an Activity class , these both the string are collected and shown in the textview shown below at the output @COPYRIGHTS BY Dhiraj P. karalkar Dhiraj P.karalkar
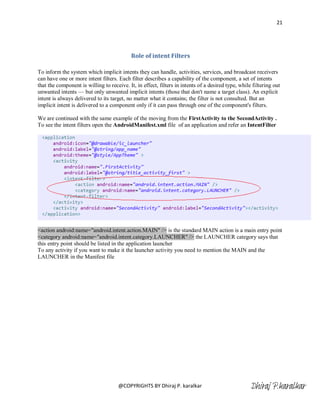
  • 21. 21 Role of intent Filters To inform the system which implicit intents they can handle, activities, services, and broadcast receivers can have one or more intent filters. Each filter describes a capability of the component, a set of intents that the component is willing to receive. It, in effect, filters in intents of a desired type, while filtering out unwanted intents — but only unwanted implicit intents (those that don't name a target class). An explicit intent is always delivered to its target, no matter what it contains; the filter is not consulted. But an implicit intent is delivered to a component only if it can pass through one of the component's filters. We are continued with the same example of the moving from the FirstActivity to the SecondActivity . To see the intent filters open the AndroidManifest.xml file of an application and refer an IntentFilter <action android:name="android.intent.action.MAIN" /> is the standard MAIN action is a main entry point <category android:name="android.intent.category.LAUNCHER" /> the LAUNCHER category says that this entry point should be listed in the application launcher To any activity if you want to make it the launcher activity you need to mention the MAIN and the LAUNCHER in the Manifest file @COPYRIGHTS BY Dhiraj P. karalkar Dhiraj P.karalkar