SlideShare a Scribd company logo
HIBBs is a program of the Global
Health Informatics Partnership
P E T E H A N K E & J E S S I C A C O T E
I N D I A N A U N I V E R S I T Y – P U R D U E
U N I V E R S I T Y – I N D I A N A P O L I S
S C H O O L O F I N F O R M A T I C S
Learning the Basics of
Microsoft Word 2010 for
Microsoft Windows
Content Covered in this Module
 What is Microsoft Word
 Starting Microsoft Word
 Ribbon Menu System
 “File” Menu
 “Home” Ribbon Menu
 “Insert” Ribbon Menu
 “Page Layout” Ribbon Menu
 “References” Ribbon Menu
 “Mailings” Ribbon Menu
 “Review” Ribbon Menu
 “View” Ribbon Menu
 Primary Tasks
 Creating a New Document
 Opening an Existing Document
 Opening Multiple Documents
 Saving a Document for the First Time
 Saving a Document
 Working With Text
 Formatting - Margins
 Formatting - Headers and Footers
 Formatting - Page Numbers
 Non-Text Items – Bullets
 Non-Text Items – Tables
 Non-Text Items – Images
 Non-Text Items – Hyperlinks
 Proofing Tools – Spellcheck
 Printing Options
 Closing Documents
What is Microsoft Word 2010?
 Microsoft Word 2010 is a word
processor created by Microsoft,
and is included in the Microsoft
Office 2010 software suite.
Starting Microsoft Word
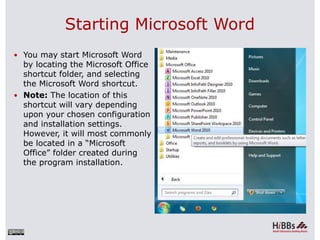
 You may start Microsoft Word
by locating the Microsoft Office
shortcut folder, and selecting
the Microsoft Word shortcut.
 Note: The location of this
shortcut will vary depending
upon your chosen configuration
and installation settings.
However, it will most commonly
be located in a “Microsoft
Office” folder created during
the program installation.
Ribbon Menu System
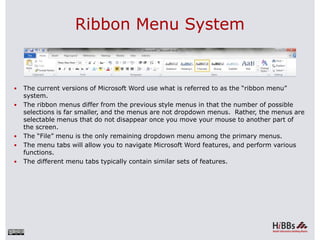
 The current versions of Microsoft Word use what is referred to as the “ribbon menu”
system.
 The ribbon menus differ from the previous style menus in that the number of possible
selections is far smaller, and the menus are not dropdown menus. Rather, the menus are
selectable menus that do not disappear once you move your mouse to another part of
the screen.
 The “File” menu is the only remaining dropdown menu among the primary menus.
 The menu tabs will allow you to navigate Microsoft Word features, and perform various
functions.
 The different menu tabs typically contain similar sets of features.
“File” Menu
 This menu will give you access to general options related to the Word file itself.
“Home” Ribbon Menu
 The “Home” menu contains general options such as font sizes, alignment, copy/paste.
 The bulk of your time in the menu system will be spent in this menu.
 The font size and style controls are located within this ribbon, as shown below. You may
adjust these settings by using the relevant dropdown menus.
“Insert” Ribbon Menu
 This menu allows you to insert a variety of non-text objects into your document. You can
use it to add tables, pictures, links, headers and footers, among other things.
“Page Layout” Ribbon Menu
 The “Page Layout” menu is where you will do the majority of your document formatting.
You can use it to set margins, page orientation, size, the number of text columns,
borders, indentation and spacing.
“References” Ribbon Menu
 The “References” menu allows you to easily cite and reference sources that you may use
while creating a document.
“Mailings” Ribbon Menu
 The “Mailings” ribbon menu contains a number of features related to documents that will
be created for the purpose of being sent in the mail.
 You can use these tools to print envelopes and labels, as well as personalizing individual
letters in a large mailing to the specific recipient using address and contact information.
 Note that not all printers support these features, and you must have contacts available in
your Microsoft Outlook application in order to use the “Select from Outlook Contacts”
feature.
“Review” Ribbon Menu
 The “Review” menu allows you to review your document for spelling and grammatical
errors, insert comments, track (and accept) changes made to your document during
reviewing, and compare or combine two documents.
“View” Ribbon Menu
 The “View” menu allows you to change how the document is viewed within Word.
 The “Zoom” and the “Document Views” sections of this document are where you will
spend the majority of the time in this menu.
Primary Tasks
 Aside from actually typing the document, there are a number of
tasks that you will perform most during your usage of Word. These
tasks include:
 Creating new documents
 Opening existing documents
 Saving documents
 Working with text within documents
 Formatting documents
 Inserting non-text items
 Proofing documents
 Printing documents
 Closing Documents
Creating a New Document
 Upon starting Microsoft Word, a new
blank document will be created.
 Alternatively, a new document may be
created by selecting the “File” dropdown
menu located at the top of the main
Word window, and selecting “New”. You
must then select the type of new
document you would like to create.
 Don’t forget to save and rename your
document from the default name after
creating it.
 Alternatively, the keyboard shortcut
CTRL + “N” may be used.
Opening an Existing Document
 To open an existing document, first
locate and select the “File” menu and
select “Open”.
 In the dialog box that appears, browse
to your file and press the button labeled
“Open” located at the lower right corner
of this box.
 Alternatively, the keyboard shortcut
CTRL + “O” may be used.
Opening Multiple Documents
 Opening multiple documents is very
similar to opening a single document.
 First, locate and select the “File” menu
and select “Open”.
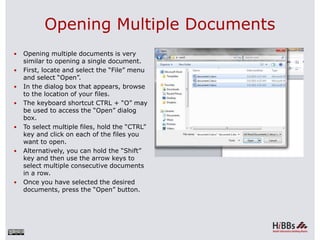
 In the dialog box that appears, browse
to the location of your files.
 The keyboard shortcut CTRL + “O” may
be used to access the “Open” dialog
box.
 To select multiple files, hold the “CTRL”
key and click on each of the files you
want to open.
 Alternatively, you can hold the “Shift”
key and then use the arrow keys to
select multiple consecutive documents
in a row.
 Once you have selected the desired
documents, press the “Open” button.
Saving a Document for the First Time
 If you are saving a document for the
first time, you should specify a file name
and the location to which the file will be
saved.
 To save a document for the first time,
select the “File” dropdown menu, and
select “Save as”.
 The “Save as” window will appear, at
which point you should locate and select
the location that you want the file to be
saved to, as well as naming the file what
you would like it to be called.
Saving a Document
 To simply save a document without
renaming or relocating it, locate and
select the “File” menu.
 Select the “Save” option.
 Alternatively, the keyboard shortcut
CTRL + S may be used.
Working With Text
 In addition to simply typing words into a document, you can highlight, select, copy, cut,
and paste items using either standard Windows shortcut methods, or buttons in Word.
 To select a block of text, click and hold the left mouse button at the beginning portion of
the block you wish to select, and then drag the mouse over the desired text. You will
notice that the text will be highlighted as you do this.
 Once you have the desired text selected, release the mouse button.
 Note that while clicking on another part of the document while you have text selected will
deselect it.
Working With Text (cont.)
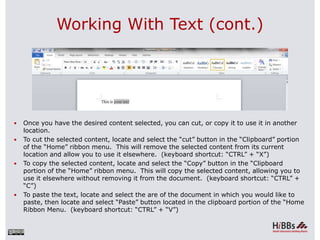
 Once you have the desired content selected, you can cut, or copy it to use it in another
location.
 To cut the selected content, locate and select the “cut” button in the “Clipboard” portion
of the “Home” ribbon menu. This will remove the selected content from its current
location and allow you to use it elsewhere. (keyboard shortcut: “CTRL” + “X”)
 To copy the selected content, locate and select the “Copy” button in the “Clipboard
portion of the “Home” ribbon menu. This will copy the selected content, allowing you to
use it elsewhere without removing it from the document. (keyboard shortcut: “CTRL” +
“C”)
 To paste the text, locate and select the are of the document in which you would like to
paste, then locate and select “Paste” button located in the clipboard portion of the “Home
Ribbon Menu. (keyboard shortcut: “CTRL” + “V”)
Formatting - Margins
 To set margins, locate and select the
“Page Layout” menu.
 Select the “Margins” button.
 A number of preset margin settings will
drop down in a menu. You can select
one of those, or select “Custom
Margins” at the bottom of this menu to
specify your own.
 A dialog box will appear. The basic
margin settings are located at the top of
this box.
 Also note the “Orientation” portion of
this menu.
Formatting – Headers and Footers
 Options for headers and footers will be
located in the “Insert” ribbon menu in
the “Header & Footer” section.
 To add a header, or footer, press the
“Header”, or “footer” button.
 A dialog box will appear which will allow
you to specify the type of header that
you would like to add.
 To just add a simple header, select the
“Blank” header.
 To navigate to or away from the header,
just double-click on the area of the
document that you would like to move
to.
Formatting – Page Numbers
 Page numbers are a very commonly
used header element.
 To add page numbers to your header or
footer, first create and select a header
or footer.
 After you have created a header or
footer, locate and select the “Page
Number” button located in the “header
and footer” portion of the “insert” ribbon
menu.
 In the dropdown menus that appears,
select the location in which you want to
place your page numbers.
Non-Text Items - Bullets
 To use bulleted lists, find and select the “Home” menu.
 Select the bullet button located the “paragraph” section of this menu to start the list.
 To create the next bullet in the list, press “enter”.
Non-Text Items - Tables
 To insert spreadsheet-like tables, first select the “Insert” menu.
 Find and select the “Table” button located in the “Tables” section of this menu.
 In the menu that appears, use the table graphic to select the size of the desired table by
clicking on the graphic in the appropriate location.
Non-Text Items – Tables (cont.)
 Once you place a table and are ready to format it, select the table and right click on the
icon in the upper left corner of the table. A contextual menu will appear.
 The most notable selections in this menu are “Table Properties”, “Insert”, and “Delete
Cells”.
Non-Text Items - Images
 To insert an image into your document,
first select the “Insert” menu.
 Locate and press the “Picture” button in
the “Illustrations” section.
 In the Dialog box that appears, browse
to the photo you wish to insert and
press the “Insert” button.
Non-Text Items - Hyperlinks
 To insert a hyperlink into your
document, select the “Insert” menu.
 Locate and select the “Links” button.
 In the dropdown menu that appears,
select the “Hyperlink” button.
 You can either browse to a location
using the “Look in:” section of this
window, or you can type an address
manually in the “Address:” bar at the
bottom.
 The name of the link as it appears in
your document will be determined by
what is entered in the “Text to display”
field located at the top of the dialog box.
 When you are done, press the “Ok”
button located at the bottom of the
screen
Proofing Tools - Spellcheck
 To check your document for spelling
errors, use the spell and grammar check
feature.
 Select the “Review” menu.
 Select the “Spelling & Grammar” button
in the “Proofing” section of the menu.
 Alternatively, press F7 to initiate the
check.
Proofing Tools – Spellcheck (cont.)
 In the “Spelling and Grammar” check
dialog box, you can enter corrections
manually in the top text field.
 Alternatively, you can select from a list
of “suggestions” located in the lower
half of the dialog box. Make your
desired selection and press the
“Change” button.
Print Options
 You will find the options related to
printing by selecting the “File” menu,
and selecting the “Print” option. The
Word window will then be populated
with options related to printing.
 The most important options are located
at the top of the window.
 Make sure that you have the desired
printer, and the desired number of
copies to print selected.
 When you are ready to print, press the
“Print” button located in the upper
portion of the screen.
Closing Documents
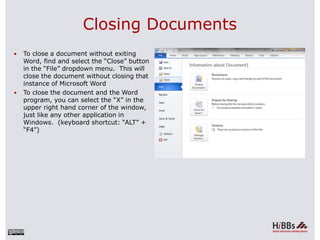
 To close a document without exiting
Word, find and select the “Close” button
in the “File” dropdown menu. This will
close the document without closing that
instance of Microsoft Word
 To close the document and the Word
program, you can select the “X” in the
upper right hand corner of the window,
just like any other application in
Windows. (keyboard shortcut: “ALT” +
“F4”)
The work is provided under the terms of this Creative Commons
Attribution-ShareAlike 3.0 Unported License (“CCPL" or "license"). The
work is protected by copyright and/or other applicable law. Any use of
the work other than as authorized under this license or copyright law is
prohibited.
HIBBs is a program of the Global Health
Informatics Partnership
www.ghip.net
This HIBB was created as part of the Computing for a Cause class in
the School of Informatics at Indiana University – Purdue University –
Indianapolis.
More Related Content

What's hot (20)

PPT
MS Word Basics Training
Michael Sheyahshe
 
PPT
Webmail and Mail Clients
Someone Else
 
PPTX
Presentation software
Mohammad Alig
 
PPT
Email
ARSD College
 
PPT
Operating Systems
Mohamed Loey
 
PDF
Basics of Microsoft windows
vethics
 
PPS
Ms office (basic) 2016 session 01
Muhammad Umer Aleem
 
PPTX
Microsoft word tutorial
Michael Hardy
 
PPTX
Ms word 2007
Dr. Priyamvada Saarsar
 
PPSX
Introduction to Microsoft Office
Cik Na Shohaili
 
PPTX
Libre Office Writer Lesson 1
Smart Chicago Collaborative
 
PPTX
Ms office ppt
PRAKHARSINGH195
 
PPTX
Welcome to word 2016
JasminMiranda7
 
PPTX
History of the internet
Amal Jith
 
PDF
Introduction to spreadsheets
Casey Robertson
 
PPTX
Word Processing
Johan Koren
 
PPTX
Ms word 2010
47ishu
 
PDF
Internet Basics
DigitalLifeAdvisor.com
 
PPTX
Application software
Rana Usman Sattar
 
MS Word Basics Training
Michael Sheyahshe
 
Webmail and Mail Clients
Someone Else
 
Presentation software
Mohammad Alig
 
Operating Systems
Mohamed Loey
 
Basics of Microsoft windows
vethics
 
Ms office (basic) 2016 session 01
Muhammad Umer Aleem
 
Microsoft word tutorial
Michael Hardy
 
Introduction to Microsoft Office
Cik Na Shohaili
 
Libre Office Writer Lesson 1
Smart Chicago Collaborative
 
Ms office ppt
PRAKHARSINGH195
 
Welcome to word 2016
JasminMiranda7
 
History of the internet
Amal Jith
 
Introduction to spreadsheets
Casey Robertson
 
Word Processing
Johan Koren
 
Ms word 2010
47ishu
 
Internet Basics
DigitalLifeAdvisor.com
 
Application software
Rana Usman Sattar
 

Similar to Basics of Microsoft Word.ppt (20)

PPT
Microsoft office support and and outlook slide show
GET CONTACT
 
PPTX
module 2.pptx
DaysPiracy
 
PPTX
Introduction to word processing
Iddrisu Issah
 
DOC
Learning the Basics of Microsoft Word 2010 for Microsoft Windows Transcript
Saide OER Africa
 
PPTX
Ms word module 1
Dr. Pallawi Bulakh
 
PPT
2. Week Two MS Word 2023 PG Students 2003 PG Students Final.ppt
AbdulmalikMusaGusau
 
PDF
Word 2007 intro
edshee
 
PPT
Microsoft Word 2007 training.ppt
workinehwogaso1
 
PPT
Microsoft word
Celia Bandelier
 
PDF
Business Application Software.pdf
premarhea
 
PPTX
Word 2007
Krishanku Bose
 
PDF
Introduction to-word-2016
Damilola Mosaku
 
PDF
Microsoft word-getting-started-basics
Praveen Sudarsan
 
PPTX
lishaaaaa3ertyujikolp34567890aaaaa (1).pptx
angelstar25122006
 
PPTX
Microsoft word
RoshanMaharjan13
 
PPTX
Microsoft Word.pptx
JayArHuet
 
PPTX
Word 2003
Yasin Ghafour
 
PPTX
word_read.word_readword_readvword_readpptx
trainer310
 
PPTX
lecture 1
umardanjumamaiwada
 
PDF
Microsoft word tutorials COMPLETE by Gulshan K Maheshwari(QAU)
GulshanKumar368
 
Microsoft office support and and outlook slide show
GET CONTACT
 
module 2.pptx
DaysPiracy
 
Introduction to word processing
Iddrisu Issah
 
Learning the Basics of Microsoft Word 2010 for Microsoft Windows Transcript
Saide OER Africa
 
Ms word module 1
Dr. Pallawi Bulakh
 
2. Week Two MS Word 2023 PG Students 2003 PG Students Final.ppt
AbdulmalikMusaGusau
 
Word 2007 intro
edshee
 
Microsoft Word 2007 training.ppt
workinehwogaso1
 
Microsoft word
Celia Bandelier
 
Business Application Software.pdf
premarhea
 
Word 2007
Krishanku Bose
 
Introduction to-word-2016
Damilola Mosaku
 
Microsoft word-getting-started-basics
Praveen Sudarsan
 
lishaaaaa3ertyujikolp34567890aaaaa (1).pptx
angelstar25122006
 
Microsoft word
RoshanMaharjan13
 
Microsoft Word.pptx
JayArHuet
 
Word 2003
Yasin Ghafour
 
word_read.word_readword_readvword_readpptx
trainer310
 
lecture 1
umardanjumamaiwada
 
Microsoft word tutorials COMPLETE by Gulshan K Maheshwari(QAU)
GulshanKumar368
 
Ad

Recently uploaded (20)

PPTX
Views on Education of Indian Thinkers Mahatma Gandhi.pptx
ShrutiMahanta1
 
PDF
Zoology (Animal Physiology) practical Manual
raviralanaresh2
 
PPTX
How to Manage Access Rights & User Types in Odoo 18
Celine George
 
PDF
BÀI TẬP BỔ TRỢ THEO LESSON TIẾNG ANH - I-LEARN SMART WORLD 7 - CẢ NĂM - CÓ ĐÁ...
Nguyen Thanh Tu Collection
 
PPTX
Pyhton with Mysql to perform CRUD operations.pptx
Ramakrishna Reddy Bijjam
 
PDF
CONCURSO DE POESIA “POETUFAS – PASSOS SUAVES PELO VERSO.pdf
Colégio Santa Teresinha
 
PDF
07.15.2025 - Managing Your Members Using a Membership Portal.pdf
TechSoup
 
PPTX
SAMPLING: DEFINITION,PROCESS,TYPES,SAMPLE SIZE, SAMPLING ERROR.pptx
PRADEEP ABOTHU
 
PDF
Comprehensive Guide to Writing Effective Literature Reviews for Academic Publ...
AJAYI SAMUEL
 
PPTX
PPT on the Development of Education in the Victorian England
Beena E S
 
PPTX
HEAD INJURY IN CHILDREN: NURSING MANAGEMENGT.pptx
PRADEEP ABOTHU
 
PPTX
Optimizing Cancer Screening With MCED Technologies: From Science to Practical...
i3 Health
 
PPTX
Latest Features in Odoo 18 - Odoo slides
Celine George
 
PPTX
Gall bladder, Small intestine and Large intestine.pptx
rekhapositivity
 
PPTX
How to Configure Access Rights of Manufacturing Orders in Odoo 18 Manufacturing
Celine George
 
PPTX
SCHOOL-BASED SEXUAL HARASSMENT PREVENTION AND RESPONSE WORKSHOP
komlalokoe
 
PPTX
ANORECTAL MALFORMATIONS: NURSING MANAGEMENT.pptx
PRADEEP ABOTHU
 
PPTX
Capitol Doctoral Presentation -July 2025.pptx
CapitolTechU
 
PPTX
Optimizing Cancer Screening With MCED Technologies: From Science to Practical...
i3 Health
 
PPTX
Nutri-QUIZ-Bee-Elementary.pptx...................
ferdinandsanbuenaven
 
Views on Education of Indian Thinkers Mahatma Gandhi.pptx
ShrutiMahanta1
 
Zoology (Animal Physiology) practical Manual
raviralanaresh2
 
How to Manage Access Rights & User Types in Odoo 18
Celine George
 
BÀI TẬP BỔ TRỢ THEO LESSON TIẾNG ANH - I-LEARN SMART WORLD 7 - CẢ NĂM - CÓ ĐÁ...
Nguyen Thanh Tu Collection
 
Pyhton with Mysql to perform CRUD operations.pptx
Ramakrishna Reddy Bijjam
 
CONCURSO DE POESIA “POETUFAS – PASSOS SUAVES PELO VERSO.pdf
Colégio Santa Teresinha
 
07.15.2025 - Managing Your Members Using a Membership Portal.pdf
TechSoup
 
SAMPLING: DEFINITION,PROCESS,TYPES,SAMPLE SIZE, SAMPLING ERROR.pptx
PRADEEP ABOTHU
 
Comprehensive Guide to Writing Effective Literature Reviews for Academic Publ...
AJAYI SAMUEL
 
PPT on the Development of Education in the Victorian England
Beena E S
 
HEAD INJURY IN CHILDREN: NURSING MANAGEMENGT.pptx
PRADEEP ABOTHU
 
Optimizing Cancer Screening With MCED Technologies: From Science to Practical...
i3 Health
 
Latest Features in Odoo 18 - Odoo slides
Celine George
 
Gall bladder, Small intestine and Large intestine.pptx
rekhapositivity
 
How to Configure Access Rights of Manufacturing Orders in Odoo 18 Manufacturing
Celine George
 
SCHOOL-BASED SEXUAL HARASSMENT PREVENTION AND RESPONSE WORKSHOP
komlalokoe
 
ANORECTAL MALFORMATIONS: NURSING MANAGEMENT.pptx
PRADEEP ABOTHU
 
Capitol Doctoral Presentation -July 2025.pptx
CapitolTechU
 
Optimizing Cancer Screening With MCED Technologies: From Science to Practical...
i3 Health
 
Nutri-QUIZ-Bee-Elementary.pptx...................
ferdinandsanbuenaven
 
Ad

Basics of Microsoft Word.ppt

  • 1. HIBBs is a program of the Global Health Informatics Partnership P E T E H A N K E & J E S S I C A C O T E I N D I A N A U N I V E R S I T Y – P U R D U E U N I V E R S I T Y – I N D I A N A P O L I S S C H O O L O F I N F O R M A T I C S Learning the Basics of Microsoft Word 2010 for Microsoft Windows
  • 2. Content Covered in this Module  What is Microsoft Word  Starting Microsoft Word  Ribbon Menu System  “File” Menu  “Home” Ribbon Menu  “Insert” Ribbon Menu  “Page Layout” Ribbon Menu  “References” Ribbon Menu  “Mailings” Ribbon Menu  “Review” Ribbon Menu  “View” Ribbon Menu  Primary Tasks  Creating a New Document  Opening an Existing Document  Opening Multiple Documents  Saving a Document for the First Time  Saving a Document  Working With Text  Formatting - Margins  Formatting - Headers and Footers  Formatting - Page Numbers  Non-Text Items – Bullets  Non-Text Items – Tables  Non-Text Items – Images  Non-Text Items – Hyperlinks  Proofing Tools – Spellcheck  Printing Options  Closing Documents
  • 3. What is Microsoft Word 2010?  Microsoft Word 2010 is a word processor created by Microsoft, and is included in the Microsoft Office 2010 software suite.
  • 4. Starting Microsoft Word  You may start Microsoft Word by locating the Microsoft Office shortcut folder, and selecting the Microsoft Word shortcut.  Note: The location of this shortcut will vary depending upon your chosen configuration and installation settings. However, it will most commonly be located in a “Microsoft Office” folder created during the program installation.
  • 5. Ribbon Menu System  The current versions of Microsoft Word use what is referred to as the “ribbon menu” system.  The ribbon menus differ from the previous style menus in that the number of possible selections is far smaller, and the menus are not dropdown menus. Rather, the menus are selectable menus that do not disappear once you move your mouse to another part of the screen.  The “File” menu is the only remaining dropdown menu among the primary menus.  The menu tabs will allow you to navigate Microsoft Word features, and perform various functions.  The different menu tabs typically contain similar sets of features.
  • 6. “File” Menu  This menu will give you access to general options related to the Word file itself.
  • 7. “Home” Ribbon Menu  The “Home” menu contains general options such as font sizes, alignment, copy/paste.  The bulk of your time in the menu system will be spent in this menu.  The font size and style controls are located within this ribbon, as shown below. You may adjust these settings by using the relevant dropdown menus.
  • 8. “Insert” Ribbon Menu  This menu allows you to insert a variety of non-text objects into your document. You can use it to add tables, pictures, links, headers and footers, among other things.
  • 9. “Page Layout” Ribbon Menu  The “Page Layout” menu is where you will do the majority of your document formatting. You can use it to set margins, page orientation, size, the number of text columns, borders, indentation and spacing.
  • 10. “References” Ribbon Menu  The “References” menu allows you to easily cite and reference sources that you may use while creating a document.
  • 11. “Mailings” Ribbon Menu  The “Mailings” ribbon menu contains a number of features related to documents that will be created for the purpose of being sent in the mail.  You can use these tools to print envelopes and labels, as well as personalizing individual letters in a large mailing to the specific recipient using address and contact information.  Note that not all printers support these features, and you must have contacts available in your Microsoft Outlook application in order to use the “Select from Outlook Contacts” feature.
  • 12. “Review” Ribbon Menu  The “Review” menu allows you to review your document for spelling and grammatical errors, insert comments, track (and accept) changes made to your document during reviewing, and compare or combine two documents.
  • 13. “View” Ribbon Menu  The “View” menu allows you to change how the document is viewed within Word.  The “Zoom” and the “Document Views” sections of this document are where you will spend the majority of the time in this menu.
  • 14. Primary Tasks  Aside from actually typing the document, there are a number of tasks that you will perform most during your usage of Word. These tasks include:  Creating new documents  Opening existing documents  Saving documents  Working with text within documents  Formatting documents  Inserting non-text items  Proofing documents  Printing documents  Closing Documents
  • 15. Creating a New Document  Upon starting Microsoft Word, a new blank document will be created.  Alternatively, a new document may be created by selecting the “File” dropdown menu located at the top of the main Word window, and selecting “New”. You must then select the type of new document you would like to create.  Don’t forget to save and rename your document from the default name after creating it.  Alternatively, the keyboard shortcut CTRL + “N” may be used.
  • 16. Opening an Existing Document  To open an existing document, first locate and select the “File” menu and select “Open”.  In the dialog box that appears, browse to your file and press the button labeled “Open” located at the lower right corner of this box.  Alternatively, the keyboard shortcut CTRL + “O” may be used.
  • 17. Opening Multiple Documents  Opening multiple documents is very similar to opening a single document.  First, locate and select the “File” menu and select “Open”.  In the dialog box that appears, browse to the location of your files.  The keyboard shortcut CTRL + “O” may be used to access the “Open” dialog box.  To select multiple files, hold the “CTRL” key and click on each of the files you want to open.  Alternatively, you can hold the “Shift” key and then use the arrow keys to select multiple consecutive documents in a row.  Once you have selected the desired documents, press the “Open” button.
  • 18. Saving a Document for the First Time  If you are saving a document for the first time, you should specify a file name and the location to which the file will be saved.  To save a document for the first time, select the “File” dropdown menu, and select “Save as”.  The “Save as” window will appear, at which point you should locate and select the location that you want the file to be saved to, as well as naming the file what you would like it to be called.
  • 19. Saving a Document  To simply save a document without renaming or relocating it, locate and select the “File” menu.  Select the “Save” option.  Alternatively, the keyboard shortcut CTRL + S may be used.
  • 20. Working With Text  In addition to simply typing words into a document, you can highlight, select, copy, cut, and paste items using either standard Windows shortcut methods, or buttons in Word.  To select a block of text, click and hold the left mouse button at the beginning portion of the block you wish to select, and then drag the mouse over the desired text. You will notice that the text will be highlighted as you do this.  Once you have the desired text selected, release the mouse button.  Note that while clicking on another part of the document while you have text selected will deselect it.
  • 21. Working With Text (cont.)  Once you have the desired content selected, you can cut, or copy it to use it in another location.  To cut the selected content, locate and select the “cut” button in the “Clipboard” portion of the “Home” ribbon menu. This will remove the selected content from its current location and allow you to use it elsewhere. (keyboard shortcut: “CTRL” + “X”)  To copy the selected content, locate and select the “Copy” button in the “Clipboard portion of the “Home” ribbon menu. This will copy the selected content, allowing you to use it elsewhere without removing it from the document. (keyboard shortcut: “CTRL” + “C”)  To paste the text, locate and select the are of the document in which you would like to paste, then locate and select “Paste” button located in the clipboard portion of the “Home Ribbon Menu. (keyboard shortcut: “CTRL” + “V”)
  • 22. Formatting - Margins  To set margins, locate and select the “Page Layout” menu.  Select the “Margins” button.  A number of preset margin settings will drop down in a menu. You can select one of those, or select “Custom Margins” at the bottom of this menu to specify your own.  A dialog box will appear. The basic margin settings are located at the top of this box.  Also note the “Orientation” portion of this menu.
  • 23. Formatting – Headers and Footers  Options for headers and footers will be located in the “Insert” ribbon menu in the “Header & Footer” section.  To add a header, or footer, press the “Header”, or “footer” button.  A dialog box will appear which will allow you to specify the type of header that you would like to add.  To just add a simple header, select the “Blank” header.  To navigate to or away from the header, just double-click on the area of the document that you would like to move to.
  • 24. Formatting – Page Numbers  Page numbers are a very commonly used header element.  To add page numbers to your header or footer, first create and select a header or footer.  After you have created a header or footer, locate and select the “Page Number” button located in the “header and footer” portion of the “insert” ribbon menu.  In the dropdown menus that appears, select the location in which you want to place your page numbers.
  • 25. Non-Text Items - Bullets  To use bulleted lists, find and select the “Home” menu.  Select the bullet button located the “paragraph” section of this menu to start the list.  To create the next bullet in the list, press “enter”.
  • 26. Non-Text Items - Tables  To insert spreadsheet-like tables, first select the “Insert” menu.  Find and select the “Table” button located in the “Tables” section of this menu.  In the menu that appears, use the table graphic to select the size of the desired table by clicking on the graphic in the appropriate location.
  • 27. Non-Text Items – Tables (cont.)  Once you place a table and are ready to format it, select the table and right click on the icon in the upper left corner of the table. A contextual menu will appear.  The most notable selections in this menu are “Table Properties”, “Insert”, and “Delete Cells”.
  • 28. Non-Text Items - Images  To insert an image into your document, first select the “Insert” menu.  Locate and press the “Picture” button in the “Illustrations” section.  In the Dialog box that appears, browse to the photo you wish to insert and press the “Insert” button.
  • 29. Non-Text Items - Hyperlinks  To insert a hyperlink into your document, select the “Insert” menu.  Locate and select the “Links” button.  In the dropdown menu that appears, select the “Hyperlink” button.  You can either browse to a location using the “Look in:” section of this window, or you can type an address manually in the “Address:” bar at the bottom.  The name of the link as it appears in your document will be determined by what is entered in the “Text to display” field located at the top of the dialog box.  When you are done, press the “Ok” button located at the bottom of the screen
  • 30. Proofing Tools - Spellcheck  To check your document for spelling errors, use the spell and grammar check feature.  Select the “Review” menu.  Select the “Spelling & Grammar” button in the “Proofing” section of the menu.  Alternatively, press F7 to initiate the check.
  • 31. Proofing Tools – Spellcheck (cont.)  In the “Spelling and Grammar” check dialog box, you can enter corrections manually in the top text field.  Alternatively, you can select from a list of “suggestions” located in the lower half of the dialog box. Make your desired selection and press the “Change” button.
  • 32. Print Options  You will find the options related to printing by selecting the “File” menu, and selecting the “Print” option. The Word window will then be populated with options related to printing.  The most important options are located at the top of the window.  Make sure that you have the desired printer, and the desired number of copies to print selected.  When you are ready to print, press the “Print” button located in the upper portion of the screen.
  • 33. Closing Documents  To close a document without exiting Word, find and select the “Close” button in the “File” dropdown menu. This will close the document without closing that instance of Microsoft Word  To close the document and the Word program, you can select the “X” in the upper right hand corner of the window, just like any other application in Windows. (keyboard shortcut: “ALT” + “F4”)
  • 34. The work is provided under the terms of this Creative Commons Attribution-ShareAlike 3.0 Unported License (“CCPL" or "license"). The work is protected by copyright and/or other applicable law. Any use of the work other than as authorized under this license or copyright law is prohibited. HIBBs is a program of the Global Health Informatics Partnership www.ghip.net This HIBB was created as part of the Computing for a Cause class in the School of Informatics at Indiana University – Purdue University – Indianapolis.