
![Building a cross-platform Hybrid
Ionic App with TypeScript
Lessons learned in building a real-world hybrid application using the
Ionic framework and TypeScript
Oleksandr Zinchenko [Macaw], Serge van den Oever [Macaw]](https://image.slidesharecdn.com/buildinganionicappwithtypescript-150126064852-conversion-gate02/85/Building-an-Ionic-hybrid-mobile-app-with-TypeScript-1-320.jpg)


![Project modifications: initial structure
1. Move the folder scss into the folder www. All sources that are compiled should we in the www
folder, so source maps can point to the original source files while debugging.
2. Change gulpfile.js so the sass folder points to the www/scss folder:
var paths = {sass: ['./www/scss/**/*.scss']};
3. Change gulpfile.js so the 'sass' task also points to the www/scss folder:
gulp.src('./www/scss/ionic.app.scss')
4. Add the folders used by the package managers www/lib, node_modules, plugins, platforms
to the .gitignore file (Gist).
All external packages, plugins and platforms should not be managed in source control.
5. When working on Windows and using Visual Studio, it is important to mark the node_modules
folder as hidden to avoid issues in Visual Studio which can’t handle deep folder structures
correctly.
6. When working in Visual Studio it is recommended that each project member create his own
solution file to be able to use different path to the project. *.suo files should be excluded from
source control.](https://image.slidesharecdn.com/buildinganionicappwithtypescript-150126064852-conversion-gate02/85/Building-an-Ionic-hybrid-mobile-app-with-TypeScript-7-320.jpg)
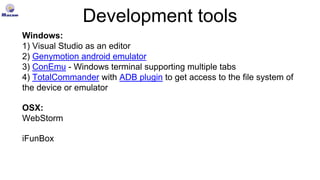
![Project modifications: hooks
When working with a Cordova hybrid app, you might need a way to extend your build process. Cordova Hooks
serves that purpose and can execute scripts before or after certain points of the build process. The obvious
example of hook usage is copying app icons and splash screens to the appropriate platform folder during build
(see more info here).
An example of hook script for copying resources that executes after Cordova’s ‘prepare’ command is
hooksafter_prepare030_resource_files.js (Gist):
#!/usr/bin/env node
var fs = require('fs');
var path = require('path');
var rootdir = process.argv[2];
filestocopy.forEach(function(obj) {
Object.keys(obj).forEach(function(key) {
var val = obj[key];
var srcfile = path.join(rootdir, key);
var destfile = path.join(rootdir, val);
console.log("copying "+srcfile+" to "+destfile);
var destdir = path.dirname(destfile);
if (fs.existsSync(srcfile) && fs.existsSync(destdir)) {
fs.createReadStream(srcfile)
.pipe(fs.createWriteStream(destfile));
}
});
});
var filestocopy = [{
"config/ios/splashscreens/Default-568h@2x~iphone.png":
"platforms/ios/MyApp/Resources/splash/Default-568h@2x~iphone.png"
}, {
"config/ios/splashscreens/Default-Landscape@2x~ipad.png":
"platforms/ios/MyApp/Resources/splash/Default-Landscape@2x~ipad.png"
}, {
"config/ios/splashscreens/Default-Landscape~ipad.png":
"platforms/ios/MyApp/Resources/splash/Default-Landscape~ipad.png"
}, {
"config/ios/splashscreens/Default-Portrait@2x~ipad.png":
"platforms/ios/MyApp/Resources/splash/Default-Portrait@2x~ipad.png"
}, {
"config/ios/splashscreens/Default-Portrait~ipad.png":
"platforms/ios/MyApp/Resources/splash/Default-Portrait~ipad.png"
}, {
"config/ios/splashscreens/Default@2x~iphone.png":
"platforms/ios/MyApp/Resources/splash/Default@2x~iphone.png"
}, {
"config/ios/splashscreens/Default~iphone.png":
"platforms/ios/MyApp/Resources/splash/Default~iphone.png"
}];](https://image.slidesharecdn.com/buildinganionicappwithtypescript-150126064852-conversion-gate02/85/Building-an-Ionic-hybrid-mobile-app-with-TypeScript-10-320.jpg)

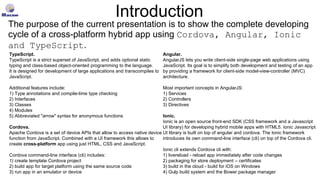
![Project modifications: TypeScript compiler
1. In order to be able to compile TypeScript into JavaScript we need to install the gulp-tsc npm module:
> npm install gulp-tsc —save-dev
2. In the default Ionic gulpfile.js add the following bold lines to support TypeScript compilation (Gist):
var typescript = require('gulp-tsc');
var paths = {
sass: ['./www/scss/**/*.scss'],
typescript: ['./www/scripts/**/*.ts']
};
gulp.task('default', ['sass', 'compile']);
function compileTypeScript(done) {
gulp.src(paths.typescript)
.pipe(typescript({ sourcemap: true, out: 'tslib.js', sourceRoot: '../scripts' }))
.pipe(gulp.dest('./www/js/'))
.on('end', done);
}
gulp.task('compile', compileTypeScript);
gulp.task('watch', function() {
compileTypeScript();
gulp.watch(paths.sass, ['sass']);
gulp.watch(paths.typescript, ['compile']);
});
3. The above additions compile all TypeScript files in the www/scripts folder to a single file www/js/tslib.js. Include this resulting JavaScript file in
index.html:
<script src="js/tslib.js"></script>](https://image.slidesharecdn.com/buildinganionicappwithtypescript-150126064852-conversion-gate02/85/Building-an-Ionic-hybrid-mobile-app-with-TypeScript-12-320.jpg)

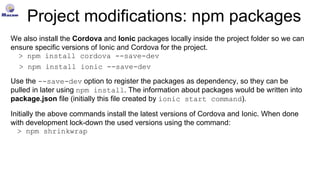
![app.ts template
app.ts is the entry point of the app (Gist).
1. Add reference to _reference.ts:
/// <reference path="_reference.ts"/>
2. We declare an interface for the global rootScope object
$rootScope:
interface IAppRootScopeService extends
ng.IRootScopeService {
online: boolean;
lastScrollTimestamp: number;
isScrolling: () => boolean;
onScroll: () => void;
}
3. Directives are registered using angular.module() calls:
var myApp: ng.IModule = angular.module("angularApp", [
"ngSanitize",
"ionic",
"directive.bindonce",
]);
4. Services should be registered using myApp.service() calls:
myApp.service("serviceName",
myNameSpace.MyServiceClassName);
5. Controllers should be registered in the UI-routing structure (Learn
more here: https://github.com/angular-ui/ui-router).
myApp.config(($stateProvider, $urlRouterProvider) => {
$stateProvider.state("view", {
url: "/view",
templateUrl: "views/view.html",
controller: "ViewController"
});
});
6. Actual code entry point of the app is myApp.run():
myApp.run(
function (
$rootScope: ft.IAppRootScopeService
) {
// myApp entry point
}
);](https://image.slidesharecdn.com/buildinganionicappwithtypescript-150126064852-conversion-gate02/85/Building-an-Ionic-hybrid-mobile-app-with-TypeScript-14-320.jpg)
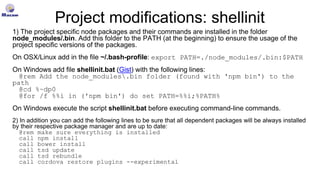
![Controller template
1) Add reference in _reference.ts
2) Bind in app.ts to angular UI-router state:
.state(‘home', {
templateUrl: "views/home.html",
controller: “MyController”
});
/// <reference path='../_reference.ts'/>
interface IMyControllerScope extends ng.IScope {
vm: IMyController; // now our view model (vm) in the scope is typed
}
interface IMyController {
myString: string;
myFunction: (arg) => boolean;
}
class MyController implements IMyController {
myString: string = ‘initial value’;
// $inject annotation. It provides $injector with information about dependencies to be injected into constructor
// it is better to have it close to the constructor, because the parameters must match in count and type.
// See http://docs.angularjs.org/guide/di
public static $inject = [
"$scope",
"$rootScope“
];
constructor(
private $scope: IMyControllerScope,
private $rootScope: IAppRootScopeService
) {
var currentClass: MyController = this;
$scope.vm = this;
$scope.$on("$destroy", () => {
// Clean up detached Dom elements
// Clean up attached listeners
});
currentClass.myString = 'assigning variables here';
}
myFunction(arg): boolean {
// arg processing here
return true;
}
}
Gist of the template](https://image.slidesharecdn.com/buildinganionicappwithtypescript-150126064852-conversion-gate02/85/Building-an-Ionic-hybrid-mobile-app-with-TypeScript-15-320.jpg)
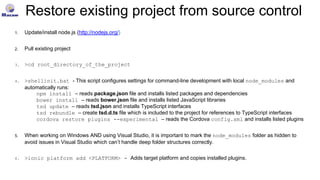
![Service template
/// <reference path='../_reference.ts'/>
module myNameSpace {
"use strict";
export class MyServiceClassName {
public static $inject = [
"$log"
];
public pubVar: string;
private privVar: string;
constructor(
private $log: ng.ILogService
) {
privVar = ‘5’;
}
someFunction(element): number {
return parseInt(privVar, 10);
}
}
}
Register a service:
1) Add reference in _reference.ts
2) Register in app.ts:
var myApp: ng.IModule = angular.module("angularApp",
[
"ngSanitize",
"ionic",
"directive.bindonce",
]);
myApp.service(“serviceName", myNameSpace.MyServiceClassName);
Gist of the template
Note that we’re creating a service inside myNameSpace name space. This kind of structure is useful for big proje
cts. As an example you can redefine some interface inside a certain namespace and it will not affect the code out
side this name space.](https://image.slidesharecdn.com/buildinganionicappwithtypescript-150126064852-conversion-gate02/85/Building-an-Ionic-hybrid-mobile-app-with-TypeScript-16-320.jpg)
![Directive template
/// <reference path='../../typings/angularjs/angular.d.ts' />
interface IMyDirectiveScope extends ng.IScope {
bookmarker: string;
}
angular.module('directive.bindonce', [])
.directive('bindOnce', function () {
return {
restrict: 'A',
scope: true,
link: ($scope: IMyDirectiveScope): void => {
setTimeout(() => {
$scope.$destroy();
}, 0);
}
}
});
Register a directive:
1) Add reference in _reference.ts
2) Register in app.ts file:
var myApp: ng.IModule = angular.module("angularApp",
[
"ngSanitize",
"ionic",
"directive.bindonce",
]);
Nota bene: Always use functions for your directive definitions. See: http://discventionstech.wordpress.com/2014/01/19/wri
te-angularjs-code-using-typescript/
Gist of the bind-once directive](https://image.slidesharecdn.com/buildinganionicappwithtypescript-150126064852-conversion-gate02/85/Building-an-Ionic-hybrid-mobile-app-with-TypeScript-17-320.jpg)


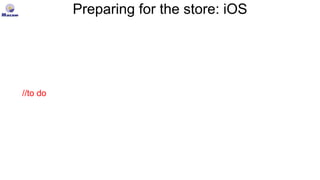
![Debug/release code compilation
In order to place the app into the web store it is recommended to:
1.minify HTML, CSS and JavaScript code
2.uglify JavaScript code
3.remove all comments from HTML, CSS and JavaScript
Install ready to use gulp modules that could perform these tasks:
1.>npm install gulp-ng-annotate -–save-dev
used to remove angularJS injections and comments and minifies
JavaScript
2.>npm install gulp-uglify –save-dev
3.>npm install gulp-sync –save-dev
helper module that is used to make sync calls of the tasks in Gulp
4.>npm install gulp-minify-html –save-dev
5.>npm install gulp-rename –save-dev
used to change file name
It is convinient to add these tasks to project gulpfile.js (see full gulpfile.js
at Gist):
var ngAnnotate = require('gulp-ng-annotate');
var uglify = require("gulp-uglify");
var gulpsync = require('gulp-sync')(gulp);
var minifyHTML = require('gulp-minify-html');
var rename = require("gulp-rename");
gulp.task('compile', compileTypeScript);
gulp.task('default', ['debug']);
gulp.task('release', gulpsync.sync(['minifyHtml', 'sass',
'compile', 'minifyJs']));
gulp.task('debug', ['sass', 'compile']);
gulp.task('minifyJs', function (done) {
gulp.src('./www/js/tslib.js')
.pipe(ngAnnotate({remove: true, add: true, single_quotes:
true}))
.pipe(uglify())
.pipe(gulp.dest('./www/js'))
.on('end', done);
});
gulp.task('minifyHtml', function (done) {
gulp.src('./www/index.html')
.pipe(minifyHTML({ empty: true }))
.pipe(rename(function (path) { path.basename += "-min"; }))
.pipe(gulp.dest('./www'));
gulp.src('./www/views/*')
.pipe(minifyHTML({ empty: true }))
.pipe(gulp.dest('./www/views/min'))
.on('end', done);
});
Now it’s much easier to compile debug/release versions of your code:
>gulp debug
>gulp release](https://image.slidesharecdn.com/buildinganionicappwithtypescript-150126064852-conversion-gate02/85/Building-an-Ionic-hybrid-mobile-app-with-TypeScript-25-320.jpg)


![Ionic/Angular issues (1)
• Ionic scroll (overflow-scroll=“false”) gives problem with
$ionicScrollDelegate.scrollTo() function. We solve it by using native scrolling
(overflow-scroll=“true”)
• Tap during scroll issue. Touching of a list item during scroll process results in firing touch event of
another item. This bug could be solved by using scroll detection $ionicScrollDelegate.on-
scroll or by creating a directive in case of overflow-scroll=“false”:
angular.module('directive.scrolldetector', [])
.directive('scrollDetector', function ($window) {
return {
restrict: 'A',
link: function (scope, element, attrs) {
function handler(e) {
scope.$evalAsync(function () {
scope.$eval((<any>attrs).scrollDetector);
});
}
scope.$on('$destroy', () => {
element[0].removeEventListener("scroll", handler);
});
element[0].addEventListener("scroll", handler);
}
}
});
Next create function that we can call to check if scrolling is active:
$rootScope.onScroll = () => {
$rootScope.lastScrollTimestamp = (new Date()).getTime();
}
$rootScope.isScrolling = () => {
//to be sure that at least 300 ms we have no scrolling
if ($rootScope.lastScrollTimestamp + 300 > (new Date()).getTime()) {
return true;
} else {
return false;
}}
usage:
in html: <ion-content overflow-scroll="true" scroll-detector="onScroll()">
in script: onTap = (e) => {
if (typeof $rootScope.isScrolling == 'function' && !$rootScope.isScrolling()) {
//tap event here
}}](https://image.slidesharecdn.com/buildinganionicappwithtypescript-150126064852-conversion-gate02/85/Building-an-Ionic-hybrid-mobile-app-with-TypeScript-30-320.jpg)


This document details lessons learned in creating a cross-platform hybrid app using the Ionic framework and TypeScript, including setup, project structure, and coding practices. Key topics include project modifications, TypeScript integration, and the usage of tools like Cordova and AngularJS for app development. The document serves as a guide for developers to streamline the app development cycle while optimizing for best practices and smooth deployment.


![[2015/2016] Apache Cordova](https://cdn.slidesharecdn.com/ss_thumbnails/05cordova-160401161537-thumbnail.jpg?width=560&fit=bounds)


![[not edited] Demo on mobile app development using ionic framework](https://cdn.slidesharecdn.com/ss_thumbnails/demoonmobileappdevelopmentusingionicframework-180409002227-thumbnail.jpg?width=560&fit=bounds)


