SlideShare a Scribd company logo
HOW TO USE MICROSOFT WORD
The Basics
Let's start off with the toolbar. The toolbar has seven different tabs.
Home, Insert, Page Layout, References, Mailings, Review, and View.
Home: This tab is the basic word processing tools, like for example, size, font, color, style, etc. You
will find that that you're going to go here most of the time.
Insert: This tab contains more tools than the Home tab, and it's really for inserting things. They are
really helpful, and they're just not used for basic word processing. They're also used for a professional
document. Some things you can do in this tab are add clip art, add links, etc.
Page Layout: This tab is mostly there for adding the final touch to your document and fixing it a little.
You can change the orientation, the size of your document, and pretty much you can do things you
normally can't do basically.
References: This tab is for inserting references. For example, adding citations, a table of contents,
footnotes, bibliography, captions, etc.
Mailings: This tab is for making envelopes and labels, starting a mail merge (sending the same
document to different people),
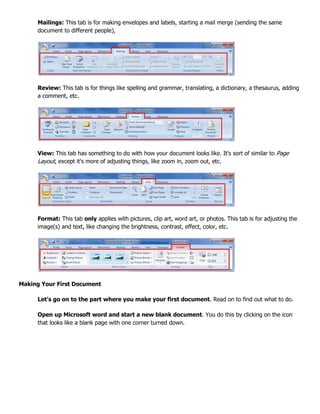
Review: This tab is for things like spelling and grammar, translating, a dictionary, a thesaurus, adding
a comment, etc.
View: This tab has something to do with how your document looks like. It's sort of similar to Page
Layout, except it's more of adjusting things, like zoom in, zoom out, etc.
Format: This tab only applies with pictures, clip art, word art, or photos. This tab is for adjusting the
image(s) and text, like changing the brightness, contrast, effect, color, etc.
Making Your First Document
Let's go on to the part where you make your first document. Read on to find out what to do.
Open up Microsoft word and start a new blank document. You do this by clicking on the icon
that looks like a blank page with one corner turned down.
Begin the process by saving.
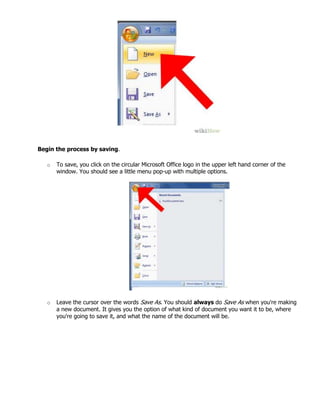
o To save, you click on the circular Microsoft Office logo in the upper left hand corner of the
window. You should see a little menu pop-up with multiple options.
o Leave the cursor over the words Save As. You should always do Save As when you're making
a new document. It gives you the option of what kind of document you want it to be, where
you're going to save it, and what the name of the document will be.
o Up will pop a window.
There are many different kinds of file type options. Click on Word 97-2003 Document or
Word Document. Word 97-2003 Document allows other people to see it, even if they have older
versions of Word and haven't installed the Office 2007 Compatibility Pack, while if you use Word
Document, only people that have Word 2007 or the Compatibility Pack can open it. Either one is a
good choice.
If this is your first time using Microsoft Word Office 2007, create a new folder for your
documents. Just type something like "Sample Documents" or something you want to name it.
After you're done creating a folder and saving the document, go back to the empty
document. Choose a font that you think is a style you like. Some suggested fonts are Times New
Roman, Calibri (Body), and Arial. The picture below shows you an example of what to do.
Type what you needed to type.
Save a document
To save a document in the format used by Word 2010 and Word 2007, do the following:
1. Click the File tab.
2. Click Save As.
3. In the File name box, enter a name for your document.
4. Click Save.
To save a document so that it is compatible with Word 2003 or earlier, do the following:
1. Open the document that you want to be used in Word 2003 or earlier.
2. Click the File tab.
3. Click Save As.
4. In the Save as type list, click Word 97-2003 Document. This changes the file format to .doc.
5. In the File name box, type a name for the document.
6. Click Save.
Read documents
1. Open the document that you want to read.
2. On the View tab, in the Document Views group, click Full Screen Reading
3. To move from page to page in a document, do one of the following:
Click the arrows in the lower corners of the pages.
Press PAGE DOWN and PAGE UP or SPACEBAR and BACKSPACE on the keyboard.
Click the navigation arrows at the top center of the screen.
Tip Click View Options, and then click Show Two Pages to view two pages, or screens, at a
time.
For more information about how to view documents, see Read documents in Word.
Top of Page
Track changes and insert comments
To turn on change tracking, on the Review tab, in the Tracking group, click Track Changes.
To insert a comment, on the Review tab, in the Comments group, click New Comment.
For more information about how to track changes made while revising, see Track changes and insert
comments.
Top of Page
Print your document
1. Click the File tab and then click Print.
2. Do the following:
Under Print, in the Copies box, enter the number of copies that you want to print.
Under Printer, make sure that the printer that you want is selected.
Under Settings, the default print settings for your printer are selected for you. If you want to change
a setting, click the setting you want to change and then select the setting that you want.
3. When you are satisfied with the settings, click Print.
http://www.wikihow.com/Use-Microsoft-Office-Word-2007
http://office.microsoft.com/en-001/word-help/basic-tasks-in-word-2010-HA101830016.aspx
HOW TO USE MICROSOFT EXCEL
We are going to build a small budget worksheet. We will sort the budget data, format it, and page preview it.
1. Open a new Excel workbook (below).
2. Change the Sheet1 name to "Budget" to reflect what we are doing. Double-click on the worksheet tab
where it says "Sheet1" and rename it to "Budget". Press the Enter key when you are done renaming it.
3. In column A create a column header called "Category", and in column B create a header called
"Amount". Enter the budget categories and amounts that you see in the image below. Add a "Total"
row in cell A11.
4. Let's format the amounts to make them look like money. Make sure the Home ribbon is selected and
look for the Number group. Locate the Accounting Number Format icon within that group. Click the
Accounting Number Format icon.
5. Select cell B10 where the formula for the total Amount is going to go. On the Home ribbon look for the
Editing group. Locate the AutoSum icon within that group. Click the AutoSum icon.
6. The AutoSum function =SUM(B2:B9) appears in the the formula bar and in cell B10. Notice that Excel
correctly guesses the range you want in the formula. Press the Enter key to finish adding the Sum
formula.
7. This is what it looks like:
8. We want to insert a new row above row 1 in order to indicate that column B is for January. We will add
more columns for more months. Select row 1. Right click and click the Insert option to insert a new
row above row 1. Row 1 becomes row 2. Enter January in cell B1, February in cell C1, Amount in cell
C2. Enter some amounts for the categories in cells C3:C10. Autosum the column total in cell C11.
Format the cells with the Accounting Number Format icon. This is what it should look like:
9. We're going to calculate the percent change between Frebruary and January. Enter "% Change" in cell
D1. In cell D3 enter the formula for the % change. To do this, step-by-step, start by entering an equals
(=) sign. Remember all formulas start with an equals sign. Next, enter a left parenthesis (. With your
mouse, select cell C3. Enter a minus sign (-). With your mouse, select cell B3. Enter a right
parenthesis, then the divisor sign - the forward slash (/). Finally, with your mouse, select cell B3 and
press the Enter key. The formula should look like =(C3-B3)/B3. While you could have entered the
formula directly through the keyboard e.g. typing in the cell addresses C3 and B3 instead of selecting
celss C3 and B3, I recommend that you select the cells to add the cell addresses to the formula. This
technique eliminates the possibility of typing the cell adress incorrectly, and this technique is used in
other worksheet functions, where you select a range with the mouse, as part of the formula.
10. Unfortunately Excel guesses wrongly and formats cell D3 as Accounting Number. Select cell D3. Locate
and click the % format icon in the Number group on the Home ribbon. With cell D3 selected still, hover
the mouse over the fill handle of cell D3. The fill handle is in the lower right hand corner of teh cell and
it is a small black square. Once the mouse is over the fill handle, the cursor changes from the default,
wide plus sign to a cross-hair cursor. Left-click, hold, and drag down to cell D11 and let go. This is
what it should look like:
http://www.useexcel.com/excel2007commontasks.aspx
How to use microsoft word

More Related Content

What's hot (20)

PDF
Introduction publisher
Ina Agustina
 
PPT
Types of Printers
Navdeep Kumar
 
PPTX
Microsoft Word
Anup Chakraborty
 
PPTX
DAY 1 - Introduction to Photo Editing and Photoshop CS6
Sef Cambaliza
 
PPTX
Ms word
HansRahu
 
PPTX
Formatting text (Microsoft Excel)
Mirea Mizushima
 
PPTX
Basic Photoshop Tutorial
Marc Dy
 
PPT
22 Excel Basics
Buffalo Seminary
 
DOCX
Word 2016
Bibhuti Behera
 
PPT
Learn MS Powerpoint basics
vethics
 
PDF
Adobe photoshop cs6
ilaazmil2
 
PPTX
Introduction to MS excel
fatimazaheer12
 
PPTX
Ms Word (Insert Option)
Saransh Arora
 
PDF
4th generation of computer
MahrukhShehzadi1
 
PDF
Learning Photoshop CS6 with 100 practical exercises
MCB Press
 
PPTX
Working with shapes and objects
Wan Nurhidayati Wan Johari
 
PPT
Introduction to photoshop
Reymart Canuel
 
PDF
Lp in ict
Ric Dagdagan
 
PPTX
TUTORIAL ON PHOTOSHOP
Anamika Chauhan
 
Introduction publisher
Ina Agustina
 
Types of Printers
Navdeep Kumar
 
Microsoft Word
Anup Chakraborty
 
DAY 1 - Introduction to Photo Editing and Photoshop CS6
Sef Cambaliza
 
Ms word
HansRahu
 
Formatting text (Microsoft Excel)
Mirea Mizushima
 
Basic Photoshop Tutorial
Marc Dy
 
22 Excel Basics
Buffalo Seminary
 
Word 2016
Bibhuti Behera
 
Learn MS Powerpoint basics
vethics
 
Adobe photoshop cs6
ilaazmil2
 
Introduction to MS excel
fatimazaheer12
 
Ms Word (Insert Option)
Saransh Arora
 
4th generation of computer
MahrukhShehzadi1
 
Learning Photoshop CS6 with 100 practical exercises
MCB Press
 
Working with shapes and objects
Wan Nurhidayati Wan Johari
 
Introduction to photoshop
Reymart Canuel
 
Lp in ict
Ric Dagdagan
 
TUTORIAL ON PHOTOSHOP
Anamika Chauhan
 

Viewers also liked (20)

PPTX
10 Tips To Maximize Your Use of Microsoft Word
David Usher
 
PPT
Seminar with the Division Education Program Supervisors-in-Charge of Private ...
Dr. Joy Kenneth Sala Biasong
 
DOCX
Guyana
PRINTDESK by Dan
 
PPTX
Presentatie Henk Oosterling
Rotterdam Sportsupport
 
PPT
Sportaccommodaties beter benutten
Rotterdam Sportsupport
 
PDF
Alex Haw lecture 140203 - Liveable Cities - The Future Of Fabrication--105
Atmos
 
PDF
I 70 over SR 0481 Phase 1 Girder Erection Photos
Pete Quinn
 
PPT
The parable of the coffee bean
PRINTDESK by Dan
 
PPT
Bridge code aashto aws d1.5
James Gray
 
PPTX
dirty policy study: Mining in Nueva Vizcaya, Philippines
Lawrence Lerias
 
DOCX
Part2 peproject
PRINTDESK by Dan
 
PPTX
Weld Carbon Steel Pipe in 6G using SMAW
Lawrence Lerias
 
DOCX
Energy drinks
PRINTDESK by Dan
 
PDF
Guidelines smaw
THalmsen
 
PDF
Dressmaking tailoring lm
PRINTDESK by Dan
 
DOCX
Peer counseling
PRINTDESK by Dan
 
PDF
K to 12 TLE Curriculum Guide for Shielded Metal Arc Welding (SMAC)
Dr. Joy Kenneth Sala Biasong
 
10 Tips To Maximize Your Use of Microsoft Word
David Usher
 
Seminar with the Division Education Program Supervisors-in-Charge of Private ...
Dr. Joy Kenneth Sala Biasong
 
Presentatie Henk Oosterling
Rotterdam Sportsupport
 
Sportaccommodaties beter benutten
Rotterdam Sportsupport
 
Alex Haw lecture 140203 - Liveable Cities - The Future Of Fabrication--105
Atmos
 
I 70 over SR 0481 Phase 1 Girder Erection Photos
Pete Quinn
 
The parable of the coffee bean
PRINTDESK by Dan
 
Bridge code aashto aws d1.5
James Gray
 
dirty policy study: Mining in Nueva Vizcaya, Philippines
Lawrence Lerias
 
Part2 peproject
PRINTDESK by Dan
 
Weld Carbon Steel Pipe in 6G using SMAW
Lawrence Lerias
 
Energy drinks
PRINTDESK by Dan
 
Guidelines smaw
THalmsen
 
Dressmaking tailoring lm
PRINTDESK by Dan
 
Peer counseling
PRINTDESK by Dan
 
K to 12 TLE Curriculum Guide for Shielded Metal Arc Welding (SMAC)
Dr. Joy Kenneth Sala Biasong
 
Ad

Similar to How to use microsoft word (20)

PPTX
Introduction to MS Word & Excel 2007-vpn.pptx
DeepakWaikar2
 
PPTX
Apc college
akash96100
 
PPTX
Word presentation ict1b
Mary Ann Landero
 
PPT
Microsoft Word Intermediate
University of Puerto Rico
 
DOCX
Document 1 Long Document
sharrison2010
 
DOCX
Document 1 Long Document
sharrison2010
 
PDF
Word2007 tutorial
sat646
 
PDF
Intro to Microsoft Excel 2007
Westerville Library
 
PDF
Microsoft word tutorials COMPLETE by Gulshan K Maheshwari(QAU)
GulshanKumar368
 
PDF
Bnet free indispensable_word_tips
Chinmay Bande
 
PPTX
Word 2007
Krishanku Bose
 
PPTX
Lect08 edit
Muhammad Jamaludin
 
PPTX
Ms word Presentation
Madhab Behera
 
PPTX
Ms word 2007 PPT
ARMANKHAN213
 
PDF
60 MS Word Tips
Ron Lewis
 
PPT
MS Word Intermediate Training
Michael Sheyahshe
 
PDF
Word 2010 tutorial
Ivanelcampeon
 
PDF
Word100
rasha3
 
PDF
Word 2010 tutorial
valjuniel
 
PDF
Word 2010 tutorial
Gyanendrapratap Arya
 
Introduction to MS Word & Excel 2007-vpn.pptx
DeepakWaikar2
 
Apc college
akash96100
 
Word presentation ict1b
Mary Ann Landero
 
Microsoft Word Intermediate
University of Puerto Rico
 
Document 1 Long Document
sharrison2010
 
Document 1 Long Document
sharrison2010
 
Word2007 tutorial
sat646
 
Intro to Microsoft Excel 2007
Westerville Library
 
Microsoft word tutorials COMPLETE by Gulshan K Maheshwari(QAU)
GulshanKumar368
 
Bnet free indispensable_word_tips
Chinmay Bande
 
Word 2007
Krishanku Bose
 
Lect08 edit
Muhammad Jamaludin
 
Ms word Presentation
Madhab Behera
 
Ms word 2007 PPT
ARMANKHAN213
 
60 MS Word Tips
Ron Lewis
 
MS Word Intermediate Training
Michael Sheyahshe
 
Word 2010 tutorial
Ivanelcampeon
 
Word100
rasha3
 
Word 2010 tutorial
valjuniel
 
Word 2010 tutorial
Gyanendrapratap Arya
 
Ad

More from PRINTDESK by Dan (20)

DOCX
MGA GAWAING PANGKALUSUGAN TUNGO SA MABIKAS NA PAGGAYAK
PRINTDESK by Dan
 
PDF
GENERAL BIOLOGY TEACHING GUIDE
PRINTDESK by Dan
 
PDF
DepEd Mission and Vision
PRINTDESK by Dan
 
PDF
EARTH SCIENCE TEACHING GUIDE
PRINTDESK by Dan
 
PDF
GENERAL PHYSICS 1 TEACHING GUIDE
PRINTDESK by Dan
 
PDF
STATISTICS AND PROBABILITY (TEACHING GUIDE)
PRINTDESK by Dan
 
PDF
21st century literature from the philippines and the world
PRINTDESK by Dan
 
DOCX
The Rice Myth - Sappia The Goddess
PRINTDESK by Dan
 
DOCX
Kultura ng taiwan
PRINTDESK by Dan
 
DOCX
MGA AWITING BAYAN
PRINTDESK by Dan
 
PDF
A control room of a local radio broadcast studio commonly known as the announcer
PRINTDESK by Dan
 
DOCX
Gawains in Aral Pan 9
PRINTDESK by Dan
 
PDF
FILIPINO Grade 10 Learning Module Unit 3
PRINTDESK by Dan
 
PDF
Mathematics 10 Learner’s Material Unit 4
PRINTDESK by Dan
 
PDF
Mathematics 10 Learner’s Material Unit 3
PRINTDESK by Dan
 
PDF
Unit 3 - Science 10 Learner’s Material
PRINTDESK by Dan
 
PDF
Science 10 Learner’s Material Unit 4
PRINTDESK by Dan
 
DOCX
Branches of biology
PRINTDESK by Dan
 
DOCX
Basketball
PRINTDESK by Dan
 
DOC
Babasit
PRINTDESK by Dan
 
MGA GAWAING PANGKALUSUGAN TUNGO SA MABIKAS NA PAGGAYAK
PRINTDESK by Dan
 
GENERAL BIOLOGY TEACHING GUIDE
PRINTDESK by Dan
 
DepEd Mission and Vision
PRINTDESK by Dan
 
EARTH SCIENCE TEACHING GUIDE
PRINTDESK by Dan
 
GENERAL PHYSICS 1 TEACHING GUIDE
PRINTDESK by Dan
 
STATISTICS AND PROBABILITY (TEACHING GUIDE)
PRINTDESK by Dan
 
21st century literature from the philippines and the world
PRINTDESK by Dan
 
The Rice Myth - Sappia The Goddess
PRINTDESK by Dan
 
Kultura ng taiwan
PRINTDESK by Dan
 
MGA AWITING BAYAN
PRINTDESK by Dan
 
A control room of a local radio broadcast studio commonly known as the announcer
PRINTDESK by Dan
 
Gawains in Aral Pan 9
PRINTDESK by Dan
 
FILIPINO Grade 10 Learning Module Unit 3
PRINTDESK by Dan
 
Mathematics 10 Learner’s Material Unit 4
PRINTDESK by Dan
 
Mathematics 10 Learner’s Material Unit 3
PRINTDESK by Dan
 
Unit 3 - Science 10 Learner’s Material
PRINTDESK by Dan
 
Science 10 Learner’s Material Unit 4
PRINTDESK by Dan
 
Branches of biology
PRINTDESK by Dan
 
Basketball
PRINTDESK by Dan
 

Recently uploaded (20)

PDF
Make GenAI investments go further with the Dell AI Factory
Principled Technologies
 
PPTX
AI in Daily Life: How Artificial Intelligence Helps Us Every Day
vanshrpatil7
 
PDF
AI Unleashed - Shaping the Future -Starting Today - AIOUG Yatra 2025 - For Co...
Sandesh Rao
 
PPTX
cloud computing vai.pptx for the project
vaibhavdobariyal79
 
PPTX
Introduction to Flutter by Ayush Desai.pptx
ayushdesai204
 
PPTX
Agentic AI in Healthcare Driving the Next Wave of Digital Transformation
danielle hunter
 
PDF
CIFDAQ's Market Wrap : Bears Back in Control?
CIFDAQ
 
PDF
Responsible AI and AI Ethics - By Sylvester Ebhonu
Sylvester Ebhonu
 
PDF
RAT Builders - How to Catch Them All [DeepSec 2024]
malmoeb
 
PPTX
AI Code Generation Risks (Ramkumar Dilli, CIO, Myridius)
Priyanka Aash
 
PPTX
Simple and concise overview about Quantum computing..pptx
mughal641
 
PPTX
AVL ( audio, visuals or led ), technology.
Rajeshwri Panchal
 
PDF
A Strategic Analysis of the MVNO Wave in Emerging Markets.pdf
IPLOOK Networks
 
PDF
Google I/O Extended 2025 Baku - all ppts
HusseinMalikMammadli
 
PDF
The Future of Mobile Is Context-Aware—Are You Ready?
iProgrammer Solutions Private Limited
 
PPTX
Farrell_Programming Logic and Design slides_10e_ch02_PowerPoint.pptx
bashnahara11
 
PDF
Generative AI vs Predictive AI-The Ultimate Comparison Guide
Lily Clark
 
PDF
OFFOFFBOX™ – A New Era for African Film | Startup Presentation
ambaicciwalkerbrian
 
PDF
Structs to JSON: How Go Powers REST APIs
Emily Achieng
 
PDF
Per Axbom: The spectacular lies of maps
Nexer Digital
 
Make GenAI investments go further with the Dell AI Factory
Principled Technologies
 
AI in Daily Life: How Artificial Intelligence Helps Us Every Day
vanshrpatil7
 
AI Unleashed - Shaping the Future -Starting Today - AIOUG Yatra 2025 - For Co...
Sandesh Rao
 
cloud computing vai.pptx for the project
vaibhavdobariyal79
 
Introduction to Flutter by Ayush Desai.pptx
ayushdesai204
 
Agentic AI in Healthcare Driving the Next Wave of Digital Transformation
danielle hunter
 
CIFDAQ's Market Wrap : Bears Back in Control?
CIFDAQ
 
Responsible AI and AI Ethics - By Sylvester Ebhonu
Sylvester Ebhonu
 
RAT Builders - How to Catch Them All [DeepSec 2024]
malmoeb
 
AI Code Generation Risks (Ramkumar Dilli, CIO, Myridius)
Priyanka Aash
 
Simple and concise overview about Quantum computing..pptx
mughal641
 
AVL ( audio, visuals or led ), technology.
Rajeshwri Panchal
 
A Strategic Analysis of the MVNO Wave in Emerging Markets.pdf
IPLOOK Networks
 
Google I/O Extended 2025 Baku - all ppts
HusseinMalikMammadli
 
The Future of Mobile Is Context-Aware—Are You Ready?
iProgrammer Solutions Private Limited
 
Farrell_Programming Logic and Design slides_10e_ch02_PowerPoint.pptx
bashnahara11
 
Generative AI vs Predictive AI-The Ultimate Comparison Guide
Lily Clark
 
OFFOFFBOX™ – A New Era for African Film | Startup Presentation
ambaicciwalkerbrian
 
Structs to JSON: How Go Powers REST APIs
Emily Achieng
 
Per Axbom: The spectacular lies of maps
Nexer Digital
 

How to use microsoft word

  • 1. HOW TO USE MICROSOFT WORD The Basics Let's start off with the toolbar. The toolbar has seven different tabs. Home, Insert, Page Layout, References, Mailings, Review, and View. Home: This tab is the basic word processing tools, like for example, size, font, color, style, etc. You will find that that you're going to go here most of the time. Insert: This tab contains more tools than the Home tab, and it's really for inserting things. They are really helpful, and they're just not used for basic word processing. They're also used for a professional document. Some things you can do in this tab are add clip art, add links, etc. Page Layout: This tab is mostly there for adding the final touch to your document and fixing it a little. You can change the orientation, the size of your document, and pretty much you can do things you normally can't do basically. References: This tab is for inserting references. For example, adding citations, a table of contents, footnotes, bibliography, captions, etc.
  • 2. Mailings: This tab is for making envelopes and labels, starting a mail merge (sending the same document to different people), Review: This tab is for things like spelling and grammar, translating, a dictionary, a thesaurus, adding a comment, etc. View: This tab has something to do with how your document looks like. It's sort of similar to Page Layout, except it's more of adjusting things, like zoom in, zoom out, etc. Format: This tab only applies with pictures, clip art, word art, or photos. This tab is for adjusting the image(s) and text, like changing the brightness, contrast, effect, color, etc. Making Your First Document Let's go on to the part where you make your first document. Read on to find out what to do. Open up Microsoft word and start a new blank document. You do this by clicking on the icon that looks like a blank page with one corner turned down.
  • 3. Begin the process by saving. o To save, you click on the circular Microsoft Office logo in the upper left hand corner of the window. You should see a little menu pop-up with multiple options. o Leave the cursor over the words Save As. You should always do Save As when you're making a new document. It gives you the option of what kind of document you want it to be, where you're going to save it, and what the name of the document will be.
  • 4. o Up will pop a window. There are many different kinds of file type options. Click on Word 97-2003 Document or Word Document. Word 97-2003 Document allows other people to see it, even if they have older versions of Word and haven't installed the Office 2007 Compatibility Pack, while if you use Word Document, only people that have Word 2007 or the Compatibility Pack can open it. Either one is a good choice.
  • 5. If this is your first time using Microsoft Word Office 2007, create a new folder for your documents. Just type something like "Sample Documents" or something you want to name it. After you're done creating a folder and saving the document, go back to the empty document. Choose a font that you think is a style you like. Some suggested fonts are Times New Roman, Calibri (Body), and Arial. The picture below shows you an example of what to do. Type what you needed to type.
  • 6. Save a document To save a document in the format used by Word 2010 and Word 2007, do the following: 1. Click the File tab. 2. Click Save As. 3. In the File name box, enter a name for your document. 4. Click Save. To save a document so that it is compatible with Word 2003 or earlier, do the following: 1. Open the document that you want to be used in Word 2003 or earlier. 2. Click the File tab. 3. Click Save As. 4. In the Save as type list, click Word 97-2003 Document. This changes the file format to .doc. 5. In the File name box, type a name for the document. 6. Click Save. Read documents 1. Open the document that you want to read. 2. On the View tab, in the Document Views group, click Full Screen Reading 3. To move from page to page in a document, do one of the following: Click the arrows in the lower corners of the pages. Press PAGE DOWN and PAGE UP or SPACEBAR and BACKSPACE on the keyboard. Click the navigation arrows at the top center of the screen. Tip Click View Options, and then click Show Two Pages to view two pages, or screens, at a time.
  • 7. For more information about how to view documents, see Read documents in Word. Top of Page Track changes and insert comments To turn on change tracking, on the Review tab, in the Tracking group, click Track Changes. To insert a comment, on the Review tab, in the Comments group, click New Comment. For more information about how to track changes made while revising, see Track changes and insert comments. Top of Page Print your document 1. Click the File tab and then click Print. 2. Do the following: Under Print, in the Copies box, enter the number of copies that you want to print. Under Printer, make sure that the printer that you want is selected. Under Settings, the default print settings for your printer are selected for you. If you want to change a setting, click the setting you want to change and then select the setting that you want. 3. When you are satisfied with the settings, click Print. http://www.wikihow.com/Use-Microsoft-Office-Word-2007 http://office.microsoft.com/en-001/word-help/basic-tasks-in-word-2010-HA101830016.aspx
  • 8. HOW TO USE MICROSOFT EXCEL We are going to build a small budget worksheet. We will sort the budget data, format it, and page preview it. 1. Open a new Excel workbook (below). 2. Change the Sheet1 name to "Budget" to reflect what we are doing. Double-click on the worksheet tab where it says "Sheet1" and rename it to "Budget". Press the Enter key when you are done renaming it.
  • 9. 3. In column A create a column header called "Category", and in column B create a header called "Amount". Enter the budget categories and amounts that you see in the image below. Add a "Total" row in cell A11. 4. Let's format the amounts to make them look like money. Make sure the Home ribbon is selected and look for the Number group. Locate the Accounting Number Format icon within that group. Click the Accounting Number Format icon.
  • 10. 5. Select cell B10 where the formula for the total Amount is going to go. On the Home ribbon look for the Editing group. Locate the AutoSum icon within that group. Click the AutoSum icon. 6. The AutoSum function =SUM(B2:B9) appears in the the formula bar and in cell B10. Notice that Excel correctly guesses the range you want in the formula. Press the Enter key to finish adding the Sum formula.
  • 11. 7. This is what it looks like: 8. We want to insert a new row above row 1 in order to indicate that column B is for January. We will add more columns for more months. Select row 1. Right click and click the Insert option to insert a new row above row 1. Row 1 becomes row 2. Enter January in cell B1, February in cell C1, Amount in cell C2. Enter some amounts for the categories in cells C3:C10. Autosum the column total in cell C11. Format the cells with the Accounting Number Format icon. This is what it should look like:
  • 12. 9. We're going to calculate the percent change between Frebruary and January. Enter "% Change" in cell D1. In cell D3 enter the formula for the % change. To do this, step-by-step, start by entering an equals (=) sign. Remember all formulas start with an equals sign. Next, enter a left parenthesis (. With your mouse, select cell C3. Enter a minus sign (-). With your mouse, select cell B3. Enter a right parenthesis, then the divisor sign - the forward slash (/). Finally, with your mouse, select cell B3 and press the Enter key. The formula should look like =(C3-B3)/B3. While you could have entered the formula directly through the keyboard e.g. typing in the cell addresses C3 and B3 instead of selecting celss C3 and B3, I recommend that you select the cells to add the cell addresses to the formula. This technique eliminates the possibility of typing the cell adress incorrectly, and this technique is used in other worksheet functions, where you select a range with the mouse, as part of the formula. 10. Unfortunately Excel guesses wrongly and formats cell D3 as Accounting Number. Select cell D3. Locate and click the % format icon in the Number group on the Home ribbon. With cell D3 selected still, hover the mouse over the fill handle of cell D3. The fill handle is in the lower right hand corner of teh cell and it is a small black square. Once the mouse is over the fill handle, the cursor changes from the default, wide plus sign to a cross-hair cursor. Left-click, hold, and drag down to cell D11 and let go. This is what it should look like: http://www.useexcel.com/excel2007commontasks.aspx