


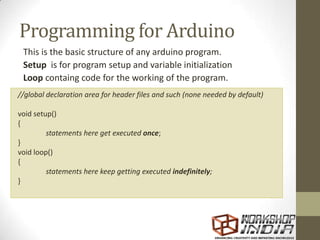


![Arrays
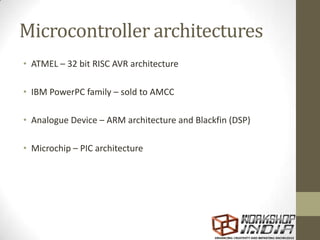
• An array is a collection of values that are accessed with an
index number.
• Arrays are zero indexed, with the first value in the array
beginning at index number 0.
int myArray[5]; // declares integer array w/ 6 positions
myArray[3] = 10; // assigns the 4th index the value 10
int x;
x = myArray[3]; // x now equals 10](https://image.slidesharecdn.com/introductiontoarduino-111120102058-phpapp02-221029122353-f833b149/85/introductiontoarduino-111120102058-phpapp02-pdf-32-320.jpg)
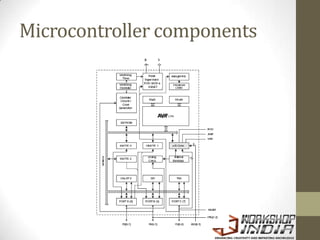
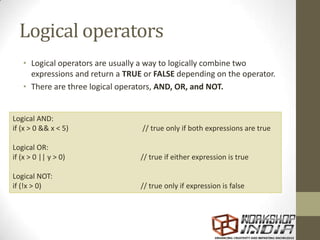
![int ledPin = 10; // LED on pin 10
byte flikr[] = {160, 130, 5, 20, 100, 30, 110, 25};
// above array of 8
void setup()
{
pinMode(ledPin, OUTPUT); // sets OUTPUT pin
}
void loop()
{
for(int i=0; i<7; i++) // looping though array
{
analogWrite(ledPin, flikr[i]); // write index value
delay(200); // pause 200ms
}
}](https://image.slidesharecdn.com/introductiontoarduino-111120102058-phpapp02-221029122353-f833b149/85/introductiontoarduino-111120102058-phpapp02-pdf-33-320.jpg)


introductiontoarduino-111120102058-phpapp02.pdf
- 2. Physical computing Developing solutions that implement a software to interact with elements in the physical universe. 1. Sensors convert signals from the physical world to information to the computing device. 2. Processing this data via the computational device 3. Performing physical actions using actuators
- 3. Microcontrollers • Microcontrollers are small computers integrated into a single chip. • They contain 1. Processor core 2. Flash Memory for program 3. I/O peripherals 4. RAM 5. Peripherals such as clocks, timers, PWM etc • Microprocessors are used for general purpose applications while microcontrollers are self sufficient and are used for specific tasks. • MCU are an example of embedded systems.
- 4. Microcontroller architectures • ATMEL – 32 bit RISC AVR architecture • IBM PowerPC family – sold to AMCC • Analogue Device – ARM architecture and Blackfin (DSP) • Microchip – PIC architecture
- 6. Parts of an MCU • CPU: central processing unit that may contain a 8-bit, 16-bit or 32-bit processor. • RAM: for volatile data storage. • ROM, EPROM, EEPROM or Flash memory for program and operating parameter storage • discrete input and output PINS • serial input/output such as serial ports (UARTs) • peripherals such as timers, event counters, PWM generators, and watchdog • clock generator • analog-to-digital converters • digital-to-analog converters • in-circuit programming and debugging support
- 7. Programming Microcontrollers Programming microcontrollers is usually hard and expensive: • Obtaining the microcontroller • Making the programming circuit • Writing the program into a target language and compiler • Flashing the program onto the chip • Removing the chip from programming circuit to application circuit • Testing and debugging • Proprietary technology is expensive
- 8. Enter the Arduino • The Arduino is an open source development board for the AVR series of microcontrollers for physical computing. • Can input a variety of sensor data. • Can communicate with programs on computer easily. • Can control a variety of motors, lights and other devices. • Advantages 1. Cheap 2. Open source hardware and software 3. Easy learning curve 4. Extensible
- 9. Freeduino • Exactly the same as the Arduino. • Developed as a clone for IP purposes only as open hardware.
- 11. Microcontroller Microcontroller ATmega328p Operating Voltage 5V Digital I/O Pins 14 (of which 6 provide PWM output) Analog Input Pins 6 DC Current per I/O Pin 40 mA DC Current for 3.3V Pin 50 mA Flash Memory 16 KB (of which 2 KB used by bootloader) SRAM 1 KB EEPROM 512 bytes Clock Speed (via XTAL) 16 MHz
- 13. Powering it up • Has a jumper that can switch between 5V from USB and a 9V input jack through a 7805. • External power can be connected via a 2.1mm standard jack. Normal adaptors that fit and are 6V-12V can be used. • If power supply is <5V, board may become unstable • If power supply >12V, board may overheat • GND, VIN, 5V and 3.3V are present for powering peripherals.
- 14. The bootloader • Programming a microcontroller is usually done by specific programmer circuits like AVR-MKll, USBtiny • ISP and JTAG are protocols to burn code onto microcontrollers • The arduino comes preloaded with code called the bootloader ( taking 2K of memory) that looks for programs coming through the serial port and moves it into the program memory for execution. • If bootloader is damaged for any reason it can be restored by an ICSP programmer.
- 15. FTDI serial to USB • Microcontrollers like the atmega328 have only serial port using the USART for external communication. • The arduino design includes a FTDI chip that acts as a Serial to USB link. • The USB cable connected to the computer shows up as a virtual COM port and behaves exactly like a serial port. • Latest Drivers can be found at the downloads section of the FTDI website. (use google)
- 16. Atmega328 to Arduino PIN
- 17. Important PINS on the board • All arduino pins operate at 5V, 40mA. DO NOT EXCEED THAT RATING! • 0(RX) and 1(TX) are the serial port pins. These pins go to the FTDI chip also. You can tap the serial data from here if you want. These pins are also connected to LED so you can see when there is data being transferred. • 2 & 3 : External Interrupts. These pins can be used as INT0 and INT1 respectively for calling an externally generated interrupt. • 3, 5, 6, 9, 10, and 11 : PWM : These pins can generate an 8-bit pulse width modulated output. • LED: 13 an LED provided on the arduino board itself. • AREF: used for external analogue signal reference for the ADC
- 18. The Arduino IDE • The arduino is an open source IDE developed from wiring. • Get the latest IDE (0022) from the website • Extract it and double click arduino.exe • Since the program is written in JAVA.. It might have some issues on win7 x64 systems. (to solve, just wait.. Its hangs for a bit occasionally)
- 19. The Arduino IDE • The arduino is programmed in C language. • The language is very simple and provides many abstraction for simplicity of reading and writing powerfull applications. • The Arduino IDE can be used write the bootloader onto any MCU via ICSP making it an “arduino”. • It provides a serial monitor to see the serial data from the USB virtual COM port. • Allows ofr one click compiling, verification and burning of code onto the arduino.
- 20. Select the right board
- 21. Programming for Arduino This is the basic structure of any arduino program. Setup is for program setup and variable initialization Loop containg code for the working of the program. //global declaration area for header files and such (none needed by default) void setup() { statements here get executed once; } void loop() { statements here keep getting executed indefinitely; }
- 22. Setup() • All code contained in this function is executed once. • REQUIRED function for an arduino program to compile void setup() { pinMode(pin, OUTPUT); // sets the 'pin' as output }
- 23. loop() • All code contained in this function is executed repeatedly. • This program is responsible for all the arduino boards functionality. • REQUIRED function for an arduino program to compile void loop() { digitalWrite(pin, HIGH); // turns 'pin' on delay(1000); // pauses for one second digitalWrite(pin, LOW); // turns 'pin' off delay(1000); // pauses for one second }
- 24. Available data types in Arduino IDE • void • boolean • char ( 0 – 255) • byte - 8 bit data ( 0 – 255) • int - 16-bit data (32,767 - -32,768) • long – 32 bit data (2,147,483,647 to -2,147,483,648) • float • double • string - char array • String - object • array
- 25. Arithmetic • Arithmetic operators include addition, subtraction, multiplication, and division. • Remember the point of variable rollover and also what happens then: e.g. (0 - 1) OR (0 - - 32768). • For math that requires fractions, you can use float variables, if you can bear large size and slow computation speeds in your microcontroller. y = y + 3; x = x - 7; i = j * 6; r = r / 5;
- 26. Comparison operators • Comparisons of one variable or constant against another are often used in if statements to test if a specified condition is true. x == y // x is equal to y x != y // x is not equal to y x < y // x is less than y x > y // x is greater than y x <= y // x is less than or equal to y x >= y // x is greater than or equal to y
- 27. Logical operators • Logical operators are usually a way to logically combine two expressions and return a TRUE or FALSE depending on the operator. • There are three logical operators, AND, OR, and NOT. Logical AND: if (x > 0 && x < 5) // true only if both expressions are true Logical OR: if (x > 0 || y > 0) // true if either expression is true Logical NOT: if (!x > 0) // true only if expression is false
- 28. TRUE/FALSE • These are Boolean constants that define logic levels of the arduino. • FALSE is easily defined as 0 (zero) • TRUE is often defined as 1, but can also be anything else except zero. So in a Boolean sense, -1, 2, and -200 are all also defined as TRUE. if (abcd== TRUE); { DoSomethingNice; } else { DoSomethingHorrible; }
- 29. HIGH/LOW • These constants define pin levels as HIGH or LOW and are used when reading or writing to digital pins. • HIGH is defined as logic level 1, ON, or 5 volts • LOW is logic level 0, OFF, or 0 volts. digitalWrite(13, HIGH);
- 30. INPUT/OUTPUT • These constants define pin levels as HIGH or LOW and are used when reading or writing to digital pins. • HIGH is defined as logic level 1, ON, or 5 volts • LOW is logic level 0, OFF, or 0 volts. pinmode(13, OUTPUT);
- 31. Writing custom functions • Functions are named blocks of code that can be called repeatedly. • Use functions to reduce clutter and perform repeated tasks. • Functions can return datatypes as required. int delayVal() { int v; // create temporary variable 'v' v = analogRead(pot); // read potentiometer value v /= 4; // converts 0-1023 to 0-255 return v; // return final value }
- 32. Arrays • An array is a collection of values that are accessed with an index number. • Arrays are zero indexed, with the first value in the array beginning at index number 0. int myArray[5]; // declares integer array w/ 6 positions myArray[3] = 10; // assigns the 4th index the value 10 int x; x = myArray[3]; // x now equals 10
- 33. int ledPin = 10; // LED on pin 10 byte flikr[] = {160, 130, 5, 20, 100, 30, 110, 25}; // above array of 8 void setup() { pinMode(ledPin, OUTPUT); // sets OUTPUT pin } void loop() { for(int i=0; i<7; i++) // looping though array { analogWrite(ledPin, flikr[i]); // write index value delay(200); // pause 200ms } }
- 34. Pinmode(pin,mode) • Used in void setup() to decide whether a specified pin must behave either as an INPUT or an OUTPUT pin. • Arduino digital pins are input by default, but still use pinmode() for brevity. • Pins configured as INPUT are said to be in a high-impedance state so don’t try to load this pin externally.. It’ll fry. • Pins configured as OUTPUT are said to be in a low-impedance state and can provide 40 mA of current to the load. • Can be used to brightly light up an LED sound a buzzer but not motors, solenoids etc.. pinMode(pin, INPUT); // set ‘pin’ to input digitalWrite(pin, HIGH); // turn on pullup resistors
- 35. digitalRead(pin) • Reads the value from a specified digital pin with the result either HIGH or LOW. • The pin can be specified as either a variable or constant (0-13). value = digitalRead(Pin); // sets 'value' equal to the input pin
- 36. digitalwrite(pin,value) • Outputs either logic level HIGH or LOW at (turns on or off) a specified digital pin. The pin can be specified as either a variable or constant (0-13). int led = 13; // connect LED to pin 13 int pin = 7; // connect pushbutton to pin 7 int value = 0; // variable to store the read value void setup() { pinMode(led, OUTPUT); // sets pin 13 as output pinMode(pin, INPUT); // sets pin 7 as input } void loop() { value = digitalRead(pin); // sets 'value' equal to I/P pin digitalWrite(led, value); // sets 'led' to the }
- 37. analogread(pin) • Reads the value from a specified analog pin with a 10-bit resolution. T • his function only works on the analog in pins (0-5). The resulting integer values range from 0 to 1023. • Analogue pins do not need to be set by using pinmode • A0 – A6 are the analoge pins value = analogRead(A0); // sets 'value' equal to A0
- 38. analogwrite(pin,value) • Writes a analog value using hardware enabled pulse width modulation (PWM) by internal timers to an output pin marked as PWM ONLY. int led = 10; // LED with 220 resistor on pin 10 int pin = 0; // potentiometer on analog pin 0 int value; // value for reading void setup(){} // no setup needed void loop() { value = analogRead(pin); // sets 'value' equal to 'pin' value /= 4; // converts 0-1023 to 0-255 analogWrite(led, value); // outputs PWM signal to led }
- 39. Serial.begin(rate) • Opens serial port and sets the baud rate for serial data transmission. • The typical baud rate for communicating with the computer is 9600. • If you get garbage values, check if baude rate matches. • Always in setup() void setup() { Serial.begin(9600); // opens serial port }
- 40. Serial.println(data) • Prints data to the serial port, followed by an automatic carriage return and line feed. • This command takes the same form as Serial.print(), but is easier for reading data on the Serial Monitor. Serial.println(analogread(A0)); //sends A0 value to serial port
- 41. Other available functions • Pointer access operators * & • Random() and randomseed() for random number generation • Sin(), cos() and tan() functions • Delayms() and delay() • Various math function, abs(), pow(), sqrt() etc • Attachinterrupt() and Detachinterrupt() for interrupt programming • All compund operators, structures and class functionality of C/C++
- 42. The arduino Sketch • A sketch is the name that Arduino uses for a program. It's the unit of code that is uploaded to and run on an Arduino board. • Sketches are stored in .pde format. Openable only by the arduino IDE. • If you have issues burning code onto the arduino, check http://arduino.cc/en/Guide/Troubleshooting for tips.
- 43. Steps in Arduino programming. • Open the IDE • Write code and logic • Click the verify/compile button to check your program for errors. • Attach the arduino via USB to the PC. • Install drivers if first time. • Set up serial port being used. • Set up board you are programming. • Click upload code to send code to arduino.