V4.1
                                                                                                   Instructor Exercises Guide


EXempty   Exercise 2. Create a Web Application with the
                      Web Site Navigation Editor

          Estimated time
                                  01:00


          What this exercise is about
                                  IBM Rational Application Developer provides a rich set of tools for
                                  organizing and visualizing the navigation flow of a Web application.
                                  One such feature is the IBM Rational Application Developer Web Site
                                  Designer. This feature allows you to create a Web site with
                                  automatically generated navigation links, and it allows you to view a
                                  map of file relationships. Page templates may be applied to your Web
                                  site to provide a consistent layout and style for your Web site.
                                  Another tool is the IBM Rational Application Developer Web Diagram
                                  editor, which allows you to connect together visual and non-visual
                                  dynamic components to create pages, create page data, and define
                                  page flow.
                                  In this lab, you:
                                   • Create a dynamic Web project
                                   • Create a servlet that forwards to a Java™ Server Page (JSP) page
                                   • Use Web Site Navigation to create a demo Web site
                                   • Create a dynamic template and use template inheritance to create
                                     JSPs
                                   • Update the template to add navigation controls, allowing navigation
                                     of your newly created pages
                                   • Convert the Web Site Navigation to a Web diagram
                                   • Test what you have built using the test environment


          What you should be able to do
                                  At the end of this exercise, you will be able to:
                                   • Create a simple Web project
                                   • Invoke a servlet that will forward to a JSP
                                   • Enable Web Site Designer support for a Web project

          © Copyright IBM Corp. 2004, 2007    Exercise 2. Create a Web Application with the Web Site Navigation           2-1
                                      Course materials may not be reproduced in whole or in part
                                             without the prior written permission of IBM.
Instructor Exercises Guide


                             • Create a Web Site Navigation file for a Web site
                             • Change the page template used by your Web site
                             • Convert the Web Site Navigation to a Web Diagram
                             • Use the Web Diagram tool to see the properties of a page


Introduction
                        In this exercise, you work with the code for a simple library Web site.
                        This project uses various Web resources, as well as JSPs, a
                        cascading style sheet, and a dynamic page template with navigation.


Requirements
                        This exercise has no requirements.


Instructor exercise overview
This lab will create simple Web pages for testing. It concentrates on organizing pages in
the Page Designer.
Using the Web Site Navigation option is at the heart of this lab. Because Rational
Application Developer automates so much of this process it is easy for a student to lose the
overview of what is being done. Steps then become a blind execution of instructions. It is a
good idea to warn students about this before they begin the lab, and urge them to think
about each step as they do it.
The same could be said of the sections where the template is added, except that this is
more straight-forward and easier to follow. As a wrap-up for this lab, it is recommended that
the instructor do a whiteboard overview of the two processes.


2-2   Developing Web Applications                                                   © Copyright IBM Corp. 2004, 2007
                               Course materials may not be reproduced in whole or in part
                                      without the prior written permission of IBM.
V4.1
                                                                                                   Instructor Exercises Guide


EXempty   Exercise instructions
          Preface
          Add a Dynamic Web project to the workspace and create the files to populate the Web site.
          This DemoLibraryWeb project will be used to gain an understanding of the complete Web
          application that will be built later. Create a Web site navigation for the pages, then add a
          template to give a homogeneous look-and-feel to the Web site. Modify the template
          according to the specific needs of this site. Test the Web site in the IBM® WebSphere®
          Test Environment. Add Web site navigation components to a Web diagram, and view them
          in the Web diagram editor.
          The following reference in the exercise instructions represents the directory location of the
          labs on your workstation:
                   • <LAB_FILES>:C:LabFiles70


          © Copyright IBM Corp. 2004, 2007    Exercise 2. Create a Web Application with the Web Site Navigation           2-3
                                      Course materials may not be reproduced in whole or in part
                                             without the prior written permission of IBM.
Instructor Exercises Guide


2.1. Prepare the Workspace
__ 1. Start IBM Rational Application Developer (V7 or later) with the workspace of the
      previous exercise, or use a new workspace. In the Workspace Launcher dialog,
      specify <LAB_FILES>workspace as the workspace directory.


      __ a. Click OK to open the workspace.


2-4    Developing Web Applications                                                © Copyright IBM Corp. 2004, 2007
                             Course materials may not be reproduced in whole or in part
                                    without the prior written permission of IBM.
V4.1
                                                                                                   Instructor Exercises Guide


EXempty   2.2. Create a New Dynamic Web Project
          __ 2. Create a new Dynamic Web Project called DemoLibraryWeb. This goal of this
                demo project is to gain an understanding of the layout of the Web application that
                will be built in later exercises.
              __ a. From the main menu, select File                New       Project.
              __ b. In the New Project dialog, choose Dynamic Web Project. Click Next.
              __ c. Enter the following information:
                          — Name: DemoLibraryWeb
                          — EAR Project: DemoLibraryEAR (default name is DemoWebLibraryEAR)


              __ d. Click Next.

                      Information

          Many of the Wizards in the tool have a Help icon    in the bottom left hand corner. Clicking
          the question mark displays a new Help panel in the right region of the dialog. Help and


          © Copyright IBM Corp. 2004, 2007    Exercise 2. Create a Web Application with the Web Site Navigation           2-5
                                      Course materials may not be reproduced in whole or in part
                                             without the prior written permission of IBM.
Instructor Exercises Guide


dynamic Help (which updates as the context changes), can be accessed from this new
panel.


            Information

The next page of the dialog sets up the project facets for the enterprise application. Project
facets allow you to add and remove functionality from a project. In this case, the project can
be deployed to an IBM® WebSphere® Application Server (V6.1 and later). You can select
a facet to display a description. You can right-click a facet and select Show Constraints to
show the other facets that it depends on. You can also click Show Runtimes to display the
available runtimes.


2-6   Developing Web Applications                                                 © Copyright IBM Corp. 2004, 2007
                             Course materials may not be reproduced in whole or in part
                                    without the prior written permission of IBM.
V4.1
                                                                                                   Instructor Exercises Guide


EXempty       __ e. On the Projects Facets page select Default style sheet (CSS file) and
                    Dynamic Page Template Support (Struts Tiles). Click Next.


                      Information

          The default style sheet Master.css file is added to the WebContent/theme folder.
          Dynamic templates depend upon Tiles. Although usually paired with Struts, Tiles does not
          require a Struts Web application.
          The file struts.jar will be added to Web App Libraries.
          A tiles-defs.xml file is added to the WEB-INF folder. The templates you create and register
          are defined in here.
          Tiles allows you to specify content areas in JSP pages. The actual JSP does not contain
          HTML or JSP code. JSP fragment files are placed in the content areas. This allows you to


          © Copyright IBM Corp. 2004, 2007    Exercise 2. Create a Web Application with the Web Site Navigation           2-7
                                      Course materials may not be reproduced in whole or in part
                                             without the prior written permission of IBM.
Instructor Exercises Guide


separate content from layout within your Web pages. Changes to a template change all of
the pages that use it and any templates that extend it.


      __ f.   On the Web Module page, change the Context Root to DemoLibrary. Click
              Finish.
      __ g. When prompted to switch to the Web perspective, select the Remember my
            selection check box and click Yes.
      __ h. If the Confirm Enablement dialog appears, click OK.
      __ i.   Ignore the warning about a broken link in the tiles-defs.xml file. When a
              template is created later on in the exercise, the warning will disappear.
__ 3. Close the WebDiagram.gph editor that automatically appears.


2-8    Developing Web Applications                                                © Copyright IBM Corp. 2004, 2007
                             Course materials may not be reproduced in whole or in part
                                    without the prior written permission of IBM.
V4.1
                                                                                                   Instructor Exercises Guide


EXempty   2.3. Forward from a Servlet to a JSP
          In this step, you create a Servlet that instantiates a Patron, places the patron in the
          request, and forwards to a JSP. The goal of this step is to show you how to create these
          different components and test them in the WebSphere test environment.
          You will start off by creating the Patron class.
          __ 4. In the DemoLibraryWeb project, create the com.ibm.library.model.Patron class.
                Add two String instance member fields firstName and lastName. Generate
                accessors and a two argument constructor that initializes the fields.
              __ a. Right-click the DemoLibraryWeb project and select New                           Class.
              __ b. Enter the following information:
                           • Package: com.ibm.library.model
                           • Name: Patron


          © Copyright IBM Corp. 2004, 2007    Exercise 2. Create a Web Application with the Web Site Navigation           2-9
                                      Course materials may not be reproduced in whole or in part
                                             without the prior written permission of IBM.
Instructor Exercises Guide


    __ c. Click Finish.
    __ d. In the Patron.java editor, add the following two private member instance fields
          firstName and lastName of type String.
            public class Patron {
               private String firstName;
               private String lastName;
            }
    __ e. Ignore the warnings about the fields never being read locally.
    __ f.   Right-click inside the editor and select Source                  Generate Getters and
            Setters. Click Select All and then click OK.
    __ g. Right-click again inside the editor and select Source Generate Constructor
          using Fields. Click Select All and then click OK. The following code should be
          generated:
            public Patron(String firstName, String lastName) {
               super();
               this.firstName = firstName;
               this.lastName = lastName;
            }
    __ h. Save your changes and close the editor.

            Information

In the Project Explorer view, you can click the Link open editors with content in the
Navigator toolbar button       . This helps you determine the location of the file that you are
working with in an editor.


__ 5. Create the com.ibm.library.servlets.CreatePatronServlet in the
      DemoLibraryWeb project. Create doPost and doGet method stubs. Change the
      URL Mapping to /ProcessLogin.
    __ a. Right-click the DemoLibraryWeb project and select New                           Servlet.


2-10 Developing Web Applications                                                  © Copyright IBM Corp. 2004, 2007
                             Course materials may not be reproduced in whole or in part
                                    without the prior written permission of IBM.
V4.1
                                                                                                   Instructor Exercises Guide


EXempty       __ b. In the Create Servlet dialog enter the following information:
                           • Java package: com.ibm.library.servlets
                           • Class name: CreatePatronServlet


              __ c. Click Next.


          © Copyright IBM Corp. 2004, 2007    Exercise 2. Create a Web Application with the Web Site Navigation         2-11
                                      Course materials may not be reproduced in whole or in part
                                             without the prior written permission of IBM.
Instructor Exercises Guide


    __ d. Select /CreatePatronServlet in the URL Mappings list. Click Edit and type
          /CreatePatron. Click OK.


    __ e. Click Next.


2-12 Developing Web Applications                                                  © Copyright IBM Corp. 2004, 2007
                             Course materials may not be reproduced in whole or in part
                                    without the prior written permission of IBM.
V4.1
                                                                                                   Instructor Exercises Guide


EXempty       __ f.   Verify that the doGet and doPost check boxes are selected.


              __ g. Click Finish to create the servlet and open it in a Java editor.
          __ 6. A warning appears in the editor because the servlet implements Serializable, but
                does not define a a serial version ID. Click the light bulb in the margin and
                double-click Add generated serial version ID.
          __ 7. In the CreatePatronServlet, create the method
                processRequest(HttpServletRequest, HttpServletResponse) that is
                called by doPut or doPost.
                  Add code to processRequest that
                           • extracts the request parameters firstName and lastName
                           • creates a Patron with the firstName and lastName
                           • forwards to DisplayPatron.jsp
              __ a. Replace the // TODO comments in both doGet and doPost with the following
                    code:
                      processRequest(request,response);


          © Copyright IBM Corp. 2004, 2007    Exercise 2. Create a Web Application with the Web Site Navigation         2-13
                                      Course materials may not be reproduced in whole or in part
                                             without the prior written permission of IBM.
Instructor Exercises Guide


    __ b. This causes to errors to appears in the editor because processRequest does
          not exist. Click the light bulb in the margin and select Create method. Note that
          you can also click the red underline and press CTRL+1. Both use code assist to
          generate the missing method. Your code should look as follows:
            protected void doGet(HttpServletRequest request,
                 HttpServletResponse response) throws ServletException, IOException {
               processRequest(request,response);
            }
            protected void doPost(HttpServletRequest request, HttpServletResponse response)
                 throws ServletException, IOException {
               processRequest(request,response);
            }

            private void processRequest(HttpServletRequest request,
            HttpServletResponse response){
               //TODO ...
            }
    __ c. Replace the // TODO comment in the processRequest method with the
          following code: (Note: you can copy from
          <LAB_FILES>Websnippetssnippet-1.txt)
            String firstName = request.getParameter("firstName");
            if(firstName==null || firstName.equals("")) {
               firstName="empty";
            }
            String lastName = request.getParameter("lastName");
            if(lastName==null || lastName.equals("")) {
               lastName="empty";
            }
            Patron patron = new Patron(firstName, lastName);

            request.setAttribute("patron", patron);
            request.getRequestDispatcher("DisplayPatron.jsp").forward(request,
            response);

    __ d. Right-click in the editor and select Source                  Organize Imports.
    __ e. Use quick fix (light bulb) to Add throws declaration to clear the errors in
          processRequest about unhandled exceptions.
    __ f.   Save your changes.
__ 8. Create the DisplayPatron.jsp. In the New Web Page dialog, click Options to set
      the Document Markup, Document Type to HTML 4.01 Strict.
    __ a. In Project Explorer, right-click DemoLibraryWeb and select New                           Web Page.


2-14 Developing Web Applications                                                  © Copyright IBM Corp. 2004, 2007
                             Course materials may not be reproduced in whole or in part
                                    without the prior written permission of IBM.
V4.1
                                                                                                   Instructor Exercises Guide


EXempty       __ b. In the New Web Page dialog, type DisplayPatron as the File Name. Verify
                    that JSP is selected as the Template.


              __ c. Click Options.
              __ d. In the New Web Page Options dialog, click the Style Sheets node. The css file
                    /theme/Master.css should appear in the Style Sheets list.
              __ e. Click the Document Markup node and change the Document Type to HTML
                    4.01 Strict, which is recommended for new Web pages and when CSS is being
                    used.
              __ f.   Click Close.
              __ g. Click Finish and the JSP Page Designer will open.


          © Copyright IBM Corp. 2004, 2007    Exercise 2. Create a Web Application with the Web Site Navigation         2-15
                                      Course materials may not be reproduced in whole or in part
                                             without the prior written permission of IBM.
Instructor Exercises Guide


__ 9. In DisplayPatron.jsp, add a <jsp:useBean> to retrieve the patron from the request
      context.
    __ a. Click JSP          Insert Bean. In the Insert JSP Bean dialog, enter the following:
                 •   ID: patron
                 •   Type: Bean
                 •   Scope: Request
                 •   Type: Click Browse From Project, type patron and select
                     com.ibm.library.model.Patron and click OK.


    __ b. Click OK.
    __ c. The following useBean is added to the JSP. A useBean icon appears on the
          Design tab.
            <jsp:useBean
               id="patron" type="com.ibm.library.model.Patron"
               scope="request">
            </jsp:useBean>


2-16 Developing Web Applications                                                   © Copyright IBM Corp. 2004, 2007
                              Course materials may not be reproduced in whole or in part
                                     without the prior written permission of IBM.
V4.1
                                                                                                   Instructor Exercises Guide


EXempty
                      Information

          There are many different ways to add a bean to the page. Another way is to use content
          assist in the Source tab of Page Designer.
                   • On an empty line, press CTRL+SPACE, type jsp:u, and select jsp:useBean


                   • Inside of the useBean element, press CTRL+SPACE for the attributes and
                     attribute values.


          __ 10. In DisplayPatron.jsp body, display the firstName and lastName of the patron.
              __ a. In the Design tab, place the cursor after the useBean icon and press ENTER.
              __ b. Type "First name: " (be sure to add a space after the colon)
              __ c. From the main menu, select JSP                 Insert Get Property


          © Copyright IBM Corp. 2004, 2007    Exercise 2. Create a Web Application with the Web Site Navigation         2-17
                                      Course materials may not be reproduced in whole or in part
                                             without the prior written permission of IBM.
Instructor Exercises Guide


    __ d. In the Insert JSP Get Property dialog, select patron                            firstName. Click OK.


    __ e. Place the cursor after the getProperty icon and press ENTER.
    __ f.   Type "Last name: " (be sure to add a space after the colon)
    __ g. From the main menu, select JSP                  Insert Get Property.
    __ h. In the Insert JSP Get Property dialog, select patron                            lastName. Click OK.
    __ i.   Save your changes.


    __ j.   Ignore the warning about the local variable patron never being read.
__ 11. Test the application in the WebSphere Test Environment. Invoke the
       ProcessLoginServlet and pass the firstName and lastName parameters.


2-18 Developing Web Applications                                                  © Copyright IBM Corp. 2004, 2007
                             Course materials may not be reproduced in whole or in part
                                    without the prior written permission of IBM.
V4.1
                                                                                                   Instructor Exercises Guide


EXempty       __ a. In the Project Navigator, right-click DemoLibrary Deployment Descriptor
                       Servlets CreatePatronServlet and select Run As Run On Server.


              __ b. In the Run On Server dialog, select the Set server as project default check
                    box and click Finish.

                      This will:
                       - Start the default WebSphere Application Server if it is not already started
                       - Add the DemoLibraryEar to the server
                       - Start the DemoLibraryEar
                       - Open a Web browser with the following URL:
                          http://localhost:9080/DemoLibrary/CreatePatron


              __ c. In the Web browser, change the URL to pass a first name and a last name:


          © Copyright IBM Corp. 2004, 2007    Exercise 2. Create a Web Application with the Web Site Navigation         2-19
                                      Course materials may not be reproduced in whole or in part
                                             without the prior written permission of IBM.
Instructor Exercises Guide


            http://localhost:9080/DemoLibrary/CreatePatron?firstName=Bob&lastNa
            me=Smith


2-20 Developing Web Applications                                                  © Copyright IBM Corp. 2004, 2007
                             Course materials may not be reproduced in whole or in part
                                    without the prior written permission of IBM.
V4.1
                                                                                                   Instructor Exercises Guide


EXempty   2.4. Create a Web Site Navigation for the Catalog Pages
          In this part of the exercise, you lay out Web pages and then implement some pages. You
          then use templates and template inheritance to "dress up" each page. JSP pages need to
          be used to support dynamic templates.
          __ 12. Make sure that Project           Build Automatically is selected in the main menu.
          __ 13. Create the Web Site Navigation.
              __ a. In the Project Explorer view, double-click DemoLibraryWeb                          Web Site
                    Navigation to open it in the editor.


          __ 14. Add an index.jsp page that represents the start page to access the other pages
                 within the demo Web application
              __ a. Click the New Page icon in the Palette view and then click anywhere within the
                    Navigation editor to create the page.


          © Copyright IBM Corp. 2004, 2007    Exercise 2. Create a Web Application with the Web Site Navigation         2-21
                                      Course materials may not be reproduced in whole or in part
                                             without the prior written permission of IBM.
Instructor Exercises Guide


    __ b. A box will replace the default graphic that was in the editor area. Change the
          Navigation label:
             - from: newpage


             - to: index.jsp and press ENTER.


__ 15. Close the Pages to add panel in the Navigation editor, as you will not be adding
       existing pages.
    __ a. Click the left arrow on the pages to collapse the panel.


__ 16. Add the child page Register.jsp to index.jsp


2-22 Developing Web Applications                                                  © Copyright IBM Corp. 2004, 2007
                             Course materials may not be reproduced in whole or in part
                                    without the prior written permission of IBM.
V4.1
                                                                                                   Instructor Exercises Guide


EXempty       __ a. Right-click index.jsp and select Add                New Page          As Child.


              __ b. Change the name to Register.jsp.


          __ 17. Add some more child pages to index.jsp. In the real application, these pages
                 provide an entry point into the Web application. Add Login.jsp, Error.jsp,
                 Search.jsp, and ListPatronItems.jsp.
              __ a. Click the New Page icon in the palette view.
              __ b. In the Navigation editor, move the cursor next to the Register.jsp page until a
                    vertical bar appears.


              __ c. Click in the editor to create the page. Change the name to Login.jsp.


          © Copyright IBM Corp. 2004, 2007    Exercise 2. Create a Web Application with the Web Site Navigation         2-23
                                      Course materials may not be reproduced in whole or in part
                                             without the prior written permission of IBM.
Instructor Exercises Guide


    __ d. Repeat a), b) and c) for Error.jsp, Search.jsp and ListPatronItems.jsp.


__ 18. Search.jsp and ListPatronItems.jsp are Utility pages that allow you to search and
       list items without logging in. Create a Utilities group to create a logical organization
       of these pages. Grouped items appear differently in navigation items, such as a
       drop-down list, a navigation bar, a navigation trail, or a site map.
    __ a. Click in the editor to the bottom-right of the ListPatronItems.jsp, drag the
          marquee to the top-left of Search.jsp and click. This selects both Search.jsp
          and ListPatronItems.jsp within the marquee. Both pages should be selected.


    __ b. Right-click either Search.jsp or ListPatronItems.jsp and select Group.


2-24 Developing Web Applications                                                  © Copyright IBM Corp. 2004, 2007
                             Course materials may not be reproduced in whole or in part
                                    without the prior written permission of IBM.
V4.1
                                                                                                   Instructor Exercises Guide


EXempty       __ c. Click the Group name Group and change it to Utilities.


          __ 19. Create more child pages to indicate how the application will flow. Add:
                       - RegistrationSuccess.jsp to Register.jsp
                       - ListItems.jsp and NoListItems.jsp to Login.jsp
              __ a. Click the New Page icon in the Palette view. In the Navigation editor, move the
                    cursor below the Register.jsp page until a horizontal bar appears.


              __ b. Click in the editor to create the JSP page. Rename the page to
                    RegistrationSuccess.jsp.


          © Copyright IBM Corp. 2004, 2007    Exercise 2. Create a Web Application with the Web Site Navigation         2-25
                                      Course materials may not be reproduced in whole or in part
                                             without the prior written permission of IBM.
Instructor Exercises Guide


    __ c. Repeat a) and b) to add ListItems.jsp as a child of Login.jsp.


    __ d. To create NoListItems.jsp, click the New Page icon in the Palette view. In the
          Navigation editor move the cursor beside the ListItems.jsp page until a vertical
          bar appears.


    __ e. Click to create the page. Change the name to NoListItems.jsp.


__ 20. Error.jsp may be the result of many pages within the application. In the Navigation
       editor, you can share a page to make it available to other pages


2-26 Developing Web Applications                                                  © Copyright IBM Corp. 2004, 2007
                             Course materials may not be reproduced in whole or in part
                                    without the prior written permission of IBM.
V4.1
                                                                                                   Instructor Exercises Guide


EXempty       __ a. Right-click Error.jsp and select Share This Page.


              __ b. Another Error.jsp, with an arrow in the bottom left-hand corner, will appear next
                    to the original Error.jsp.


          __ 21. Drag the shared Error.jsp page to make it a child of Register.jsp.
              __ a. Drag the shared Error.jsp next to RegistrationSuccess.jsp. When a vertical bar
                    appears, drop the Error.jsp.


              __ b. The diagram should look as follows:


          © Copyright IBM Corp. 2004, 2007    Exercise 2. Create a Web Application with the Web Site Navigation         2-27
                                      Course materials may not be reproduced in whole or in part
                                             without the prior written permission of IBM.
Instructor Exercises Guide


__ 22. Error.jsp can also appear when you attempt to login. Copy the Error.jsp shared
       page and paste it as a child of Login.jsp. (Note that many of the other pages could
       also result in an error, but you will only do Login.jsp.)
    __ a. CTRL-Click the shared Error.jsp page and drag it to the right of NoListItems.jsp.
          When a vertical bar appears, drop the Error.jsp page. Release the CTRL key.


    __ b. Save your changes.
__ 23. The entire diagram should now look as follows:


2-28 Developing Web Applications                                                  © Copyright IBM Corp. 2004, 2007
                             Course materials may not be reproduced in whole or in part
                                    without the prior written permission of IBM.
V4.1
                                                                                                   Instructor Exercises Guide


EXempty   2.5. Create Page Templates for the JSP Files
          Templates define the look and feel of Web pages. In this part, you create a master template
          and two child templates. JSP pages can leverage Tiles to create these reusable templates.
          How it works:
                   • A file called tiles-defs.xml defines templates that specify the layout and content
                     area(s) of a page.
                   • Individual JSP files specify page fragments that fill the content areas of the
                     template they implement.
                   • JSP fragments contain the actual HTML for a specific content area.
          This is how Tiles allows you to separate content from layout. In DemoLibraryWeb, template
          inheritance is used to define the two types of pages:
                   • Pages with sub headers
                   • Pages without sub headers


          © Copyright IBM Corp. 2004, 2007    Exercise 2. Create a Web Application with the Web Site Navigation         2-29
                                      Course materials may not be reproduced in whole or in part
                                             without the prior written permission of IBM.
Instructor Exercises Guide


__ 24. Create a root template that will define the general layout of all of the Web pages.
       Create a Dynamic Page Template called LibraryRootTemplate.
    __ a. Right-click DemoLibraryWeb and select New                         Web Page Template.
    __ b. In the New Web Page Template dialog:
             - Enter LibraryRootTemplate as the File Name
             - Click Dynamic Page Template
             - Keep Basic Templates               JSP as the Template


    __ c. Click Finish.
__ 25. A Create Page Template dialog appears to indicate that templates must have one
       or more content areas. Click OK.
__ 26. In the Page Designer for LibraryRootTemplate.jsp, insert a table with one column
       and three rows. Set the table width to 100%.


2-30 Developing Web Applications                                                  © Copyright IBM Corp. 2004, 2007
                             Course materials may not be reproduced in whole or in part
                                    without the prior written permission of IBM.
V4.1
                                                                                                   Instructor Exercises Guide


EXempty       __ a. From the main menu, select Table                 Insert Table. Enter the following and click
                    OK:
                       - Rows: 3
                       - Columns: 1
                       - Table width: 100% (Note it is pixels by default.)


          __ 27. In the first cell, enter IBM Library System as an h1 heading.
              __ a. Place the cursor in the first cell and type IBM Library System.


          © Copyright IBM Corp. 2004, 2007    Exercise 2. Create a Web Application with the Web Site Navigation         2-31
                                      Course materials may not be reproduced in whole or in part
                                             without the prior written permission of IBM.
Instructor Exercises Guide


    __ b. Select the text you just entered. In the Properties view, click the Text tab if
          necessary, and select Heading 1 from the Paragraph drop-down.


__ 28. Add a content areas called subHeadingArea and bodyArea to the remaining cells
       in the table.
    __ a. In the Palette view, click the Page Template drawer and click the Content Area
          icon. In Page Designer, click the second cell to drop the content area there.


2-32 Developing Web Applications                                                  © Copyright IBM Corp. 2004, 2007
                             Course materials may not be reproduced in whole or in part
                                    without the prior written permission of IBM.
V4.1
                                                                                                   Instructor Exercises Guide


EXempty       __ b. In the Insert Content Area for Page Template dialog, type subHeadingArea
                    as the Content area name. Click OK.


              __ c. Repeat a) and b) to create the Content area bodyArea in the third cell.


              __ d. Save your changes.
          __ 29. Create the child template LibraryNoSubHeadingTemplate.jsp that inherits from
                 LibraryRootTemplate.jsp. The page is created as a JSP page that implements the


          © Copyright IBM Corp. 2004, 2007    Exercise 2. Create a Web Application with the Web Site Navigation         2-33
                                      Course materials may not be reproduced in whole or in part
                                             without the prior written permission of IBM.
Instructor Exercises Guide


        LibraryRootTemplate. The JSP page is then registered as a dynamic template.
        Configure the subHeadingArea to have an empty text content.
    __ a. Right-click DemoLibraryWeb and select New                         Web Page.
    __ b. In the New Web Page dialog enter the following
             - File name: LibraryNoSubHeadingTemplate.jsp
             - Template: MyTemplates               LibraryRootTemplate


    __ c. Click Finish.
    __ d. The Dynamic Page Template dialog appears. Click Yes to configure the content
          areas.
    __ e. In the Configure Content Areas of Dynamic Pages Template dialog, click the
          subHeadingArea in the Content Area list.


2-34 Developing Web Applications                                                  © Copyright IBM Corp. 2004, 2007
                             Course materials may not be reproduced in whole or in part
                                    without the prior written permission of IBM.
V4.1
                                                                                                   Instructor Exercises Guide


EXempty       __ f.   Click Text content, and leave the text area blank. This will create a page without
                      a sub-heading.


              __ g. Do not configure the bodyArea, as this will be configured by the JSP page that
                    implements this template.
              __ h. Click OK and save your changes.
          __ 30. Repeat the previous step for the other template,
                 LibraryWithSubHeadingTemplate.jsp. However do not configure the content
                 areas. In the Dynamic Page Template dialog, click NO. Save your changes.
          __ 31. The last step to turn the JSP pages into template is to register them.
              __ a. Make sure that Page Designer is open for both of the templates. Otherwise the
                    menu entry in the main File menu will not appear.
              __ b. In the Project Explorer, double-click DemoLibraryWeb                           WebContent
                       LibraryWithSubHeadingTemplate.jsp.
              __ c. From the main menu, select File                Page Template            Register as Dynamic
                    Page Template.


          © Copyright IBM Corp. 2004, 2007    Exercise 2. Create a Web Application with the Web Site Navigation         2-35
                                      Course materials may not be reproduced in whole or in part
                                             without the prior written permission of IBM.
Instructor Exercises Guide


    __ d. The Register as a Dynamic Page Template dialog appears. Keep the default
          template name: LibraryWithSubHeadingTemplate. Click OK.


    __ e. Save your changes.
    __ f.   In the Project Explorer, double-click DemoLibraryWeb                          WebContent
            LibraryNoSubHeadingTemplate.jsp.
    __ g. In the Dynamic Page Template dialog, click NO
    __ h. From the main menu, select File                 Page Template            Register as Dynamic
          Page Template.
    __ i.   The Register as a Dynamic Page Template dialog appears. Keep the default
            template name: LibraryNoSubHeadingTemplate. Click OK.
    __ j.   Save your changes.

            Information

Both templates have now been added to DemoLibraryWeb                             WebContent         WEB-INF
  tiles-defs.xml.
Note the extends keyword that indicates that the two templates inherit from the
LibraryRootTemplate.jsp.
<tiles-definitions>
<definition name="LibraryRootTemplate" path="/LibraryRootTemplate.jsp">
</definition>
<definition name="LibraryWithSubHeadingTemplate"
extends="LibraryRootTemplate">
    <put name="documentTitle" value="LibraryWithSubHeadingTemplate"
    type="string">
    </put>
</definition>


2-36 Developing Web Applications                                                  © Copyright IBM Corp. 2004, 2007
                             Course materials may not be reproduced in whole or in part
                                    without the prior written permission of IBM.
V4.1
                                                                                                   Instructor Exercises Guide


EXempty   <definition name="LibraryNoSubHeadingTemplate"
          extends="LibraryRootTemplate">
              <put name="subHeadingArea" value="" type="string">
              </put>
              <put name="documentTitle" value="LibraryNoSubHeadingTemplate"
              type="string">
              </put>
          </definition>
          </tiles-definitions>


          © Copyright IBM Corp. 2004, 2007    Exercise 2. Create a Web Application with the Web Site Navigation         2-37
                                      Course materials may not be reproduced in whole or in part
                                             without the prior written permission of IBM.
Instructor Exercises Guide


2.6. Apply Page Templates to JavaServer Pages
In this part you create pages using one of the two templates that were created.
__ 32. In the Navigation editor for DemoLibraryWeb, use the
       LibraryWithSubHeadingTemplate for Register.jsp. Configure the content areas as
       follows:
            • subHeadingArea(Text content): <h2>Register A New Patron</h2>
            • bodyArea(New or existing fragment file): RegisterBodyContent.jsp
    __ a. In the Project Explorer, double-click Web Site Navigation in the
          DemoLibraryWeb project.
    __ b. In the Navigation editor, double-click Register.jsp.
    __ c. In the New Web Page dialog, select My Templates
             LibraryWithSubHeadingTemplate for the Template.


    __ d. Click Finish.
    __ e. Click Yes to configure the content areas.
    __ f.     In the Configure Content Areas of Dynamic Page Template dialog
               - Select subHeadingArea and enter <h2>Register A New Patron</h2> as
                 the Text content
               - Select bodyArea and enter RegisterBodyContent.jsp as the New or
                 existing fragment file. (Note: this files is created automatically.)

2-38 Developing Web Applications                                                  © Copyright IBM Corp. 2004, 2007
                             Course materials may not be reproduced in whole or in part
                                    without the prior written permission of IBM.
V4.1
                                                                                                   Instructor Exercises Guide


EXempty       __ g. Click OK. Save your changes.


                      Note

          Page Designer supports direct editing of JSP fragment files embedded inside of the main
          JavaServer page. When you click the embedded JSP fragment, Page Designer will then
          edit the fragment instead of the main page. Clicking the Source tab will then show the
          source for the fragment, and not the main page.
          In the preceding example, you can edit RegisterBodyContent.jsp from within Register.jsp.
          RegisterBodyContent.jsp can be found in the tilesContent folder.


          __ 33. In Page Designer, click in the third row, and then click the Source tab to replace the
                 existing HTML in RegisterBodyContent.jsp. Verify results in the Design tab and
                 save your changes.
                   • Replace:
                      <p>Place RegisterBodyContent.jsp's content here.</p>
                   • With: (Note: you can copy from <LAB_FILES>Websnippetssnippet-2.txt)
                      <table border="1" height="100%" width="100%">
                      <tr>
                         <td>First Name:</td>
                         <td><input type="text" name="nameText" size="20"></td>
                      </tr>
                      <tr>
                         <td>Last Name:</td>
                         <td><input type="text" name="nameText0" size="20"></td>
                      </tr>
                      <tr>
                         <td>Email:</td>
                         <td><input type="text" name="nameText00" size="38"></td>
                      </tr>
                      <tr>
                         <td>Password:</td>
                         <td><input type="password" name="nameText000" size="20"></td>
                      </tr>
                      <tr>

          © Copyright IBM Corp. 2004, 2007    Exercise 2. Create a Web Application with the Web Site Navigation         2-39
                                      Course materials may not be reproduced in whole or in part
                                             without the prior written permission of IBM.
Instructor Exercises Guide


               <td align="center"><input type="submit" value="Register"></td>
            </tr>
            </table>


__ 34. In the Navigation editor for DemoLibraryWeb, use the
       LibraryNoSubHeadingTemplate for ListPatronItems.jsp. Configure the content
       areas as follows:
         • bodyArea(New or existing fragment file): ListPatronItemsBodyContent.jsp
    __ a. In the Project Explorer, double-click Web Site Navigation in the
          DemoLibraryWeb project.
    __ b. In the Navigation editor, double-click ListPatronItems.jsp.


2-40 Developing Web Applications                                                  © Copyright IBM Corp. 2004, 2007
                             Course materials may not be reproduced in whole or in part
                                    without the prior written permission of IBM.
V4.1
                                                                                                   Instructor Exercises Guide


EXempty       __ c. In the New Web Page dialog, select My Templates
                       LibraryNoSubHeadingTemplate for the Template.


              __ d. Click Finish.
              __ e. Click Yes to configure the content areas.
              __ f.   In the Configure Content Areas of Dynamic Page Template dialog
                       - Select bodyArea and enter ListPatronItemsBodyContent.jsp as the
                         New or existing fragment file.
              __ g. Click OK.


          __ 35. In Page Designer, click in the third row and then click the Source tab to replace the
                 existing HTML in ListPatronItemsBodyContent.jsp. Verify in the Design tab and
                 save your changes.

          © Copyright IBM Corp. 2004, 2007    Exercise 2. Create a Web Application with the Web Site Navigation         2-41
                                      Course materials may not be reproduced in whole or in part
                                             without the prior written permission of IBM.
Instructor Exercises Guide


         • Replace:
            <p>Place ListPatronItemsBodyContent.jsp's content here.</p>
         • With: (Note: you can copy from <LAB_FILES>Websnippetssnippet-3.txt)
            <table border="1" width="100%" height="100%">
            <tr>
               <th>Title</th>
               <th>Due Date</th>
            </tr>
            <tr>
               <td>Fishing</td>
               <td>10 April, 2007</td>
            </tr>
            </table>


__ 36. Test Register.jsp and ListPatronItems.jsp in the WebSphere Test Environment.
    __ a. In the Project Explorer, right-click DemoLibraryWeb WebContent
             listpatronitems.jsp and select Run As     Run On Server.
    __ b. If a Save Resource dialog appears, click Yes.
    __ c. If the Run On Server dialog appears, click Finish. A browser should open on the
          JSP page.

            Note

If you get an Error 500, click Publish in the Servers view and try step a) again.


    __ d. In the Project Explorer, right-click DemoLibraryWeb                             WebContent
             register.jsp and select Run As     Run On Server.
    __ e. If the Run On Server dialog appears, click Finish. A browser should open on the
          JSP page.
__ 37. Update the LibraryRootTemplate to display the heading on the side, from top to
       bottom.
    __ a. In the Project Explorer, double-click DemoLibraryWeb                            WebContent
             LibraryRootTemplate.jsp.

2-42 Developing Web Applications                                                  © Copyright IBM Corp. 2004, 2007
                             Course materials may not be reproduced in whole or in part
                                    without the prior written permission of IBM.
V4.1
                                                                                                   Instructor Exercises Guide


EXempty
                      Note

          To edit the template, you could have also clicked within the JSP page that uses the
          LibraryRootTemplate.
          .


              __ b. In Page Designer, click the Source tab and update the HTML.
                   • Replace: (Note: you can copy from <LAB_FILES>Websnippetssnippet-4.txt)
                      <td><h1>IBM Library System</h1>
                      </td>
                      </tr>
                      <tr>
                      <td><tiles:insert attribute="subHeadingArea"></tiles:insert></td>
                   • With:
                      <td width="90%">
                         <tiles:insert attribute="subHeadingArea"></tiles:insert>
                      </td>
                      <td rowspan="2">
                         <div style="writing-mode: tb-rl; white-space: nowrap">
                         <h1>IBM Library System</h1>
                         </div>
                      </td>
              __ c. Save your changes.
          __ 38. Test Register.jsp and ListPatronItems.jsp in the WebSphere Test Environment.
              __ a. In the Project Explorer, right-click DemoLibraryWeb WebContent
                       listpatronitems.jsp and select Run As      Run On Server.


          © Copyright IBM Corp. 2004, 2007    Exercise 2. Create a Web Application with the Web Site Navigation         2-43
                                      Course materials may not be reproduced in whole or in part
                                             without the prior written permission of IBM.
Instructor Exercises Guide


    __ b. If the Run On Server dialog appears, click Finish. A browser should open on the
          JSP page.


    __ c. In the Project Explorer, right-click DemoLibraryWeb WebContent
             register.jsp and select Run As      Run On Server.
    __ d. In the Run On Server dialog, click Finish. A browser should open on the JSP
          page.


            Note

As you can see in the two preceding images, changes to the root template are propagated
down to the child templates. This facilitates the maintenance of your Web pages.


2-44 Developing Web Applications                                                  © Copyright IBM Corp. 2004, 2007
                             Course materials may not be reproduced in whole or in part
                                    without the prior written permission of IBM.
V4.1
                                                                                                   Instructor Exercises Guide


EXempty   2.7. Improve the Home Page
          __ 39. Add a site map to index.jsp. Use the LibraryWithSubHeadingTemplate.
              __ a. Double-click the index.jsp page icon in the Navigation editor to load the JSP
                    page in Page Designer.
              __ b. In the New Web Page dialog, choose the LibraryNoSubHeadingTemplate and
                    click Finish.
              __ c. In the Dynamic Page Template dialog, click Yes to configure the content area.
              __ d. In the Configure Content Areas of Dynamic Page Templates dialog, for
                    bodyArea, type indexBodyContent.jsp as the New or existing fragment
                    file. Click OK.
              __ e. In Page Designer, remove the text: Place indexBodyContent.jsp's content
                    here.
              __ f.   In the Palette view, expand the Web Site Navigation drawer.


              __ g. Drag the Site Map component onto the Page Designer it in the table cell where
                    you deleted the text:
                      Place indexBodyContent.jsp's content here.


          © Copyright IBM Corp. 2004, 2007    Exercise 2. Create a Web Application with the Web Site Navigation         2-45
                                      Course materials may not be reproduced in whole or in part
                                             without the prior written permission of IBM.
Instructor Exercises Guide


    __ h. Accept the default setting in the Insert Site Map dialog, click Finish.


    __ i.   Save the changes and close index.jsp.
__ 40. Test index.jsp in the WebSphere Test Environment.
    __ a. In the Project Explorer, right-click DemoLibraryWeb                        WebContent
             index.jsp and select Run As        Run On Server.
    __ b. If the Save Resource dialog appears, click Yes.


2-46 Developing Web Applications                                                  © Copyright IBM Corp. 2004, 2007
                             Course materials may not be reproduced in whole or in part
                                    without the prior written permission of IBM.
V4.1
                                                                                                   Instructor Exercises Guide


EXempty       __ c. If the Run On Server dialog appears, click Finish. A browser should open on the
                    JSP page.


              __ d. Experiment by clicking the links. Pages that have not been created cannot be
                    navigated to.
              __ e. Optional: Implement Error.jsp using the LibaryNoSubHeadingTemplate and
                    setting the bodyArea to the text content: error. Test the page. Can you access
                    all of the error.jsp shared pages as well?


          © Copyright IBM Corp. 2004, 2007    Exercise 2. Create a Web Application with the Web Site Navigation         2-47
                                      Course materials may not be reproduced in whole or in part
                                             without the prior written permission of IBM.
Instructor Exercises Guide


2.8. Creating A Web Diagram
In this part of the exercise, you will add some pages from Web navigation to the Web
diagram. You will also reverse-engineer the project to add DisplayPatron.jsp.
The Web Diagram editor allows you to build dynamic Web applications visually. This is a
powerful tool that will be used in later exercises.
__ 41. In the Navigation editor, show index.jsp, Register.jsp, and ListPatronItems.jsp in
       the Web Diagram editor.
    __ a. In the Navigation editor, multi-select index.jsp, Register.jsp, and
          ListPatronItems.jsp.
    __ b. Right-click one of the selected pages and select Show Page in Web Diagram
          editor.
    __ c. In the Add Pages to the Web Diagram File dialog, select the default
          /WebDiagram.gph. Click OK.
    __ d. In the Web Diagram editor that opens, close the Welcome to the Web Diagram
          editor hover panel.
    __ e. Right-click in the Web diagram editor and select Arrange All.


__ 42. In the Web Diagram editor, reverse-engineer the project.
    __ a. Right-click in the Web Diagram editor and select Reverse Engineer Project.
    __ b. This adds all of the JSP pages and templates from the project.
    __ c. Navigate down to the last JSP page: DisplayPatron.jsp.


2-48 Developing Web Applications                                                  © Copyright IBM Corp. 2004, 2007
                             Course materials may not be reproduced in whole or in part
                                    without the prior written permission of IBM.
V4.1
                                                                                                   Instructor Exercises Guide


EXempty       __ d. Double-click the down arrow to display the bean that is included in the page.


                      Note

          In the preceding step, you used the Web Diagram editor to parse a JSP and display the
          Beans used in the page.


          __ 43. Save any changes.


          © Copyright IBM Corp. 2004, 2007    Exercise 2. Create a Web Application with the Web Site Navigation         2-49
                                      Course materials may not be reproduced in whole or in part
                                             without the prior written permission of IBM.
Instructor Exercises Guide


2.9. Clean up
The goal of this lab was to explore some of the functionality in Web Site Navigation,
Templates, and Web Page Designer.
The DemoLibraryEAR and DemoLibraryWeb can be used to understand the layout of the
Web application you are going to build.
The DemoLibraryEAR and DemoLibraryWeb will not be needed in subsequent labs.
__ 44. Remove DemoLibraryEAR from the server.
    __ a. In the Servers view, expand the WebSphere Application Server.
    __ b. Right-click DemoLibraryEAR and select Remove.
__ 45. Close the DemoLibraryEAR and DemoLibraryWeb projects.
    __ a. In the Project Explorer, right-click DemoLibraryEAR and select Close Project.
    __ b. In the Project Explorer, right-click DemoLibraryWeb and select Close Project.

End of exercise


2-50 Developing Web Applications                                                  © Copyright IBM Corp. 2004, 2007
                             Course materials may not be reproduced in whole or in part
                                    without the prior written permission of IBM.

More Related Content

PDF
Part 2 java development
PDF
IBM Mobile Foundation POT - Part 2 introduction to application development wi...
PDF
Lab 2) develop a java application
PDF
Part 1 workbench basics
PDF
Part 3 web development
PDF
Lab 5b) create a java server faces application
PDF
We4IT lcty 2013 - infra-man - whats new in ibm domino application development
PDF
Connect 2014 AD209 - Making Your Development Team More Productive With IBM Do...
Part 2 java development
IBM Mobile Foundation POT - Part 2 introduction to application development wi...
Lab 2) develop a java application
Part 1 workbench basics
Part 3 web development
Lab 5b) create a java server faces application
We4IT lcty 2013 - infra-man - whats new in ibm domino application development
Connect 2014 AD209 - Making Your Development Team More Productive With IBM Do...

What's hot (20)

PDF
Web works presso
ODP
Portlet factory 101
PDF
AD201 - IBM Domino Application Development Today And Tomorrow
PDF
Workflow for XPages
PPT
Should I Be Writing My Own Web Experience Factory Builder? TECH-D13 from IBM ...
PPT
Where Does IBM Web Experience Factory Fit in your Architecture? TECH-D22 from...
PPTX
Becoming an IBM Connections Developer
ODP
MAS202 - Customizing IBM Connections - Downloadable
PPT
Engage - Expanding XPages with Bootstrap Plugins for ultimate usability
PPTX
Desktop Applications with NetBeans
ODP
DanNotes XPages Mobile Controls
PDF
WebWorks Development for BlackBerry PlayBook and Smartphones
PDF
XPages Application Layout Control - TLCC March, 2014 Webinar
PPT
Principles of web design
PDF
"BlackBerry Webworks : Apps for The Smartphone and Tablet"
PPTX
VisionX Prototyping.
ODP
Workflow Management with Espresso Workflow
PPTX
Bootstrap4XPages webinar
PDF
Drupaldelphia 2013 Presentation- Making Your Site more Friendly to Search Eng...
Web works presso
Portlet factory 101
AD201 - IBM Domino Application Development Today And Tomorrow
Workflow for XPages
Should I Be Writing My Own Web Experience Factory Builder? TECH-D13 from IBM ...
Where Does IBM Web Experience Factory Fit in your Architecture? TECH-D22 from...
Becoming an IBM Connections Developer
MAS202 - Customizing IBM Connections - Downloadable
Engage - Expanding XPages with Bootstrap Plugins for ultimate usability
Desktop Applications with NetBeans
DanNotes XPages Mobile Controls
WebWorks Development for BlackBerry PlayBook and Smartphones
XPages Application Layout Control - TLCC March, 2014 Webinar
Principles of web design
"BlackBerry Webworks : Apps for The Smartphone and Tablet"
VisionX Prototyping.
Workflow Management with Espresso Workflow
Bootstrap4XPages webinar
Drupaldelphia 2013 Presentation- Making Your Site more Friendly to Search Eng...
Ad

Similar to Lab 3) create a web application (20)

PPT
3) web development
PPT
web development
PDF
Ad402 create self-service apps in minutes with ibm forms experience builder
PDF
Lab 7a) debug a web application
PDF
Web engineering notes unit 2
PPT
Have your Dojo and eat it too! A Technical Presentations from the 2012 IBM Ex...
PDF
Lab 5a) create a struts application
PPTX
Zeroboard traning
PDF
Lab 7b) test a web application
PPTX
IBM Forms Experience Builder - Web Form Apps for Marketers
PDF
X pages jumpstart jmp101
PDF
Lab 4) working with databases
PDF
AD116 XPages Extension Library: Making Application Development Even Easier
ODP
XPages is Workflow's new best friend
PDF
Tip from ConnectED 2015: Using Bootstrap and Ratchet frameworks in Domino mob...
PDF
Lab 6) package and deploy a j2 ee application
PDF
seminar
PDF
IBM Lotus Notes/Domino Application Development Competitive Advantage : The So...
PDF
PDF 1.pdf
PPTX
Mobile Websites for Dummies
3) web development
web development
Ad402 create self-service apps in minutes with ibm forms experience builder
Lab 7a) debug a web application
Web engineering notes unit 2
Have your Dojo and eat it too! A Technical Presentations from the 2012 IBM Ex...
Lab 5a) create a struts application
Zeroboard traning
Lab 7b) test a web application
IBM Forms Experience Builder - Web Form Apps for Marketers
X pages jumpstart jmp101
Lab 4) working with databases
AD116 XPages Extension Library: Making Application Development Even Easier
XPages is Workflow's new best friend
Tip from ConnectED 2015: Using Bootstrap and Ratchet frameworks in Domino mob...
Lab 6) package and deploy a j2 ee application
seminar
IBM Lotus Notes/Domino Application Development Competitive Advantage : The So...
PDF 1.pdf
Mobile Websites for Dummies
Ad

More from techbed (19)

PDF
1456.base boot
PDF
1455.ata atapi standards - 1-7
PDF
1454.ata features
PPT
1432.encoding concepts
PDF
Flash cs4 tutorials_2009
PDF
Photoshop tut
PDF
Part 6 debugging and testing java applications
PDF
What is struts_en
PDF
Part 7 packaging and deployment
PDF
First java-server-faces-tutorial-en
PDF
Part 5 running java applications
PDF
Part 4 working with databases
PDF
Lab 1) rad installation
PPT
6) debugging and testing
PPT
7) packaging and deployment
PPT
5) running applications
PPT
4) databases
PPT
2009 ibm academic initiative
PPT
2) java development
1456.base boot
1455.ata atapi standards - 1-7
1454.ata features
1432.encoding concepts
Flash cs4 tutorials_2009
Photoshop tut
Part 6 debugging and testing java applications
What is struts_en
Part 7 packaging and deployment
First java-server-faces-tutorial-en
Part 5 running java applications
Part 4 working with databases
Lab 1) rad installation
6) debugging and testing
7) packaging and deployment
5) running applications
4) databases
2009 ibm academic initiative
2) java development

Recently uploaded (20)

DOCX
EDUCATIONAL ASSESSMENT ASSIGNMENT SEMESTER MAY 2025.docx
PPTX
Diploma pharmaceutics notes..helps diploma students
PPTX
ACFE CERTIFICATION TRAINING ON LAW.pptx
PDF
African Communication Research: A review
PDF
CHALLENGES FACED BY TEACHERS WHEN TEACHING LEARNERS WITH DEVELOPMENTAL DISABI...
PDF
FYJC - Chemistry textbook - standard 11.
PPTX
Power Point PR B.Inggris 12 Ed. 2019.pptx
PDF
Physical pharmaceutics two in b pharmacy
PDF
GSA-Past-Papers-2010-2024-2.pdf CSS examination
PDF
LATAM’s Top EdTech Innovators Transforming Learning in 2025.pdf
PDF
WHAT NURSES SAY_ COMMUNICATION BEHAVIORS ASSOCIATED WITH THE COMP.pdf
PPTX
Approach to a child with acute kidney injury
PDF
Horaris_Grups_25-26_Definitiu_15_07_25.pdf
PPT
hsl powerpoint resource goyloveh feb 07.ppt
PDF
Compact First Student's Book Cambridge Official
PPTX
Neurological complocations of systemic disease
PPTX
MMW-CHAPTER-1-final.pptx major Elementary Education
PPTX
Math 2 Quarter 2 Week 1 Matatag Curriculum
PPTX
principlesofmanagementsem1slides-131211060335-phpapp01 (1).ppt
PPTX
operating_systems_presentations_delhi_nc
EDUCATIONAL ASSESSMENT ASSIGNMENT SEMESTER MAY 2025.docx
Diploma pharmaceutics notes..helps diploma students
ACFE CERTIFICATION TRAINING ON LAW.pptx
African Communication Research: A review
CHALLENGES FACED BY TEACHERS WHEN TEACHING LEARNERS WITH DEVELOPMENTAL DISABI...
FYJC - Chemistry textbook - standard 11.
Power Point PR B.Inggris 12 Ed. 2019.pptx
Physical pharmaceutics two in b pharmacy
GSA-Past-Papers-2010-2024-2.pdf CSS examination
LATAM’s Top EdTech Innovators Transforming Learning in 2025.pdf
WHAT NURSES SAY_ COMMUNICATION BEHAVIORS ASSOCIATED WITH THE COMP.pdf
Approach to a child with acute kidney injury
Horaris_Grups_25-26_Definitiu_15_07_25.pdf
hsl powerpoint resource goyloveh feb 07.ppt
Compact First Student's Book Cambridge Official
Neurological complocations of systemic disease
MMW-CHAPTER-1-final.pptx major Elementary Education
Math 2 Quarter 2 Week 1 Matatag Curriculum
principlesofmanagementsem1slides-131211060335-phpapp01 (1).ppt
operating_systems_presentations_delhi_nc

Lab 3) create a web application

  • 1. V4.1 Instructor Exercises Guide EXempty Exercise 2. Create a Web Application with the Web Site Navigation Editor Estimated time 01:00 What this exercise is about IBM Rational Application Developer provides a rich set of tools for organizing and visualizing the navigation flow of a Web application. One such feature is the IBM Rational Application Developer Web Site Designer. This feature allows you to create a Web site with automatically generated navigation links, and it allows you to view a map of file relationships. Page templates may be applied to your Web site to provide a consistent layout and style for your Web site. Another tool is the IBM Rational Application Developer Web Diagram editor, which allows you to connect together visual and non-visual dynamic components to create pages, create page data, and define page flow. In this lab, you: • Create a dynamic Web project • Create a servlet that forwards to a Java™ Server Page (JSP) page • Use Web Site Navigation to create a demo Web site • Create a dynamic template and use template inheritance to create JSPs • Update the template to add navigation controls, allowing navigation of your newly created pages • Convert the Web Site Navigation to a Web diagram • Test what you have built using the test environment What you should be able to do At the end of this exercise, you will be able to: • Create a simple Web project • Invoke a servlet that will forward to a JSP • Enable Web Site Designer support for a Web project © Copyright IBM Corp. 2004, 2007 Exercise 2. Create a Web Application with the Web Site Navigation 2-1 Course materials may not be reproduced in whole or in part without the prior written permission of IBM.
  • 2. Instructor Exercises Guide • Create a Web Site Navigation file for a Web site • Change the page template used by your Web site • Convert the Web Site Navigation to a Web Diagram • Use the Web Diagram tool to see the properties of a page Introduction In this exercise, you work with the code for a simple library Web site. This project uses various Web resources, as well as JSPs, a cascading style sheet, and a dynamic page template with navigation. Requirements This exercise has no requirements. Instructor exercise overview This lab will create simple Web pages for testing. It concentrates on organizing pages in the Page Designer. Using the Web Site Navigation option is at the heart of this lab. Because Rational Application Developer automates so much of this process it is easy for a student to lose the overview of what is being done. Steps then become a blind execution of instructions. It is a good idea to warn students about this before they begin the lab, and urge them to think about each step as they do it. The same could be said of the sections where the template is added, except that this is more straight-forward and easier to follow. As a wrap-up for this lab, it is recommended that the instructor do a whiteboard overview of the two processes. 2-2 Developing Web Applications © Copyright IBM Corp. 2004, 2007 Course materials may not be reproduced in whole or in part without the prior written permission of IBM.
  • 3. V4.1 Instructor Exercises Guide EXempty Exercise instructions Preface Add a Dynamic Web project to the workspace and create the files to populate the Web site. This DemoLibraryWeb project will be used to gain an understanding of the complete Web application that will be built later. Create a Web site navigation for the pages, then add a template to give a homogeneous look-and-feel to the Web site. Modify the template according to the specific needs of this site. Test the Web site in the IBM® WebSphere® Test Environment. Add Web site navigation components to a Web diagram, and view them in the Web diagram editor. The following reference in the exercise instructions represents the directory location of the labs on your workstation: • <LAB_FILES>:C:LabFiles70 © Copyright IBM Corp. 2004, 2007 Exercise 2. Create a Web Application with the Web Site Navigation 2-3 Course materials may not be reproduced in whole or in part without the prior written permission of IBM.
  • 4. Instructor Exercises Guide 2.1. Prepare the Workspace __ 1. Start IBM Rational Application Developer (V7 or later) with the workspace of the previous exercise, or use a new workspace. In the Workspace Launcher dialog, specify <LAB_FILES>workspace as the workspace directory. __ a. Click OK to open the workspace. 2-4 Developing Web Applications © Copyright IBM Corp. 2004, 2007 Course materials may not be reproduced in whole or in part without the prior written permission of IBM.
  • 5. V4.1 Instructor Exercises Guide EXempty 2.2. Create a New Dynamic Web Project __ 2. Create a new Dynamic Web Project called DemoLibraryWeb. This goal of this demo project is to gain an understanding of the layout of the Web application that will be built in later exercises. __ a. From the main menu, select File New Project. __ b. In the New Project dialog, choose Dynamic Web Project. Click Next. __ c. Enter the following information: — Name: DemoLibraryWeb — EAR Project: DemoLibraryEAR (default name is DemoWebLibraryEAR) __ d. Click Next. Information Many of the Wizards in the tool have a Help icon in the bottom left hand corner. Clicking the question mark displays a new Help panel in the right region of the dialog. Help and © Copyright IBM Corp. 2004, 2007 Exercise 2. Create a Web Application with the Web Site Navigation 2-5 Course materials may not be reproduced in whole or in part without the prior written permission of IBM.
  • 6. Instructor Exercises Guide dynamic Help (which updates as the context changes), can be accessed from this new panel. Information The next page of the dialog sets up the project facets for the enterprise application. Project facets allow you to add and remove functionality from a project. In this case, the project can be deployed to an IBM® WebSphere® Application Server (V6.1 and later). You can select a facet to display a description. You can right-click a facet and select Show Constraints to show the other facets that it depends on. You can also click Show Runtimes to display the available runtimes. 2-6 Developing Web Applications © Copyright IBM Corp. 2004, 2007 Course materials may not be reproduced in whole or in part without the prior written permission of IBM.
  • 7. V4.1 Instructor Exercises Guide EXempty __ e. On the Projects Facets page select Default style sheet (CSS file) and Dynamic Page Template Support (Struts Tiles). Click Next. Information The default style sheet Master.css file is added to the WebContent/theme folder. Dynamic templates depend upon Tiles. Although usually paired with Struts, Tiles does not require a Struts Web application. The file struts.jar will be added to Web App Libraries. A tiles-defs.xml file is added to the WEB-INF folder. The templates you create and register are defined in here. Tiles allows you to specify content areas in JSP pages. The actual JSP does not contain HTML or JSP code. JSP fragment files are placed in the content areas. This allows you to © Copyright IBM Corp. 2004, 2007 Exercise 2. Create a Web Application with the Web Site Navigation 2-7 Course materials may not be reproduced in whole or in part without the prior written permission of IBM.
  • 8. Instructor Exercises Guide separate content from layout within your Web pages. Changes to a template change all of the pages that use it and any templates that extend it. __ f. On the Web Module page, change the Context Root to DemoLibrary. Click Finish. __ g. When prompted to switch to the Web perspective, select the Remember my selection check box and click Yes. __ h. If the Confirm Enablement dialog appears, click OK. __ i. Ignore the warning about a broken link in the tiles-defs.xml file. When a template is created later on in the exercise, the warning will disappear. __ 3. Close the WebDiagram.gph editor that automatically appears. 2-8 Developing Web Applications © Copyright IBM Corp. 2004, 2007 Course materials may not be reproduced in whole or in part without the prior written permission of IBM.
  • 9. V4.1 Instructor Exercises Guide EXempty 2.3. Forward from a Servlet to a JSP In this step, you create a Servlet that instantiates a Patron, places the patron in the request, and forwards to a JSP. The goal of this step is to show you how to create these different components and test them in the WebSphere test environment. You will start off by creating the Patron class. __ 4. In the DemoLibraryWeb project, create the com.ibm.library.model.Patron class. Add two String instance member fields firstName and lastName. Generate accessors and a two argument constructor that initializes the fields. __ a. Right-click the DemoLibraryWeb project and select New Class. __ b. Enter the following information: • Package: com.ibm.library.model • Name: Patron © Copyright IBM Corp. 2004, 2007 Exercise 2. Create a Web Application with the Web Site Navigation 2-9 Course materials may not be reproduced in whole or in part without the prior written permission of IBM.
  • 10. Instructor Exercises Guide __ c. Click Finish. __ d. In the Patron.java editor, add the following two private member instance fields firstName and lastName of type String. public class Patron { private String firstName; private String lastName; } __ e. Ignore the warnings about the fields never being read locally. __ f. Right-click inside the editor and select Source Generate Getters and Setters. Click Select All and then click OK. __ g. Right-click again inside the editor and select Source Generate Constructor using Fields. Click Select All and then click OK. The following code should be generated: public Patron(String firstName, String lastName) { super(); this.firstName = firstName; this.lastName = lastName; } __ h. Save your changes and close the editor. Information In the Project Explorer view, you can click the Link open editors with content in the Navigator toolbar button . This helps you determine the location of the file that you are working with in an editor. __ 5. Create the com.ibm.library.servlets.CreatePatronServlet in the DemoLibraryWeb project. Create doPost and doGet method stubs. Change the URL Mapping to /ProcessLogin. __ a. Right-click the DemoLibraryWeb project and select New Servlet. 2-10 Developing Web Applications © Copyright IBM Corp. 2004, 2007 Course materials may not be reproduced in whole or in part without the prior written permission of IBM.
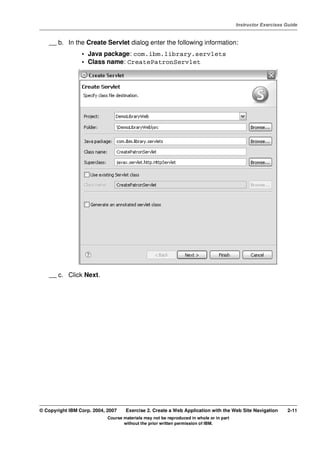
  • 11. V4.1 Instructor Exercises Guide EXempty __ b. In the Create Servlet dialog enter the following information: • Java package: com.ibm.library.servlets • Class name: CreatePatronServlet __ c. Click Next. © Copyright IBM Corp. 2004, 2007 Exercise 2. Create a Web Application with the Web Site Navigation 2-11 Course materials may not be reproduced in whole or in part without the prior written permission of IBM.
  • 12. Instructor Exercises Guide __ d. Select /CreatePatronServlet in the URL Mappings list. Click Edit and type /CreatePatron. Click OK. __ e. Click Next. 2-12 Developing Web Applications © Copyright IBM Corp. 2004, 2007 Course materials may not be reproduced in whole or in part without the prior written permission of IBM.
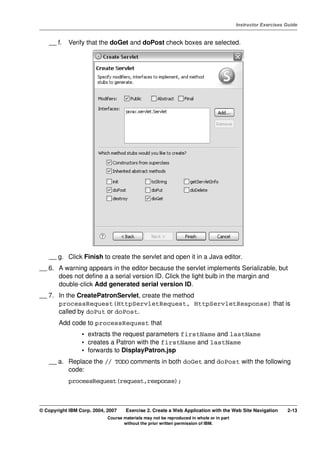
  • 13. V4.1 Instructor Exercises Guide EXempty __ f. Verify that the doGet and doPost check boxes are selected. __ g. Click Finish to create the servlet and open it in a Java editor. __ 6. A warning appears in the editor because the servlet implements Serializable, but does not define a a serial version ID. Click the light bulb in the margin and double-click Add generated serial version ID. __ 7. In the CreatePatronServlet, create the method processRequest(HttpServletRequest, HttpServletResponse) that is called by doPut or doPost. Add code to processRequest that • extracts the request parameters firstName and lastName • creates a Patron with the firstName and lastName • forwards to DisplayPatron.jsp __ a. Replace the // TODO comments in both doGet and doPost with the following code: processRequest(request,response); © Copyright IBM Corp. 2004, 2007 Exercise 2. Create a Web Application with the Web Site Navigation 2-13 Course materials may not be reproduced in whole or in part without the prior written permission of IBM.
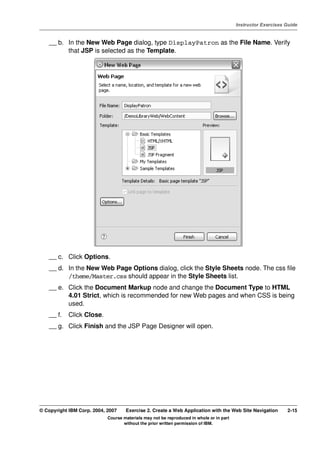
  • 14. Instructor Exercises Guide __ b. This causes to errors to appears in the editor because processRequest does not exist. Click the light bulb in the margin and select Create method. Note that you can also click the red underline and press CTRL+1. Both use code assist to generate the missing method. Your code should look as follows: protected void doGet(HttpServletRequest request, HttpServletResponse response) throws ServletException, IOException { processRequest(request,response); } protected void doPost(HttpServletRequest request, HttpServletResponse response) throws ServletException, IOException { processRequest(request,response); } private void processRequest(HttpServletRequest request, HttpServletResponse response){ //TODO ... } __ c. Replace the // TODO comment in the processRequest method with the following code: (Note: you can copy from <LAB_FILES>Websnippetssnippet-1.txt) String firstName = request.getParameter("firstName"); if(firstName==null || firstName.equals("")) { firstName="empty"; } String lastName = request.getParameter("lastName"); if(lastName==null || lastName.equals("")) { lastName="empty"; } Patron patron = new Patron(firstName, lastName); request.setAttribute("patron", patron); request.getRequestDispatcher("DisplayPatron.jsp").forward(request, response); __ d. Right-click in the editor and select Source Organize Imports. __ e. Use quick fix (light bulb) to Add throws declaration to clear the errors in processRequest about unhandled exceptions. __ f. Save your changes. __ 8. Create the DisplayPatron.jsp. In the New Web Page dialog, click Options to set the Document Markup, Document Type to HTML 4.01 Strict. __ a. In Project Explorer, right-click DemoLibraryWeb and select New Web Page. 2-14 Developing Web Applications © Copyright IBM Corp. 2004, 2007 Course materials may not be reproduced in whole or in part without the prior written permission of IBM.
  • 15. V4.1 Instructor Exercises Guide EXempty __ b. In the New Web Page dialog, type DisplayPatron as the File Name. Verify that JSP is selected as the Template. __ c. Click Options. __ d. In the New Web Page Options dialog, click the Style Sheets node. The css file /theme/Master.css should appear in the Style Sheets list. __ e. Click the Document Markup node and change the Document Type to HTML 4.01 Strict, which is recommended for new Web pages and when CSS is being used. __ f. Click Close. __ g. Click Finish and the JSP Page Designer will open. © Copyright IBM Corp. 2004, 2007 Exercise 2. Create a Web Application with the Web Site Navigation 2-15 Course materials may not be reproduced in whole or in part without the prior written permission of IBM.
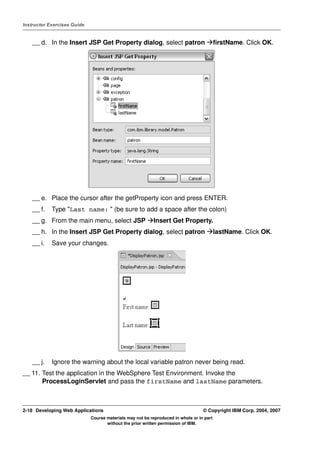
  • 16. Instructor Exercises Guide __ 9. In DisplayPatron.jsp, add a <jsp:useBean> to retrieve the patron from the request context. __ a. Click JSP Insert Bean. In the Insert JSP Bean dialog, enter the following: • ID: patron • Type: Bean • Scope: Request • Type: Click Browse From Project, type patron and select com.ibm.library.model.Patron and click OK. __ b. Click OK. __ c. The following useBean is added to the JSP. A useBean icon appears on the Design tab. <jsp:useBean id="patron" type="com.ibm.library.model.Patron" scope="request"> </jsp:useBean> 2-16 Developing Web Applications © Copyright IBM Corp. 2004, 2007 Course materials may not be reproduced in whole or in part without the prior written permission of IBM.
  • 17. V4.1 Instructor Exercises Guide EXempty Information There are many different ways to add a bean to the page. Another way is to use content assist in the Source tab of Page Designer. • On an empty line, press CTRL+SPACE, type jsp:u, and select jsp:useBean • Inside of the useBean element, press CTRL+SPACE for the attributes and attribute values. __ 10. In DisplayPatron.jsp body, display the firstName and lastName of the patron. __ a. In the Design tab, place the cursor after the useBean icon and press ENTER. __ b. Type "First name: " (be sure to add a space after the colon) __ c. From the main menu, select JSP Insert Get Property © Copyright IBM Corp. 2004, 2007 Exercise 2. Create a Web Application with the Web Site Navigation 2-17 Course materials may not be reproduced in whole or in part without the prior written permission of IBM.
  • 18. Instructor Exercises Guide __ d. In the Insert JSP Get Property dialog, select patron firstName. Click OK. __ e. Place the cursor after the getProperty icon and press ENTER. __ f. Type "Last name: " (be sure to add a space after the colon) __ g. From the main menu, select JSP Insert Get Property. __ h. In the Insert JSP Get Property dialog, select patron lastName. Click OK. __ i. Save your changes. __ j. Ignore the warning about the local variable patron never being read. __ 11. Test the application in the WebSphere Test Environment. Invoke the ProcessLoginServlet and pass the firstName and lastName parameters. 2-18 Developing Web Applications © Copyright IBM Corp. 2004, 2007 Course materials may not be reproduced in whole or in part without the prior written permission of IBM.
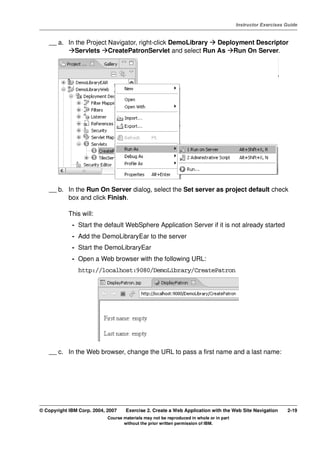
  • 19. V4.1 Instructor Exercises Guide EXempty __ a. In the Project Navigator, right-click DemoLibrary Deployment Descriptor Servlets CreatePatronServlet and select Run As Run On Server. __ b. In the Run On Server dialog, select the Set server as project default check box and click Finish. This will: - Start the default WebSphere Application Server if it is not already started - Add the DemoLibraryEar to the server - Start the DemoLibraryEar - Open a Web browser with the following URL: http://localhost:9080/DemoLibrary/CreatePatron __ c. In the Web browser, change the URL to pass a first name and a last name: © Copyright IBM Corp. 2004, 2007 Exercise 2. Create a Web Application with the Web Site Navigation 2-19 Course materials may not be reproduced in whole or in part without the prior written permission of IBM.
  • 20. Instructor Exercises Guide http://localhost:9080/DemoLibrary/CreatePatron?firstName=Bob&lastNa me=Smith 2-20 Developing Web Applications © Copyright IBM Corp. 2004, 2007 Course materials may not be reproduced in whole or in part without the prior written permission of IBM.
  • 21. V4.1 Instructor Exercises Guide EXempty 2.4. Create a Web Site Navigation for the Catalog Pages In this part of the exercise, you lay out Web pages and then implement some pages. You then use templates and template inheritance to "dress up" each page. JSP pages need to be used to support dynamic templates. __ 12. Make sure that Project Build Automatically is selected in the main menu. __ 13. Create the Web Site Navigation. __ a. In the Project Explorer view, double-click DemoLibraryWeb Web Site Navigation to open it in the editor. __ 14. Add an index.jsp page that represents the start page to access the other pages within the demo Web application __ a. Click the New Page icon in the Palette view and then click anywhere within the Navigation editor to create the page. © Copyright IBM Corp. 2004, 2007 Exercise 2. Create a Web Application with the Web Site Navigation 2-21 Course materials may not be reproduced in whole or in part without the prior written permission of IBM.
  • 22. Instructor Exercises Guide __ b. A box will replace the default graphic that was in the editor area. Change the Navigation label: - from: newpage - to: index.jsp and press ENTER. __ 15. Close the Pages to add panel in the Navigation editor, as you will not be adding existing pages. __ a. Click the left arrow on the pages to collapse the panel. __ 16. Add the child page Register.jsp to index.jsp 2-22 Developing Web Applications © Copyright IBM Corp. 2004, 2007 Course materials may not be reproduced in whole or in part without the prior written permission of IBM.
  • 23. V4.1 Instructor Exercises Guide EXempty __ a. Right-click index.jsp and select Add New Page As Child. __ b. Change the name to Register.jsp. __ 17. Add some more child pages to index.jsp. In the real application, these pages provide an entry point into the Web application. Add Login.jsp, Error.jsp, Search.jsp, and ListPatronItems.jsp. __ a. Click the New Page icon in the palette view. __ b. In the Navigation editor, move the cursor next to the Register.jsp page until a vertical bar appears. __ c. Click in the editor to create the page. Change the name to Login.jsp. © Copyright IBM Corp. 2004, 2007 Exercise 2. Create a Web Application with the Web Site Navigation 2-23 Course materials may not be reproduced in whole or in part without the prior written permission of IBM.
  • 24. Instructor Exercises Guide __ d. Repeat a), b) and c) for Error.jsp, Search.jsp and ListPatronItems.jsp. __ 18. Search.jsp and ListPatronItems.jsp are Utility pages that allow you to search and list items without logging in. Create a Utilities group to create a logical organization of these pages. Grouped items appear differently in navigation items, such as a drop-down list, a navigation bar, a navigation trail, or a site map. __ a. Click in the editor to the bottom-right of the ListPatronItems.jsp, drag the marquee to the top-left of Search.jsp and click. This selects both Search.jsp and ListPatronItems.jsp within the marquee. Both pages should be selected. __ b. Right-click either Search.jsp or ListPatronItems.jsp and select Group. 2-24 Developing Web Applications © Copyright IBM Corp. 2004, 2007 Course materials may not be reproduced in whole or in part without the prior written permission of IBM.
  • 25. V4.1 Instructor Exercises Guide EXempty __ c. Click the Group name Group and change it to Utilities. __ 19. Create more child pages to indicate how the application will flow. Add: - RegistrationSuccess.jsp to Register.jsp - ListItems.jsp and NoListItems.jsp to Login.jsp __ a. Click the New Page icon in the Palette view. In the Navigation editor, move the cursor below the Register.jsp page until a horizontal bar appears. __ b. Click in the editor to create the JSP page. Rename the page to RegistrationSuccess.jsp. © Copyright IBM Corp. 2004, 2007 Exercise 2. Create a Web Application with the Web Site Navigation 2-25 Course materials may not be reproduced in whole or in part without the prior written permission of IBM.
  • 26. Instructor Exercises Guide __ c. Repeat a) and b) to add ListItems.jsp as a child of Login.jsp. __ d. To create NoListItems.jsp, click the New Page icon in the Palette view. In the Navigation editor move the cursor beside the ListItems.jsp page until a vertical bar appears. __ e. Click to create the page. Change the name to NoListItems.jsp. __ 20. Error.jsp may be the result of many pages within the application. In the Navigation editor, you can share a page to make it available to other pages 2-26 Developing Web Applications © Copyright IBM Corp. 2004, 2007 Course materials may not be reproduced in whole or in part without the prior written permission of IBM.
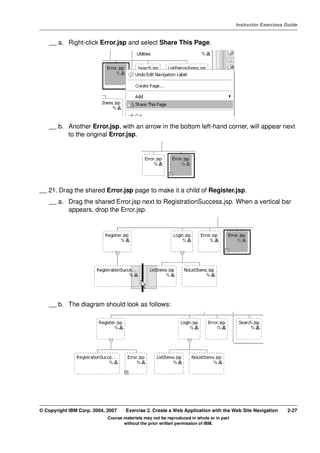
  • 27. V4.1 Instructor Exercises Guide EXempty __ a. Right-click Error.jsp and select Share This Page. __ b. Another Error.jsp, with an arrow in the bottom left-hand corner, will appear next to the original Error.jsp. __ 21. Drag the shared Error.jsp page to make it a child of Register.jsp. __ a. Drag the shared Error.jsp next to RegistrationSuccess.jsp. When a vertical bar appears, drop the Error.jsp. __ b. The diagram should look as follows: © Copyright IBM Corp. 2004, 2007 Exercise 2. Create a Web Application with the Web Site Navigation 2-27 Course materials may not be reproduced in whole or in part without the prior written permission of IBM.
  • 28. Instructor Exercises Guide __ 22. Error.jsp can also appear when you attempt to login. Copy the Error.jsp shared page and paste it as a child of Login.jsp. (Note that many of the other pages could also result in an error, but you will only do Login.jsp.) __ a. CTRL-Click the shared Error.jsp page and drag it to the right of NoListItems.jsp. When a vertical bar appears, drop the Error.jsp page. Release the CTRL key. __ b. Save your changes. __ 23. The entire diagram should now look as follows: 2-28 Developing Web Applications © Copyright IBM Corp. 2004, 2007 Course materials may not be reproduced in whole or in part without the prior written permission of IBM.
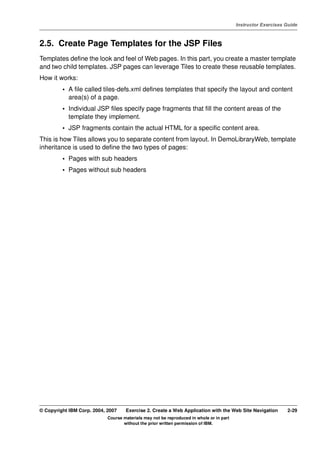
  • 29. V4.1 Instructor Exercises Guide EXempty 2.5. Create Page Templates for the JSP Files Templates define the look and feel of Web pages. In this part, you create a master template and two child templates. JSP pages can leverage Tiles to create these reusable templates. How it works: • A file called tiles-defs.xml defines templates that specify the layout and content area(s) of a page. • Individual JSP files specify page fragments that fill the content areas of the template they implement. • JSP fragments contain the actual HTML for a specific content area. This is how Tiles allows you to separate content from layout. In DemoLibraryWeb, template inheritance is used to define the two types of pages: • Pages with sub headers • Pages without sub headers © Copyright IBM Corp. 2004, 2007 Exercise 2. Create a Web Application with the Web Site Navigation 2-29 Course materials may not be reproduced in whole or in part without the prior written permission of IBM.
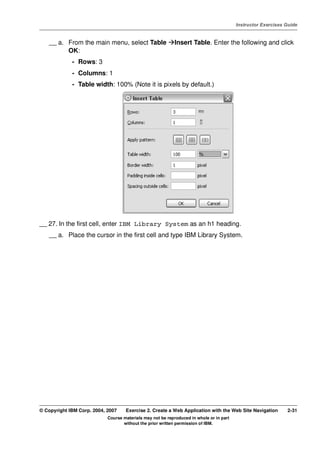
  • 30. Instructor Exercises Guide __ 24. Create a root template that will define the general layout of all of the Web pages. Create a Dynamic Page Template called LibraryRootTemplate. __ a. Right-click DemoLibraryWeb and select New Web Page Template. __ b. In the New Web Page Template dialog: - Enter LibraryRootTemplate as the File Name - Click Dynamic Page Template - Keep Basic Templates JSP as the Template __ c. Click Finish. __ 25. A Create Page Template dialog appears to indicate that templates must have one or more content areas. Click OK. __ 26. In the Page Designer for LibraryRootTemplate.jsp, insert a table with one column and three rows. Set the table width to 100%. 2-30 Developing Web Applications © Copyright IBM Corp. 2004, 2007 Course materials may not be reproduced in whole or in part without the prior written permission of IBM.
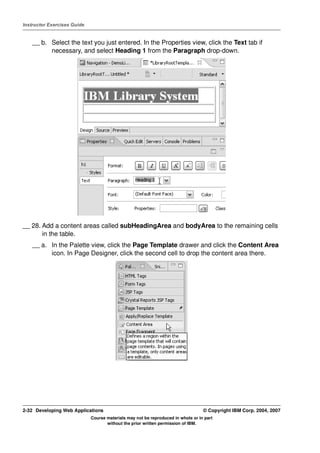
  • 31. V4.1 Instructor Exercises Guide EXempty __ a. From the main menu, select Table Insert Table. Enter the following and click OK: - Rows: 3 - Columns: 1 - Table width: 100% (Note it is pixels by default.) __ 27. In the first cell, enter IBM Library System as an h1 heading. __ a. Place the cursor in the first cell and type IBM Library System. © Copyright IBM Corp. 2004, 2007 Exercise 2. Create a Web Application with the Web Site Navigation 2-31 Course materials may not be reproduced in whole or in part without the prior written permission of IBM.
  • 32. Instructor Exercises Guide __ b. Select the text you just entered. In the Properties view, click the Text tab if necessary, and select Heading 1 from the Paragraph drop-down. __ 28. Add a content areas called subHeadingArea and bodyArea to the remaining cells in the table. __ a. In the Palette view, click the Page Template drawer and click the Content Area icon. In Page Designer, click the second cell to drop the content area there. 2-32 Developing Web Applications © Copyright IBM Corp. 2004, 2007 Course materials may not be reproduced in whole or in part without the prior written permission of IBM.
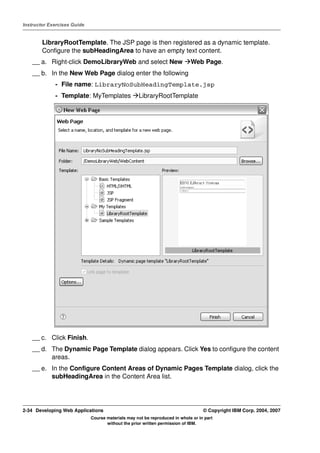
  • 33. V4.1 Instructor Exercises Guide EXempty __ b. In the Insert Content Area for Page Template dialog, type subHeadingArea as the Content area name. Click OK. __ c. Repeat a) and b) to create the Content area bodyArea in the third cell. __ d. Save your changes. __ 29. Create the child template LibraryNoSubHeadingTemplate.jsp that inherits from LibraryRootTemplate.jsp. The page is created as a JSP page that implements the © Copyright IBM Corp. 2004, 2007 Exercise 2. Create a Web Application with the Web Site Navigation 2-33 Course materials may not be reproduced in whole or in part without the prior written permission of IBM.
  • 34. Instructor Exercises Guide LibraryRootTemplate. The JSP page is then registered as a dynamic template. Configure the subHeadingArea to have an empty text content. __ a. Right-click DemoLibraryWeb and select New Web Page. __ b. In the New Web Page dialog enter the following - File name: LibraryNoSubHeadingTemplate.jsp - Template: MyTemplates LibraryRootTemplate __ c. Click Finish. __ d. The Dynamic Page Template dialog appears. Click Yes to configure the content areas. __ e. In the Configure Content Areas of Dynamic Pages Template dialog, click the subHeadingArea in the Content Area list. 2-34 Developing Web Applications © Copyright IBM Corp. 2004, 2007 Course materials may not be reproduced in whole or in part without the prior written permission of IBM.
  • 35. V4.1 Instructor Exercises Guide EXempty __ f. Click Text content, and leave the text area blank. This will create a page without a sub-heading. __ g. Do not configure the bodyArea, as this will be configured by the JSP page that implements this template. __ h. Click OK and save your changes. __ 30. Repeat the previous step for the other template, LibraryWithSubHeadingTemplate.jsp. However do not configure the content areas. In the Dynamic Page Template dialog, click NO. Save your changes. __ 31. The last step to turn the JSP pages into template is to register them. __ a. Make sure that Page Designer is open for both of the templates. Otherwise the menu entry in the main File menu will not appear. __ b. In the Project Explorer, double-click DemoLibraryWeb WebContent LibraryWithSubHeadingTemplate.jsp. __ c. From the main menu, select File Page Template Register as Dynamic Page Template. © Copyright IBM Corp. 2004, 2007 Exercise 2. Create a Web Application with the Web Site Navigation 2-35 Course materials may not be reproduced in whole or in part without the prior written permission of IBM.
  • 36. Instructor Exercises Guide __ d. The Register as a Dynamic Page Template dialog appears. Keep the default template name: LibraryWithSubHeadingTemplate. Click OK. __ e. Save your changes. __ f. In the Project Explorer, double-click DemoLibraryWeb WebContent LibraryNoSubHeadingTemplate.jsp. __ g. In the Dynamic Page Template dialog, click NO __ h. From the main menu, select File Page Template Register as Dynamic Page Template. __ i. The Register as a Dynamic Page Template dialog appears. Keep the default template name: LibraryNoSubHeadingTemplate. Click OK. __ j. Save your changes. Information Both templates have now been added to DemoLibraryWeb WebContent WEB-INF tiles-defs.xml. Note the extends keyword that indicates that the two templates inherit from the LibraryRootTemplate.jsp. <tiles-definitions> <definition name="LibraryRootTemplate" path="/LibraryRootTemplate.jsp"> </definition> <definition name="LibraryWithSubHeadingTemplate" extends="LibraryRootTemplate"> <put name="documentTitle" value="LibraryWithSubHeadingTemplate" type="string"> </put> </definition> 2-36 Developing Web Applications © Copyright IBM Corp. 2004, 2007 Course materials may not be reproduced in whole or in part without the prior written permission of IBM.
  • 37. V4.1 Instructor Exercises Guide EXempty <definition name="LibraryNoSubHeadingTemplate" extends="LibraryRootTemplate"> <put name="subHeadingArea" value="" type="string"> </put> <put name="documentTitle" value="LibraryNoSubHeadingTemplate" type="string"> </put> </definition> </tiles-definitions> © Copyright IBM Corp. 2004, 2007 Exercise 2. Create a Web Application with the Web Site Navigation 2-37 Course materials may not be reproduced in whole or in part without the prior written permission of IBM.
  • 38. Instructor Exercises Guide 2.6. Apply Page Templates to JavaServer Pages In this part you create pages using one of the two templates that were created. __ 32. In the Navigation editor for DemoLibraryWeb, use the LibraryWithSubHeadingTemplate for Register.jsp. Configure the content areas as follows: • subHeadingArea(Text content): <h2>Register A New Patron</h2> • bodyArea(New or existing fragment file): RegisterBodyContent.jsp __ a. In the Project Explorer, double-click Web Site Navigation in the DemoLibraryWeb project. __ b. In the Navigation editor, double-click Register.jsp. __ c. In the New Web Page dialog, select My Templates LibraryWithSubHeadingTemplate for the Template. __ d. Click Finish. __ e. Click Yes to configure the content areas. __ f. In the Configure Content Areas of Dynamic Page Template dialog - Select subHeadingArea and enter <h2>Register A New Patron</h2> as the Text content - Select bodyArea and enter RegisterBodyContent.jsp as the New or existing fragment file. (Note: this files is created automatically.) 2-38 Developing Web Applications © Copyright IBM Corp. 2004, 2007 Course materials may not be reproduced in whole or in part without the prior written permission of IBM.
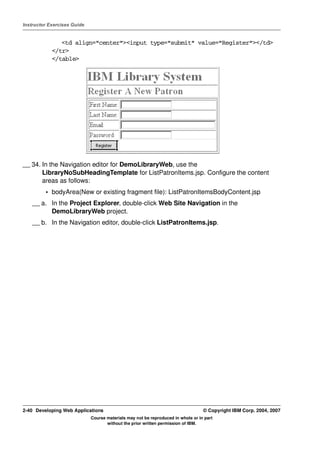
  • 39. V4.1 Instructor Exercises Guide EXempty __ g. Click OK. Save your changes. Note Page Designer supports direct editing of JSP fragment files embedded inside of the main JavaServer page. When you click the embedded JSP fragment, Page Designer will then edit the fragment instead of the main page. Clicking the Source tab will then show the source for the fragment, and not the main page. In the preceding example, you can edit RegisterBodyContent.jsp from within Register.jsp. RegisterBodyContent.jsp can be found in the tilesContent folder. __ 33. In Page Designer, click in the third row, and then click the Source tab to replace the existing HTML in RegisterBodyContent.jsp. Verify results in the Design tab and save your changes. • Replace: <p>Place RegisterBodyContent.jsp's content here.</p> • With: (Note: you can copy from <LAB_FILES>Websnippetssnippet-2.txt) <table border="1" height="100%" width="100%"> <tr> <td>First Name:</td> <td><input type="text" name="nameText" size="20"></td> </tr> <tr> <td>Last Name:</td> <td><input type="text" name="nameText0" size="20"></td> </tr> <tr> <td>Email:</td> <td><input type="text" name="nameText00" size="38"></td> </tr> <tr> <td>Password:</td> <td><input type="password" name="nameText000" size="20"></td> </tr> <tr> © Copyright IBM Corp. 2004, 2007 Exercise 2. Create a Web Application with the Web Site Navigation 2-39 Course materials may not be reproduced in whole or in part without the prior written permission of IBM.
  • 40. Instructor Exercises Guide <td align="center"><input type="submit" value="Register"></td> </tr> </table> __ 34. In the Navigation editor for DemoLibraryWeb, use the LibraryNoSubHeadingTemplate for ListPatronItems.jsp. Configure the content areas as follows: • bodyArea(New or existing fragment file): ListPatronItemsBodyContent.jsp __ a. In the Project Explorer, double-click Web Site Navigation in the DemoLibraryWeb project. __ b. In the Navigation editor, double-click ListPatronItems.jsp. 2-40 Developing Web Applications © Copyright IBM Corp. 2004, 2007 Course materials may not be reproduced in whole or in part without the prior written permission of IBM.
  • 41. V4.1 Instructor Exercises Guide EXempty __ c. In the New Web Page dialog, select My Templates LibraryNoSubHeadingTemplate for the Template. __ d. Click Finish. __ e. Click Yes to configure the content areas. __ f. In the Configure Content Areas of Dynamic Page Template dialog - Select bodyArea and enter ListPatronItemsBodyContent.jsp as the New or existing fragment file. __ g. Click OK. __ 35. In Page Designer, click in the third row and then click the Source tab to replace the existing HTML in ListPatronItemsBodyContent.jsp. Verify in the Design tab and save your changes. © Copyright IBM Corp. 2004, 2007 Exercise 2. Create a Web Application with the Web Site Navigation 2-41 Course materials may not be reproduced in whole or in part without the prior written permission of IBM.
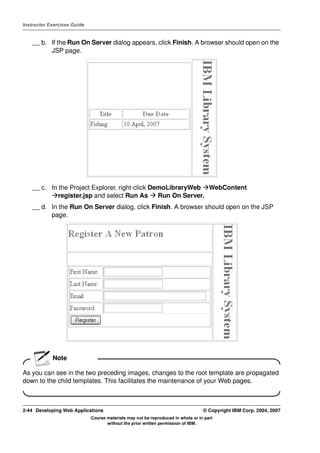
  • 42. Instructor Exercises Guide • Replace: <p>Place ListPatronItemsBodyContent.jsp's content here.</p> • With: (Note: you can copy from <LAB_FILES>Websnippetssnippet-3.txt) <table border="1" width="100%" height="100%"> <tr> <th>Title</th> <th>Due Date</th> </tr> <tr> <td>Fishing</td> <td>10 April, 2007</td> </tr> </table> __ 36. Test Register.jsp and ListPatronItems.jsp in the WebSphere Test Environment. __ a. In the Project Explorer, right-click DemoLibraryWeb WebContent listpatronitems.jsp and select Run As Run On Server. __ b. If a Save Resource dialog appears, click Yes. __ c. If the Run On Server dialog appears, click Finish. A browser should open on the JSP page. Note If you get an Error 500, click Publish in the Servers view and try step a) again. __ d. In the Project Explorer, right-click DemoLibraryWeb WebContent register.jsp and select Run As Run On Server. __ e. If the Run On Server dialog appears, click Finish. A browser should open on the JSP page. __ 37. Update the LibraryRootTemplate to display the heading on the side, from top to bottom. __ a. In the Project Explorer, double-click DemoLibraryWeb WebContent LibraryRootTemplate.jsp. 2-42 Developing Web Applications © Copyright IBM Corp. 2004, 2007 Course materials may not be reproduced in whole or in part without the prior written permission of IBM.
  • 43. V4.1 Instructor Exercises Guide EXempty Note To edit the template, you could have also clicked within the JSP page that uses the LibraryRootTemplate. . __ b. In Page Designer, click the Source tab and update the HTML. • Replace: (Note: you can copy from <LAB_FILES>Websnippetssnippet-4.txt) <td><h1>IBM Library System</h1> </td> </tr> <tr> <td><tiles:insert attribute="subHeadingArea"></tiles:insert></td> • With: <td width="90%"> <tiles:insert attribute="subHeadingArea"></tiles:insert> </td> <td rowspan="2"> <div style="writing-mode: tb-rl; white-space: nowrap"> <h1>IBM Library System</h1> </div> </td> __ c. Save your changes. __ 38. Test Register.jsp and ListPatronItems.jsp in the WebSphere Test Environment. __ a. In the Project Explorer, right-click DemoLibraryWeb WebContent listpatronitems.jsp and select Run As Run On Server. © Copyright IBM Corp. 2004, 2007 Exercise 2. Create a Web Application with the Web Site Navigation 2-43 Course materials may not be reproduced in whole or in part without the prior written permission of IBM.
  • 44. Instructor Exercises Guide __ b. If the Run On Server dialog appears, click Finish. A browser should open on the JSP page. __ c. In the Project Explorer, right-click DemoLibraryWeb WebContent register.jsp and select Run As Run On Server. __ d. In the Run On Server dialog, click Finish. A browser should open on the JSP page. Note As you can see in the two preceding images, changes to the root template are propagated down to the child templates. This facilitates the maintenance of your Web pages. 2-44 Developing Web Applications © Copyright IBM Corp. 2004, 2007 Course materials may not be reproduced in whole or in part without the prior written permission of IBM.
  • 45. V4.1 Instructor Exercises Guide EXempty 2.7. Improve the Home Page __ 39. Add a site map to index.jsp. Use the LibraryWithSubHeadingTemplate. __ a. Double-click the index.jsp page icon in the Navigation editor to load the JSP page in Page Designer. __ b. In the New Web Page dialog, choose the LibraryNoSubHeadingTemplate and click Finish. __ c. In the Dynamic Page Template dialog, click Yes to configure the content area. __ d. In the Configure Content Areas of Dynamic Page Templates dialog, for bodyArea, type indexBodyContent.jsp as the New or existing fragment file. Click OK. __ e. In Page Designer, remove the text: Place indexBodyContent.jsp's content here. __ f. In the Palette view, expand the Web Site Navigation drawer. __ g. Drag the Site Map component onto the Page Designer it in the table cell where you deleted the text: Place indexBodyContent.jsp's content here. © Copyright IBM Corp. 2004, 2007 Exercise 2. Create a Web Application with the Web Site Navigation 2-45 Course materials may not be reproduced in whole or in part without the prior written permission of IBM.
  • 46. Instructor Exercises Guide __ h. Accept the default setting in the Insert Site Map dialog, click Finish. __ i. Save the changes and close index.jsp. __ 40. Test index.jsp in the WebSphere Test Environment. __ a. In the Project Explorer, right-click DemoLibraryWeb WebContent index.jsp and select Run As Run On Server. __ b. If the Save Resource dialog appears, click Yes. 2-46 Developing Web Applications © Copyright IBM Corp. 2004, 2007 Course materials may not be reproduced in whole or in part without the prior written permission of IBM.
  • 47. V4.1 Instructor Exercises Guide EXempty __ c. If the Run On Server dialog appears, click Finish. A browser should open on the JSP page. __ d. Experiment by clicking the links. Pages that have not been created cannot be navigated to. __ e. Optional: Implement Error.jsp using the LibaryNoSubHeadingTemplate and setting the bodyArea to the text content: error. Test the page. Can you access all of the error.jsp shared pages as well? © Copyright IBM Corp. 2004, 2007 Exercise 2. Create a Web Application with the Web Site Navigation 2-47 Course materials may not be reproduced in whole or in part without the prior written permission of IBM.
  • 48. Instructor Exercises Guide 2.8. Creating A Web Diagram In this part of the exercise, you will add some pages from Web navigation to the Web diagram. You will also reverse-engineer the project to add DisplayPatron.jsp. The Web Diagram editor allows you to build dynamic Web applications visually. This is a powerful tool that will be used in later exercises. __ 41. In the Navigation editor, show index.jsp, Register.jsp, and ListPatronItems.jsp in the Web Diagram editor. __ a. In the Navigation editor, multi-select index.jsp, Register.jsp, and ListPatronItems.jsp. __ b. Right-click one of the selected pages and select Show Page in Web Diagram editor. __ c. In the Add Pages to the Web Diagram File dialog, select the default /WebDiagram.gph. Click OK. __ d. In the Web Diagram editor that opens, close the Welcome to the Web Diagram editor hover panel. __ e. Right-click in the Web diagram editor and select Arrange All. __ 42. In the Web Diagram editor, reverse-engineer the project. __ a. Right-click in the Web Diagram editor and select Reverse Engineer Project. __ b. This adds all of the JSP pages and templates from the project. __ c. Navigate down to the last JSP page: DisplayPatron.jsp. 2-48 Developing Web Applications © Copyright IBM Corp. 2004, 2007 Course materials may not be reproduced in whole or in part without the prior written permission of IBM.
  • 49. V4.1 Instructor Exercises Guide EXempty __ d. Double-click the down arrow to display the bean that is included in the page. Note In the preceding step, you used the Web Diagram editor to parse a JSP and display the Beans used in the page. __ 43. Save any changes. © Copyright IBM Corp. 2004, 2007 Exercise 2. Create a Web Application with the Web Site Navigation 2-49 Course materials may not be reproduced in whole or in part without the prior written permission of IBM.
  • 50. Instructor Exercises Guide 2.9. Clean up The goal of this lab was to explore some of the functionality in Web Site Navigation, Templates, and Web Page Designer. The DemoLibraryEAR and DemoLibraryWeb can be used to understand the layout of the Web application you are going to build. The DemoLibraryEAR and DemoLibraryWeb will not be needed in subsequent labs. __ 44. Remove DemoLibraryEAR from the server. __ a. In the Servers view, expand the WebSphere Application Server. __ b. Right-click DemoLibraryEAR and select Remove. __ 45. Close the DemoLibraryEAR and DemoLibraryWeb projects. __ a. In the Project Explorer, right-click DemoLibraryEAR and select Close Project. __ b. In the Project Explorer, right-click DemoLibraryWeb and select Close Project. End of exercise 2-50 Developing Web Applications © Copyright IBM Corp. 2004, 2007 Course materials may not be reproduced in whole or in part without the prior written permission of IBM.