2. Objectives
Understand the basic building blocks
of a linked list.
Understand the advantages (and
disadvantages) of using linked lists.
Understand the basic insertion and
deletion operations associated with
linked lists.
Be able to code up a linked list and its
basic operations.
3. Linked List Concepts
A linked list is a collection of data in
which each element contains the
location of the next element.
Each element in the list contains 2
parts:
Data (Contains the stored data)
Link (Contains the address of the next
element in the list)
4. Linked List Concepts
Here we see a basic linked list.
There are 4 elements in the list, each one with a
data portion and a link portion.
pHead is a pointer to the head of the list.
Typically, the name given to this pointer is the
name of the list.
Note the last element of the list. The X in the link
portion denotes a NULL pointer (i.e., the end of
the list).
5. Nodes
The elements in a linked list are
traditionally called nodes.
A node in a linked list is a structure
that has at least 2 fields: one contains
the data, the other contains the
address of the next element in the list.
A node can contain data of any type,
including objects of other classes.
6. Nodes
Here we see 3 examples of
node types:
1) The 1st
is a simple node
with 1 data field (number)
and 1 link field.
2) The 2nd
is a node with 3
data fields (name, id,
grdPts) and 1 link field.
3) The 3rd
is a node with 1
data field and 1 link field.
However, this data field
contains a structure, which
itself contains multiple
7. Nodes
The nodes that make up a linked list
are self-referential structures.
A self-referential structure is one in
which each instance of the structure
contains a pointer to another
instance of the same structural type.
8. Linked List Concepts
Data is stored in a linked list
dynamically – each node is created as
necessary.
Nodes of linked lists are not
necessarily stored contiguously in
memory (as in an array).
Although lists of data can be stored in
arrays, linked lists provide several
advantages.
9. Linked List Concepts
Advantage 1: Dynamic
A linked list is appropriate when the
number of data elements to be
stored in the list is unknown.
Because linked lists are dynamic,
their size can grow or shrink to
accommodate the actual number of
elements in the list.
10. Linked List Concepts
The size of a “conventional” C++ array,
however, cannot be altered, because the array
size is fixed at compile time.
Also, arrays can become full (i.e., all elements
of the array are occupied).
A linked list is full only when the computer
runs out of memory in which to store nodes.
Note: it is possible to create a dynamic array.
11. Linked List Concepts
Advantage 2: Easy Insertions and
Deletions
Although arrays are easy to implement and
use, they can be quite inefficient when
sequenced data needs to be inserted or
deleted.
However, the linked list structure allows us
to easily insert and delete items from a list.
With arrays, it is more difficult to rearrange
data (copying to temporary variables, etc.)
12. Linked List Concepts
However, linked lists are not without
their drawbacks.
For example, we can perform efficient
searches on arrays (e.g., binary
search) but this is not practical with a
linked list.
13. Linked List Data Structure
One of the attributes of a linked list is
that there is not a physical
relationship between the nodes; that
is, they are not stored contiguously in
memory (as array elements are).
To determine the beginning of the
list, and each additional element in
the list, we need to use pointers.
14. Linked List Data Structure
The pointer to the first node in the list is
referred to as the head pointer, because it
points to the head node in the list.
In addition to the head pointer, there are
usually other pointers associated with the list.
These can include a pointer to the last
element in the list (tail pointer) and a pointer
that traverses the list to find data (navigator
or traversal pointer).
15. Linked List Data Structure
Oftentimes it is convenient to create
a structure that contains the head
pointer of a list and also information
about the list itself (e.g., number of
elements currently in the list,
maximum number of elements to be
allowed in the list, etc).
This extra data is referred to as
metadata.
16. Linked List Data Structure
A linked list is usually implemented with 2
classes:
List class
Node class
The Node class will contain the data and
link fields.
The List class will contain the head pointer
and the metadata, along with the list insert
and delete functions.
17. Linked List Algorithms
With a linked list, there are a standard
set of functions that operate on the
list:
Creating the list
Inserting nodes
Deleting nodes
Traversing the list
Destroying the list
18. Linked List Algorithms
The algorithms we discuss will be
implemented using pseudocode.
Note that these algorithms are merely used
to introduce the concepts involved when
working with linked lists … they do not
necessarily represent the best way to
implement a linked list in practice.
The end of the slides contains an actual C+
+ linked list implementation.
19. Create List
This function is used to initialize a
linked list.
Typically, this is implemented in the
constructor for the List class.
21. Insert Node
This function inserts a node into the
linked list.
To insert a node into the list, we need a
pointer to the node’s logical predecessor.
Given the predecessor, there are 3 steps
to the insertion:
1) Allocate memory for the new node
2) Point the new node to its successor
3) Point the new node’s predecessor to the new
node.
22. Insert Node
The inserted node can come at the
beginning, middle, or end of the list.
We will look at each of these
possibilities …
23. Insert into an Empty List
When the head pointer of the list is null,
the list is empty.
To add a node to an empty list, we simply
assign the head pointer the address of the
new node and set the link field of the new
node to NULL to indicate the end of the list.
Note: it’s usually a good idea to initialize
the link field of a node to NULL in the
node’s constructor.
24. Insert into an Empty List
Pseudocode
head = pNew
? ?
count head
list
0
0 0
75
pNew
1
Here, we want to insert our new
node in the list.
pNew is a pointer to the new node.
25. Insert at Beginning
We insert a node at the beginning of the
list anytime we need to insert a node
before the first element of the list.
To insert at the beginning of the list, we
set the link portion of our new node to
the head pointer of the list and then set
the head pointer to the new node.
26. Insert at Beginning
Pseudocode
pNew->link = head
?
count head
list
0 0
75
pNew
1
39
head = pNew
2
0
Here, we want to insert our new
node before 75 to make it the
first element of the list.
27. Insert in Middle
To insert a node between two nodes,
we point the new node to its
successor and then point its
predecessor to the new node.
28. Insert in Middle
Pseudocode
pNew->link = pPre->link
?
count head
list
2 0
75
pPre->link = pNew
pNew
52 0
39
pPre
Here, we want to insert our new
node between 39 and 75.
pPre is a pointer to the
predecessor node.
3
29. Insert at End
To insert a node at the end of the list,
we only need to point the last node of
the list to the new node and set the
new node’s link field to NULL.
30. Insert at End
Pseudocode
pPre->link = pNew
Here, we want to insert our new
node after 75 at the end of the
list.
pPre is a pointer to the
predecessor node.
3
count head
list
75
pNew
134 0
39
pPre
52
0
4
31. Insert Node Algorithm
if( pPre null )
//adding before 1st
node or to empty list
pNew->link = head
head = pNew
else
//adding in middle or at end
pNew->link = pPre->link
pPre->link = pNew
end if
count++
32. Insert Node Algorithm
Note that although we presented 4
different cases (insert into an empty
list, insert at front, insert at back, and
insert in middle) we were able to
reduce the code to 2 cases:
Adding before 1st
node or to an empty list.
Adding in the middle or at the end of the
list.
33. Delete Node
The delete node algorithm logically
removes a node from the linked list by
changing various link pointers and
then reclaiming the memory used by
the node.
The delete situations parallel those for
add: we can delete the only node in
the list, the first node, the last node,
or a node in the middle of the list.
34. Delete First Node
When we delete the first node, we must
reset the head pointer to point to the
first node’s successor and then recycle
the memory for the deleted node.
The pseudocode to delete the first node
in the list also applies to the case where
we are deleting the only node in the list.
35. Delete First Node
Pseudocode
head = pLoc->link
3
count head
list 134
39
0
pPre
Here, we want to delete the first
node in the list (39).
pPre is NULL as there is no
predecessor to 39 and pLoc
points to the node we want to
delete.
75
0
pLoc
delete pLoc
(available)
2
36. General Delete Case
We call deleting any node other than
the first node a general case because
the same logic applies to deleting a
node in either the middle or at the
end of the list.
For both of these cases, we simply
point the predecessor node to the
successor node (of the node being
deleted).
37. General Delete Case
Pseudocode
pPre->link = pLoc->link
count head
list 134
39
pPre
Here, we want to delete 75.
pPre is a pointer to the
predecessor node and pLoc
points to the node we want to
delete.
75
0
pLoc
delete pLoc
(available)
3
2
38. Delete Node Algorithm
if (pPre null)
//Deleting first node
head = pLoc->link
else
//Deleting other nodes
pPre->link = pLoc->link
end if
delete pLoc
count--
39. Search List
A search list is used by several
algorithms to locate data in a list:
To insert data, we need to know the
logical predecessor to the new data.
To delete data, we need to find the node
to be deleted and identify its logical
predecessor.
To retrieve data from a list, we need to
search the list and find the data.
Used for sorted
list
40. Ordered List Search
First let us consider searching a list in
which the elements are sorted based
on a field value.
Given a target key, the ordered list
search attempts to locate the
requested node in the linked list.
If a node in the list matches the
target, the search returns true, else
we return false.
41. Ordered List Search
We start at the beginning and search
the list sequentially until the target
value is no longer greater than the
current node’s key.
When the target value becomes less
than the current node’s key, we know
that the item being searched for
cannot be in the list.
42. Ordered List Search
pLoc = pHead
loop (pLoc not null AND
target > pLoc->data.key)
pLoc = pLoc->link
end loop
//Set return value
if( pLoc null )
found = false
else
if(target equal pLoc-
>data.key)
found = true
else
found = false
end if
end if
return found
43. Unordered List Search
In our previous slides, we assumed
that the list was ordered on a key.
Oftentimes we need to search an
unordered list looking for a specific
data match.
To do this, we use a simple sequential
search (i.e., just search every node in
order).
44. Empty List
The code we write often assumes that
the list is not empty.
Therefore, we will develop a function
to check whether or the not the list is
empty before we begin searching,
inserting, deleting, etc.
This is simply done with the following:
return (count equal to zero)
45. Full List
Similarly, we must also make sure that
our list is not full before we begin.
To do this, we need to make sure that
our system has more memory and that
the number of nodes we have created is
less than the maximum number of
nodes we have designated for our list.
46. Full List
if (list.count equal to list.maxCount)
return true
end if
allocate pNew
if (allocation successful)
delete pNew
return false
end if
return true
47. List Count
This is a simple member function to
return the number of elements in the
list:
return count
48. Traverse List
Algorithms that traverse a list start at the
first node and examine each node in
succession until the last node has been
processed.
Traversal logic is used by several different
types of algorithms, such as changing a
value in each node, printing the list,
summing a field in the list, or calculating the
average of a field.
Any application that requires that the entire
list be processed uses a traversal.
49. Traverse List
To traverse the list we need a walking
(navigator) pointer.
This pointer is used to move from
node to node as each element is
processed.
50. Traverse List
pWalker = head
loop (pWalker not null)
process (pWalker->data)
pWalker = pWalker->link
We begin by setting the walking pointer to the first
node in the list.
We then process the first node and continue until all
of the data has been processed.
When the last node has been processed, the walking
pointer becomes null and the loop terminates.
51. Destroy List
When a list is no longer needed but the
application is not finished, the list should
be destroyed.
This function will delete any nodes in the
list, reclaim their memory, and set any
metadata to an empty list condition.
This type of functionality is commonly
found in the destructor.
52. Destroy List
loop (head not null)
pNodeToDelete = head
head = head->next
delete pNodeToDelete
end loop
53. Testing
As with all software development
applications, it is vital to test your
implementation.
Here are some tests to run on your
toolbox of linked list functions to
verify correct operation.
54. Testing Insert Logic
1) Insert a node into an empty list.
2) Insert a node before the 1st
node.
3) Insert a node between two nodes.
4) Insert a node after the last node.
55. Testing Delete Logic
1) Delete the entire list.
2) Delete the first node.
3) Delete a node between two nodes.
4) Delete the last node.
5) Try to delete a node that doesn’t exist.
6) Try to delete a node whose key is less than the
first data node’s key.
7) Try to delete a node whose key is greater than
the last data node’s key.
8) Try to delete from an empty list.
56. Complex Linked List
Structures
In this section, we introduce 3 useful
linked list variations:
Circular linked list
Doubly linked list
Multilinked list
57. Circular Linked Lists
In a circular linked list, the last node’s link
points to the first node of the list.
Situation where some element has to be
located from the center. But navigator is at
end
58. Circular Linked Lists
Insertions and deletions into a circular
linked list follow the same logic patterns
used in a singly linked list except that the
last node points to the first node.
Therefore, when inserting or deleting the
last node, in addition to updating the tail
pointer, we must also point the link field of
the new last node to the first node.
59. Circular Linked Lists
Note that the last element in the list does not
have a NULL valued link field … it points back to
the first node.
In this case, how do we know when we have
finished searching the list?
loop (target not equal to pLoc->data.key AND
pLoc->link not equal to head)
Note: you must account for the last node if you
implement this logic.
60. Circular Linked Lists
One application: a queue.
When we get to queues next week, we will
see that they are essentially a linked list with
pointers to the head and tail nodes.
However, if the queue is implemented using
a circular linked list, only one pointer is
needed -- tail.
Why?
because head = tail->next …
61. Doubly Linked Lists
One of the most powerful variations
of a linked list is the doubly linked
list.
A doubly linked list is a linked list in
which each node has a pointer to
both its successor and its
predecessor.
62. Doubly Linked Lists
The doubly linked list eliminates the
need for the “pPre” pointer since each
node has pointers to both the
previous and next nodes in the list.
63. Doubly Linked Lists
A variation on the doubly linked list is the
circular doubly linked list.
In this variation, the forward pointer of the last
node points to the first node and the backward
pointer of the first node points to the last node.
Advantage: if you have a “dummy” node at the
beginning of the list, there are no special cases
to worry about when inserting/deleting.
64. Multilinked Lists
A multilinked list is a list with two or more
logical key sequences.
For example, consider the list of the first 10
presidents of US.
We could have a list that is sorted by the
date the President assumed office,
alphabetical order based on the president’s
last name, alphabetical order by the
president’s wife’s first name, etc.
65. Multilinked Lists
We may wish to have the list sorted in all these formats.
The beauty of the multilinked list is that the data exists
only once, but there are different pointers for the
different lists.
66. Actual Implementations
Up to now, we have introduced
everything in very abstract terms and
have used pseudocode.
Now we will develop a more concrete
view of the linked list.
In the coming slides we will develop
the C++ code to implement a basic
linked list and some of the functions
associated with it.
67. Introduction to the Code
We will have 2 main classes:
List
Node
List is the class that all the functions
of the list will be included in (e.g.,
add, delete, print, etc).
Node is the class that will contain the
structure and operations for a
specific node in the linked list.
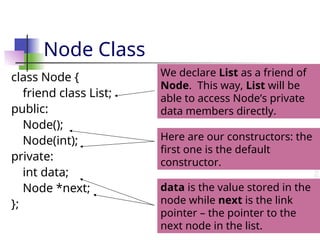
68. Node Class
class Node {
friend class List;
public:
Node();
Node(int);
private:
int data;
Node *next;
};
We declare List as a friend of
Node. This way, List will be
able to access Node’s private
data members directly.
Here are our constructors: the
first one is the default
constructor.
data is the value stored in the
node while next is the link
pointer – the pointer to the
next node in the list.
69. Node Class Constructors
Node::Node() {
data = 0;
next = NULL;
}
Node::Node(int value) {
data = value;
next = NULL;
}
The constructors initialize the
data value and also set the link
field of the node to NULL.
This constructor is used to
initialize the data value upon
instantiation.
70. List Class
class List {
public:
List();
void printList();
void deleteList();
bool isEmpty();
Node* findNode(int);
void addToFront(Node *);
void addToBack(Node *);
void deleteFromFront();
void deleteFromBack();
private:
int numNodes;
Node *head; };
Functions to print and delete
the list.
Functions to add/delete nodes
to/from the list.
Metadata (number of nodes in
the list) and a pointer to the
first node in the list.
A function to find a node with
a given value.
A helper function.
71. List Class Constructor
List::List() {
numNodes = 0;
head = NULL;
}
Here we initialize the number
of nodes in the linked list to 0
and set the head pointer to
NULL.
Remember: the constructor is
called upon instantiation.
Since the list was just
instantiated, it has no nodes
yet.
72. deleteList
void List::deleteList() {
Node *toDelete;
while( head != NULL ) {
toDelete = head;
head = head->next;
delete toDelete;
}
numNodes = 0;
}
This function is used to delete
the entire list.
Since the list is now empty, we
set the number of elements in
the list to 0.
We go through the
list, node by node,
deleting each node
along the way.
73. isEmpty
bool List::isEmpty() {
if (numNodes == 0) {
return true;
}
else {
return false;
}
}
If the list is empty, this
function will return TRUE. If
there are nodes in the list, it
will return FALSE.
Here we check to see if the list is
empty … what’s another way to
check to see if the list is empty?
if (head == NULL) …
74. addToFront
void List::addToFront(Node *nodeToAdd)
{
nodeToAdd->next = head;
head = nodeToAdd;
numNodes++;
}
We increment the number of
nodes in the list when we’re done.
We have to make sure
to update the head
pointer.
This function is used to insert a
node to the front of the list.
75. addToBack
void List::addToBack(Node *nodeToAdd) {
if( isEmpty() ) {
head = nodeToAdd;
}
else {
Node *navigator = head;
while( navigator->next != NULL ) {
navigator = navigator->next;
}
navigator->next = nodeToAdd;
}
numNodes++;}
This function is used to insert a
node to the back of the list.
If the list is empty, we need to
handle the insert differently.
We increment the number of
nodes in the list when we’re done.
We are traversing
the list to find the
last node.
76. deleteFromFront
void List::deleteFromFront() {
if( !isEmpty() ) {
Node *newHead = head->next;
delete head;
head = newHead;
numNodes--;
}
else {}
}
We decrement the number of
nodes in the list when we’re done.
This function is used to delete
a node from the front of the
list.
We have to make sure to
update the head pointer.
77. deleteFromBack
void List::deleteFromBack() {
if( !isEmpty() ) {
Node *follower = NULL;
Node *leader = head;
if( numNodes == 1 ) {
delete head;
head = NULL;
}
else {
while( leader->next != NULL ) {
follower = leader;
leader = leader->next;
}
delete leader;
follower->next = NULL;
}
numNodes--;
}}
This function is used to delete
a node from the back of the
list.
We decrement the
number of nodes in the
list when we’re done.
We need to handle the special
case of a list with 1 node.
Note that we need 2
temp
pointers for this function.
78. findNode
Node* List::findNode(int valueToFind) {
Node *navigator = head;
while(navigator!=NULL && navigator->data !=valueToFind){
navigator = navigator->next;
}
return navigator;
}
This function returns a pointer
to the node with a given value.
If this is not the 1st
condition in
the loop, your program might
seg fault.
Keep looping until we
find the node with the
data.
79. printList
void List::printList() {
cout << "Number of elements in list: " << numNodes << endl;
Node *navigator = head;
while( navigator != NULL ) {
cout << (navigator->data) << endl;
navigator = navigator->next;
}
}
This function prints the entire
list.
Initially we print the number of
elements in the list.
Then we traverse the list,
printing out the data values as
we go.
80. main
int main(int argc, char* argv[])
{
List list;
list.printList();
Node *firstNode = new Node(5);
list.addToFront(firstNode);
list.printList();
Node *lastNode = new Node;
list.addToBack(lastNode);
list.printList();
Node *newFirstNode = new
Node(2);
list.addToFront(newFirstNode
list.printList();
list.deleteFromBack();
list.printList();
list.deleteFromFront();
list.printList();
list.deleteList();
list.printList();
return 0; }
Note that when we make a new node, it is declared as a pointer to a node.
82. Another Example
In this example, we will develop the
C++ code that reads a list of integers
from the keyboard, creates a linked
list out of them, and prints the
results.
83. Node Class
class Node {
friend class List;
public:
Node(int);
private:
int data;
Node *next;
};
We declare List as a friend of
Node. This way, List will be
able to access Node’s private
data members directly.
We make sure to create a
constructor.
data is the value stored in the
node while next is the link
pointer – the pointer to the
next node in the list.
84. List Class
class List {
public:
List();
void addToList(Node *);
void printList();
private:
Node *head;
};
The List class is what contains
all the functions we use to
operate on the list.
head is a pointer to the first
node of the list.
85. Constructors
List::List() {
head = NULL;
}
Node::Node(int value) {
data = value;
next = NULL;
}
The List constructor initializes
the empty list.
The Node constructor
initializes the data to the given
value and the link pointer to
NULL.
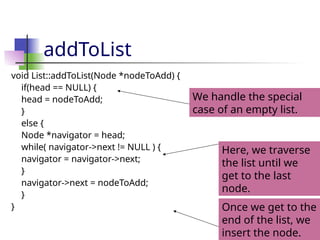
86. addToList
void List::addToList(Node *nodeToAdd) {
if(head == NULL) {
head = nodeToAdd;
}
else {
Node *navigator = head;
while( navigator->next != NULL ) {
navigator = navigator->next;
}
navigator->next = nodeToAdd;
}
}
We handle the special
case of an empty list.
Here, we traverse
the list until we
get to the last
node.
Once we get to the
end of the list, we
insert the node.
87. printList
void List::printList() {
Node *navigator = head;
cout << "List: ";
while( navigator != NULL ) {
cout << navigator->data << " ";
navigator = navigator->next;
}
cout << endl;
}
Here, we traverse
the list and print
out each node’s
data along the
way.
88. Main
int main(int argc, char* argv[])
{
List list;
int input, done = 0;
while( !done ) {
cout << "Enter an integer (-9999 to quit): ";
cin >> input;
if( input != -9999 ) {
Node *newNode = new Node(input);
list.addToList(newNode);
}
else { done = 1; }
}
list.printList();
}
Here we read a list
of integers from
the user until we
receive a –9999.
After each integer,
we add the node
to the list.
89. Final Suggestion
To code linked lists, there is only
thing to remember …
DRAW A PICTURE
DRAW A PICTURE
DRAW A PICTURE


![main
int main(int argc, char* argv[])
{
List list;
list.printList();
Node *firstNode = new Node(5);
list.addToFront(firstNode);
list.printList();
Node *lastNode = new Node;
list.addToBack(lastNode);
list.printList();
Node *newFirstNode = new
Node(2);
list.addToFront(newFirstNode
list.printList();
list.deleteFromBack();
list.printList();
list.deleteFromFront();
list.printList();
list.deleteList();
list.printList();
return 0; }
Note that when we make a new node, it is declared as a pointer to a node.](https://image.slidesharecdn.com/linkedlists-250706113327-494a39db/85/linked_lists-ppt-linked_lists-linked_lists-80-320.jpg)


![Main
int main(int argc, char* argv[])
{
List list;
int input, done = 0;
while( !done ) {
cout << "Enter an integer (-9999 to quit): ";
cin >> input;
if( input != -9999 ) {
Node *newNode = new Node(input);
list.addToList(newNode);
}
else { done = 1; }
}
list.printList();
}
Here we read a list
of integers from
the user until we
receive a –9999.
After each integer,
we add the node
to the list.](https://image.slidesharecdn.com/linkedlists-250706113327-494a39db/85/linked_lists-ppt-linked_lists-linked_lists-88-320.jpg)
