Mvc4
22 likes8,542 views

The document outlines the key features and enhancements of ASP.NET MVC 4, including the introduction of ASP.NET Web API for building HTTP services, improved project templates, and functionalities like mobile templates and bundling and minification. It covers various aspects such as controllers, views, models, and security, emphasizing conventions in MVC structure and the transition to open source projects. Additionally, it describes the application structure, how to create controllers and views, and the importance of strong typing in MVC applications.


![Introduction
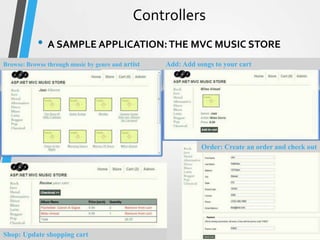
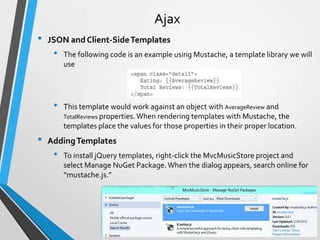
Some of the Web API features that are similar to MVC, just adapted
for the HTTP service domain:
• Filters: MVC uses filters to allow for adding behaviors to actions via
attributes. For instance, adding an [Authorize] attribute to an MVC action
will prohibit anonymous access, automatically redirecting to the login page.
Web API also supports some of the standard MVC filters (like a service-
optimized [Authorize] attribute) and custom filters.
• Scaffolding: You add new Web API controllers using the same dialog used to
add an MVC controller. You have the option to use the Add Controller dialog
to quickly scaffold a Web API controller based on an Entity Framework–based
model type.
• Easy unit testability: Much like MVC, Web API is built around the concepts
of dependency injection and avoiding the use of global state.](https://image.slidesharecdn.com/mvc4-130319082026-phpapp01/85/Mvc4-6-320.jpg)


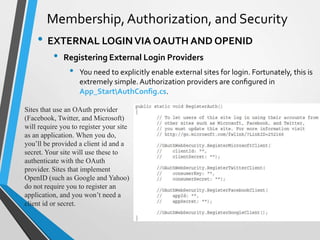
![Introduction
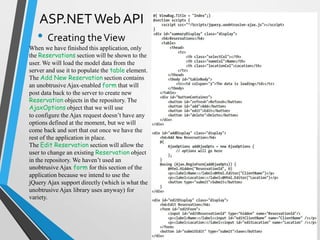
ASP.NET MVC and Conventions
For instance, MVC uses a convention-based directory-naming structure when resolving View
templates. By default, ASP.NET MVC looks for the View template file within the
Views[ControllerName] directory underneath the application.
Convention over Configuration
means: We know, by now, how to build a web application. Let’s roll that experience into the
framework so we don’t have to configure absolutely everything again. You can see this
concept at work in ASP.NET MVC by taking a look at the three core directories that make the
application work: Controllers Models Views
You don’t have to set these folder names in the web.config file — they are just expected to be
there by convention. This saves you the work of having to edit an XML file like your web.config
example, in order to explicitly tell the MVC engine, “You can find my views in the Views
directory” — it already knows. It’s a convention.
ASP.NET MVC’s conventions are pretty straightforward. Each controller’s class name ends
with Controller: ProductController, HomeController, and so on, and lives in the Controllers
directory. There is a single Views directory for all the views of your application. Views that
controllers use live in a subdirectory of the Views main directory and are named according to
the controller name (minus the Controller suffix). For example, the views for the
ProductController discussed earlier would live in /Views/Product. All reusable UI elements live
in a similar structure, but in a Shared directory in the Views folder.](https://image.slidesharecdn.com/mvc4-130319082026-phpapp01/85/Mvc4-22-320.jpg)


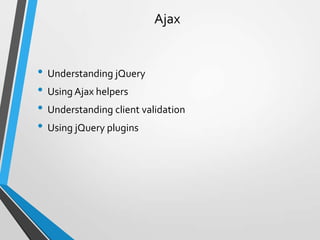
![Views
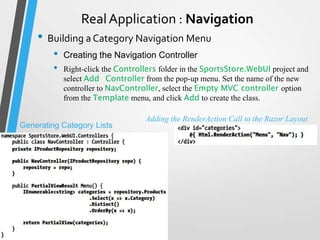
• ViewData and ViewBag
• Technically, data is passed from the controllers to the views via a
ViewDataDictionary (a specialized dictionary class) called ViewData.
The ViewBag is a dynamic wrapper around ViewData.
ViewBag.CurrentTime is equivalent to ViewData["CurrentTime"].](https://image.slidesharecdn.com/mvc4-130319082026-phpapp01/85/Mvc4-38-320.jpg)


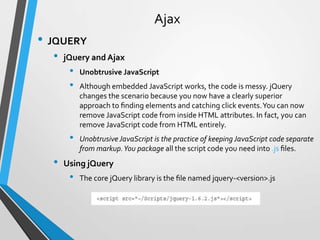


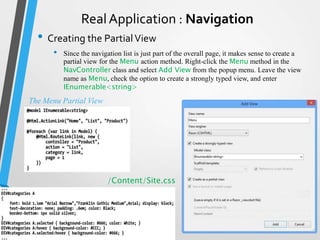
![Routing
• USING ROUTING WITH WEB FORMS
• You can use Route values in your markup as well, using the new
<asp:RouteParameter> object to bind a segment value to a database query
or command.
You can also use the RouteValueExpressionBuilder to write out a
route parameter value a little more elegantly than just writing out
Page.RouteValue["key"].](https://image.slidesharecdn.com/mvc4-130319082026-phpapp01/85/Mvc4-144-320.jpg)


Mvc4
- 2. Agenda • Introduction • Controllers • Views • Models • Forms and HTML Helpers • Data Annotations and Validation • Membership, Authorization, and Security • Ajax • Routing • NuGet • ASP.NET Web API • Dependency Injection • Real Application
- 4. Introduction • The MVC 4 release is building on a pretty mature base and is able to focus on some more advanced scenarios. Some top features include: • ASP.NET Web API • Enhancements to default project templates • Mobile project template using jQuery Mobile • Display Modes • Task support for Asynchronous Controllers • Bundling and minification
- 5. Introduction • ASP.NET Web API • MVC 4 includes a better solution: ASP.NET Web API (referred to as Web API), a framework that offers the ASP.NET MVC development style but is tailored to writing HTTP services. This includes both modifying some ASP.NET MVC concepts to the HTTP service domain and supplying some new service- oriented features. Here are some of the Web API features that are similar to MVC, just adapted for the HTTP service domain: • Routing: ASP.NET Web API uses the same routing system for mapping URLs to controller actions. It contextualizes the routing to HTTP services by mapping HTTP verbs to actions by convention, which both makes the code easier to read and encourages following RESTful service design. • Model binding and validation: Just as MVC simplifies the process of mapping input values (form fields, cookies, URL parameters, etc.) to model values, Web API automatically maps HTTP request values to models. The binding system is extensible and includes the same attribute-based validation that you use in MVC model binding.
- 6. Introduction Some of the Web API features that are similar to MVC, just adapted for the HTTP service domain: • Filters: MVC uses filters to allow for adding behaviors to actions via attributes. For instance, adding an [Authorize] attribute to an MVC action will prohibit anonymous access, automatically redirecting to the login page. Web API also supports some of the standard MVC filters (like a service- optimized [Authorize] attribute) and custom filters. • Scaffolding: You add new Web API controllers using the same dialog used to add an MVC controller. You have the option to use the Add Controller dialog to quickly scaffold a Web API controller based on an Entity Framework–based model type. • Easy unit testability: Much like MVC, Web API is built around the concepts of dependency injection and avoiding the use of global state.
- 7. Introduction Web API also adds some new concepts and features specific to HTTP service development: • HTTP programming model: The Web API development experience is optimized for working with HTTP requests and responses. There’s a strongly typed HTTP object model, HTTP status codes and headers are easily accessible, etc. • Action dispatching based on HTTP verbs: In MVC the dispatching of action methods is based on their names. In Web API methods can be automatically dispatched based on the HTTP verb. So, for example, a GET request would be automatically dispatched to a controller action named GetItem. • Content negotiation: HTTP has long supported a system of content negotiation, in which browsers (and other HTTP clients) indicate their response format preferences, and the server responds with the highest preferred format that it can support. This means that your controller can supply XML, JSON, and other formats (you can add your own), responding to whichever the client most prefers. This allows you to add support for new formats without having to change any of your controller code. • Code-based configuration: Service configuration can be complex. Unlike WCF’s verbose and complex configuration file approach, Web API is configured entirely via code.
- 8. Introduction Enhancements to Default Project Templates In MVC 4, both the HTML and CSS for the default template have been completely redesigned. A new MVC application appears as shown below When you created a new MVC project and ran it, you got a white square on a blue background, as shown above
- 9. Introduction • Mobile Project Template Using jQuery Mobile • If you’re going to be creating sites that will only be viewed in mobile browsers, you can make use of the new Mobile Project template. This template preconfigures your site to use the popular jQuery Mobile library, which provides styles that look good and work well on mobile devices. jQuery Mobile is touch optimized, supports Ajax navigation, and uses progressive enhancement to support mobile device features.
- 10. Introduction • Display Modes • The default view engine first looks for views with names ending with .Mobile.cshtml when the browser’s user agent indicates a known mobile device. For example, if you have a generic view titled Index.cshtml and a mobile view titled Index.Mobile.cshtml, MVC 4 will automatically use the mobile view when viewed in a mobile browser. Additionally, you can register your own custom device modes that will be based on your own custom Criteria — All in just one code statement. For example, to register a WinPhone device mode that would serve views ending with .WinPhone.cshtml to Windows Phone devices, you’d use the following code in the Application_Start method of your Global.asax:
- 11. Introduction • Bundling and Minification • This system reduces requests to your site by combining several individual script references into a single request. It also “minifies” the requests through a number of techniques, such as shortening variable names and removing whitespace and comments. This system works on CSS as well, bundling CSS requests into a single request and compressing the size of the CSS request to produce equivalent rules using a minimum of bytes, including advanced techniques like semantic analysis to collapse CSS selectors. • One nice byproduct of using bundling and minification is that you can remove file references from your view code. This means that you can add or upgrade script libraries and CSS files that have different filenames without having to update your views or layout, since the references are made to script and CSS bundles rather than individual files. For example, the MVC Internet application template includes a jQuery bundle that is not tied to the version number: This is then referenced in the site layout ( _Layout.cshtml) by the bundle URL, as follows:
- 12. Introduction • Included Open Source Libraries • MVC 4 project templates include a few new libraries: • Json.NET: Json.NET is a .NET library for manipulating information in JavaScript Object Notation (JSON). It was included in MVC 4 as part of Web API to support serializing data to JSON format, allowing for data contracts, anonymous types, dynamic types, Dates, TimeSpans, object reference preservation, indenting, camel casing, and many other useful serialization features. • DotNetOpenAuth: MVC uses DotNetOpenAuth to support OpenID- and OAuth-based logins using third-party identity providers. The Account Controller is set up to make it easy to add support for Facebook, Microsoft, Google, and Twitter; however, since these logins are built on top of OpenID and OAuth, you can easily plug in additional providers. While you can use the DotNetOpenAuth classes directly, MVC 4 also provides an OAuthWebSecurity (in the Microsoft.Web.WebPages.OAuth namespace) to simplify common usage.
- 13. Introduction • Miscellaneous Features • Configuration logic moved to App_Start: New features are nice, but the additional logic for features that are configured via code was really starting to clutter up the Global.asax Application_Start method. These configurations have been moved to static classes in the App_Start directory. • AuthConfig.cs: Used to configure security settings, including sites for OAuth login. • BundleConfig.cs: Used to register bundles used by the bundling and minification system. Several bundles are added by default, including jQuery, jQueryUI, jQuery validation, Modernizr, and default CSS references. • FilterConfig.cs: Unsurprisingly, this is used to register global MVC filters. The only filter registered by default is the HandleErrorAttribute, but this is a great place to put other filter registrations. • RouteConfig.cs: Holds the granddaddy of the MVC config statements, Route configuration. • WebApiConfig.cs: Used to register Web API routes, as well as set any additional Web API configuration settings.
- 14. Introduction • Miscellaneous Features • Empty MVC project template: MVC 4 has included an Empty project template since MVC 2, but it wasn’t really empty; it still included the folder structure, a CSS file, and more than a dozen JavaScript files. Due to popular request, that template has been renamed Basic, and the new Empty project template really is empty. • Add Controller anywhere: Previously, the Visual Studio Add Controller menu item only displayed when you right-clicked on the Controllers folder. However, the use of the Controllers folder was purely for organization. (MVC will recognize any class that implements the IController interface as a controller, regardless of its location in your application.) The MVC 4 Visual Studio tooling has been modified to display the Add Controller menu item for any folder in your MVC project.
- 15. Introduction • Miscellaneous Features • Open Source Release • transition of ASP.NET MVC, ASP.NET Web Pages (including the Razor view engine), and ASP.NET Web API from open source licensed code to fully open source projects. All code changes and issue tracking for these projects is done in public code repositories, and these projects are allowed to accept community code contributions (aka pull requests) if the team agrees that the changes make sense.
- 16. Introduction • Creating an ASP.NET MVC 4 Application • To create a new MVC project: • Begin by choosing File > New Project , select the Visual C# > Web templates list
- 17. Introduction • Application Templates • The Internet Application template: This contains the beginnings of an MVC web application — enough so that you can run the application immediately after creating it and see a few pages. You’ll do that in just a minute. This template also includes some basic account management functions which run against the ASP.NET Membership system. • The Intranet Application template: The Intranet Application template was added as part of the ASP.NET MVC 3 Tools Update. It is similar to the Internet Application template, but the account management functions run against Windows accounts rather than the ASP.NET Membership system.
- 18. Introduction • Application Templates • The Basic template: This template is pretty minimal. It still has the basic folders, CSS, and MVC application infrastructure in place, but no more. Running an application created using the Empty template just gives you an error message. • The Empty template: The Basic template used to be called the Empty template, but developers complained that it wasn’t quite empty enough. • The Mobile Application template: the Mobile Application template is preconfigured with jQuery Mobile to jump-start creating a mobile only website. It includes mobile visual themes, a touch-optimized UI, and support for Ajax navigation. • The Web API template: ASP.NET Web API is a framework for creating HTTP services. The Web API template is similar to the Internet Application template but is streamlined for Web API development. For instance, there is no user account management functionality, as Web API account management is often significantly different from standard MVC account management. Web API functionality is also available in the other MVC project templates.
- 19. Introduction • Application Templates View Engines View engines offer different templating languages used to generate the HTML markup in your MVC application Testing All the built-in project templates have an option to create a unit test project with sample unit tests.
- 20. Introduction • THE MVC APPLICATION STRUCTURE
- 21. Introduction • THE MVC APPLICATION STRUCTURE /Views directory Controller classes
- 22. Introduction ASP.NET MVC and Conventions For instance, MVC uses a convention-based directory-naming structure when resolving View templates. By default, ASP.NET MVC looks for the View template file within the Views[ControllerName] directory underneath the application. Convention over Configuration means: We know, by now, how to build a web application. Let’s roll that experience into the framework so we don’t have to configure absolutely everything again. You can see this concept at work in ASP.NET MVC by taking a look at the three core directories that make the application work: Controllers Models Views You don’t have to set these folder names in the web.config file — they are just expected to be there by convention. This saves you the work of having to edit an XML file like your web.config example, in order to explicitly tell the MVC engine, “You can find my views in the Views directory” — it already knows. It’s a convention. ASP.NET MVC’s conventions are pretty straightforward. Each controller’s class name ends with Controller: ProductController, HomeController, and so on, and lives in the Controllers directory. There is a single Views directory for all the views of your application. Views that controllers use live in a subdirectory of the Views main directory and are named according to the controller name (minus the Controller suffix). For example, the views for the ProductController discussed earlier would live in /Views/Product. All reusable UI elements live in a similar structure, but in a Shared directory in the Views folder.
- 23. Controllers
- 24. Controllers • THE CONTROLLER’S ROLE • Controllers within the MVC pattern are responsible for responding to user input, often making changes to the model in response to user input. In this way, controllers in the MVC pattern are concerned with the flow of the application, working with data coming in, and providing data going out to the relevant view. • The URL tells the routing mechanism which controller class to instantiate and which action method to call, and supplies the required arguments to hat method. The controller’s method then decides which view to use, and that view then renders the HTML.
- 25. Controllers • A SAMPLE APPLICATION: THE MVC MUSIC STORE
- 26. Controllers • A SAMPLE APPLICATION: THE MVC MUSIC STORE Browse: Browse through music by genre and artist Add: Add songs to your cart Order: Create an order and check out Shop: Update shopping cart
- 27. Controllers • CONTROLLER BASICS • Getting started with MVC presents something of a chicken and egg problem: There are three parts (model, view, and controller) to understand, and it’s difficult to really dig into one of those parts without understanding the others. • A Simple Example: The Home Controller • Projects created using the Internet Application template include two controller classes: • HomeController : Responsible for the “home page” at the root of the website, as well as an “about page” and a “contact page” • AccountController: Responsible for account-related requests, such as login and account registration
- 28. Controllers Notice that this is a pretty simple class that inherits from the Controller base class. The Index method of the HomeController class is responsible for deciding what will happen when you browse to the homepage of the website.
- 29. Controllers • Replace “Welcome to ASP.NET MVC!” in the Index method with the phrase of your choice, perhaps “I like cake!”:
- 30. Controllers • Writing Your First Controller • Start by creating a controller to handle URLs related to browsing through the music catalog. The index page lists the music genres that your store carries. Clicking a genre leads to a browse page that lists all of the music albums in a particular genre. Clicking an album leads to a details page that shows information about a specific music album. • Creating the New Controller Start by adding a new StoreController class. Right-click the Controllers folder within the Solution Explorer and select the Add Í Controller menu item.
- 31. Controllers • Writing Your First Controller Writing Your Action Methods To get an idea of how a controller action works, follow these steps:
- 32. Controllers • Parameters in Controller Actions • Change the Browse action method to retrieve a query string value from the URL. When you do this, ASP.NET MVC automatically passes any query string or form post parameters named “genre” to your action method when it is invoked. Browse to /Store/Browse?Genre=Disco HTML ENCODING USER INPUT We’re using the HttpUtility.HtmlEncode utility method to sanitize the user input. This prevents users from injecting JavaScript code or HTML markup into our view with a link like /Store/Browse?Genre=<script>window.location='http:// hacker.example.com'</script>
- 33. Controllers • Parameters in Controller Actions • Change the Details action to read and display an input parameter named ID. For example: /Store/Details/5.
- 34. Views
- 35. Views • The purpose of views • Specifying a view • All about strongly typed views • Understanding view models • Adding a view • Using Razor • Specifying a partial view
- 36. Views • THE PURPOSE OF VIEWS • Most controller actions need to display dynamic information in HTML format. If the controller actions are just returning strings, they’ll be doing a lot of string substitution, which gets messy fast. A templating system is clearly needed, which is where the view comes in. • The view is responsible for providing the user interface (UI) to the user. It is given a reference to the model (the information the controller needs displayed), and the view transforms that model into a format ready to be presented to the user. • Let’s take a quick look at an example of a view. Sample.cshtml HomeController.cs
- 37. Views • SPECIFYING A VIEW • Within each controller folder, there’s a view file for each action method, named the same as the action method. This provides the basis for how views are associated to an action method. For example, an action method can return a ViewResult via the View method The view selected in this case would be /Views/Home/Index.cshtml. In this case, it will still look in the /Views/Home directory, but choose NotIndex.cshtml as the view. When using the tilde syntax, you must supply the file extension of the view because this bypasses the view engine’s internal lookup mechanism for finding views.
- 38. Views • ViewData and ViewBag • Technically, data is passed from the controllers to the views via a ViewDataDictionary (a specialized dictionary class) called ViewData. The ViewBag is a dynamic wrapper around ViewData. ViewBag.CurrentTime is equivalent to ViewData["CurrentTime"].
- 39. Views • STRONGLY TYPED VIEWS • To simply add the albums to the view data dictionary (via the ViewBag property) and iterate over them from within the view. Controller action view Remember that ViewData is a ViewDataDictionary, not just a generic Dictionary. One reason for this is that it has an additional Model property to allow for a specific model object to be available to the view. Since there can be only one model object in ViewData, it’s convenient to use this to pass a specific class to the view. This allows your view to specify the class it is expecting the model object to be, which allows you take advantage of strong typing.
- 40. Views • STRONGLY TYPED VIEWS • In the Controller method, you can specify the model via an overload of the View method whereby you pass in the model instance Controller action view
- 41. Views • STRONGLY TYPED VIEWS • To avoid needing to specify a fully qualified type name for the model, you can make use of the @using declaration. View An even better approach for namespaces that you end up using often within views is to declare the namespace in the web.config file within the Views directory. web.config
- 42. Views • VIEW MODELS • Often a view needs to display a variety of data that doesn’t map directly to a domain model. For example, you might have a view meant to display details about an individual product. But that same view also displays other information that’s ancillary to the product, such as the name of the currently logged-in user, whether that user is allowed to edit the product or not, and so on. ShoppingCartViewModel Now you can make a view strongly typed to this model, using the following @model directive: View
- 43. Views • ADDING A VIEW • Understanding the Add View Dialog Options • Begin by adding an Edit action method to the HomeController in an MVC 4 application that contains the following code: action method View name View engine Create a strongly-typed view Scaffold template Reference script libraries
- 44. Views • ADDING A VIEW • Understanding the Add View Dialog Options • Begin by adding an Edit action method to the HomeController in an MVC 4 application that contains the following code: action method Create as a partial view Use a layout or master page
- 45. Views • ADDING A VIEW • Scaffold template • Once you select a type, you can also choose a scaffold template. These templates use the Visual Studio T4 templating system to generate a view based on the model type selected and are listed
- 46. Views • ADDING A VIEW • Reference script libraries • This option is used to indicate whether the view you are creating should include references to a set of JavaScript files if it makes sense for the view. By default, the _Layout.cshtml file references the main jQuery library, but doesn’t reference the jQuery Validation library or the Unobtrusive jQuery Validation library. • Create as a partial view • For the Razor view engine, the resulting partial view looks much like a regular view, except there will be no <html> tag or <head> tag at the top of the view. • Use a layout or master page • For Razor view engines, specifying a layout is not necessary if you choose to use the default layout because the layout is already specified in the _ViewStart.cshtml file.
- 47. Views • THE RAZOR VIEW ENGINE • What Is Razor? • The Razor view engine was introduced with ASP.NET MVC 3 and is the default view engine moving forward. The previous code sample uses C# syntax, which means the file has the .cshtml The Razor View Engine file extension. Similarly, Razor views, which use the Visual Basic syntax, have the .vbhtml file extension. These file extensions are important, as they signal the code language syntax to the Razor parser.
- 48. Views • THE RAZOR VIEW ENGINE • Code Expressions • Expressions are evaluated and written to the response. In contrast, with a Web Forms view, which supports only explicit code expressions, this would look like: Razor is smart enough to recognize the general pattern of an e-mail address and will leave this expression alone. Some valid e-mails may appear not to be e-mails, in which case you can always escape the @ sign with an @@ sign. For example, going back to an earlier example in this section, what if you had the following list items: In this particular case, that expression seems to match an e-mail address, so Razor will print it out verbatim. But it just so happens that we expected the output to be something like: Once again, parentheses to the rescue! Any time there’s an ambiguity in Razor, you can use parentheses to be explicit about what you want. You are in control.
- 49. Views • HTML Encoding • Given that there are many cases where a view is used to display user input, such as a blog post comment or a product review, there’s always the potential for cross-site script injection attacks (also known as XSS) The good news is that Razor expressions are automatically HTML encoded. This code will not result in an alert box popping up but will instead render the encoded HTML: However, in cases where you intend to show HTML markup, you can return an instance of System.Web.IHtmlString and Razor will not encode it. You can also create an instance of HtmlString or use the Html.Raw convenience method:
- 50. Views • HTML Encoding • This automatic HTML encoding is great for mitigating XSS vulnerabilities by encoding user input meant to be displayed as HTML, but it is not sufficient for displaying user input within JavaScript. For example: When setting variables in JavaScript to values supplied by the user, it’s important to use JavaScript string encoding and not just HTML encoding. Use the @Ajax.JavaScriptStringEncode to encode the input. Here’s the same code again using this method to better protect against XSS attacks:
- 51. Views • Code Blocks • Because Razor understands the structure of HTML markup, it also transitions automatically back to code when the <li> tag is closed. Thus we didn’t need to demarcate the closing curly brace at all. Web Forms view engine equivalent snippet One example of this is in a multi-line code block: Another example of this is when calling methods that don’t return a value (i.e., the return type is void):
- 52. Views • Razor Syntax Samples • Implicit Code Expression • As described previously, code expressions are evaluated and written to the response. This is typically how you display a value in a view: Code expressions in Razor are always HTML encoded. This Web Forms syntax also automatically HTML encodes the value. • Explicit Code Expression • Code expressions are evaluated and written to the response.
- 53. Views • Razor Syntax Samples • Unencoded Code Expression • <span>ISBN<%: isbn ></span> In some cases, you need to explicitly render some value that should not be HTML encoded. You can use the Html.Raw method to ensure that the value is not encoded. • Code Block • Unlike code expressions, which are evaluated and outputted to the response, blocks of code are simply sections of code that are executed.
- 54. Views • Razor Syntax Samples • Combining Text and Markup • Mixing Code and Plain Text
- 55. Views • Razor Syntax Samples • Escaping the Code Delimiter • Server-Side Comment
- 56. Views • Razor Syntax Samples • Calling a Generic Method • This is really no different than an explicit code expression. Even so, many folks get tripped up when trying to call a generic method. The confusion comes from the fact that the code to call a generic method includes angle brackets. And as you’ve learned, angle brackets cause Razor to transition back to markup unless you wrap the whole expression in parentheses.
- 57. Views • Layouts • Layouts in Razor help maintain a consistent look and feel across multiple views within your application. If you’re familiar with Web Forms, layouts serve the same purpose as master pages, but offer both a simpler syntax and greater flexibility. In some ways, it’s like an abstract base class for your views. Let’s look at a very simple layout; we’ll creatively call it SiteLayout.cshtml: Let’s look at an example that uses this layout, Index.cshtml:
- 58. Views • Layouts • A layout may have multiple sections. For example, let’s add a footer section to the previous layout, SiteLayout.cshtml: Running the previous view again without any changes will throw an exception stating that a section Named Footer was not defined. By default, a view must supply content for every section defined in the layout.
- 59. Views • Layouts • Fortunately, the RenderSection method has an overload that allows you to specify that the section is not required. To mark the Footer section as optional you can pass in false for the required parameter: But wouldn’t it be nicer if you could define some default content if the section isn’t defined in the view? Well, here’s one way. It’s a bit verbose, but it works.
- 60. Views • ViewStart • In the preceding examples, each view specified its layout page using the Layout property. For a group of views that all use the same layout, this can get a bit redundant and harder to maintain. The _ViewStart.cshtml page can be used to remove this redundancy. The code within this file is executed before the code in any view placed in the same directory. This file is also recursively applied to any view within a subdirectory. When you create a default ASP.NET MVC project, you’ll notice there is already a _ViewStart.cshtml file in the Views directory. It specifies a default layout:
- 61. Views • SPECIFYING A PARTIAL VIEW • In addition to returning a view, an action method can also return a partial view in the form of a PartialViewResult via the PartialView method. Here’s an example: The partial view itself looks much like a normal view, except it doesn’t specify a layout: This is useful in partial update scenarios using AJAX. The following shows a very simple example using jQuery to load the contents of a partial view into the current view using an AJAX call: This code uses the jQuery load method to make an AJAX request to the Message action and updates the DIV with the id result with the result of that request.
- 62. Models
- 63. Models • How to model the Music Store • What it means to scaffold • How to edit an album • All about model binding
- 64. Models • MODELING THE MUSIC STORE Album Artist Genre
- 65. Models • SCAFFOLDING A STORE MANAGER • Your next decision might be to create a store manager. A store manager is a controller enabling you to edit album information. To get started you can right-click the Controllers folder in your new solution and select Add Controller. • What Is Scaffolding? • Scaffolding in ASP.NET MVC can generate the boilerplate code you need for create, read, update, and delete (CRUD) functionality in an application.
- 66. Models • SCAFFOLDING A STORE MANAGER • Empty Controller The empty controller template adds a Controller-derived class to the Controllers folder with the name you specify. The only action in the controller will be an Index action with no code inside (other than the code to return a default ViewResult). This template will not create any views. • Controller with Empty Read/Write Actions This template adds a controller to your project with Index, Details, Create, Edit, and Delete actions. The actions inside are not entirely empty, but they won’t perform any useful work until you add your own code and create the views for each action. • API Controller with Empty Read/Write Actions This template adds a controller derived from the ApiController base class. You can use this template to build a Web API for your application. We will discuss Web API in more detail later. • Controller with Read/Write Actions and Views, Using Entity Framework This template is the template you are about to select. This template not only generates your controller with the entire suite of Index, Details, Create, Edit, and Delete actions, but also generates all the required views and the code to persist and retrieve information from a database.
- 67. Models • The Views • Once the scaffolding finishes running, you’ll also find a collection of views underneath the new Views/StoreManager folder. These views provide the UI for listing, editing, and deleting albums.
- 68. Models • EDITING AN ALBUM HTTP GET for /StoreManager/Edit/8 The Edit View
- 69. Models • Responding to the Edit POST Request The action accepting an HTTP POST request to edit album
- 70. Models • MODEL BINDING • The DefaultModelBinder • Instead of digging form values out of the request, the Edit action simply takes an Album object as a parameter: When you have an action with a parameter, the MVC runtime uses a model binder to build the parameter. You can have multiple model binders registered in the MVC runtime for different types of models, but the workhorse by default will be the DefaultModelBinder. In the case of an Album object, the default model binder inspects the album and finds all the album properties available for binding. Model binding isn’t restricted to HTTP POST operations and complex parameters like an Album object. Model binding can also feed primitive parameters into an action, like for the Edit action responding to an HTTP GET request:
- 71. Models • Explicit Model Binding • You can also explicitly invoke model binding using the UpdateModel and TryUpdateModel methods in your controller. UpdateModel will throw an exception if something goes wrong during model binding and the model is invalid. UpdateModel instead of an action parameter TryUpdateModel also invokes model binding, but doesn’t throw an exception If any errors occurred during model binding, model state will contain the names of the properties that caused failures, the attempted values, and the error messages. While model state is useful for your own debugging purposes, it’s primarily used to display error messages to the user indicating why their data entry failed.
- 72. Forms and HTML Helpers
- 73. Forms and HTML Helpers • Understanding forms • Making HTML helpers work for you • Editing and inputting helpers • Displaying and rendering helpers
- 74. Forms and HTML Helpers • USING FORMS • Many developers coming to the MVC framework have been using ASP.NET WebForms. WebForms don’t expose the full power of the form tag (you could say WebForms manages and exploits the form tag for its own purposes). It’s easy to excuse the WebForms developer who forgets what the form tag is capable of — such as creating an HTTP GET request. • The Action and the Method • A form is a container for input elements: buttons, checkboxes, text inputs, and more. It’s the input elements in a form that enable a user to enter information into a page and submit information to a server. But which server? And how does the information get to the server? When a user submits a form using an HTTP GET request, the browser takes the input names and values inside the form and puts them in the query string. In other words, the preceding form would send the browser to the following URL (assuming the user is searching for love): http://www.bing.com/search?q=love
- 75. Forms and HTML Helpers • To GET or to POST? • Web applications generally use GET requests for reads and POST requests for writes (which typically include updates, creates, and deletes). A request to pay for music uses POST. A request to search for music, a scenario you look at next, uses GET. Searching for Music with a Search Form Search.cshtml Index view Search method in HomeController
- 76. Forms and HTML Helpers • To GET or to POST?
- 77. Forms and HTML Helpers • HTML HELPERS • HTML helpers are methods you can invoke on the Html property of a view. You also have access to URL helpers (via the Url property), and AJAX helpers (via the Ajax property). All these helpers have the same goal: to make views easy to author. The URL helper is also available from within the controller. • Automatic Encoding • Like any good friend, an HTML helper can keep you out of trouble. Many of the HTML helpers you will see in this chapter are helpers you use to output model values. All the helpers that output model values will HTML encode the values before rendering.
- 78. Forms and HTML Helpers • Inside HTML Helpers • You know you are working with an extension method when the IntelliSense window shows the method name with a down arrow to the left AntiForgeryToken is an instance method, whereas BeginForm is an extension method. Extension methods are a wonderful approach to building HTML helpers. Extension methods in C# are available only when the namespace of the extension method is in scope. All of MVC’s extension methods for HtmlHelper live in the System.Web.Mvc.Html namespace (which is in scope by default thanks to a namespace entry in the Views/web.config file).
- 79. Forms and HTML Helpers • Setting Up the Album Edit Form Html.ValidationSummary The ValidationSummary helper displays an unordered list of all validation errors in the ModelState dictionary. The Boolean parameter you are using (with a value of true) is telling the helper to exclude property-level errors. In other words, you are telling the summary to display only the errors in ModelState associated with the model itself, and exclude any errors associated with a specific model property. We will be displaying property-level errors separately.
- 80. Forms and HTML Helpers • Adding Inputs The following new helpers are in the view: • Label • DropDownList • TextBox • ValidationMessage • TextArea • ListBox
- 81. Forms and HTML Helpers • Helpers, Models, and View Data
- 82. Forms and HTML Helpers • Strongly Typed Helpers Replacing strings with lambda expressions provides a number of additional benefits. The benefits include IntelliSense, compile-time error checking, and easier refactoring (if you change the name of a property in your model, Visual Studio can automatically change the code in the view).
- 83. Forms and HTML Helpers • Helpers and Model Metadata Templated Helpers Let’s see what happens if you add a DataType annotation to the Title property:
- 84. Forms and HTML Helpers • OTHER INPUT HELPERS • Html.Hidden • Html.Password • Html.RadioButton
- 85. Forms and HTML Helpers • OTHER INPUT HELPERS • Html.CheckBox • You are probably wondering why the helper renders a hidden input in addition to the checkbox input. The helper renders two inputs because the HTML specification indicates that a browser will submit a value for a checkbox only when the checkbox is on (selected). In this example, the second input guarantees a value will appear for IsDiscounted even when the user does not check the checkbox input.
- 86. Forms and HTML Helpers • RENDERING HELPERS • Html.ActionLink and Html.RouteLink Notice that you specify the controller name without the Controller suffix. You never specify the controller’s type name. • URL Helpers • The URL helpers are similar to the HTML ActionLink and RouteLink helpers, but instead of returning HTML they build URLs and return the URLs as strings.
- 87. Forms and HTML Helpers • Html.Partial and Html.RenderPartial • The Partial helper renders a partial view into a string. Typically, a partial view contains reusable markup you want to render from inside multiple different views. So, which should you use, Partial or RenderPartial? In general, you should prefer Partial to RenderPartial because Partial is more convenient. However, RenderPartial may result in better performance because it writes directly to the response stream, although it would require a lot of use before the difference would be noticeable.
- 88. Forms and HTML Helpers • Html.Action and Html.RenderAction • The Partial helper typically helps a view render a portion of a view’s model using view markup in a separate file. Action, on the other hand, executes a separate controller action and displays the results. Action offers more flexibility and re-use because the controller action can build a different model and make use of a separate controller context. Menu partial view MyController Index.cshtml
- 89. Data Annotations and Validation
- 90. Data Annotations and Validation • Using data annotations for validation • Creating your own validation logic • Using model metadata annotations
- 91. Data Annotations and Validation • Using Validation Annotations • Required • StringLength • RegularExpression
- 92. Data Annotations and Validation • Using Validation Annotations • Range • Validation Attributes from System.Web.Mvc • Compare
- 93. Data Annotations and Validation • Custom Error Messages and Localization In applications built for international markets, the hardcoded error messages are a bad idea. Instead of literal strings, you’ll want to display different text for different locales. Fortunately, all the validation attributes also allow you to specify a resource type and a resource name for localized error messages: The preceding code assumes you have a resource file in the project named ErrorMessages.resx with the appropriate entries inside (LastNameRequired and LastNameTooLong). For ASP.NET to use localized resource files, you have to have the UICulture property of the current thread set to the proper culture.
- 94. Data Annotations and Validation • Looking behind the Annotation Curtain • Validation and Model Binding • By default, the ASP.NET MVC framework executes validation logic during model binding. • Validation and Model State • Controller Actions and Validation Errors
- 95. Data Annotations and Validation • CUSTOM VALIDATION LOGIC • Packaging validation logic into a custom data annotation • Packaging validation logic into a model object itself • Custom Annotations
- 96. Data Annotations and Validation • CUSTOM VALIDATION LOGIC • IValidatableObject • A self-validating model is a model object that knows how to validate itself. A model object can announce this capability by implementing the IValidatableObject interface.
- 97. Data Annotations and Validation • DISPLAY AND EDIT ANNOTATIONS • Display • ScaffoldColumn • The ScaffoldColumn attribute hides a property from HTML helpers such as EditorForModel and DisplayForModel • DisplayFormat
- 98. Data Annotations and Validation • DISPLAY AND EDIT ANNOTATIONS • ReadOnly • make sure the default model binder does not set the property with a new value from the request, Note the EditorForModel helper will still display an enabled input for the property, so only the model binder respects the ReadOnly attribute. • DataType • Other data types include Currency, Date, Time, and MultilineText. • HiddenInput • Render an input element with a type of hidden. Hidden inputs are a great way to keep information in a form so the browser will send the data back to the server, but the user won’t be able to see or edit the data.
- 99. Membership, Authorization, and Security
- 100. Membership, Authorization, and Security • Requiring login with the Authorize Attribute • Requiring role membership using the Authorize Attribute • Using security vectors in a web application
- 101. Membership, Authorization, and Security • USING THE AUTHORIZE ATTRIBUTE TO REQUIRE LOGIN
- 102. Membership, Authorization, and Security • USING THE AUTHORIZE ATTRIBUTE TO REQUIRE LOGIN • If the user fails authentication, an HttpUnauthorizedResult action result is returned, which produces an HTTP 401 (Unauthorized) status code. This 401 status code is intercepted by the FormsAuthenticationModule OnLeave method, which instead redirects to the application login page defined in the application’s web.config, as shown here: This redirection address includes a return URL, so after completing login successfully, the Account/LogOn action redirects to the originally requested page.
- 103. Membership, Authorization, and Security • Securing Entire Controllers • Securing Your Entire Application Using a Global Authorization Filter • It’s simpler to require authorization by default and make exceptions in the few places where anonymous access is allowed — such as the site’s home page and URLs required for the login process. For this case, it’s a good idea to configure the AuthorizeAttribute as a global filter and allow anonymous access to specific controllers or methods using the AllowAnonymous attribute.
- 104. Membership, Authorization, and Security • USING THE AUTHORIZE ATTRIBUTE TO REQUIRE ROLE MEMBERSHIP As implied by the name, the Roles parameter can take more than one role. You can pass in a comma-delimited list: You can also authorize by a list of users: And you can combine them, as well:
- 105. Membership, Authorization, and Security • EXTERNAL LOGIN VIA OAUTH AND OPENID • Registering External Login Providers • You need to explicitly enable external sites for login. Fortunately, this is extremely simple. Authorization providers are configured in App_StartAuthConfig.cs. Sites that use an OAuth provider (Facebook, Twitter, and Microsoft) will require you to register your site as an application. When you do, you’ll be provided a client id and a secret. Your site will use these to authenticate with the OAuth provider. Sites that implement OpenID (such as Google and Yahoo) do not require you to register an application, and you won’t need a client id or secret.
- 106. Membership, Authorization, and Security • EXTERNAL LOGIN VIA OAUTH AND OPENID • Configuring OpenID Providers • The example code to implement Google provider support is already included in AuthConfig, so just uncomment it.
- 107. Membership, Authorization, and Security • EXTERNAL LOGIN VIA OAUTH AND OPENID
- 108. Membership, Authorization, and Security • EXTERNAL LOGIN VIA OAUTH AND OPENID
- 109. Membership, Authorization, and Security • Require SSL for Login • The callback from an external provider to your site contains security tokens that will allow access to your site and contain user information. It’s important that this information be transmitted over HTTPS to prevent interception while this information travels over the Internet.
- 110. Ajax
- 111. Ajax • Understanding jQuery • Using Ajax helpers • Understanding client validation • Using jQuery plugins
- 112. Ajax • JQUERY • jQuery Features • jQuery Selectors
- 113. Ajax • JQUERY • jQuery Features • jQuery Events
- 114. Ajax • JQUERY • jQuery and Ajax • Unobtrusive JavaScript • Although embedded JavaScript works, the code is messy. jQuery changes the scenario because you now have a clearly superior approach to finding elements and catching click events. You can now remove JavaScript code from inside HTML attributes. In fact, you can remove JavaScript code from HTML entirely. • Unobtrusive JavaScript is the practice of keeping JavaScript code separate from markup. You package all the script code you need into .js files. • Using jQuery • The core jQuery library is the file named jquery-<version>.js
- 115. Ajax • AJAX HELPERS • Behind the scenes, these Ajax helpers depend on the unobtrusive MVC extensions for jQuery. To use the helpers, you need to have the jquery.unobtrusive-ajax script present. • Ajax ActionLinks In this scenario, you are using options to specify that you want to replace the element with an id of “dailydeal” using whatever response comes from the server.
- 116. Ajax • AJAX HELPERS • Ajax ActionLinks After the user clicks to see the special, the page (without doing a full refresh) will look the following
- 117. Ajax • Ajax Forms The options include a number of parameters you can set to catch various client-side events that flow from every Ajax request OnBegin, OnComplete, OnSuccess, and OnFailure). For the OnFailure event, you specify a function named searchFailed, so you’ll need the following function to be available at run time
- 118. Ajax • Ajax Forms • For this example, the controller action needs to query the database and render a partial view. Again, you could return plain text, but you want the artists to be in a list, so the action renders a partial view. ArtistSearch.cshtml
- 119. Ajax • CLIENT VALIDATION • jQuery Validation • AJAX SETTINGS IN WEB.CONFIG • Custom Validation • To support client-side validation, you need your attribute to implement an interface IClientValidatable
- 120. Ajax • CLIENT VALIDATION • To support client-side validation, you need your attribute to implement an interface IClientValidatable there are a few pieces of information you’d need on the client to run the validation: • What error message to display if the validation fails • How many words are allowed • An identifier for a piece of JavaScript code that can count the words
- 121. Ajax • Custom Validation Script Code • you want to make sure MusicScripts.js appears after the validation scripts appear. Inside of MovieScripts.js, adding two additional references will give you all the IntelliSense you need. Alternatively, you could add these references to _references.js
- 122. Ajax • Custom Validation Script Code • The first piece of code to write is the adapter. The MVC framework’s unobtrusive validation extension stores all adapters in the jQuery.validator.unobtrusive.adapters object. The adapters object exposes an API for you to add new adapters.
- 123. Ajax • Custom Validation Script Code • For the maximum words scenario, you could use either addSingleVal or addMinMax (or add, because it can do anything). Because you do not need to check for a minimum number of words, you can use the addSingleVal API The first parameter is the name of the adapter, and must match the ValidationProperty value you set on the server-side rule. The second parameter is the name of the single parameter to retrieve from metadata. The adapter is relatively simple. Again, the primary goal of an adapter is to identify the metadata that the unobtrusive extensions need to locate.
- 124. Ajax • Custom Validation Script Code • With the adapter in place, you can now write the validator. All the validators live in the jQuery.validator object. Like the adapters object, the validator object has an API to add new validators. The name of the method is addMethod: The method takes two parameters: • The name of the validator, which by convention matches the name of the adapter (which matches the ValidationType property on the server). • A function to invoke when validation occurs. The validator function accepts three parameters and can return true (validation passed) or false (validation failed): • The first parameter to the function will contain the input value (like the title of an album). • The second parameter is the input element containing the value to validate (in case the value itself doesn’t provide enough information). • The third parameter will contain all the validation parameters in an array, or in this case, the single validation parameter (the maximum number of words).
- 125. Ajax • jQuery UI • Autocomplete with jQuery UI
- 126. Ajax • JSON and Client-Side Templates • The following code is an example using Mustache, a template library we will use • This template would work against an object with AverageReview and TotalReviews properties. When rendering templates with Mustache, the templates place the values for those properties in their proper location. • Adding Templates • To install jQuery templates, right-click the MvcMusicStore project and select Manage NuGet Package. When the dialog appears, search online for “mustache.js.”
- 127. Ajax • JSON and Client-Side Templates • Modifying the Search Form
- 128. Ajax • JSON and Client-Side Templates • Getting JSON What do you do inside of the callback? You have JSON data — an array of artists — but no markup to present the artists. This is where templates come into play. A template is markup embedded inside a script tag.
- 129. Ajax • JSON and Client-Side Templates • Getting JSON • A template is markup embedded inside a script tag. The following code shows a template Notice that the script tag is of type text/html. This type ensures the browser does not try to interpret the contents of the script tag as real code. The {{#artists}} expression tells the template engine to loop through an array named artists on the data object we’ll use to render the template. The {{Name}} syntax is a binding expression.
- 130. Ajax • JSON and Client-Side Templates • jQuery.ajax for Maximum Flexibility
- 131. Ajax • JSON and Client-Side Templates • IMPROVING AJAX PERFORMANCE • Using Content Delivery Networks • If you want to serve jQuery from the Microsoft CDN instead of your server, you can use the following script tag: • You can find the list of URLs for and see all the latest releases on Microsoft’s CDN at http://www.asp.net/ajaxlibrary/CDN.ashx
- 132. Ajax • JSON and Client-Side Templates • IMPROVING AJAX PERFORMANCE • Script Optimizations • Bundling and Minification The combination of bundling and minification generally decreases the amount of time needed to load a page into the browser. Once you have bundles configured, you can render the bundles with Scripts and Styles helper classes. The following code will output the jQuery bundle and the default application style sheet:
- 133. Routing
- 134. Routing • Introduction to Routing • A peek under the Routing hood • A look at advanced Routing • Routing extensibility and magic • Using Routing with Web Forms
- 135. Routing • INTRODUCTION TO ROUTING • Routing within the ASP.NET MVC framework serves two main purposes: • It matches incoming requests that would not otherwise match a file on the file system and maps the requests to a controller action. • It constructs outgoing URLs that correspond to controller actions. • Defining Routes • Route URLs • In Global.asax.cs. You’ll notice that the Application_Start method contains a call to a method named the RegisterRoutes method. This method is where all routes for the application are registered and is located in the ~/App_Start/RouteConfig.cs file.
- 136. Routing • INTRODUCTION TO ROUTING • Defining Routes • Let’s clear out the routes in the RegisterRoutes method for now and replace them with a very simple route. When you’re done, your RegisterRoutes method should look like this: Route Values If you actually make a request to the URLs listed, you’ll notice that a request for your application ends up returning a 404 File Not Found error. Although you can define a route with any parameter names you’d like, certain special parameter names are required by ASP.NET MVC in order to function correctly: {controller} and {action}
- 137. Routing • Route Defaults Naturally, you might want to call this method via the URL: The Routing API allows you to supply default values for parameter segments. For example, you can define the route like this: Multiple default values can be provided. The following snippet demonstrates providing a default value for the {action} parameter, as well:
- 138. Routing • Route Constraints • Sometimes you need more control over your URLs than specifying the number of URL segments. For example, take a look at the following two URLs: In the preceding snippet, the first route contains three URL parameters, {year}, {month}, and {day}. Each of those parameters map to a constraint in the constraints dictionary specifi ed using an anonymous object initializer, {year=@"d{4}", month=@"d{2}", day=@"d{2}"}. As you can see, the keys of the constraints dictionary map to the route’s URL parameters. Thus the constraint for the {year} segment is d{4}, a regular expression that only matches strings containing exactly four digits.
- 139. Routing • Named Routes • Routing in ASP.NET doesn’t require that you name your routes, and in many cases it seems to work just fine without using names. To generate a URL, simply grab a set of route values you have lying around there are cases where this can break down due to ambiguities about which route should be chosen to generate a URL. Named routes solve this problem by giving precise control over route selection when generating URLs.
- 140. Routing • MVC Areas • Areas allow you to divide your models, views, and controllers into separate functional sections. This means you can separate larger or more complex sites into sections, which can make them a lot easier to manage. • Area Route Registration • Area Route Conflicts If you have two controllers with the same name, one within an area and one in the root of your application, you may run into an exception with a rather verbose error message when a request matches the route without a namespace. The preceding code uses a fourth parameter that is an array of namespace names. The controllers for the example project live in a namespace called AreasDemoWeb.Controllers.
- 141. Routing • Catch-All Parameter • A catch-all parameter allows for a route to match part of a URL with an arbitrary number of segments. The value put in the parameter is the rest of the URL sans query string.
- 142. Routing • StopRoutingHandler and IgnoreRoute • By default, Routing ignores requests that map to physical files on disk. That’s why requests for files such as CSS, JPG, and JS fi les are ignored by Routing and handled in the normal manner. • But in some situations, there are requests that don’t map to a file on disk that you don’t want Routing to handle. For example, requests for ASP.NET’s web resource handlers, WebResource.axd, are handled by an HTTP handler and don’t correspond to a file on disk.
- 143. Routing • USING ROUTING WITH WEB FORMS • In ASP.NET 4, you can add a reference to System.Web.Routing to your Global.asax and declare a Web Forms route in almost the exact same format as an ASP.NET MVC application: The only real difference from an MVC route is the last parameter, in which you direct the route to a Web Forms page. You can then use Page.RouteData to access the route parameter values.
- 144. Routing • USING ROUTING WITH WEB FORMS • You can use Route values in your markup as well, using the new <asp:RouteParameter> object to bind a segment value to a database query or command. You can also use the RouteValueExpressionBuilder to write out a route parameter value a little more elegantly than just writing out Page.RouteValue["key"].
- 145. Routing • USING ROUTING WITH WEB FORMS You can generate outgoing URLs for using the Page.GetRouteUrl() in code-behind logic method: The corresponding RouteUrlExpressionBuilder allows you to construct an outgoing URL using Routing:
- 146. NuGet
- 147. NuGet • Introduction to NuGet • Installing NuGet • Installing packages • Creating packages • Publishing packages
- 148. NuGet • NuGet is a package-management system for .NET and Visual Studio that makes it easy to add, update, and remove external libraries and their dependencies in your application. NuGet also makes it easy to create packages that you can share with the world. • If you have ASP.NET MVC 4 or Visual Studio 2012 installed, you already have NuGet. If you are still using Visual Studio 2010 and don’t have NuGet installed, it’s easy to install it via the Visual Studio Extension Manager
- 149. NuGet • ADDING A LIBRARY AS A PACKAGE • With NuGet installed, you can now easily add a library such as ELMAH into your project. • Finding Packages
- 150. NuGet • When NuGet installs the ELMAH package, it makes a few changes to your project. a new file named packages .config is added to the project
- 151. NuGet • Using the Package Manager Console • This is a PowerShell-based console within Visual Studio that provides a powerful way to find and install packages and supports a few additional scenarios that the dialog doesn’t. • Launch the console by selecting Tools Í Library Package Manager > Package Manager Console • Perform an action: This is done with commands such as Get-Package, which lists available packages online. This command supports search filters • Install-Package command, this command enables you to install a package. • Compose commands: PowerShell also enables composing commands together by piping one command into another. For example, if you want to install a package into every project in your solution, you can run the following command:
- 152. NuGet • Using the Package Manager Console • Dynamically add new commands: One very powerful aspect of the PowerShell interface is that some packages will add new commands to the shell you can use. For example, after you install the MvcScaffolding package, the console will support new commands for scaffolding a controller and its views.
- 153. NuGet • Using the Package Manager Console • Dynamically add new commands: One very powerful aspect of the PowerShell interface is that some packages will add new commands to the shell you can use. For example, after you install the MvcScaffolding package, the console will support new commands for scaffolding a controller and its views.
- 154. NuGet • CREATING PACKAGES • Before you create a package, make sure to download the NuGet.exe command-line utility from the NuGet CodePlex website at http://nuget.codeplex.com/. Copy NuGet.exe to a more central location on your hard drive and add that location to your PATH environment variable. • Once you have NuGet.exe installed, there are three main steps to create a package: • Organize the package contents into a convention-based folder structure. • Specify the metadata for the package in a .nuspec file. • Run the NuGet.exe Pack command against the .nuspec file: Install-Package NuGet.CommandLine
- 155. NuGet • CREATING PACKAGES • Packaging a Project • In many cases, a package contains a single assembly that maps nicely to a Visual Studio project (a .csproj or .vbproj). In this case, creating a NuGet package is trivially easy. From a command prompt, navigate to the directory containing your project fi le and run the following command: • You can do this via the following command: • This creates a .nuspec file (covered later in this section) with special replacement tokens for information that will be retrieved from the assembly.
- 156. NuGet • CREATING PACKAGES • Packaging a Folder • This makes sense when you don’t have a simple mapping from a project to a package — for example, your package contains versions of your assembly for multiple versions of the .NET Framework. • A package consists of three types of files If your package requires extra details for the developer who uses it, include a readme.txt file in the root of the package. When the package is installed, NuGet will open the readme.txt file when installation is complete.
- 157. NuGet • Metadata
- 158. NuGet • Metadata
- 159. NuGet • Dependencies • Many packages are not developed in isolation, but themselves depend on other libraries. You could include those dependencies in your package, but if they are available as NuGet packages, an even better approach is to specify those packages as dependencies in your package’s metadata. • Specifying Files to Include • If you follow the folder structure conventions described earlier, you do not have to specify a list of files in the .nuspec file. But in some cases you may choose to be explicit about which files to include. For example, you might have a build process where you’d rather choose the files to include rather than copy them into the convention-based structure first. You can use the <files> element to choose which files to include.
- 160. NuGet • Framework and Profile Targeting • Many assemblies target a specific version of the .NET Framework. For example, you might have one version of your library that’s specific to .NET 2.0 and another version of the same library that takes advantage of .NET 4 features. You do not need to create separate packages for each of these versions. NuGet supports putting multiple versions of the same library in a single package, keeping them in separate folders within the package. When NuGet installs an assembly from a package, it checks the target .NET Framework version of the project you re adding the package to. NuGet then selects the correct version of the assembly in the package by selecting the correct subfolder within the lib folder.
- 161. NuGet • PUBLISHING PACKAGES • Publishing to NuGet.org • Set up a NuGet Gallery account at http://nuget.org/.
- 162. NuGet • PUBLISHING PACKAGES • Publishing to NuGet.org • Uploading a package takes you to a screen that enables you to verify the metadata for the package
- 163. ASP.NET Web API
- 164. ASP.NET Web API • Understanding the Web API • The Web API feature is based on adding a special kind of controller to an MVC Framework application. This kind of controller, called an API Controller, has two distinctive characteristics: • Action methods return model, rather than ActionResult, objects • Action methods selected based on the HTTP method used in the request • Creating the Web API Application • There is a WebAPI template option available, but it just creates a normal MVC Framework project and adds a couple example controllers.
- 165. ASP.NET Web API • Creating the Model and Repository • For this example application, we have created an especially simple model class called Reservation, which we defined in a class file called Reservation.cs that we placed in the Models folder.
- 166. ASP.NET Web API • We are going to create a repository interface and a simple implementation. We are taking the time to do this because one of the most striking aspects of an API controller is just how simple it is—and we do not want to undermine that effect. We created a new interface called IReservationRepository in the IReservationRepository.cs file in the Models folder
- 167. ASP.NET Web API • Creating the Home Controller • You can freely mix regular controllers and API controllers in a project. In fact, you will usually need to if you want to support HTML clients because API controllers will only return object data and will not render a view. So that we can start using our application, we have created a Home controller whose Index action method will render the default view. We do not pass any model objects to the view because we want to take a totally Web service approach to getting the data we require from the API controller. You can see the Home controller
- 168. ASP.NET Web API • Creating the View When we have finished this application, only the Reservations section will be shown to the user. We will load the model data from the server and use it to populate the table element. The Add New Reservation section contains an unobtrusive Ajax-enabled form that will post data back to the server to create new Reservation objects in the repository. The AjaxOptions object that we will use to configure the Ajax request doesn’t have any options defined at the moment, but we will come back and sort that out once we have the rest of the application in place. The Edit Reservation section will allow the user to change an existing Reservation object in the repository. We haven’t used an unobtrusive Ajax form for this section of the application because we intend to use the jQuery Ajax support directly (which is what the unobtrusive Ajax library uses anyway) for variety.
- 169. ASP.NET Web API • Creating the API Controller • To create the controller, right-click the Controllers folder in the Solution Explorer and select Add Controller from the pop-up menu. Change the Controller name field to ReservationController and select Empty API controller from the Template drop-down menu
- 170. ASP.NET Web API • Testing the API Controller • Navigate to the /api/reservation URL. The result that you see will depend on the browser that you are using. If you are using Internet Explorer 10, then you will be prompted to save or open a file that contains the following JSON data: If you navigate to the same URL using a different browser, such as Google Chrome or Mozilla Firefox, then the browser will display the following XML data:
- 171. ASP.NET Web API • Understanding How the API Controller Works • You will understand a lot more about how the API controller works by navigating to the /api/reservation/3 URL. You will see the following JSON (or the equivalent XML if you are using another browser): • API controllers have their own routing configuration, which is completely separate from the rest of the application. You can see the default configuration that Visual Studio creates for new projects by looking at the /App_Start/WebApiConfig.cs file
- 172. ASP.NET Web API • Understanding API Controller Action Selection • When a request comes in to the application that matches a Web API route, the action is determined from the HTTP method used to make the request. When we tested the API controller by requesting /api/reservation using the browser, the browser specified the GET method. The ApiController class, which is the base for API controllers, knows which controller it needs to target from the route and uses the HTTP method to look for suitable action methods. • For our example, that means that a GET request results in a choice between the GetAllReservations and GetReservation but method names like DoGetReservation or just ThisIsTheGetAction would also be matched.
- 173. ASP.NET Web API • Mapping HTTP Methods to Action Methods • We explained that the ApiController base class uses the HTTP method to work out which action methods to target. It is a nice approach, but it does mean that you end up with some unnatural method names that are inconsistent with conventions you might be using elsewhere. For example, the PutReservation method might be more naturally called UpdateReservation.
- 174. ASP.NET Web API • Writing the JavaScript Code to Use the Web API • We will be using jQuery to manipulate the HTML elements that the /Views/Home/Index.cshtml view renders and to handle the Ajax requests that we will make to target actions in the Reservation controller. • Creating the Basic Functionality • Adding a Script Element for the Index.js File to the Index.cshtml View
- 176. ASP.NET Web API • At the moment, we respond to the Refresh button by calling the getData function to reload the data from the server, and respond to the Edit and Add buttons by calling the selectView function to show the elements that are required to create and edit model objects.
- 177. ASP.NET Web API • Adding Support for Editing New Reservations • We want to target all the action methods in our Reservation controller, so we are going to take a slightly odd approach to editing Reservation records. We already have the data that we need in the HTML document to be able to edit a Reservation, but we are going to start by making a request to the server for a single Reservation object so that we can target the GetReservation object. Index.js
- 178. ASP.NET Web API • To allow the user to save their changes, we need to fill out the case block that deals with the submitEdit button id • We use the same URL that gets the Reservation object, /api/reservation/3, but we use the HTTP PUT method, which means that the PutReservation action method in the Reservation controller will be used to service the request.
- 179. ASP.NET Web API • Adding Support for Deleting Reservations • You can see the pattern we have established and how the HTTP method changes the action method that our request targets, even if we are using the same URL. In Listing 25-15, you can see how we have added support for deleting reservations, which we do by using the HTTP DELETE method. • We delete the row in the table element that contains the data for the reservation that has been deleted. We do this irrespective of the result we get from the server, which is not something that would be sensible in real project.
- 180. ASP.NET Web API • Adding Support for Creating Reservations • We have taken a slightly different approach for creating new reservations. It is easier to use the jQuery Ajax support directly when making PUT or DELETE requests, but the MVC Framework unobtrusive Ajax forms feature can be used without any problems for POST and GET requests. All we have to do to add support for creating new data objects is to configure the AjaxOptions object that we use with the Ajax.BeginForm helper method in the Index.cshtml listing
- 181. ASP.NET Web API • The form will be submitted using the POST method by default and we do not have to build a URL dynamically because the PostReservation action method does not rely on segment variables for parameters (it takes a Reservation object, which we rely on the model binder to create). When the user submits the form to the server, the PostReservation action method is called and a new Reservation is created in the repository. When the request has finished, we call the getData method to refresh the client data and switch to the summary view. We don’t do this to keep our JavaScript code as simple as possible, even though the server sends back a JSON representation of the newly created Reservation that we could have used to append a new row to the table element.
- 182. Dependency Injection
- 183. Dependency Injection • Software design patterns • Using the dependency resolver in MVC • Using the dependency resolver in Web API
- 184. Dependency Injection • SOFTWARE DESIGN PATTERNS • A software design pattern is used to formalize the description of a problem and a solution to that problem, so that developers an use the pattern to simplify the identification and communication of common problems and solutions. • Design Pattern: Inversion of Control • Everyone has probably seen (or written) code like this: You can see that NotificationSystem has a dependency on EmailService. When a component has a dependency on something else, we call that coupling. In this case, the notification system creates an instance of the e-mail service directly inside of the notification system’s constructor; in other words, the notification system knows exactly what kind of service class it’s creating and consuming. This coupling is an indication of how interconnected your code is. A class that knows a lot about the other classes it interacts with (as in the preceding example) is said to be tightly coupled.
- 185. Dependency Injection In software design, tight coupling is often considered to be a liability in your design. When one class knows explicitly about the design and implementation of another class, you raise the risk that changes to one class will break the other class. Also consider another potential problem with the design above: What if the notification system wants to start sending other kinds of messages when the interesting event happens? For example, maybe the administrator of the system wants to start getting text messages instead of e-mails, or also wants to start logging every notification into a database so they can be reviewed at a later time. To enable this behavior, we have to dive back into the implementation of the notification system. To reduce coupling, you generally take two separate but related steps: • Introduce an abstraction layer between two pieces of code.
- 186. Dependency Injection • Moving the creation of dependencies outside of the class that consumes those dependencies is called the inversion of control pattern, so named because what you’re inverting here is the creation of dependencies (and in so doing, you are removing the control of dependency creation from the consumer of the class). • The inversion of control (IoC) pattern is abstract; it says that one should move dependency creation out of the consumer class, but it doesn’t talk about exactly how to achieve that. • to apply the inversion of control pattern to achieve this responsibility shift: service locator and dependency injection.
- 187. Dependency Injection • Design Pattern: Service Locator • The service locator pattern says that inversion of control is achieved by having components get their dependencies through an external component known as the service locator. • Strongly Typed Service Locator In this case, when you need an implementation of IMessagingService, you know to call GetMessagingService.
- 188. Dependency Injection • Weakly Typed Service Locator It’s called a weakly typed service locator because it takes a Type and returns an un-typed instance (that is, an object of type Object). You need to cast the result of the call to GetService to get the correctly typed object back.
- 189. Dependency Injection • The contract for such a method implies that it will return an object already cast to the correct type (notice that its return type is TService now instead of Object). That makes the consuming code quite a bit cleaner:
- 190. Dependency Injection • The Pros and Cons of Service Locators • The benefit of the constant signature is as much a downside as it is an upside. It creates opacity of requirements for your component: The developers who consume your component can’t tell just by looking at the constructor signature what your service requirements are going to be. They are forced to consult documentation, which may be out of date, or simply to pass in an empty service locator and see what kinds of things you request.
- 191. Dependency Injection • Design Pattern: Dependency Injection • The dependency injection (DI) pattern is another form of the inversion of control pattern, wherein there is no intermediary object like the service locator. Instead, components are written in a way that allows their dependencies to be stated explicitly, usually by way of constructor parameters or property setters. • Constructor Injection • This technique involves creating a constructor for your class that expresses all of its dependencies explicitly In this code, the first benefit is that the implementation of the constructor is dramatically simplified. The component is always expecting whoever creates it to pass the required dependencies. Another benefit is that you’ve reduced the number of things NotificationSystem needs to know about.
- 192. Dependency Injection • Property Injection The InterestingEventHappened method is now slightly dangerous. It presumes that the service dependency has already been provided; if it hasn’t, then it will throw a NullReferenceException. You should update the InterestingEventHappened method to ensure that it has been provided with its dependency before using the service:
- 193. Dependency Injection • Dependency Injection Containers • Using a dependency injection container is one way to make the resolution of these dependencies simpler. A dependency injection container is a software library that acts as a factory for components, automatically inspecting and fulfilling their dependency requirements. The consumption portion of the API for a dependency injection container looks a lot like a service locator because the primary action you ask it to perform is to provide you with some component, usually based on its type.
- 194. Dependency Injection • DEPENDENCY RESOLUTION IN MVC • The primary way that MVC talks to containers is through an interface created for MVC applications:IDependencyResolver. The interface is defined as follows: • This interface is consumed by the MVC framework itself. If you want to register a dependency injection container (or a service locator, for that matter), you need to provide an implementation of this interface. You can typically register an instance of the resolver inside your Global.asax file, with ode much like this:
- 195. Dependency Injection • Singly Registered Services in MVC • MVC has services that it consumes for which the user can register one (and exactly one) instance of that service. It calls these services singly registered services, and the method used to retrieve singly registered services from the resolver is GetService.
- 196. Dependency Injection • Multiply Registered Services in MVC • For all the multiply registered services, MVC consults the dependency resolver for the services the first time they are needed, and caches the results for the lifetime of the application. You can use both the dependency resolver API and the traditional registration API, and MVC combines the results in a single merged services list. • When listing the multiply registered services that MVC supports, there is a designation titled “multi-service model,” with one of two values: • Competitive services: • Those where the MVC framework will go from service to service (in order), and ask the service whether it can perform its primary function. The first service that responds that it can fulfill the request is the one that MVC uses. An example of competitive services is the view engine service: Only a single view engine will render a view in a particular request.
- 197. Dependency Injection • Multiply Registered Services in MVC • Cooperative services: Those where the MVC framework asks every service to perform its primary function, and all services that indicate that they can fulfill the request will contribute to the operation. An example of cooperative services is filter providers: Every provider may find filters to run for a request, and all filters found from all providers will be run.
- 198. Dependency Injection • Arbitrary Objects in MVC • Creating Controllers • If you’ve ever tried to write a controller with a constructor with parameters before, at run time you’ll get an exception that says, “No parameterless constructor defined for this object.” In an MVC application, if you look closely at the stack trace of the exception, you’ll see that it includes DefaultControllerFactory as well as DefaultControllerActivator. • The default controller factory in MVC splits this behavior into two separate steps: the mapping of controller names to types, and the instantiation of those types into objects.
- 199. Dependency Injection • Creating Views • Much as the controller activator is responsible for creating instances of controllers, the view page activator is responsible for creating instances of view pages. Again, because these types are arbitrary types that a dependency injection container will probably not be preconfigured for, the activator gives the container an opportunity to know that a view is being requested. • A view engine’s primary responsibility is to convert view names into view instances. The MVC framework splits the actual instantiation of the view page objects out into the view activator, while leaving the identification of the correct view files and the compilation of those files to the build manager view engine base class.
- 200. Real Application
- 201. Real Application • Creating the Visual Studio Solution and Projects We are using the Basic version of the ASP.NET MVC 4 Web Application template because it contains some use additions, including a set of commonly- used JavaScript libraries in the Scripts folder (including jQuery, jQuery UI, Knockout, and Modernizr), a basic layout in the Views folder, and some CSS styles in the Content folder
- 202. Real Application • Adding References • We need to add references to the tool libraries we are going to use for two of the projects we created. The easiest way to add the libraries is to right-click each project, and then select Manage NuGet Packages to bring up the NuGet dialog and locate and install the required libraries.
- 203. Real Application • Setting Up the DI Container • Create a new folder within the SportsStore.WebUI project called Infrastructure, then create a class called NinjectControllerFactory
- 204. Real Application • Setting Up the DI Container • We need to tell MVC that we want to use the NinjectController class to create controller objects, which we do by making the additions shown in bold in Listing 7-2 to the Application_Start method of Global.asax.cs in the SportsStore.WebUI project.
- 205. Real Application • Starting the Domain Model • Since this is an e-commerce application, the most obvious domain entity we will need is a product. Create a new folder called Entities inside the SportsStore.Domain project and then a new C# class called Product within it We have followed the convention of defining our domain model in a separate Visual Studio project, which means that the class must be marked as public. You do not need to follow this convention, but we find that it helps us keep the model separate from the controllers.
- 206. Real Application • Creating an Abstract Repository Create a new top-level folder inside the SportsStore.Domain project called Abstract and a new interface called IProductsRepository • Adding a Controller Right-click the Controllers folder in the SportsStore.WebUI project and select Add Controller from the pop-up menus. Change the name of the controller to ProductController and ensure that the Template option is set to Empty controller.
- 207. Real Application • Adding an Action Method • In addition to removing the Index action method, we have added a constructor that takes an IProductRepository parameter. This will allow Ninject to inject the dependency for the product repository when it instantiates the controller class. We have also imported the SportsStore.Domain namespaces so that we can refer to the repository and model classes without having to quality their names. Next, we have added an action method, called List, which will render a view showing the complete list of products
- 208. Real Application • Adding the View • Now we need to add the default view for the List action method. Right-click the List method in the code editor and select Add View from the pop-up menu. For the model class, enter IEnumerable<SportsStore.Domain.Entities.Product>. You will need to type this in; it will not be available from the drop-down list, which does not include enumerations of domain objects.
- 209. Real Application • Rendering the View Data • Setting the Default Route
- 210. Real Application • Preparing a Database • Creating the Database The first step is to create the database connection in Visual Studio. Open the Database Explorer window from the View menu and click the Connect to Database button (which looks like a power cablewith a green plus sign on it). You will see the Add Connection dialog. Set the server name to (localdb)v11.0—this is a special name that indicates that you want to use the LocalDB feature. Ensure that the Use Windows Authentication option is checked and set the database name to SportsStore
- 211. Real Application • Defining the Database Schema Adding Data to the Database
- 212. Real Application • Creating the Entity Framework Context • The latest versions of the Entity Framework include a nice feature called code-first. The idea is that we can define the classes in our model and then generate a database from those classes. This is great for green-field development projects, but these are few and far between. Instead, we are going to show you a variation on code-first, where we associate our model classes with an existing database. The first step is to add Entity Framework version 5.0 to our SportsStore.Domain project.
- 213. Real Application • The next step is to create a context class that will associate our simple model with the database. Create a new folder called Concrete and add a new class called EFDbContext within it. To take advantage of the code-first feature, we need to create a class that is derived from System.Data.Entity.DbContext. This class then automatically defines a property for each table in the database that we want to work with. Adding a Database Connection We need to tell the Entity Framework how to connect to the database, and we do that by adding a database connection string to the Web.config file in the SportsStore.WebUI project with the same name as the context class.
- 214. Real Application • Creating the Product Repository • We now have everything we need to implement the IProductRepository class for real. Add a class to the Concrete folder of the SportsStore.Domain project called EFProductRepository. Edit your class file so it Edit the NinjectControllerFactory class in the SportsStore.WebUI project so that the AddBindings method looks like
- 215. Real Application • Running the Application
- 216. Real Application • Adding Pagination
- 217. Real Application • Displaying Page Links • Adding the View Model • The easiest way to do this is to create a view model. Add the class called PagingInfo, to the Models folder in the SportsStore.WebUI project.
- 218. Real Application • Adding the HTML Helper Method • Now that we have the view model, we can implement the HTML helper method, which we are going to call PageLinks. Create a new folder in the SportsStore.WebUI project called HtmlHelpers and add a new static class called PagingHelpers.
- 219. Real Application • Adding the HTML Helper Method Namespace to the Views/Web.config File
- 220. Real Application • Adding the View Model Data • We are not quite ready to use our HTML helper method. We have yet to provide an instance of the PagingInfo view model class to the view. We could do this using the view bag feature, but we would rather wrap all of the data we are going to send from the controller to the view in a single view model class. To do this, add a new class called ProductsListViewModel to the Models folder of the SportsStore.WebUI project.
- 221. Real Application • Displaying the Page Links
- 222. Real Application • Improving the URLs • We have the page links working, but they still use the query string to pass page information to the server, like this: • http://localhost/?page=2 • We can do better, specifically by creating a scheme that follows the pattern of composable URLs. A composable URL is one that makes sense to the user, like this one: • http://localhost/Page2
- 223. Real Application Site.css _Layout.cshtml
- 224. Real Application • Creating a Partial View • To add the partial view, right-click the /Views/Shared folder in the SportsStore.WebUI project and select Add View from the pop-up menu. Set the name of the view to ProductSummary. We want to display details of a product, so select the Product class from the Model class drop-down menu or type the qualified class name. Check the Create as a partial view option Views/Shared/ProductSummary.cshtml Views/Products/List.cshtml
- 225. Real Application : Navigation • Filtering the Product List ProductsListViewModel http://localhost:61576/?category=Soccer ProductController
- 226. Real Application : Navigation • Refining the URL Scheme Adding Category Information to the Pagination Links
- 227. Real Application : Navigation • Building a Category Navigation Menu • Creating the Navigation Controller • Right-click the Controllers folder in the SportsStore.WebUI project and select Add Controller from the pop-up menu. Set the name of the new controller to NavController, select the Empty MVC controller option from the Template menu, and click Add to create the class. Adding the RenderAction Call to the Razor Layout Generating Category Lists
- 228. Real Application : Navigation • Creating the Partial View • Since the navigation list is just part of the overall page, it makes sense to create a partial view for the Menu action method. Right-click the Menu method in the NavController class and select Add View from the popup menu. Leave the view name as Menu, check the option to create a strongly typed view, and enter IEnumerable<string> The Menu Partial View /Content/Site.css
- 229. Real Application : Navigation • Highlighting the Current Category Menu.cshtml
- 230. Real Application : Navigation • Correcting the Page Count
- 231. Real Application : Navigation • Building the Shopping Cart An Add to cart button will be displayed alongside each of the products in our catalog. Clicking this button will show a summary of the products the customer has selected so far, including the total cost. At this point, the user can click the Continue shopping button to return to the product catalog, or click the Checkout now button to complete the order and finish the shopping session.
- 232. Real Application : Navigation • Defining the Cart Entity A shopping cart is part of our application’s business domain, so it makes sense to represent a cart by creating an entity in our domain model. Add a class file called Cart to the Entities folder in the SportsStore.Domain project
- 233. Real Application : Navigation • Adding the Add to Cart Buttons Views/Shared/ProductSummary.cshtml We have added a Razor block that creates a small HTML form for each product in the listing. When this form is submitted, it will invoke the AddToCart action method in the Cart controller Styling the Buttons
- 234. Real Application : Navigation • Implementing the Cart Controller
- 235. Real Application : Navigation • Displaying the Contents of the Cart We need to pass two pieces of information to the view that will display the contents of the cart: the Cart object and the URL to display if the user clicks the Continue shopping button. We will create a simple view model class for this purpose. Create a new class called CartIndexViewModel in the Models folder of the SportsStore.WebUI project. Now that we have the view model, we can implement the Index action method in the Cart controller class
- 236. Real Application : Navigation • Displaying the Contents of the Cart • The last step is to display the contents of the cart is to create the new view. Right-click the Index method and select Add View from the pop-up menu. Set the name of the view to Index, check the option to create a strongly typed view, and select CartIndexViewModel as the model class.
- 237. Real Application : Completing the Cart • Using Model Binding • We like using the session state feature in the Cart controller to store and manage our Cart objects, but we do not like the way we have to go about it. It does not fit the rest of our application model, which is based around action method parameters. We cannot properly unit test the CartController class unless we mock the Session parameter of the base class, and that means mocking the Controller class and a whole bunch of other stuff we would rather not deal with. • To solve this problem, we are going to create a custom model binder that obtains the Cart object contained in the session data.
- 238. Real Application : Completing the Cart • Creating a Custom Model Binder • We create a custom model binder by implementing the IModelBinder interface. Create a new folder in the SportsStore.WebUI project called Binders and create a CartModelBinder class inside that folder.
- 239. Real Application : Completing the Cart The IModelBinder interface defines one method: BindModel. The two parameters are provided to make creating the domain model object possible. The ControllerContext provides access to all the information that the controller class has, which includes details of the request from the client. The ModelBindingContext gives you information about the model object you are being asked to build and some tools for making the binding process easier. • Registering the CartModelBinder Class
- 240. Real Application : Completing the Cart • Relying on the Model Binder in CartController We have removed the GetCart method and added a Cart parameter to each of the action methods. When the MVC Framework receives a request that requires, say, the AddToCart method to be invoked, it begins by looking at the parameters for the action method. It looks at the list of binders available and tries to find one that can create instances of each parameter type. Our custom binder is asked to create a Cart object, and it does so by working with the session state feature. Between our binder and the default binder, the MVC Framework is able to create the set of parameters required to call the action method, allowing us to refactor the controller so that it has no knowledge of how Cart objects are created when requests are received.
- 241. Real Application : Completing the Cart • Completing the Cart • Removing Items from the Cart • We have already defined and tested the RemoveFromCart action method in the controller, so letting the customer remove items is just a matter of exposing this method in a view, which we are going to do by adding a Remove button in each row of the cart summary. The changes to Views/Cart/Index.cshtml
- 242. Real Application : Completing the Cart • Adding the Cart Summary Adding the Summary Method to the Cart Controller The Summary Partial View
- 243. Real Application : Completing the Cart • Adding the Cart Summary This is a simple view that displays the number of items in the cart, the total cost of those items, and a link that shows the contents of the cart to the user. Now that we have defined the view that is returned by the Summary action method, we can include the rendered result in the _Layout.cshtml file.
- 244. Real Application : Completing the Cart • Submitting Orders • Extending the Domain Model • Add a class called ShippingDetails to the Entities folder of the SportsStore.Domain project. This is the class we will use to represent the shipping details for a customer.
- 245. Real Application : Completing the Cart • Adding the Checkout Process • Our goal is to reach the point where users are able to enter their shipping details and submit their order. To start this off, we need to add a Checkout now button to the cart summary view. we need to apply to the Views/Cart/Index.cshtml file.
- 246. Real Application : Completing the Cart • Adding the Checkout Process The Checkout method returns the default view and passes a new ShippingDetails object as the view model. To create the corresponding view, right-click the Checkout method, select Add View. We are going to use the ShippingDetails domain class as the basis for the strongly typed view. Check the option to use a layout, because we are rendering a full page and want it to be consistent with the rest of the application.
- 247. Real Application : Completing the Cart • Adding the Checkout Process
- 248. Real Application : Completing the Cart • Implementing the Order Processor • Add a new interface called IOrderProcessor to the Abstract folder of the SportsStore.Domain project
- 249. Real Application : Completing the Cart • Registering the Implementation We created an EmailSettings object, which we use with the Ninject WithConstructorArgument method so that we can inject it into the EmailOrderProcessor constructor when new instances are created to service requests for the IOrderProcessor interface. we specified a value for only one of the EmailSettings properties: WriteAsFile. We read the value of this property using the ConfigurationManager.AppSettings property, which allows us to access application settings we have placed in the Web.config file (the one in the root project folder)
- 250. Real Application : Completing the Cart • Completing the Cart Controller • To complete the CartController class, we need to modify the constructor so that it demands an implementation of the IOrderProcessor interface and add a new action method that will handle the HTTP form POST when the user clicks the Complete order button.
- 251. Real Application : Completing the Cart • Displaying Validation Errors • we need to add a validation summary to the view, Checkout.cshtml view.
- 252. Real Application : Completing the Cart • Displaying a Summary Page • To complete the checkout process, we will show customers a page that confirms the order has been processed and thanks them for their business. Right-click any of the action methods in the CartController class and select Add View from the pop-up menu. Set the name of the view to Completed Completed.cshtml
- 253. Real Application : Administration • Adding Catalog Management Creating a CRUD Controller We will create a new controller to handle our administration functions. Right-click the Controllers folder of the SportsStore.WebUI project and select Add Controller from the pop-up menu. Set the name of the controller to AdminController and ensure that Empty MVC Controller is selected from the Template dropdown list.
- 254. Real Application : Administration • Creating a New Layout • To create the layout, right-click the Views/Shared folder in the SportsStore.WebUI project and select Add New Item. Select the MVC 4 Layout Page (Razor) template and set the name to _AdminLayout.cshtml
- 255. Real Application : Administration • Implementing the List View • we have created the new layout, we can add a view to the project for the Index action method of the Admin controller. Right-click inside the Index method and select Add View from the pop-up menu. Set the name of the view to Index
- 256. Real Application : Administration • Modifying the Index.cshtml View
- 257. Real Application : Administration • Editing Products Creating the Edit Action Method
- 258. Real Application : Administration • Editing Products • Creating the Edit View The HiddenInput attribute tells the MVC Framework to render the property as a hidden form element, and the DataType attribute allows us to specify how a value is presented and edited.
- 259. Real Application : Administration • Updating the Product Repository • Implementing the SaveProduct Method
- 260. Real Application : Administration • Handling Edit POST Requests
- 261. Real Application : Administration • Displaying a Confirmation Message • We are going to deal with the message we stored using TempData in the _AdminLayout.cshtml layout file. By handling the message in the template, we can create messages in any view that uses the template without needing to create additional Razor blocks.
- 262. Real Application : Administration
- 263. Real Application : Administration • Adding Model Validation
- 264. Real Application : Administration • Enabling Client-Side Validation • This feature is enabled by default, but it has not been working because we have not added links to the required JavaScript libraries. The simplest place to add these links is in the _AdminLayout.cshtml file, so that client validation can work on any page that uses this layout.
- 265. Real Application : Administration • for some reason, you do not want to validate at the client, you need to use the following statements: • If you put these statements in a view or in a controller, then client-side validation is disabled only for the current action. You can disable client-side validation for the entire application by using those statements in the Application_Start method of Global.asax or by adding values to the Web.config file, like this:
- 266. Real Application : Administration • Creating New Products • Adding the Create Action Method to the Admin Controller • Explicitly Specifying an Action Method and Controller for a Form
- 267. Real Application : Administration • Now the form will always be posted to the Edit action, regardless of which action rendered it. We can create products by clicking the Add a new product link and filling in the details
- 268. Real Application : Administration • Deleting Products • Adding a Method to Delete Products EFProductRepository
- 269. Real Application : Administration • Deleting Products
- 270. Real Application : Security & Finishing Touches • Securing the Administration Controller We have kept things very simple and hard-code a username (admin) and password (secret) in the Web.config file. Our focus in this chapter is applying basic security to an MVC application, so hard-coded credentials suit us just fine.
- 271. Real Application : Security & Finishing Touches • Applying Authorization with Filters When you try to access the Index action method of the Admin controller, the MVC Framework detects the Authorize filter. Because you have not been authenticated, you are redirected to the URL specified in the Web.config forms authentication section: /Account/Login. We have not created the Account controller yet—which is what causes the error shown in the figure—but the fact that the MVC Framework has tried to instantiate an AccountController class shows us that the Authorize attribute is working.
- 272. Real Application : Security & Finishing Touches • Creating the Authentication Provider • Using the forms authentication feature requires us to call two static methods of the System.Web.Security.FormsAuthentication class: • The Authenticate method lets us validate credentials supplied by the user. • The SetAuthCookie method adds a cookie to the response to the browser, so that users do not need to authenticate every time they make a request. • We start by defining the authentication provider interface. Create a new folder called Abstract in the Infrastructure folder of the SportsStore.WebUI project and add a new interface called IAuthProvider.
- 273. Real Application : Security & Finishing Touches • Adding the Authentication Provider Ninject Binding • Creating the Account Controller
- 274. Real Application : Security & Finishing Touches • The AccountController
- 275. Real Application : Security & Finishing Touches • Creating the View • Right click in one of the action methods in the Account controller class and select Add View from the popup menu. Create a strongly typed view called Login that uses LoginViewModel as the view model type Check the option to use a layout and select the AdminLayout.cshtml file.
- 276. Real Application : Security & Finishing Touches • Image Uploads • Extending the Database • Enhancing the Domain Model
- 277. Real Application : Security & Finishing Touches • Creating the Upload User Interface Elements • Modify the Views/Admin/Edit.cshtml Without the enctype attribute, the browser will transmit only the name of the file and not its content, which is no use to us at all. To ensure that the enctype attribute appears, we must use an overload of the Html.BeginForm helper method that lets us specify HTML attributes
- 278. Real Application : Security & Finishing Touches • Saving Images to the Database • We need to enhance the POST version of the Edit action method in the AdminController class so that we take the image data that has been uploaded to us and save it in the database. EFProductRepository AdminController
- 279. Real Application : Security & Finishing Touches • Implementing the GetImage Action Method The GetImage Action Method
- 280. Real Application : Security & Finishing Touches The administrator can now upload images for products. You can try this yourself by starting the application, navigating to the /Admin/Index URL and editing one of the products.
- 281. Real Application : Security & Finishing Touches • Displaying Product Images Views/Shared/ProductSummary.cshtml
- 282. Thank You • Prepared by: Muhammad Alaa [email protected]