SlideShare a Scribd company logo
Deep Learning Lab 9:
Neural Networks from Scratch
& TensorFlow 101
DataLab
Department of Computer Science,
National Tsing Hua University, Taiwan
Outline
• Neural Networks from Scratch
• Why TensorFlow?
• Environment Setup
• TensorFlow 2 Quickstart
• Dataset Preparation
• Building Model via Sequential API, Functional API, and Model Subclassing
• Better performance with tf.function
• Customize gradient flow by tf.custom_gradient
Outline
• Neural Networks from Scratch
• Why TensorFlow?
• Environment Setup
• TensorFlow 2 Quickstart
• Dataset Preparation
• Building Model via Sequential API, Functional API, and Model Subclassing
• Better performance with tf.function
• Customize gradient flow by tf.custom_gradient
Neural Networks from Scratch
• In this lab, you will learn the fundamentals of how you can
build neural networks without the help of the deep
learning frameworks, and instead by using NumPy
Neural Networks from Scratch
• Creating complex neural networks with different
architectures with deep learning frameworks should be
a standard practice for any Machine Learning Engineer
and Data Scientist
• But a genuine understanding of how a neural network
works is equally as valuable
Model Architecture
• We are going to build a deep neural network with 3 layers
in total: 1 input layer, 1 hidden layers and 1 output layer
• All layers will be fully-connected
• In this tutorial, we will use MNIST dataset
• MNIST contains 70,000 images of hand-written digits, 60,000 for training
and 10,000 for testing, each 28x28=784 pixels, in greyscale with
pixel-values from 0 to 255
Model Architecture
• To be able to classify digits, we must end up with the
probabilities of an image belonging to a certain class
• Input layer: Flatten images into one array with
28x28=784 elements. This means our input layer will
have 784 nodes
• Hidden layer: Reduce the number of nodes from 784 in
the input layer to 64 nodes, so there’s 64 nodes in
hidden layer
• Output layer: Reduce 64 nodes to a total of 10 nodes,
and we can evaluate them against the label. The label is
in the form of an array with 10 elements, where one of
the elements is 1, while the rest is 0
Model Architecture
Hidden
Layer,
784x64
Output
Layer,
64x10
Input
Layer
(Flatten)
Model Architecture
• When instantiating the DeepNeuralNetwork class, we
pass in an array of sizes that defines the number of
activations for each layer
• This initializes the class by the init function
Initialization
•
Initialization
•
Feedforward
• The forward pass consists of the dot operation, which
turns out to be just matrix multiplication
• We have to multiply the weights by the activations of
the previous layer, and then apply the activation
function to the outcome
• In the last layer we use the softmax activation function,
since we wish to have probabilities of each class, so
that we can measure how well our current forward pass
performs
Neural Networks from Scratch - TensorFlow 101
Activation Functions
• One magical power in deep neural networks is the
non-linear activation functions
• They enable us to learn the non-linear relationship
between input and output
Activation Functions
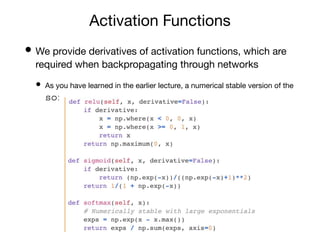
• We provide derivatives of activation functions, which are
required when backpropagating through networks
• As you have learned in the earlier lecture, a numerical stable version of the
softmax function was chosen
Backpropagation
• Backpropagation, short for backward propagation of
errors, is key to supervised learning of deep neural
networks
• It has enabled the recent surge in popularity of deep learning algorithms
since the early 2000s
• The backward pass is hard to get right, because there are so many sizes
and operations that have to align, for all the operations to be successful
Neural Networks from Scratch - TensorFlow 101
Training
• We have defined a forward and backward pass, but how
can we start using them?
• We have to make a training loop and choose an optimizer
to update the parameters of the neural network
Training
Number of epochs
Running through each batch
Compute predictions
Compute gradients
Update networks
Optimization
•
Optimization
Results
• The results completely dependent on how the weights are
initialized and the activation function we use
• Experimentally, due to non-bounded behavior of relu(), the learning
rate should be set much smaller than the one
for sigmoid() (bounded)
• Training with SGD optimizer with momentum should have better result
since it avoids from getting stuck in local minima or saddle points
• The reason behind this phenomenon is complicated and beyond the
scope of this class. In short, the training results will be more stable and
consistent as the batch size increases
Sigmoid + Momentum optimizer
ReLU + SGD optimizer
Outline
• Neural Networks from Scratch
• Why TensorFlow?
• Environment Setup
• TensorFlow 2 Quickstart
• Dataset Preparation
• Building Model via Sequential API, Functional API, and Model Subclassing
• Better performance with tf.function
• Customize gradient flow by tf.custom_gradient
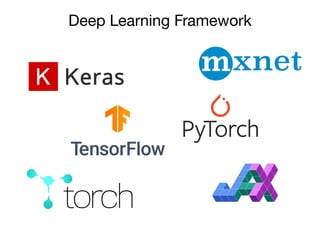
Deep Learning Framework
TensorFlow v.s. PyTorch
• The two frameworks had a lot of major differences in
terms of design, paradigm, syntax, etc till some time back
• But they have since evolved a lot, both have picked up
good features from each other and are no longer that
different
TensorFlow v.s. PyTorch
TensorFlow
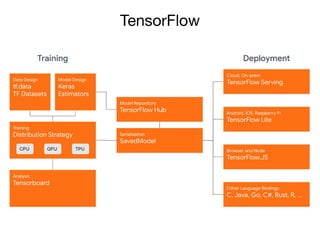
• Originally developed by Google Brain, TensorFlow is an
end-to-end open source platform for machine learning,
which has several benefits:
• Easy model building
• Robust ML production anywhere
• Powerful experimentation for research
TensorFlow
Neural Networks from Scratch - TensorFlow 101
Outline
• Neural Networks from Scratch
• Why TensorFlow?
• Environment Setup
• TensorFlow 2 Quickstart
• Dataset Preparation
• Building Model via Sequential API, Functional API, and Model Subclassing
• Better performance with tf.function
• Customize gradient flow by tf.custom_gradient
Software requirements
• Before using TensorFlow, the following NVIDIA® software
must be installed on your system:
• NVIDIA® GPU drivers —CUDA® 11.x requires 450.xx or higher
• CUDA® Toolkit —TensorFlow supports CUDA® 11.0 (TensorFlow >= 2.4.0)
• CUPTI ships with the CUDA® Toolkit
• cuDNN SDK 8.9.5 (see cuDNN versions)
• (Optional) TensorRT 8.0 to improve latency and throughput for inference
on some models
Software requirements
LINK
Install CUDA
• Please refer to TensorFlow website, GPU Support section,
for more details and latest information
• Please check the version of the abovementioned
softwares carefully. There is a strict requirement
between TensorFlow's version and NVIDIA® softwares’
• (Optional) If you are using Anaconda environment, you
can install corresponding CUDA Toolkit and cuDNN
SDK via
• Notice that you still have to install NVIDIA® GPU drivers
manually
Environment Setup
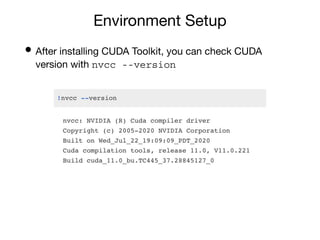
• After installing CUDA Toolkit, you can check CUDA
version with nvcc --version
Environment Setup
• You can also check GPU utilization after installing GPU
driver with nvidia-smi
Install TensorFlow 2
• TensorFlow is tested and supported on the following
64-bit systems:
• Python 3.5–3.8
• Ubuntu 16.04 or later
• macOS 10.12.6 (Sierra) or later (no GPU support)
• Windows 7 or later
• Raspbian 9.0 or later
Install TensorFlow 2
• We can simply install TensorFlow with
Python's pip package manager
• It is recommanded to install TensorFlow in a virtual environment, for more
details, please refer to Install TensorFlow with pip
Install TensorFlow 2
• We can test whether TensorFlow is installed successfully
and confirm that TensorFlow is using the GPU by
executing following code
Google Colab
• Google Colab provides a Jupyter notebook environment that
requires no setup with free GPU
• The types of GPUs available in Colab vary over time, including Nvidia K80, T4,
P4, P100
• There is no way to choose what type of GPU you can connect to in Colab at
any given time
• However, there are few constraints when using Google Colab:
• 12 hours lifetimes limit
• Various available GPU memory
• Google announced a new service called Colab
Pro ($9.99/month), which provides faster GPUs, longer
runtimes, and more memory compared with Colab
Outline
• Neural Networks from Scratch
• Why TensorFlow?
• Environment Setup
• TensorFlow 2 Quickstart
• Dataset Preparation
• Building Model via Sequential API, Functional API, and Model Subclassing
• Better performance with tf.function
• Customize gradient flow by tf.custom_gradient
TensorFlow 2 Quickstart
• Later on you will learn how to build a simple deep neural
network to classify hand-written digit numbers
• This time with TensorFlow!
Input
Layer
(Flatten)
Hidden
Layer,
784x64
Output
Layer,
64x10
Limit GPU Memory Growth
• By default, TensorFlow maps nearly all of the GPU
memory of all GPUs visible to the process
• This is done to more efficiently use the relatively precious GPU memory
resources on the devices by reducing memory fragmentation
• To limit a specific set of GPUs and to allocate a subset of
the available memory, you can execute
Restrict GPU to use
Allocate subset
of memory
Outline
• Neural Networks from Scratch
• Why TensorFlow?
• Environment Setup
• TensorFlow 2 Quickstart
• Dataset Preparation
• Building Model via Sequential API, Functional API, and Model Subclassing
• Better performance with tf.function
• Customize gradient flow by tf.custom_gradient
Dataset Preparation
• Currently, tf.keras.dataset supports 7 datasets.
Including:
• mnist module: MNIST handwritten digits dataset.
• cifar10 module: CIFAR10 small images classification dataset.
• cifar100 module: CIFAR100 small images classification dataset.
• fashion_mnist module: Fashion-MNIST dataset.
• imdb module: IMDB sentiment classification dataset.
• boston_housing module: Boston housing price regression
dataset.
• reuters module: Reuters topic classification dataset.
Outline
• Neural Networks from Scratch
• Why TensorFlow?
• Environment Setup
• TensorFlow 2 Quickstart
• Dataset Preparation
• Building Model via Sequential API, Functional API, and Model Subclassing
• Better performance with tf.function
• Customize gradient flow by tf.custom_gradient
Build model via Sequential API
• A Sequential API is the simplest way to build a model,
which is appropriate for a plain stack of layers where
each layer has exactly one input tensor and one output
tensor
Build model via Sequential API
• To classify MNIST, let’s build a simple neural network with
fully-connected layers
• Build the tf.keras.Sequential model by stacking
layers. Choose an optimizer and loss function for training:
Model architecture
Loss function
Optimizer
Build model via Sequential API
• The Model.summary method prints a string summary of
the network, which is quite useful to examining model
architecture before training
= 784*128 + 128
= 128*10 + 10
Build model via Sequential API
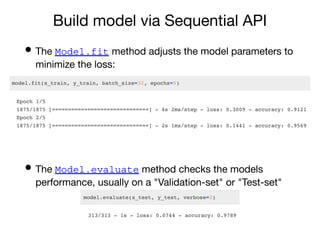
• The Model.fit method adjusts the model parameters to
minimize the loss:
• The Model.evaluate method checks the models
performance, usually on a "Validation-set" or "Test-set"
Build model via Functional API
• The Keras Functional API is a way to create models that
are more flexible than Sequential API
• The functional API can handle models with non-linear topology, shared
layers, and even multiple inputs or outputs
Build model via Functional API
• The main idea is that a deep learning model is usually a
directed acyclic graph (DAG) of layers. So the functional
API is a way to build graphs of layers
• Consider the following model:
Build model via Functional API
• Building model using the functional API by creating an
input node first:
• You create a new node in the graph of layers by calling a
layer on this inputs object. The "layer call" action is like
drawing an arrow from "inputs" to this layer you created
Build model via Functional API
• At this point, you can create a Model by specifying its
inputs and outputs in the graph of layers:
= 784*128 + 128
= 128*10 + 10
Build model via Model Subclassing
• Model subclassing is fully-customizable and enables
you to implement your own custom forward-pass of
the model
• However, this flexibility and customization comes at a
cost — model subclassing is way harder to utilize than the
Sequential API or Functional API
Build model via Model Subclassing
• Exotic architectures or custom layer/model
implementations, especially those utilized by
researchers, can be extremely challenging
• Researchers wish to have control over every nuance of
the network and training process — and that’s exactly
what model subclassing provides them
Build model via Model Subclassing
• Build the model with Keras model subclassing API:
Model architecture
Forward path
Custom Training
• You can always train the model with model.fit and
model.evaluate, no matter which method you used to
build the model
• However, if you need more flexible training and evaluating
process, you can implement your own methods
Training
Custom Training
Number of epochs
Running through each batch
Custom Training
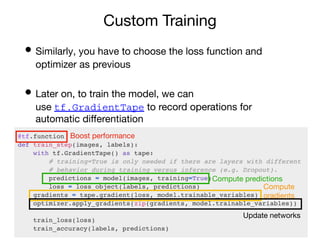
• Similarly, you have to choose the loss function and
optimizer as previous
• Later on, to train the model, we can
use tf.GradientTape to record operations for
automatic differentiation
Boost performance
Compute predictions
Compute
gradients
Update networks
Gradients and Automatic Differentiation
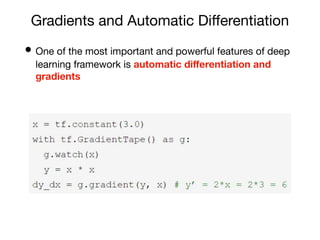
• One of the most important and powerful features of deep
learning framework is automatic differentiation and
gradients
Gradients and Automatic Differentiation
• As we can see in Neural Networks from Scratch, building
neural networks manually requires strong knowledge of
backpropagation algorithm
• It is interesting as we don't have too many operations or the model
architecture is relatively simple
• But what if we have this model?
Gradients and Automatic Differentiation
• TensorFlow provides the tf.GradientTape API
for automatic differentiation; that is, computing the
gradient of a computation with respect to some inputs
• In short, you can regard tape.gradient(loss,
model.trainable_variable) as
Sequential API, Functional API, and Model Subclassing
Define Model Architecture
Define Loss and then Train
Sequential API, Functional API, and Model Subclassing
• All models can interact with each other, whether they’re
sequential models, functional models, or subclassed
models
Sequential Functional Subclassing
Simple
Flexibility
1 2 3
1
2
3
Outline
• Neural Networks from Scratch
• Why TensorFlow?
• Environment Setup
• TensorFlow 2 Quickstart
• Dataset Preparation
• Building Model via Sequential API, Functional API, and Model Subclassing
• Better performance with tf.function
• Customize gradient flow by tf.custom_gradient
Better Performance with tf.function
• In TensorFlow 2, eager execution is turned on by default.
The user interface is intuitive and flexible
• But this can come at the expense of performance and
deployability
• You can use tf.function to make graphs out of your
programs. It is a transformation tool that creates
Python-independent dataflow graphs out of your Python
code
Better Performance with tf.function
• Let's create two function with same operation, one runs
in eager and another runs in graph mode
Debugging
• In general, debugging code is easier in eager mode than
inside tf.function. You should ensure that your code
executes error-free in eager mode first
• Debug in eager mode, then decorate
with @tf.function
• Don't rely on Python side effects like object mutation or
list appends
• tf.function works best with TensorFlow ops;
NumPy and Python calls are converted to constants
Python Side Effects
• Python side effects like printing, appending to lists, and
mutating globals only happen the first time you call a
function with a set of inputs
• Afterwards, the traced tf.Graph is reexecuted, without
executing the Python code
Python Side Effects
Python Side Effects
Outline
• Neural Networks from Scratch
• Why TensorFlow?
• Environment Setup
• TensorFlow 2 Quickstart
• Dataset Preparation
• Building Model via Sequential API, Functional API, and Model Subclassing
• Better performance with tf.function
• Customize gradient flow by tf.custom_gradient
Customize Gradient Flow
• tf.custom_gradient is a decorator to define a
function with a custom gradient
• This may be useful for multiple reasons, including providing a more
efficient or numerically stable gradient for a sequence of operations
Customize Gradient Flow
•
Customize Gradient Flow
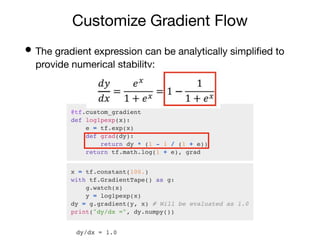
• The gradient expression can be analytically simplified to
provide numerical stability:
Reference
• TensorFlow
• 3 ways to create a Keras model with TensorFlow 2.0
• Pytorch vs Tensorflow in 2020

More Related Content

Similar to Neural Networks from Scratch - TensorFlow 101 (20)

PDF
Urs Köster - Convolutional and Recurrent Neural Networks
Intel Nervana
 
PDF
Introduction to Chainer
Preferred Networks
 
PDF
Introduction to Chainer
Shunta Saito
 
PPTX
KERAS Python Tutorial
MahmutKAMALAK
 
PPTX
Final training course
Noor Dhiya
 
PPTX
2018 03 25 system ml ai and openpower meetup
Ganesan Narayanasamy
 
PDF
Synthetic dialogue generation with Deep Learning
S N
 
PDF
Using Deep Learning Toolkits with Kubernetes clusters
Joy Qiao
 
PPTX
DigitRecognition.pptx
ruvex
 
PDF
"Quantizing Deep Networks for Efficient Inference at the Edge," a Presentatio...
Edge AI and Vision Alliance
 
PPTX
Neural Networks with Google TensorFlow
Darshan Patel
 
PPTX
Coding For Cores - C# Way
Bishnu Rawal
 
PDF
NLP and Deep Learning for non_experts
Sanghamitra Deb
 
PPTX
Expanding HPCC Systems Deep Neural Network Capabilities
HPCC Systems
 
PPTX
Flexible compute
Peter Clapham
 
PPTX
Sanger, upcoming Openstack for Bio-informaticians
Peter Clapham
 
PPTX
Explore Deep Learning Architecture using Tensorflow 2.0 now! Part 2
Tyrone Systems
 
PDF
Democratizing machine learning on kubernetes
Docker, Inc.
 
PPTX
Smart Data Conference: DL4J and DataVec
Josh Patterson
 
PDF
running stable diffusion on android
Koan-Sin Tan
 
Urs Köster - Convolutional and Recurrent Neural Networks
Intel Nervana
 
Introduction to Chainer
Preferred Networks
 
Introduction to Chainer
Shunta Saito
 
KERAS Python Tutorial
MahmutKAMALAK
 
Final training course
Noor Dhiya
 
2018 03 25 system ml ai and openpower meetup
Ganesan Narayanasamy
 
Synthetic dialogue generation with Deep Learning
S N
 
Using Deep Learning Toolkits with Kubernetes clusters
Joy Qiao
 
DigitRecognition.pptx
ruvex
 
"Quantizing Deep Networks for Efficient Inference at the Edge," a Presentatio...
Edge AI and Vision Alliance
 
Neural Networks with Google TensorFlow
Darshan Patel
 
Coding For Cores - C# Way
Bishnu Rawal
 
NLP and Deep Learning for non_experts
Sanghamitra Deb
 
Expanding HPCC Systems Deep Neural Network Capabilities
HPCC Systems
 
Flexible compute
Peter Clapham
 
Sanger, upcoming Openstack for Bio-informaticians
Peter Clapham
 
Explore Deep Learning Architecture using Tensorflow 2.0 now! Part 2
Tyrone Systems
 
Democratizing machine learning on kubernetes
Docker, Inc.
 
Smart Data Conference: DL4J and DataVec
Josh Patterson
 
running stable diffusion on android
Koan-Sin Tan
 

Recently uploaded (20)

PDF
Stokey: A Jewish Village by Rachel Kolsky
History of Stoke Newington
 
PPTX
PATIENT ASSIGNMENTS AND NURSING CARE RESPONSIBILITIES.pptx
PRADEEP ABOTHU
 
PPTX
How to Handle Salesperson Commision in Odoo 18 Sales
Celine George
 
PPTX
ASRB NET 2023 PREVIOUS YEAR QUESTION PAPER GENETICS AND PLANT BREEDING BY SAT...
Krashi Coaching
 
PDF
The Constitution Review Committee (CRC) has released an updated schedule for ...
nservice241
 
PPTX
A PPT on Alfred Lord Tennyson's Ulysses.
Beena E S
 
PDF
Reconstruct, Restore, Reimagine: New Perspectives on Stoke Newington’s Histor...
History of Stoke Newington
 
PDF
Chapter-V-DED-Entrepreneurship: Institutions Facilitating Entrepreneurship
Dayanand Huded
 
PDF
CONCURSO DE POESIA “POETUFAS – PASSOS SUAVES PELO VERSO.pdf
Colégio Santa Teresinha
 
PPTX
Stereochemistry-Optical Isomerism in organic compoundsptx
Tarannum Nadaf-Mansuri
 
PDF
Horarios de distribución de agua en julio
pegazohn1978
 
PDF
0725.WHITEPAPER-UNIQUEWAYSOFPROTOTYPINGANDUXNOW.pdf
Thomas GIRARD, MA, CDP
 
PDF
Women's Health: Essential Tips for Every Stage.pdf
Iftikhar Ahmed
 
PDF
QNL June Edition hosted by Pragya the official Quiz Club of the University of...
Pragya - UEM Kolkata Quiz Club
 
PDF
ARAL-Orientation_Morning-Session_Day-11.pdf
JoelVilloso1
 
PPTX
QUARTER 1 WEEK 2 PLOT, POV AND CONFLICTS
KynaParas
 
PPTX
Unit 2 COMMERCIAL BANKING, Corporate banking.pptx
AnubalaSuresh1
 
PPT
Talk on Critical Theory, Part One, Philosophy of Social Sciences
Soraj Hongladarom
 
PPTX
care of patient with elimination needs.pptx
Rekhanjali Gupta
 
PDF
Exploring the Different Types of Experimental Research
Thelma Villaflores
 
Stokey: A Jewish Village by Rachel Kolsky
History of Stoke Newington
 
PATIENT ASSIGNMENTS AND NURSING CARE RESPONSIBILITIES.pptx
PRADEEP ABOTHU
 
How to Handle Salesperson Commision in Odoo 18 Sales
Celine George
 
ASRB NET 2023 PREVIOUS YEAR QUESTION PAPER GENETICS AND PLANT BREEDING BY SAT...
Krashi Coaching
 
The Constitution Review Committee (CRC) has released an updated schedule for ...
nservice241
 
A PPT on Alfred Lord Tennyson's Ulysses.
Beena E S
 
Reconstruct, Restore, Reimagine: New Perspectives on Stoke Newington’s Histor...
History of Stoke Newington
 
Chapter-V-DED-Entrepreneurship: Institutions Facilitating Entrepreneurship
Dayanand Huded
 
CONCURSO DE POESIA “POETUFAS – PASSOS SUAVES PELO VERSO.pdf
Colégio Santa Teresinha
 
Stereochemistry-Optical Isomerism in organic compoundsptx
Tarannum Nadaf-Mansuri
 
Horarios de distribución de agua en julio
pegazohn1978
 
0725.WHITEPAPER-UNIQUEWAYSOFPROTOTYPINGANDUXNOW.pdf
Thomas GIRARD, MA, CDP
 
Women's Health: Essential Tips for Every Stage.pdf
Iftikhar Ahmed
 
QNL June Edition hosted by Pragya the official Quiz Club of the University of...
Pragya - UEM Kolkata Quiz Club
 
ARAL-Orientation_Morning-Session_Day-11.pdf
JoelVilloso1
 
QUARTER 1 WEEK 2 PLOT, POV AND CONFLICTS
KynaParas
 
Unit 2 COMMERCIAL BANKING, Corporate banking.pptx
AnubalaSuresh1
 
Talk on Critical Theory, Part One, Philosophy of Social Sciences
Soraj Hongladarom
 
care of patient with elimination needs.pptx
Rekhanjali Gupta
 
Exploring the Different Types of Experimental Research
Thelma Villaflores
 
Ad

Neural Networks from Scratch - TensorFlow 101

  • 1. Deep Learning Lab 9: Neural Networks from Scratch & TensorFlow 101 DataLab Department of Computer Science, National Tsing Hua University, Taiwan
  • 2. Outline • Neural Networks from Scratch • Why TensorFlow? • Environment Setup • TensorFlow 2 Quickstart • Dataset Preparation • Building Model via Sequential API, Functional API, and Model Subclassing • Better performance with tf.function • Customize gradient flow by tf.custom_gradient
  • 3. Outline • Neural Networks from Scratch • Why TensorFlow? • Environment Setup • TensorFlow 2 Quickstart • Dataset Preparation • Building Model via Sequential API, Functional API, and Model Subclassing • Better performance with tf.function • Customize gradient flow by tf.custom_gradient
  • 4. Neural Networks from Scratch • In this lab, you will learn the fundamentals of how you can build neural networks without the help of the deep learning frameworks, and instead by using NumPy
  • 5. Neural Networks from Scratch • Creating complex neural networks with different architectures with deep learning frameworks should be a standard practice for any Machine Learning Engineer and Data Scientist • But a genuine understanding of how a neural network works is equally as valuable
  • 6. Model Architecture • We are going to build a deep neural network with 3 layers in total: 1 input layer, 1 hidden layers and 1 output layer • All layers will be fully-connected • In this tutorial, we will use MNIST dataset • MNIST contains 70,000 images of hand-written digits, 60,000 for training and 10,000 for testing, each 28x28=784 pixels, in greyscale with pixel-values from 0 to 255
  • 7. Model Architecture • To be able to classify digits, we must end up with the probabilities of an image belonging to a certain class • Input layer: Flatten images into one array with 28x28=784 elements. This means our input layer will have 784 nodes • Hidden layer: Reduce the number of nodes from 784 in the input layer to 64 nodes, so there’s 64 nodes in hidden layer • Output layer: Reduce 64 nodes to a total of 10 nodes, and we can evaluate them against the label. The label is in the form of an array with 10 elements, where one of the elements is 1, while the rest is 0
  • 9. Model Architecture • When instantiating the DeepNeuralNetwork class, we pass in an array of sizes that defines the number of activations for each layer • This initializes the class by the init function
  • 12. Feedforward • The forward pass consists of the dot operation, which turns out to be just matrix multiplication • We have to multiply the weights by the activations of the previous layer, and then apply the activation function to the outcome • In the last layer we use the softmax activation function, since we wish to have probabilities of each class, so that we can measure how well our current forward pass performs
  • 14. Activation Functions • One magical power in deep neural networks is the non-linear activation functions • They enable us to learn the non-linear relationship between input and output
  • 15. Activation Functions • We provide derivatives of activation functions, which are required when backpropagating through networks • As you have learned in the earlier lecture, a numerical stable version of the softmax function was chosen
  • 16. Backpropagation • Backpropagation, short for backward propagation of errors, is key to supervised learning of deep neural networks • It has enabled the recent surge in popularity of deep learning algorithms since the early 2000s • The backward pass is hard to get right, because there are so many sizes and operations that have to align, for all the operations to be successful
  • 18. Training • We have defined a forward and backward pass, but how can we start using them? • We have to make a training loop and choose an optimizer to update the parameters of the neural network
  • 19. Training Number of epochs Running through each batch Compute predictions Compute gradients Update networks
  • 22. Results • The results completely dependent on how the weights are initialized and the activation function we use • Experimentally, due to non-bounded behavior of relu(), the learning rate should be set much smaller than the one for sigmoid() (bounded) • Training with SGD optimizer with momentum should have better result since it avoids from getting stuck in local minima or saddle points • The reason behind this phenomenon is complicated and beyond the scope of this class. In short, the training results will be more stable and consistent as the batch size increases
  • 23. Sigmoid + Momentum optimizer ReLU + SGD optimizer
  • 24. Outline • Neural Networks from Scratch • Why TensorFlow? • Environment Setup • TensorFlow 2 Quickstart • Dataset Preparation • Building Model via Sequential API, Functional API, and Model Subclassing • Better performance with tf.function • Customize gradient flow by tf.custom_gradient
  • 26. TensorFlow v.s. PyTorch • The two frameworks had a lot of major differences in terms of design, paradigm, syntax, etc till some time back • But they have since evolved a lot, both have picked up good features from each other and are no longer that different
  • 28. TensorFlow • Originally developed by Google Brain, TensorFlow is an end-to-end open source platform for machine learning, which has several benefits: • Easy model building • Robust ML production anywhere • Powerful experimentation for research
  • 31. Outline • Neural Networks from Scratch • Why TensorFlow? • Environment Setup • TensorFlow 2 Quickstart • Dataset Preparation • Building Model via Sequential API, Functional API, and Model Subclassing • Better performance with tf.function • Customize gradient flow by tf.custom_gradient
  • 32. Software requirements • Before using TensorFlow, the following NVIDIA® software must be installed on your system: • NVIDIA® GPU drivers —CUDA® 11.x requires 450.xx or higher • CUDA® Toolkit —TensorFlow supports CUDA® 11.0 (TensorFlow >= 2.4.0) • CUPTI ships with the CUDA® Toolkit • cuDNN SDK 8.9.5 (see cuDNN versions) • (Optional) TensorRT 8.0 to improve latency and throughput for inference on some models
  • 34. Install CUDA • Please refer to TensorFlow website, GPU Support section, for more details and latest information • Please check the version of the abovementioned softwares carefully. There is a strict requirement between TensorFlow's version and NVIDIA® softwares’ • (Optional) If you are using Anaconda environment, you can install corresponding CUDA Toolkit and cuDNN SDK via • Notice that you still have to install NVIDIA® GPU drivers manually
  • 35. Environment Setup • After installing CUDA Toolkit, you can check CUDA version with nvcc --version
  • 36. Environment Setup • You can also check GPU utilization after installing GPU driver with nvidia-smi
  • 37. Install TensorFlow 2 • TensorFlow is tested and supported on the following 64-bit systems: • Python 3.5–3.8 • Ubuntu 16.04 or later • macOS 10.12.6 (Sierra) or later (no GPU support) • Windows 7 or later • Raspbian 9.0 or later
  • 38. Install TensorFlow 2 • We can simply install TensorFlow with Python's pip package manager • It is recommanded to install TensorFlow in a virtual environment, for more details, please refer to Install TensorFlow with pip
  • 39. Install TensorFlow 2 • We can test whether TensorFlow is installed successfully and confirm that TensorFlow is using the GPU by executing following code
  • 40. Google Colab • Google Colab provides a Jupyter notebook environment that requires no setup with free GPU • The types of GPUs available in Colab vary over time, including Nvidia K80, T4, P4, P100 • There is no way to choose what type of GPU you can connect to in Colab at any given time • However, there are few constraints when using Google Colab: • 12 hours lifetimes limit • Various available GPU memory • Google announced a new service called Colab Pro ($9.99/month), which provides faster GPUs, longer runtimes, and more memory compared with Colab
  • 41. Outline • Neural Networks from Scratch • Why TensorFlow? • Environment Setup • TensorFlow 2 Quickstart • Dataset Preparation • Building Model via Sequential API, Functional API, and Model Subclassing • Better performance with tf.function • Customize gradient flow by tf.custom_gradient
  • 42. TensorFlow 2 Quickstart • Later on you will learn how to build a simple deep neural network to classify hand-written digit numbers • This time with TensorFlow! Input Layer (Flatten) Hidden Layer, 784x64 Output Layer, 64x10
  • 43. Limit GPU Memory Growth • By default, TensorFlow maps nearly all of the GPU memory of all GPUs visible to the process • This is done to more efficiently use the relatively precious GPU memory resources on the devices by reducing memory fragmentation • To limit a specific set of GPUs and to allocate a subset of the available memory, you can execute Restrict GPU to use Allocate subset of memory
  • 44. Outline • Neural Networks from Scratch • Why TensorFlow? • Environment Setup • TensorFlow 2 Quickstart • Dataset Preparation • Building Model via Sequential API, Functional API, and Model Subclassing • Better performance with tf.function • Customize gradient flow by tf.custom_gradient
  • 45. Dataset Preparation • Currently, tf.keras.dataset supports 7 datasets. Including: • mnist module: MNIST handwritten digits dataset. • cifar10 module: CIFAR10 small images classification dataset. • cifar100 module: CIFAR100 small images classification dataset. • fashion_mnist module: Fashion-MNIST dataset. • imdb module: IMDB sentiment classification dataset. • boston_housing module: Boston housing price regression dataset. • reuters module: Reuters topic classification dataset.
  • 46. Outline • Neural Networks from Scratch • Why TensorFlow? • Environment Setup • TensorFlow 2 Quickstart • Dataset Preparation • Building Model via Sequential API, Functional API, and Model Subclassing • Better performance with tf.function • Customize gradient flow by tf.custom_gradient
  • 47. Build model via Sequential API • A Sequential API is the simplest way to build a model, which is appropriate for a plain stack of layers where each layer has exactly one input tensor and one output tensor
  • 48. Build model via Sequential API • To classify MNIST, let’s build a simple neural network with fully-connected layers • Build the tf.keras.Sequential model by stacking layers. Choose an optimizer and loss function for training: Model architecture Loss function Optimizer
  • 49. Build model via Sequential API • The Model.summary method prints a string summary of the network, which is quite useful to examining model architecture before training = 784*128 + 128 = 128*10 + 10
  • 50. Build model via Sequential API • The Model.fit method adjusts the model parameters to minimize the loss: • The Model.evaluate method checks the models performance, usually on a "Validation-set" or "Test-set"
  • 51. Build model via Functional API • The Keras Functional API is a way to create models that are more flexible than Sequential API • The functional API can handle models with non-linear topology, shared layers, and even multiple inputs or outputs
  • 52. Build model via Functional API • The main idea is that a deep learning model is usually a directed acyclic graph (DAG) of layers. So the functional API is a way to build graphs of layers • Consider the following model:
  • 53. Build model via Functional API • Building model using the functional API by creating an input node first: • You create a new node in the graph of layers by calling a layer on this inputs object. The "layer call" action is like drawing an arrow from "inputs" to this layer you created
  • 54. Build model via Functional API • At this point, you can create a Model by specifying its inputs and outputs in the graph of layers: = 784*128 + 128 = 128*10 + 10
  • 55. Build model via Model Subclassing • Model subclassing is fully-customizable and enables you to implement your own custom forward-pass of the model • However, this flexibility and customization comes at a cost — model subclassing is way harder to utilize than the Sequential API or Functional API
  • 56. Build model via Model Subclassing • Exotic architectures or custom layer/model implementations, especially those utilized by researchers, can be extremely challenging • Researchers wish to have control over every nuance of the network and training process — and that’s exactly what model subclassing provides them
  • 57. Build model via Model Subclassing • Build the model with Keras model subclassing API: Model architecture Forward path
  • 58. Custom Training • You can always train the model with model.fit and model.evaluate, no matter which method you used to build the model • However, if you need more flexible training and evaluating process, you can implement your own methods
  • 60. Custom Training Number of epochs Running through each batch
  • 61. Custom Training • Similarly, you have to choose the loss function and optimizer as previous • Later on, to train the model, we can use tf.GradientTape to record operations for automatic differentiation Boost performance Compute predictions Compute gradients Update networks
  • 62. Gradients and Automatic Differentiation • One of the most important and powerful features of deep learning framework is automatic differentiation and gradients
  • 63. Gradients and Automatic Differentiation • As we can see in Neural Networks from Scratch, building neural networks manually requires strong knowledge of backpropagation algorithm • It is interesting as we don't have too many operations or the model architecture is relatively simple • But what if we have this model?
  • 64. Gradients and Automatic Differentiation • TensorFlow provides the tf.GradientTape API for automatic differentiation; that is, computing the gradient of a computation with respect to some inputs • In short, you can regard tape.gradient(loss, model.trainable_variable) as
  • 65. Sequential API, Functional API, and Model Subclassing Define Model Architecture Define Loss and then Train
  • 66. Sequential API, Functional API, and Model Subclassing • All models can interact with each other, whether they’re sequential models, functional models, or subclassed models Sequential Functional Subclassing Simple Flexibility 1 2 3 1 2 3
  • 67. Outline • Neural Networks from Scratch • Why TensorFlow? • Environment Setup • TensorFlow 2 Quickstart • Dataset Preparation • Building Model via Sequential API, Functional API, and Model Subclassing • Better performance with tf.function • Customize gradient flow by tf.custom_gradient
  • 68. Better Performance with tf.function • In TensorFlow 2, eager execution is turned on by default. The user interface is intuitive and flexible • But this can come at the expense of performance and deployability • You can use tf.function to make graphs out of your programs. It is a transformation tool that creates Python-independent dataflow graphs out of your Python code
  • 69. Better Performance with tf.function • Let's create two function with same operation, one runs in eager and another runs in graph mode
  • 70. Debugging • In general, debugging code is easier in eager mode than inside tf.function. You should ensure that your code executes error-free in eager mode first • Debug in eager mode, then decorate with @tf.function • Don't rely on Python side effects like object mutation or list appends • tf.function works best with TensorFlow ops; NumPy and Python calls are converted to constants
  • 71. Python Side Effects • Python side effects like printing, appending to lists, and mutating globals only happen the first time you call a function with a set of inputs • Afterwards, the traced tf.Graph is reexecuted, without executing the Python code
  • 74. Outline • Neural Networks from Scratch • Why TensorFlow? • Environment Setup • TensorFlow 2 Quickstart • Dataset Preparation • Building Model via Sequential API, Functional API, and Model Subclassing • Better performance with tf.function • Customize gradient flow by tf.custom_gradient
  • 75. Customize Gradient Flow • tf.custom_gradient is a decorator to define a function with a custom gradient • This may be useful for multiple reasons, including providing a more efficient or numerically stable gradient for a sequence of operations
  • 77. Customize Gradient Flow • The gradient expression can be analytically simplified to provide numerical stability:
  • 78. Reference • TensorFlow • 3 ways to create a Keras model with TensorFlow 2.0 • Pytorch vs Tensorflow in 2020