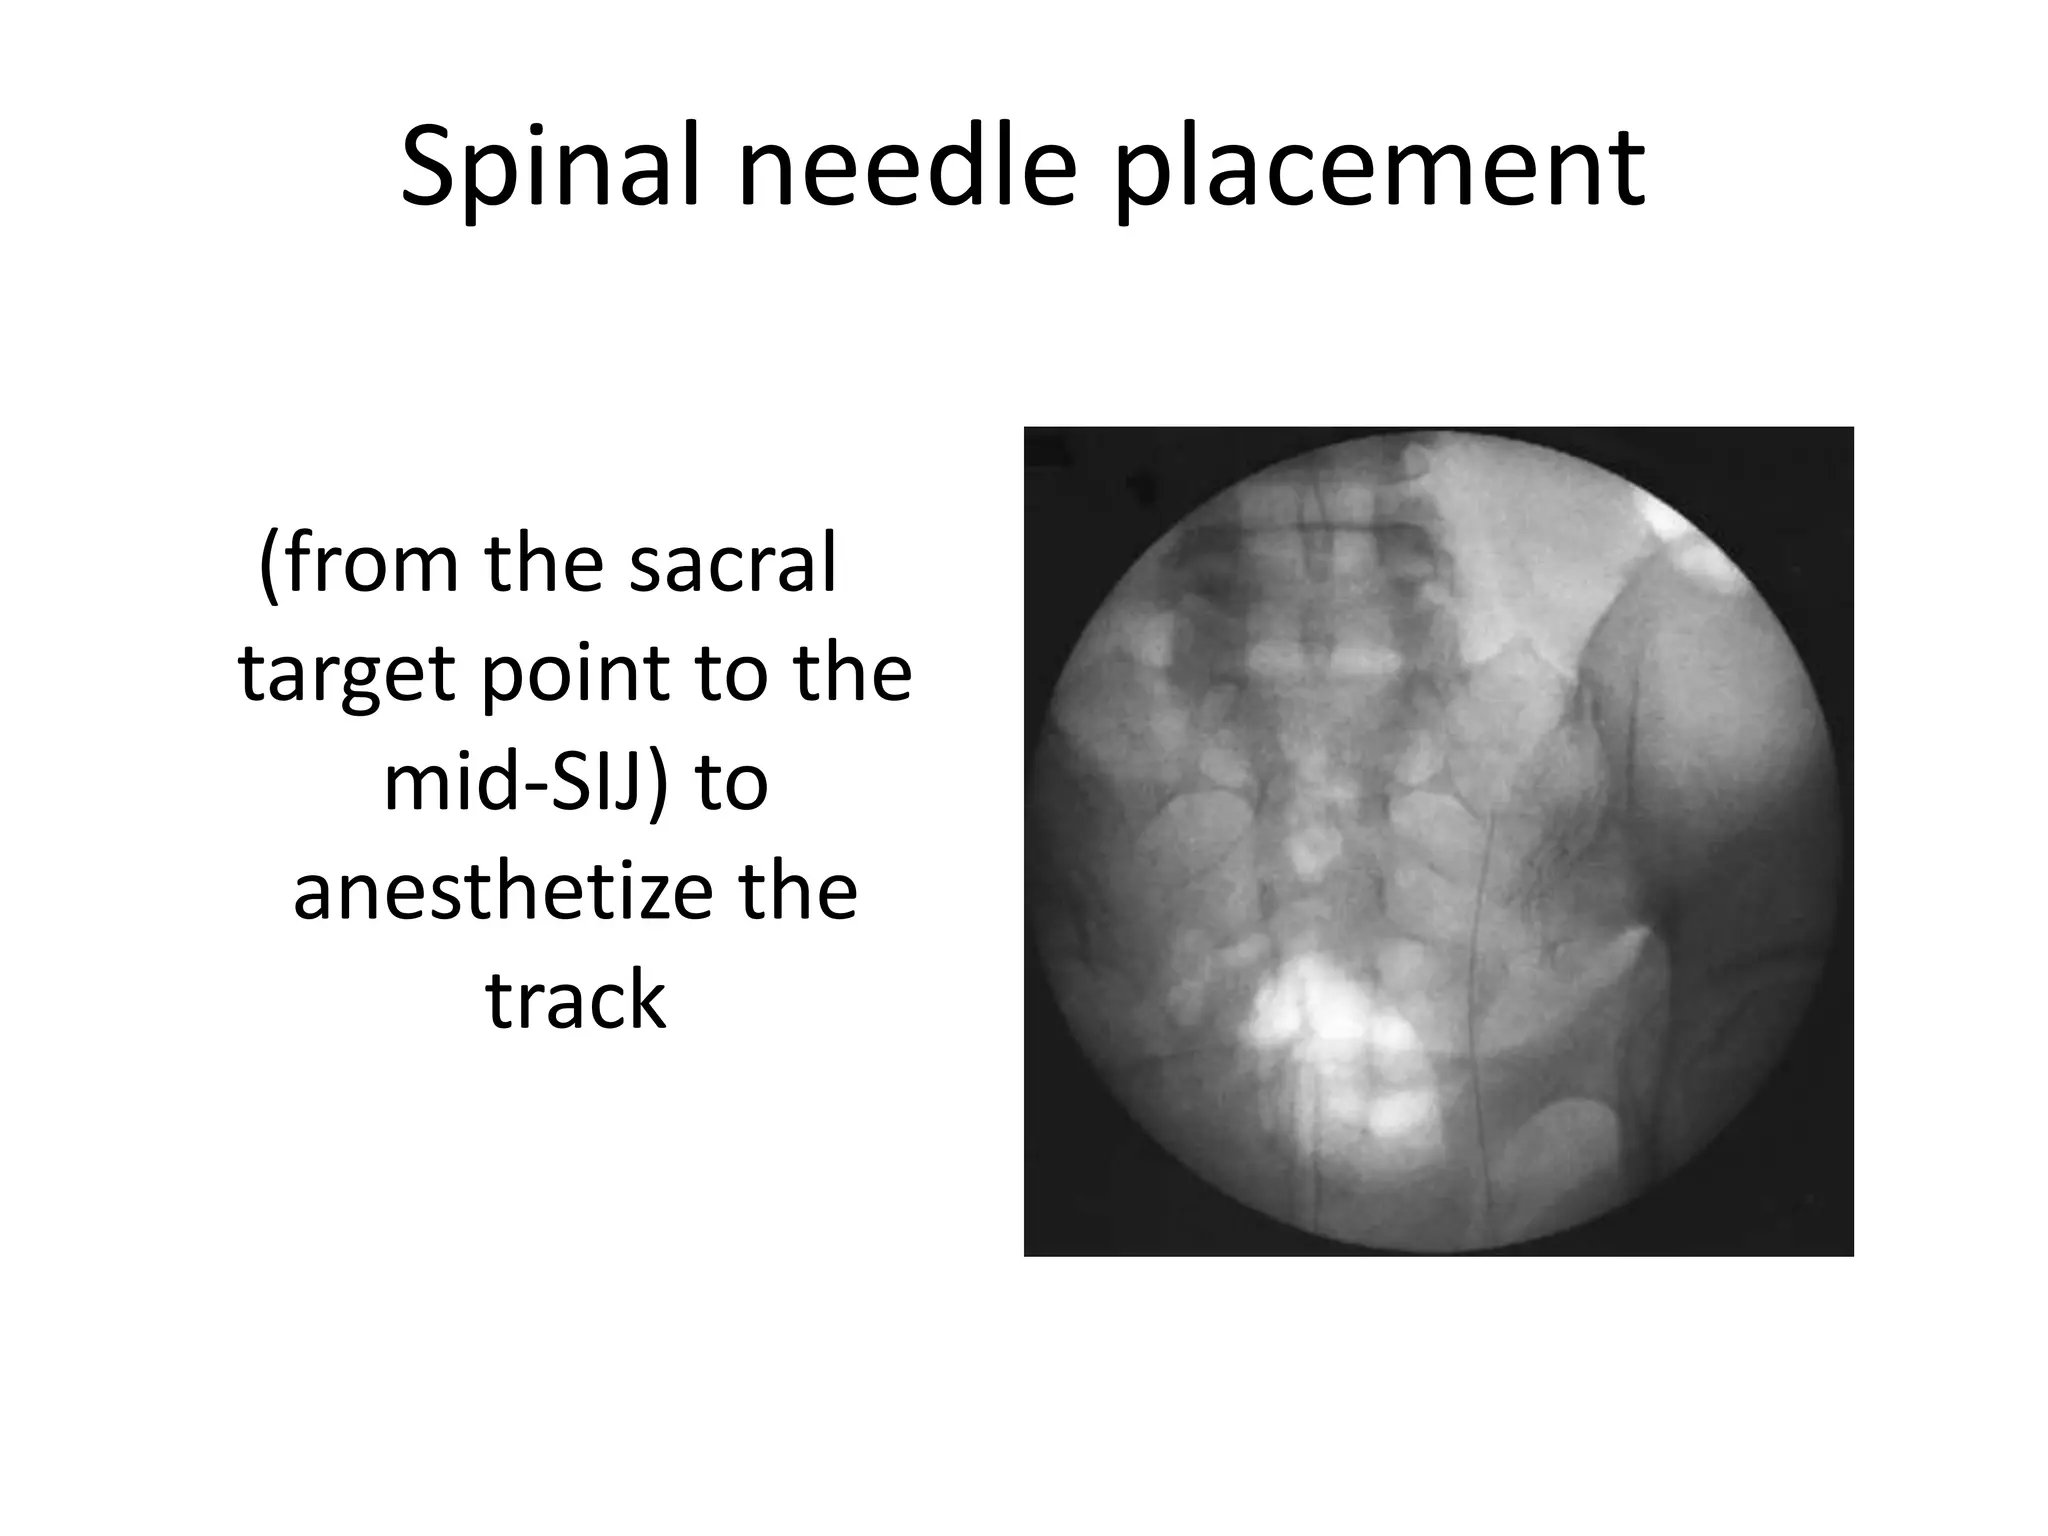
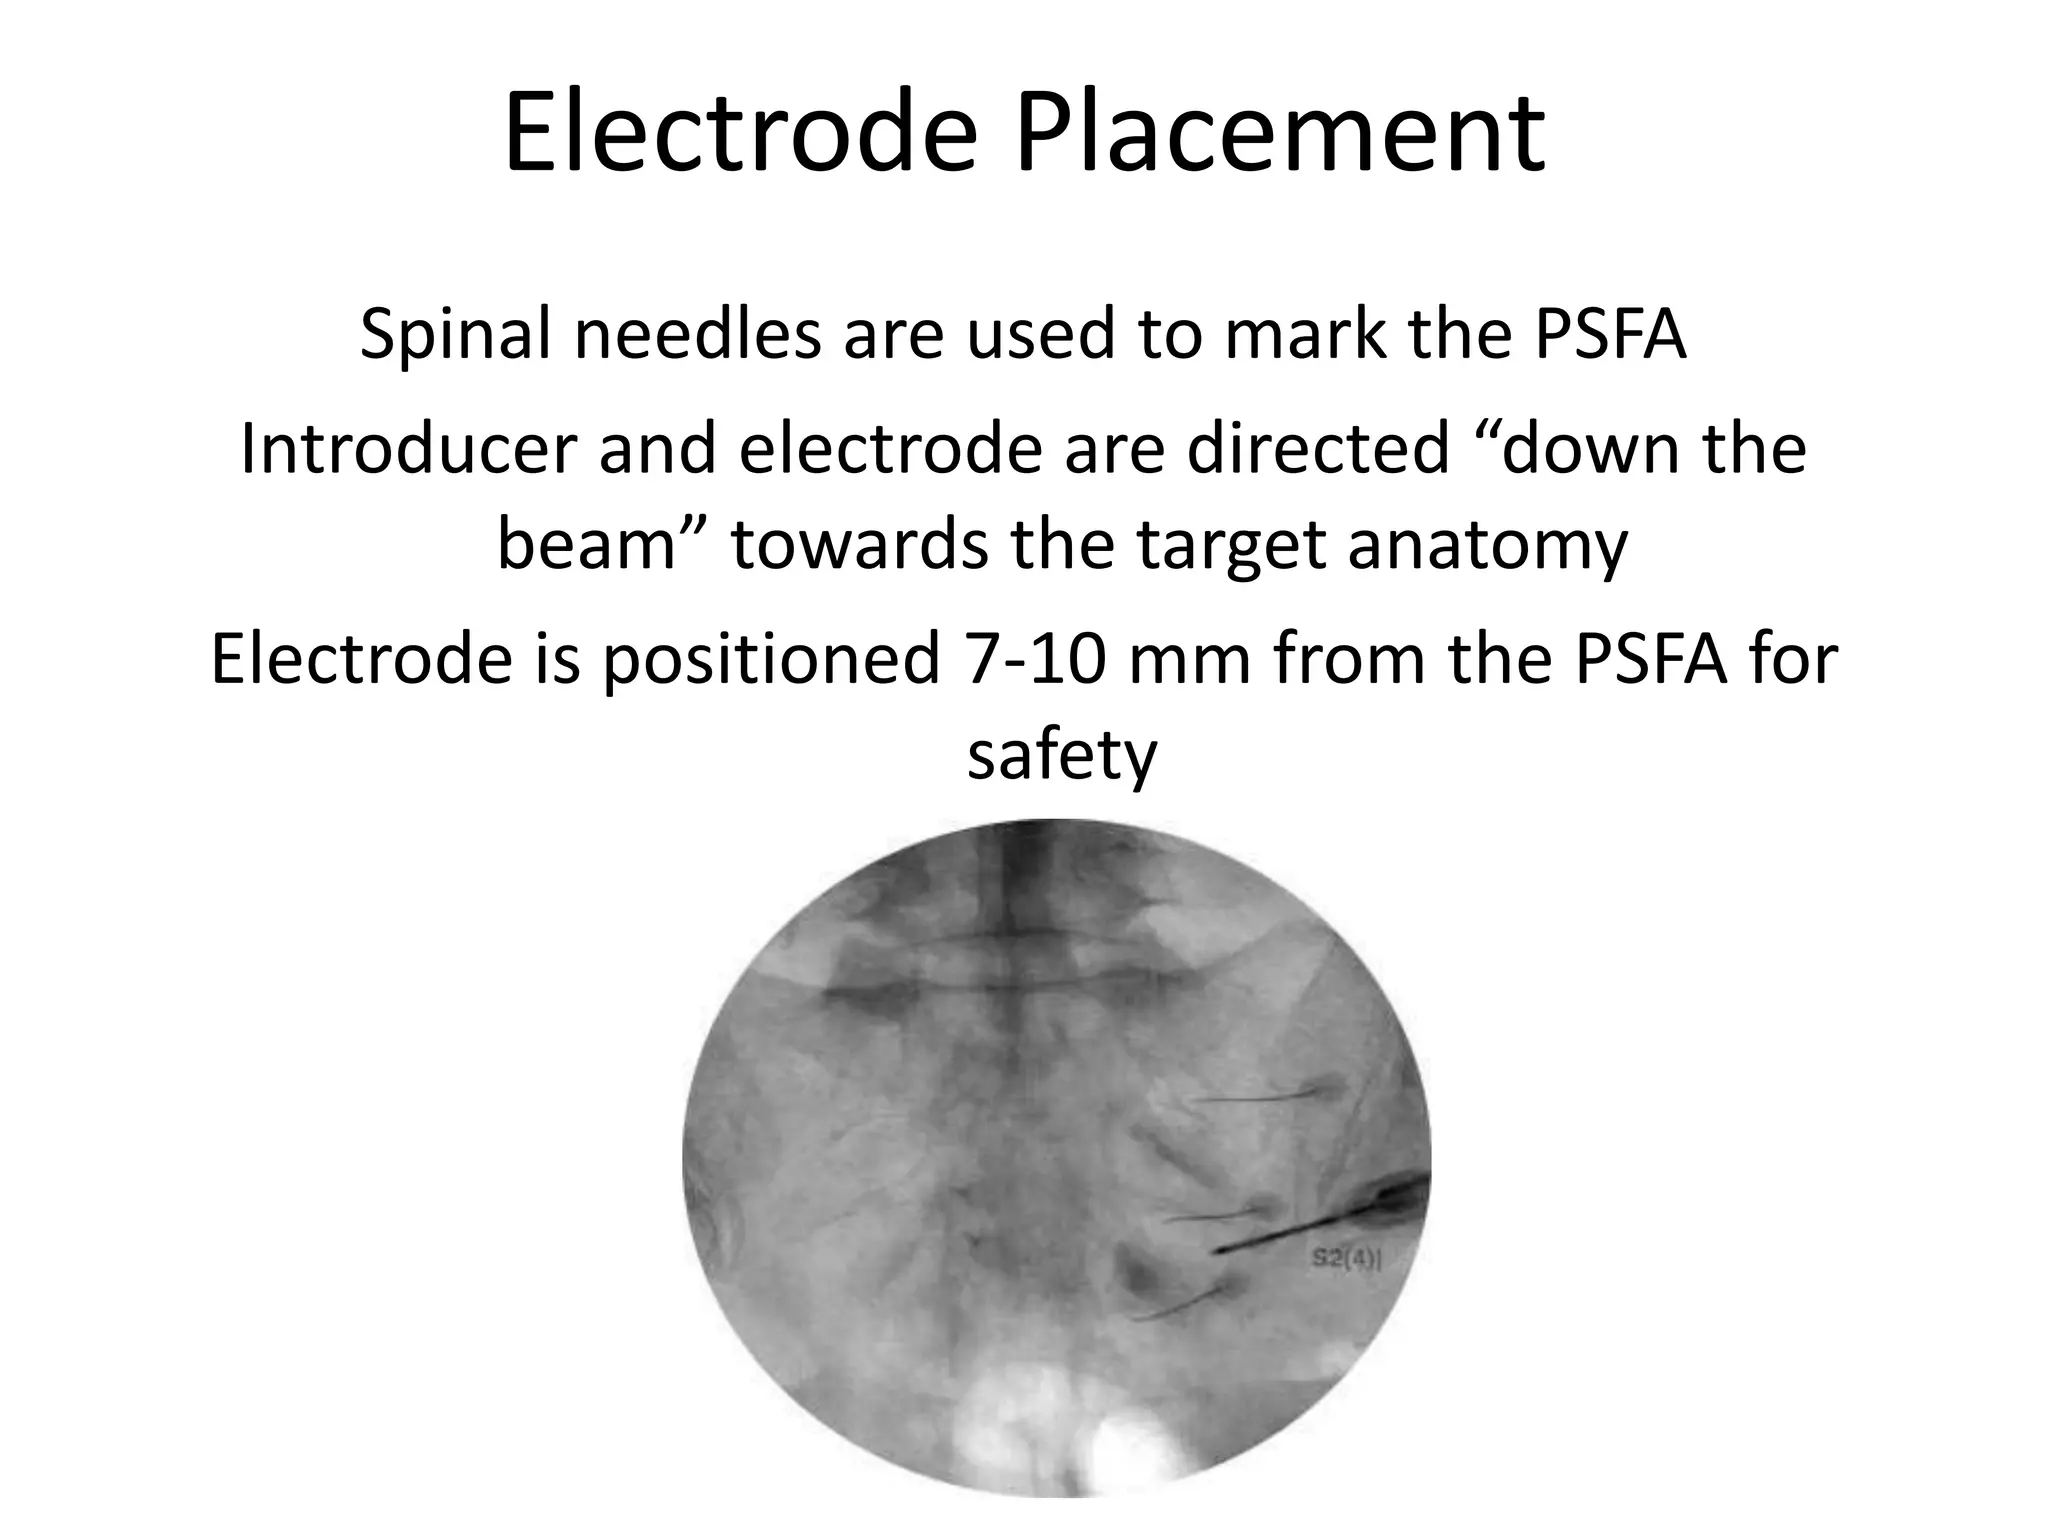
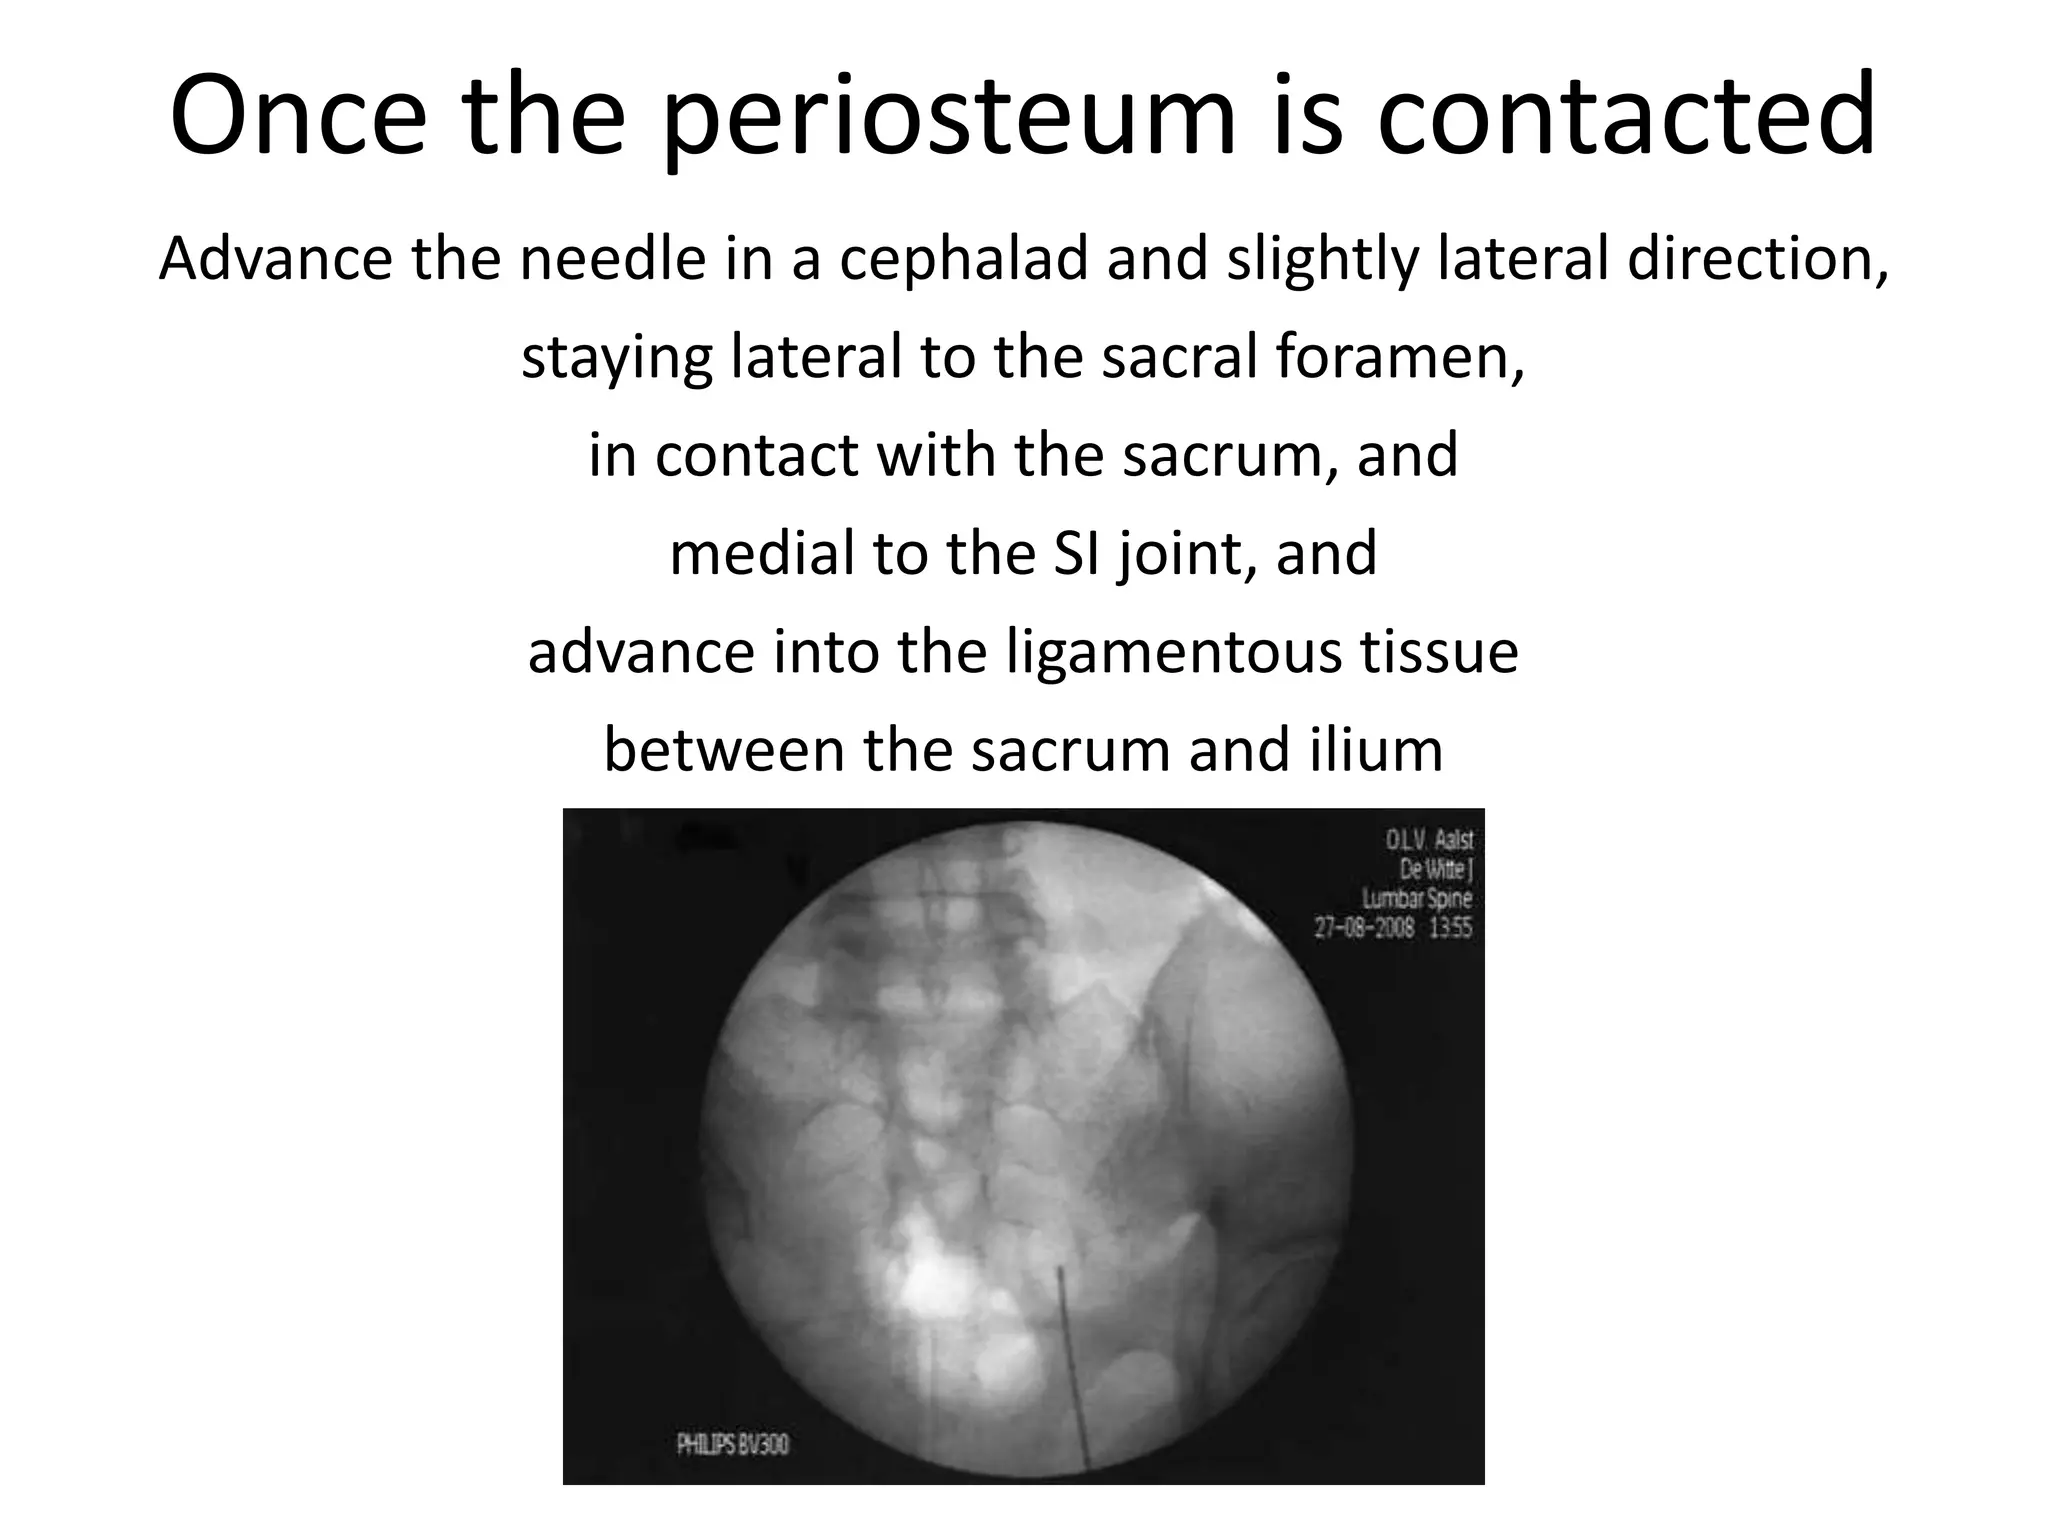
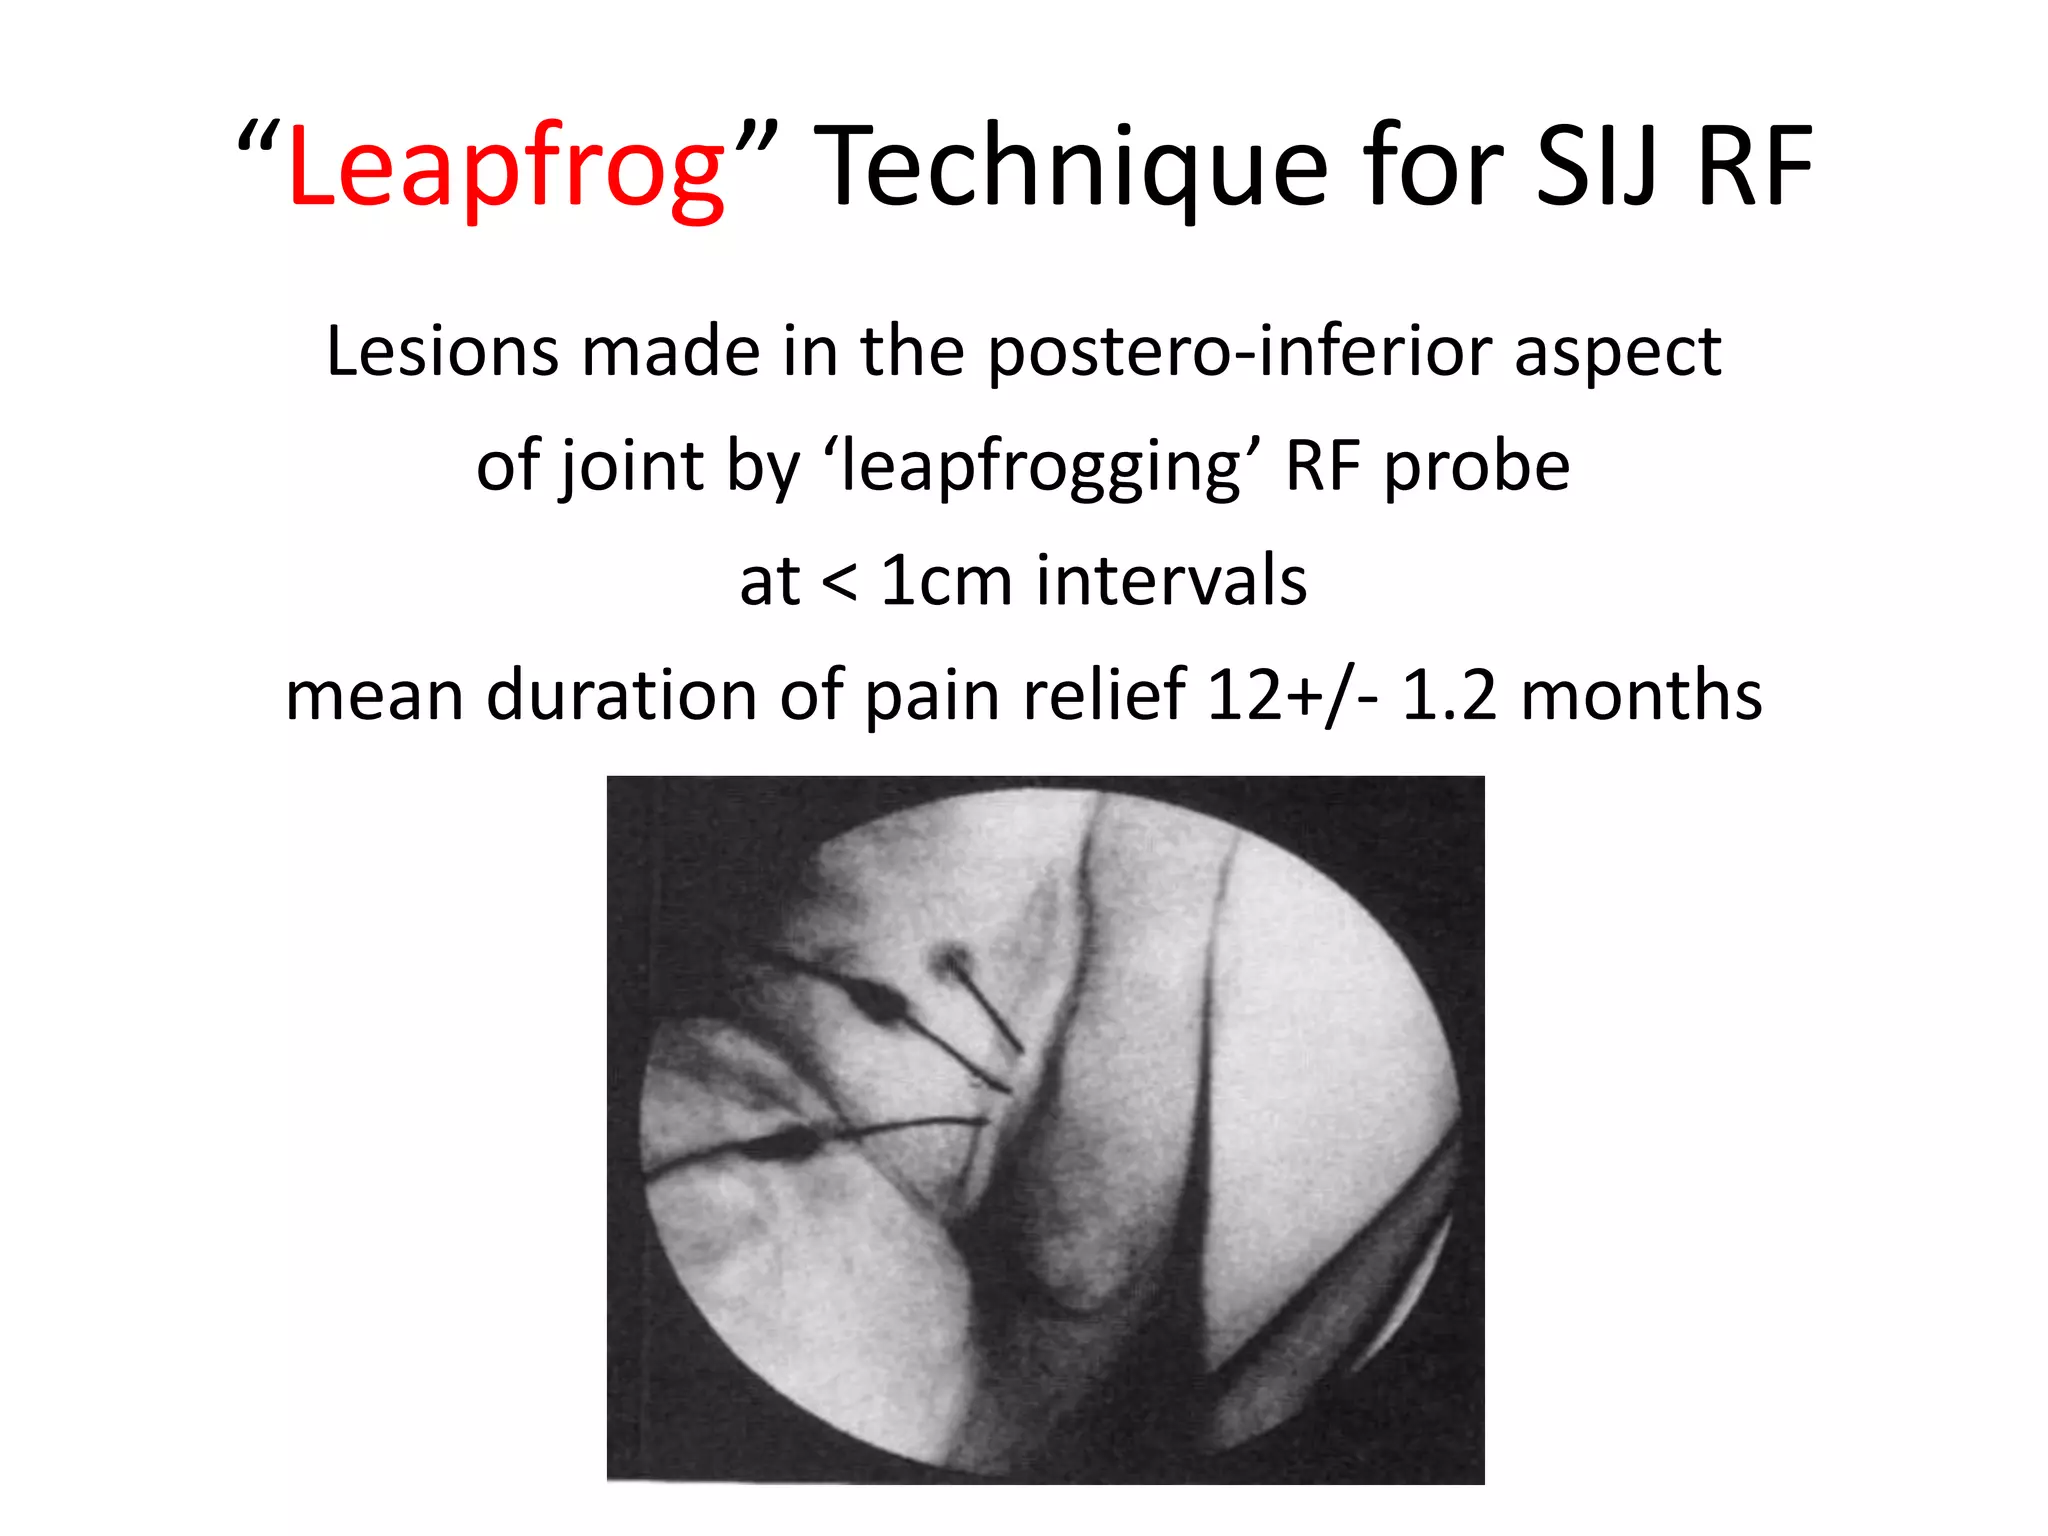
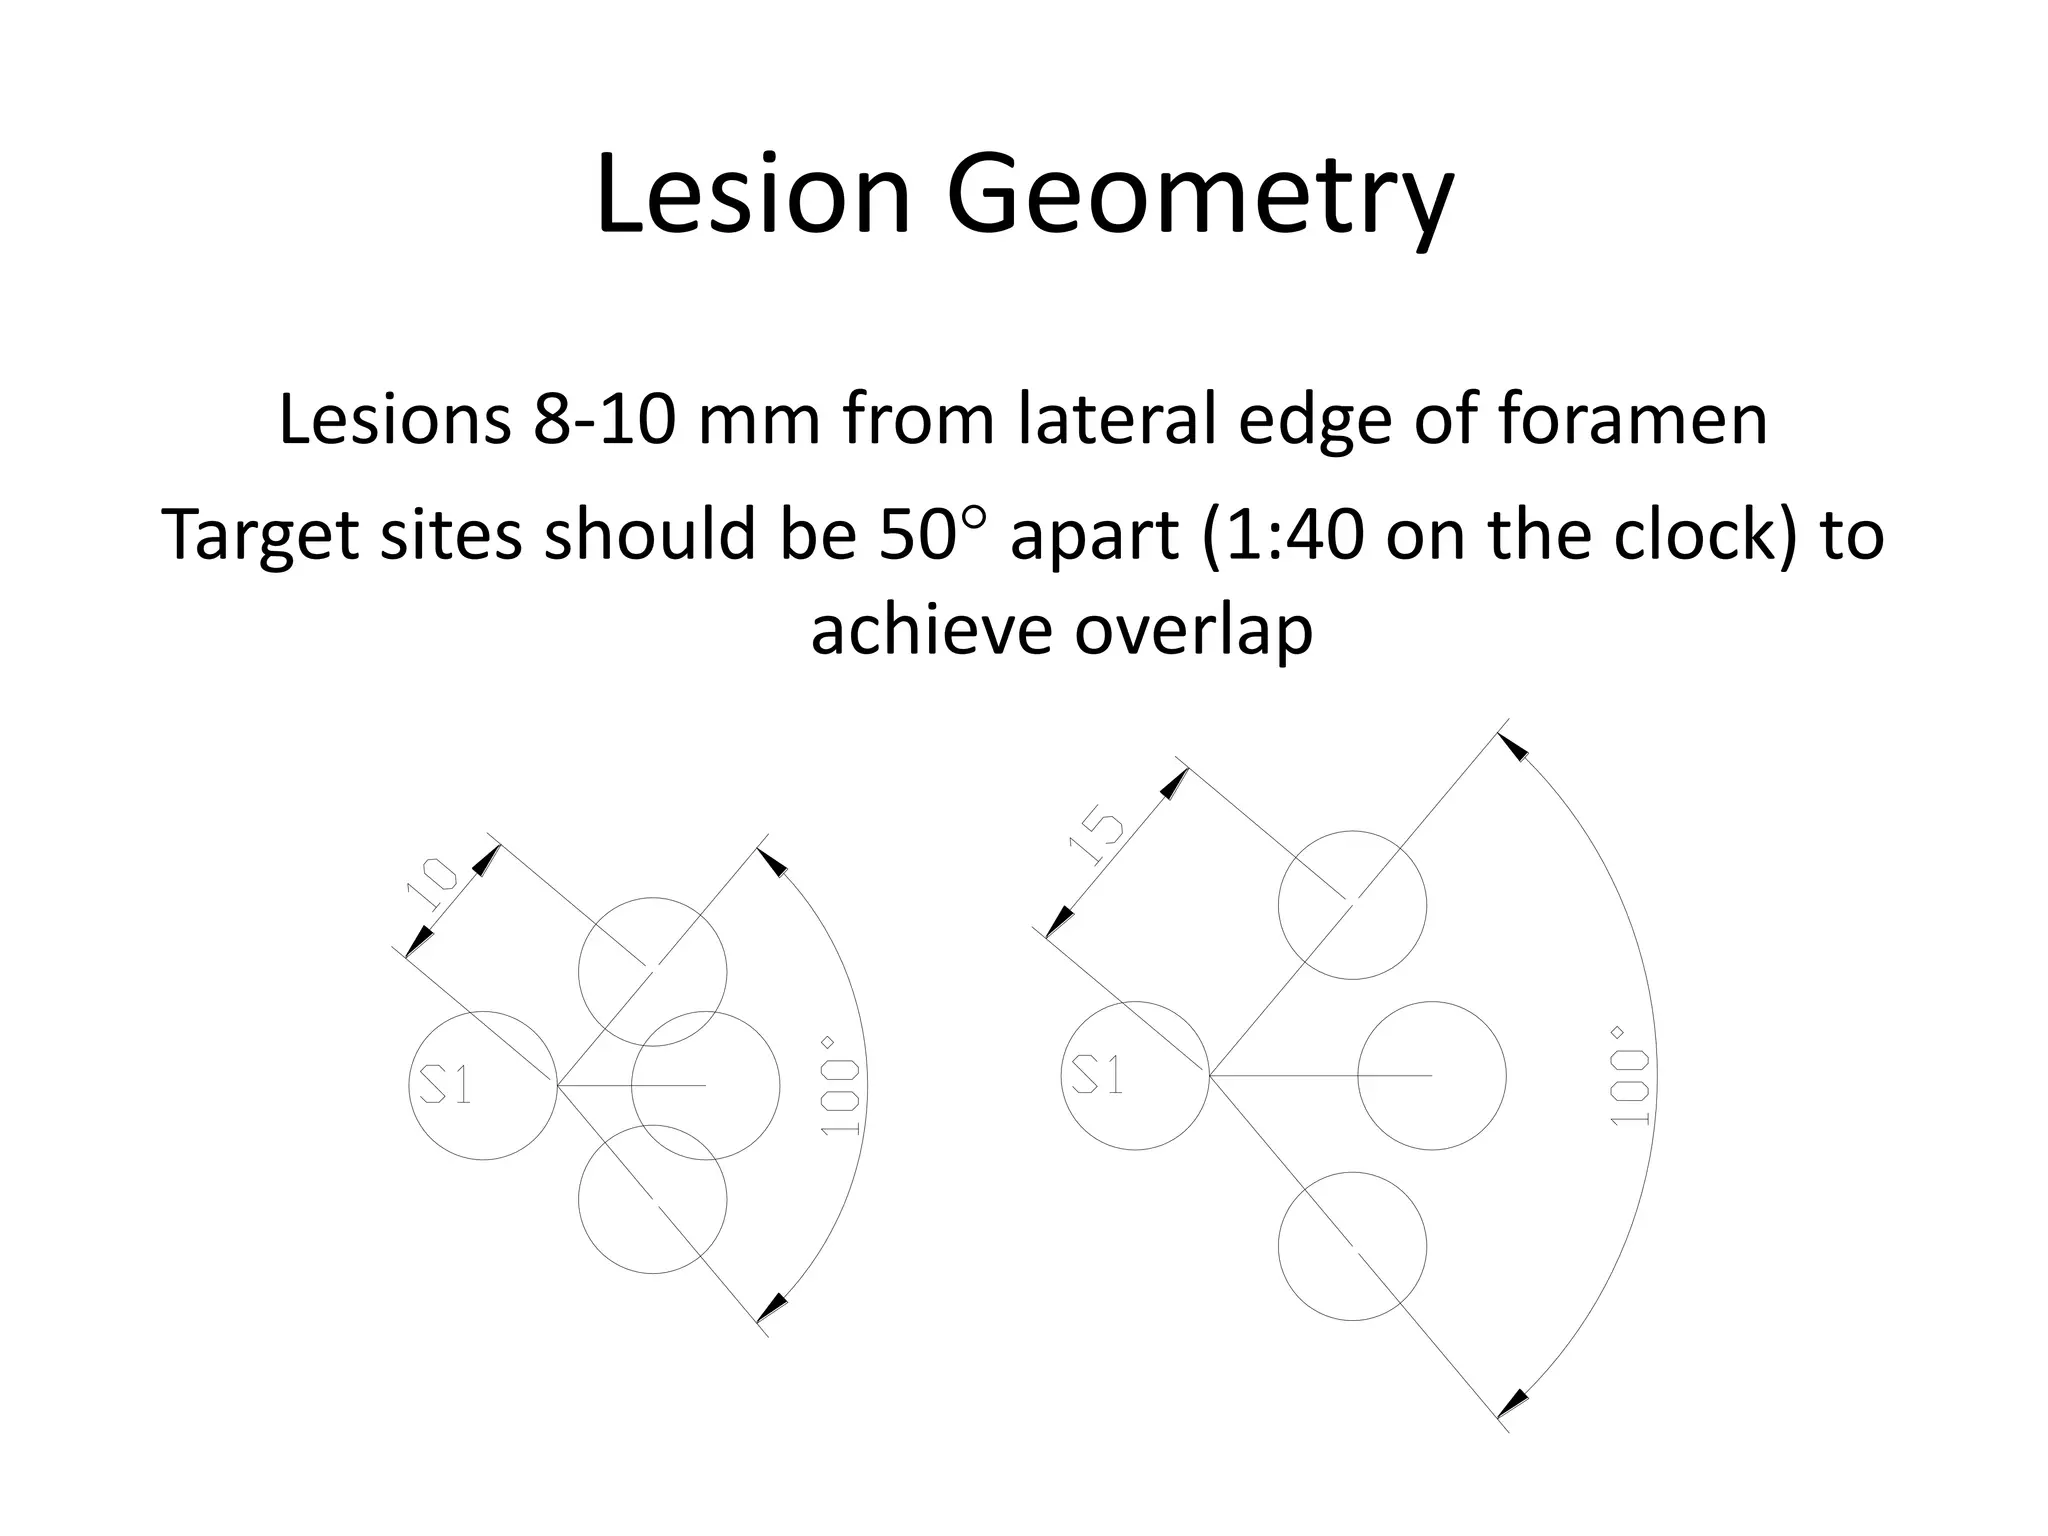
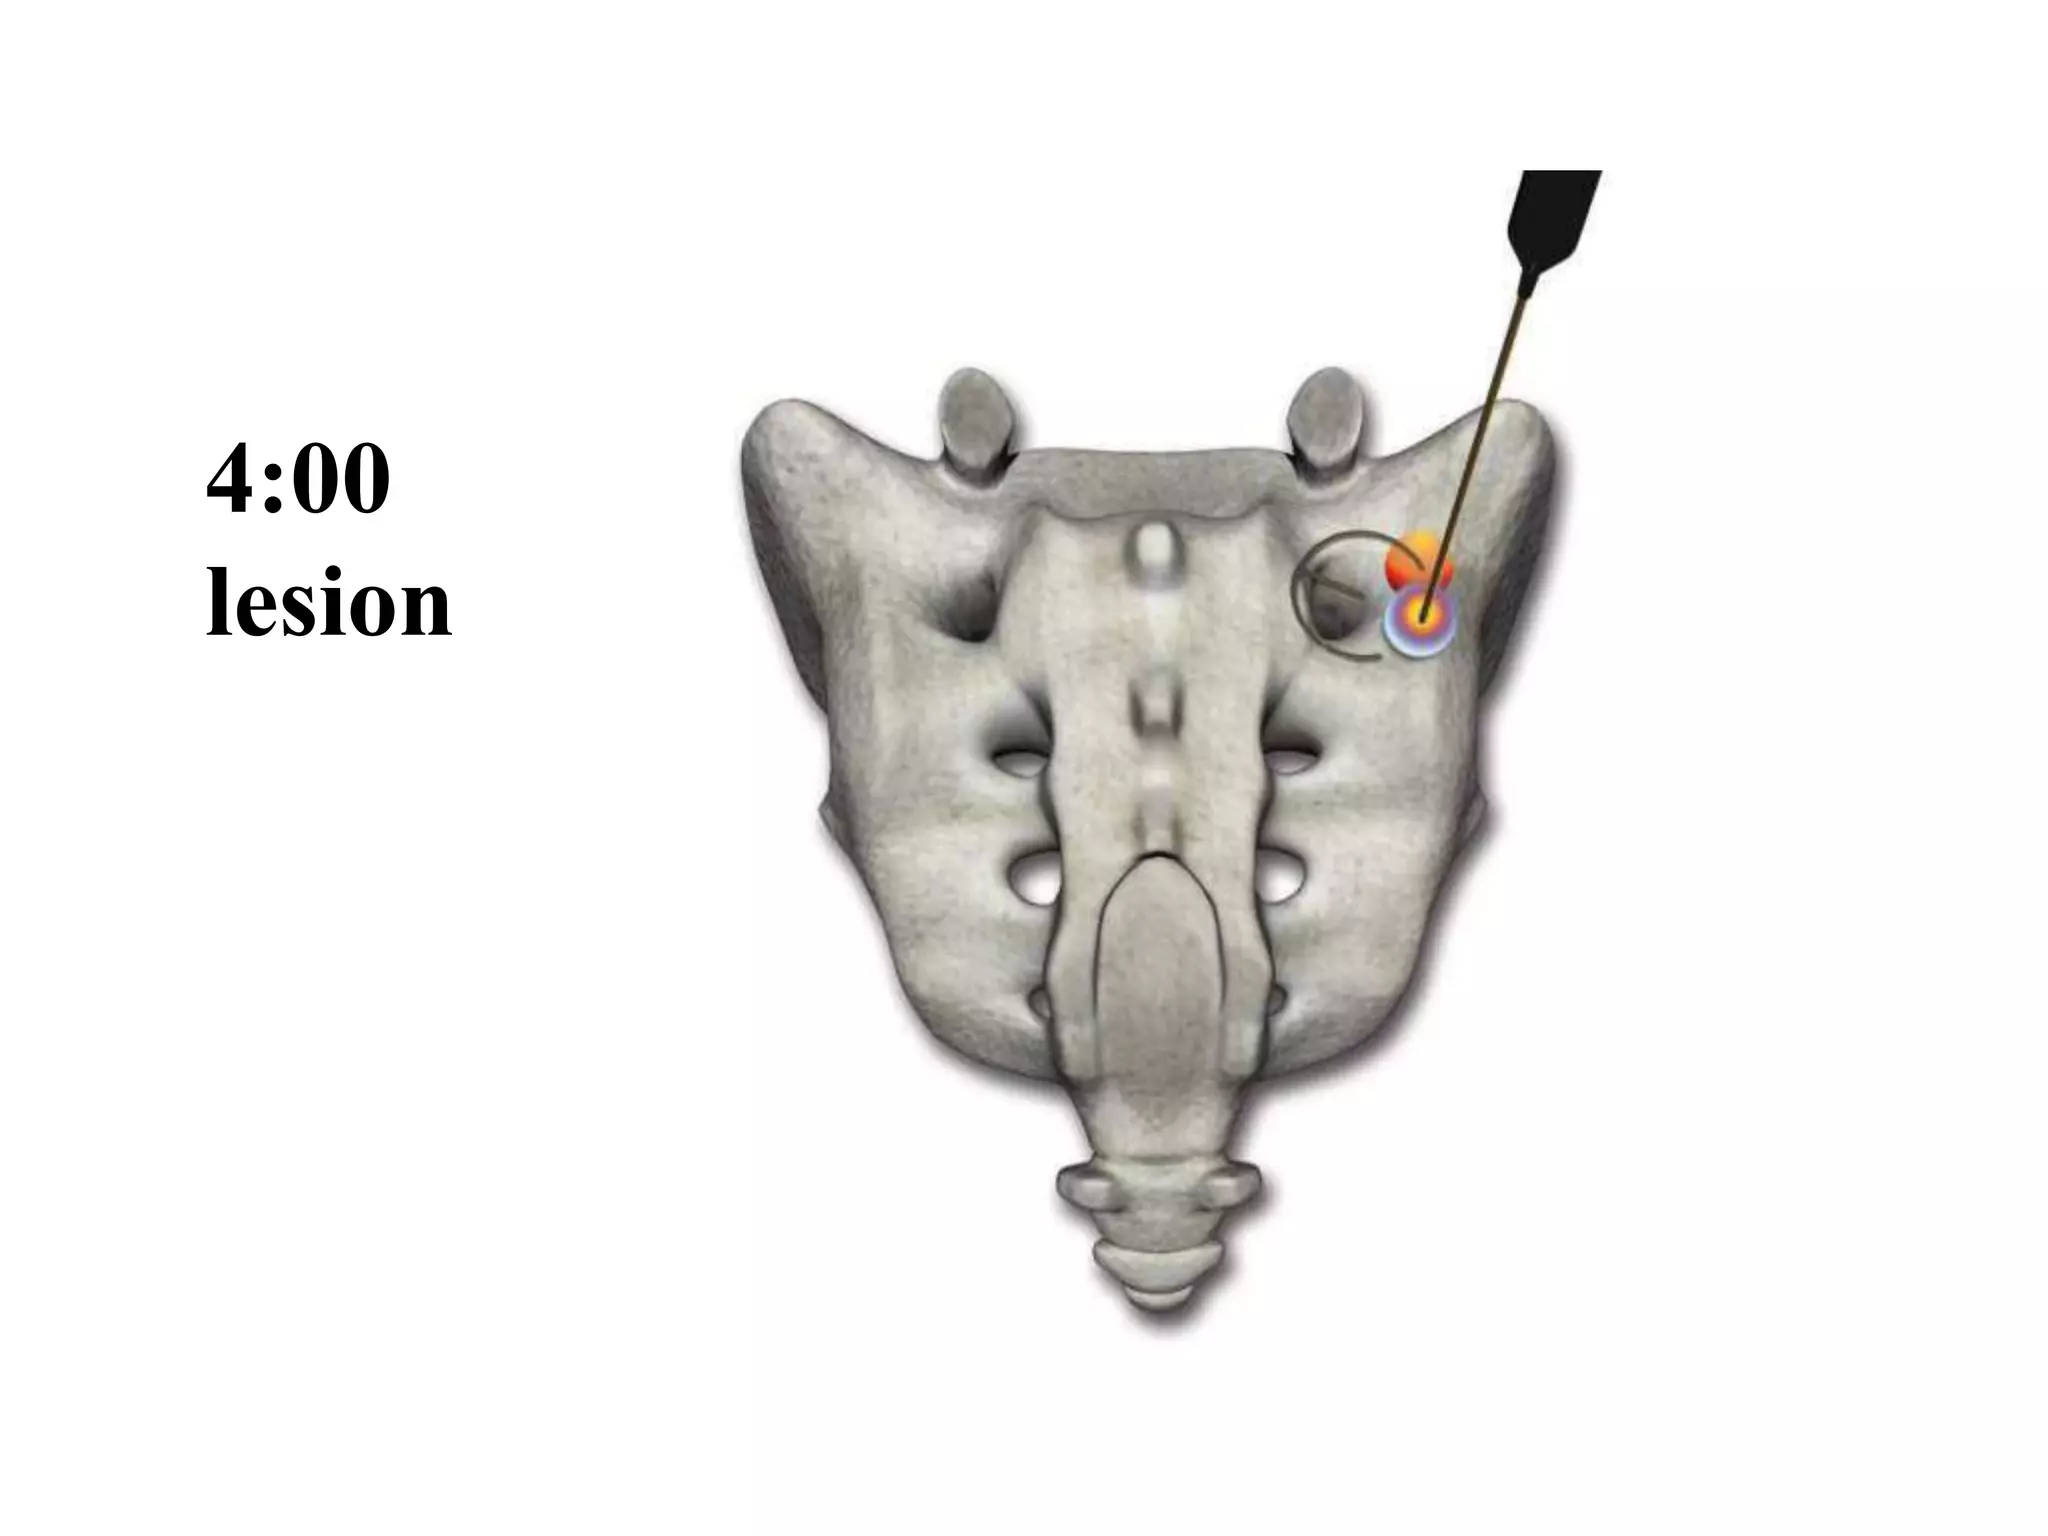
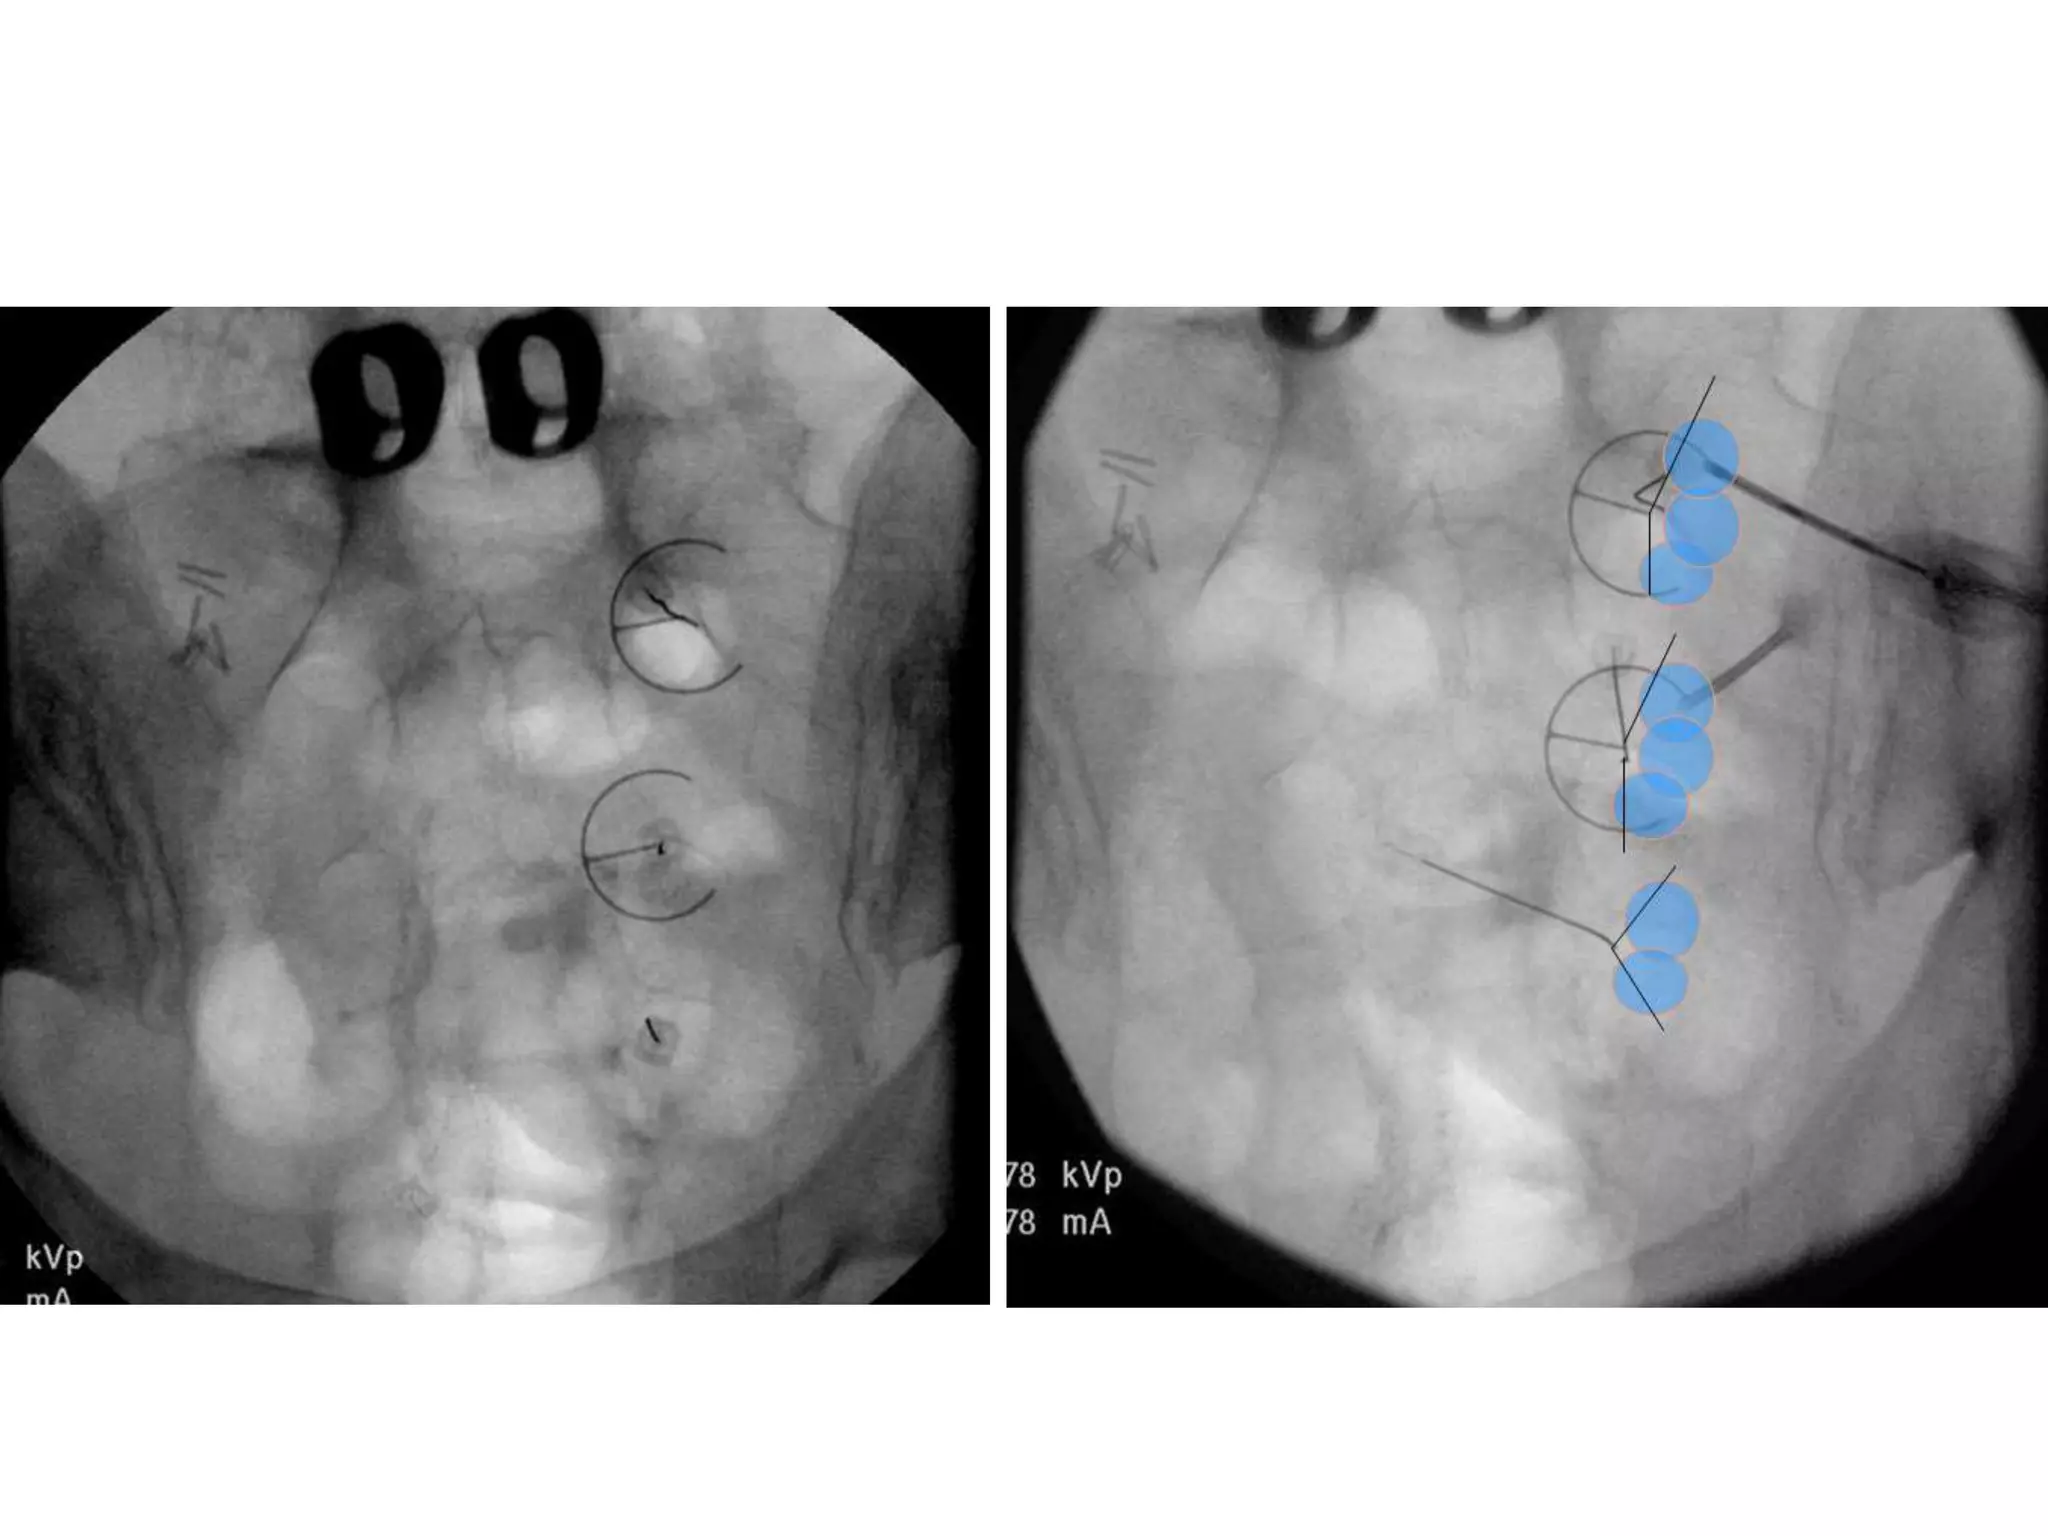
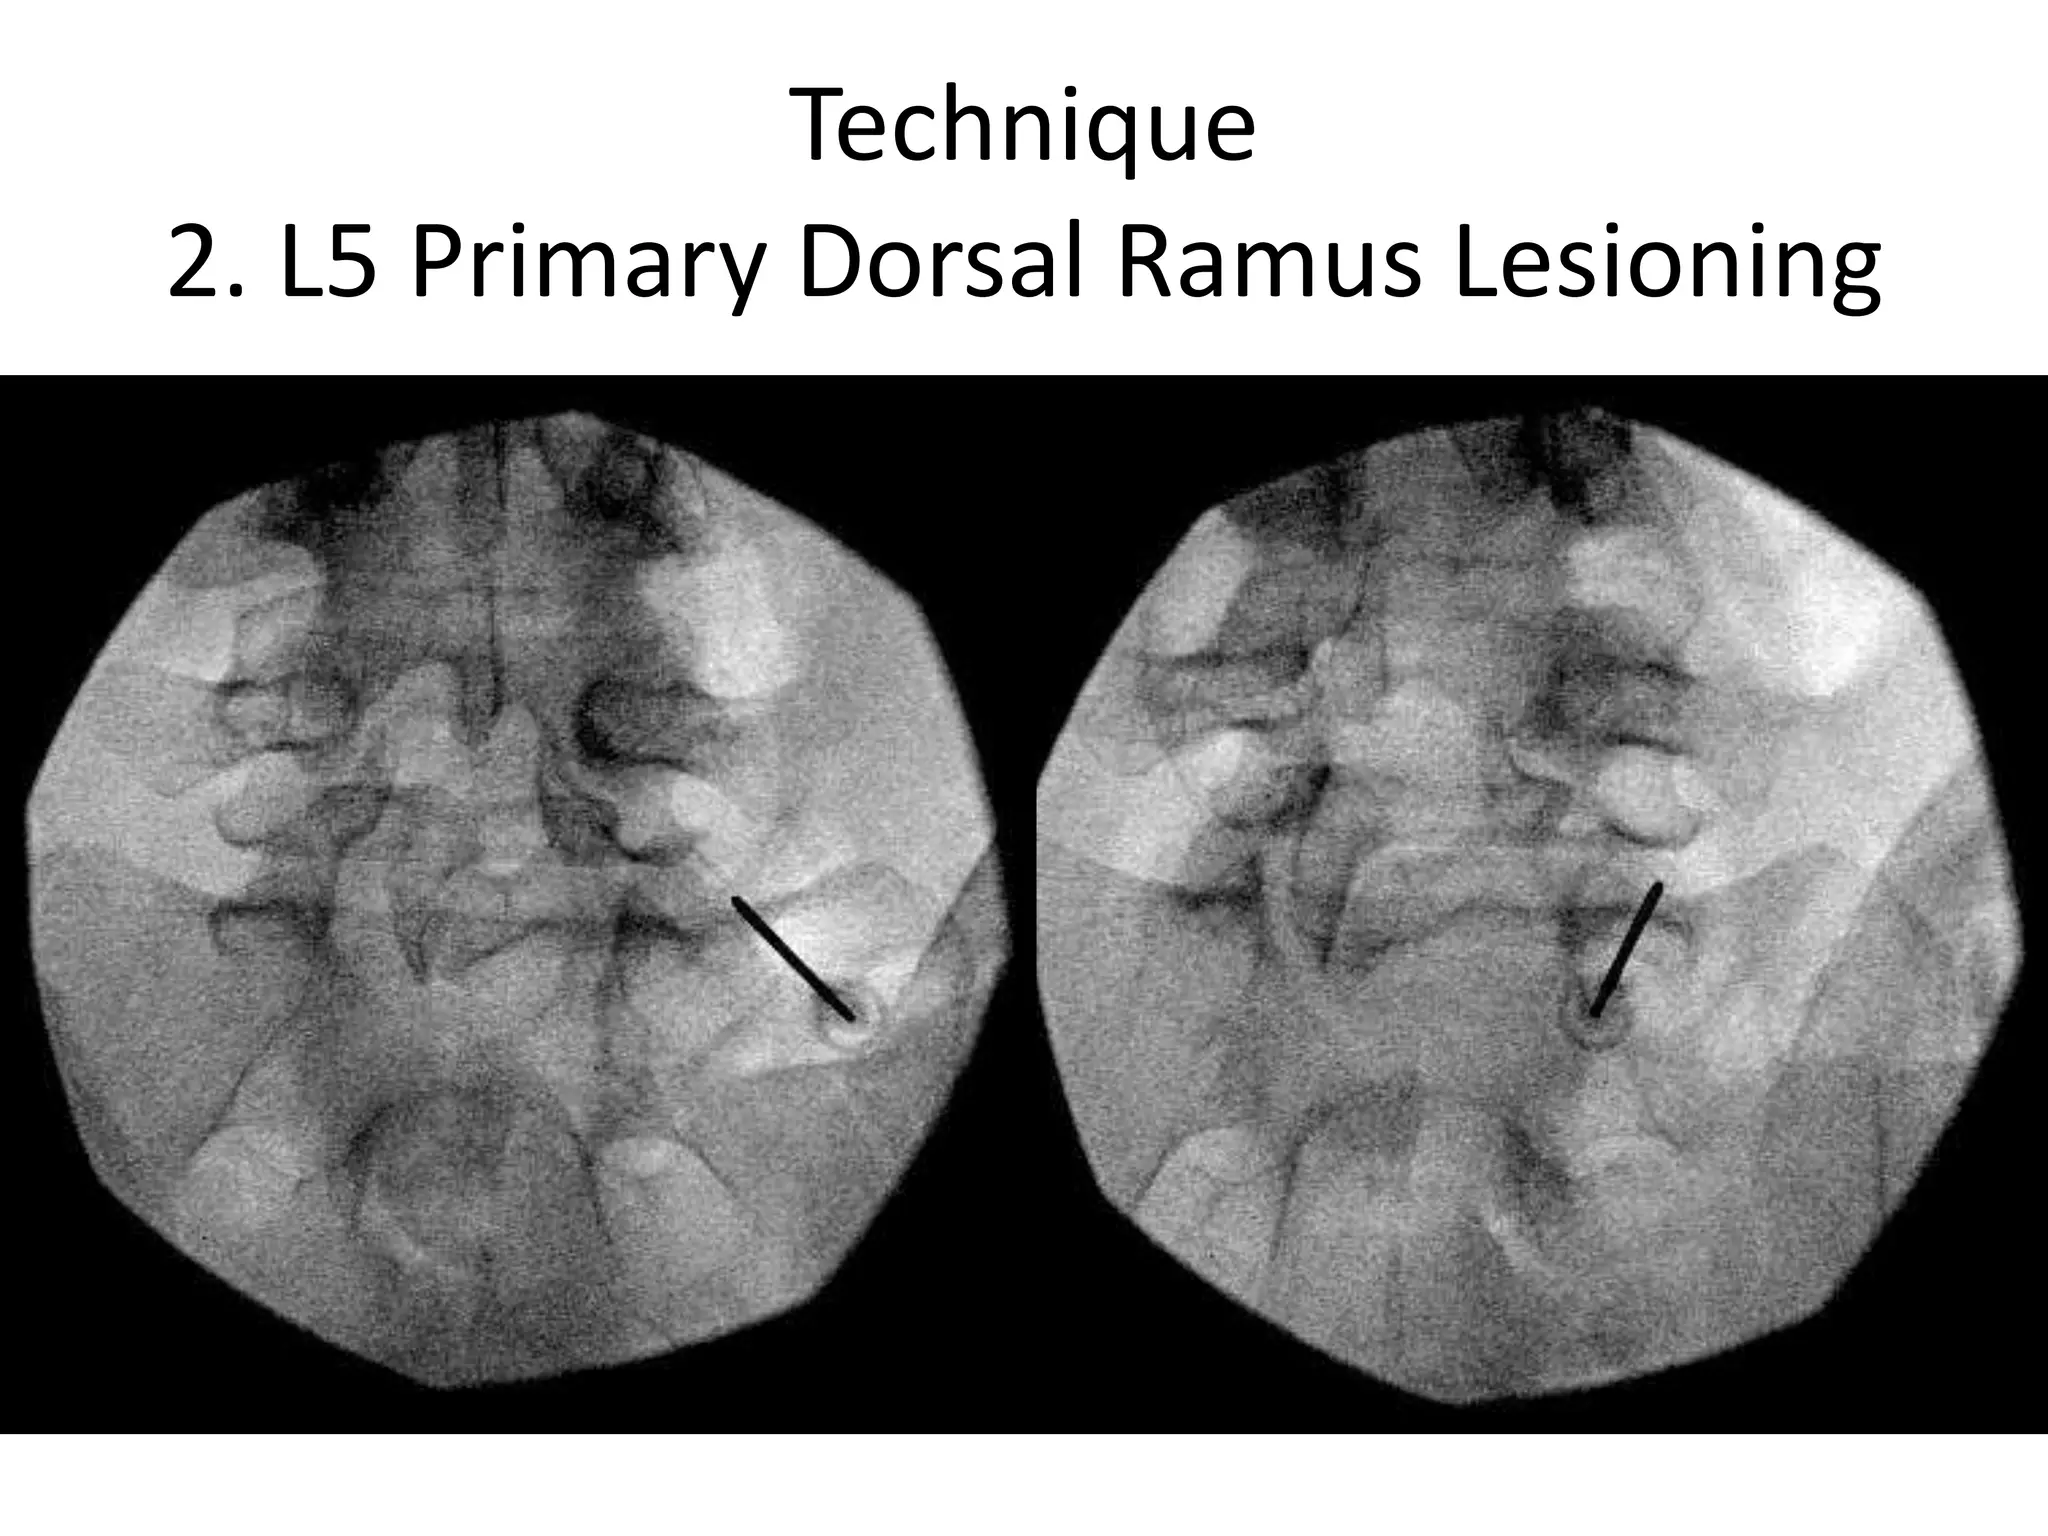
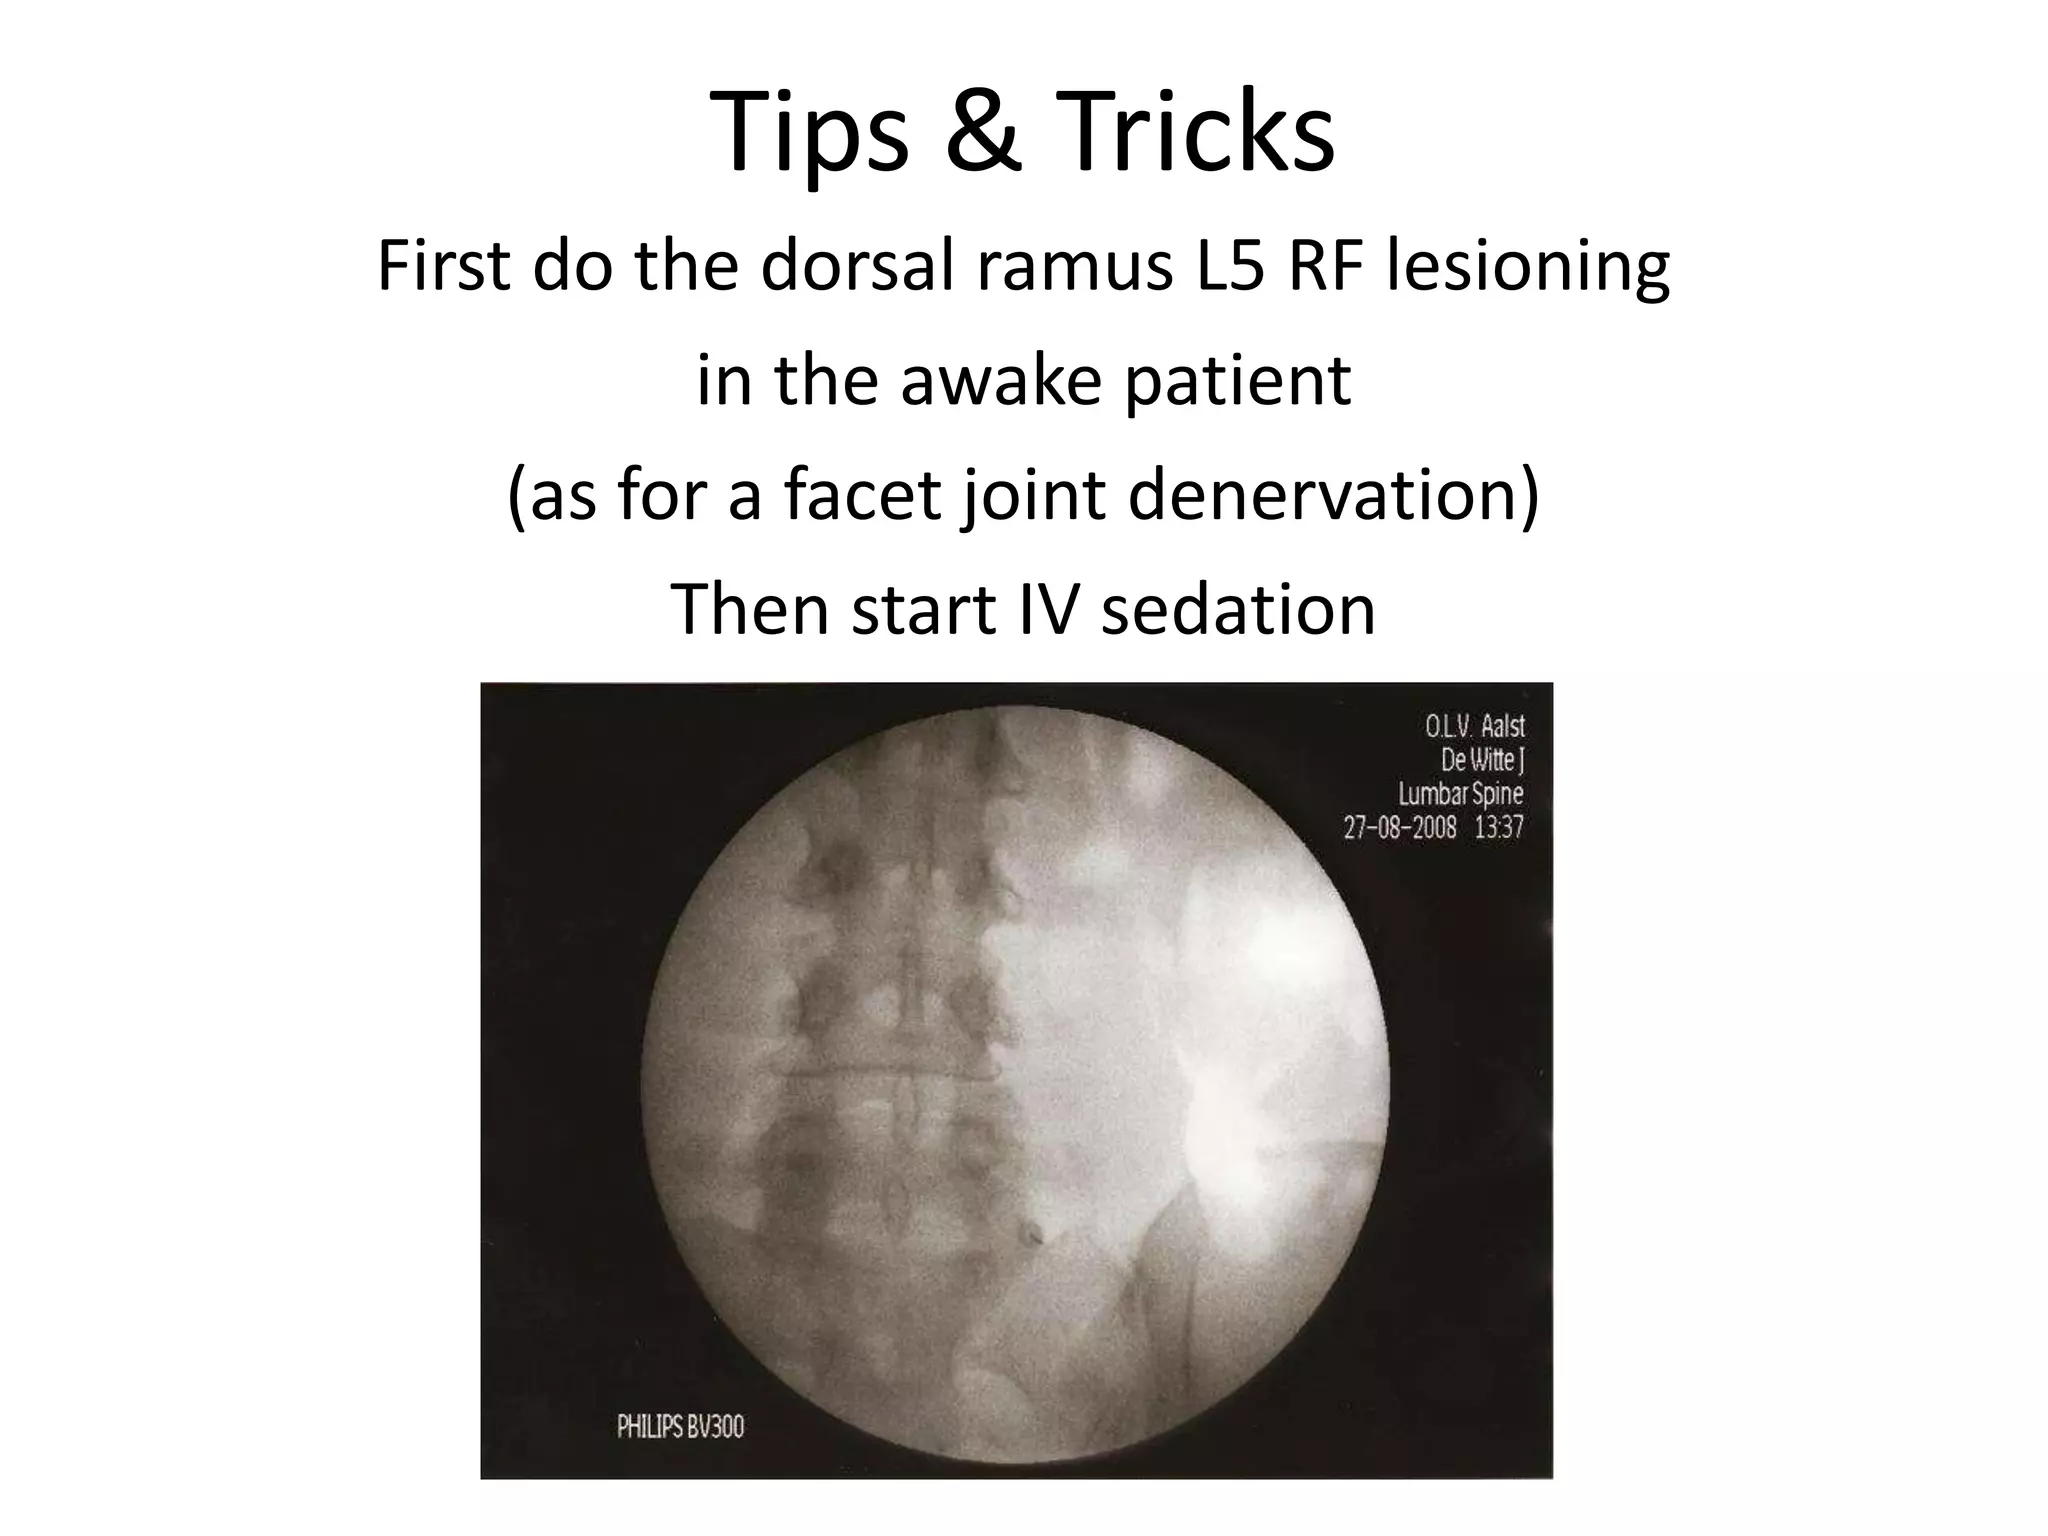
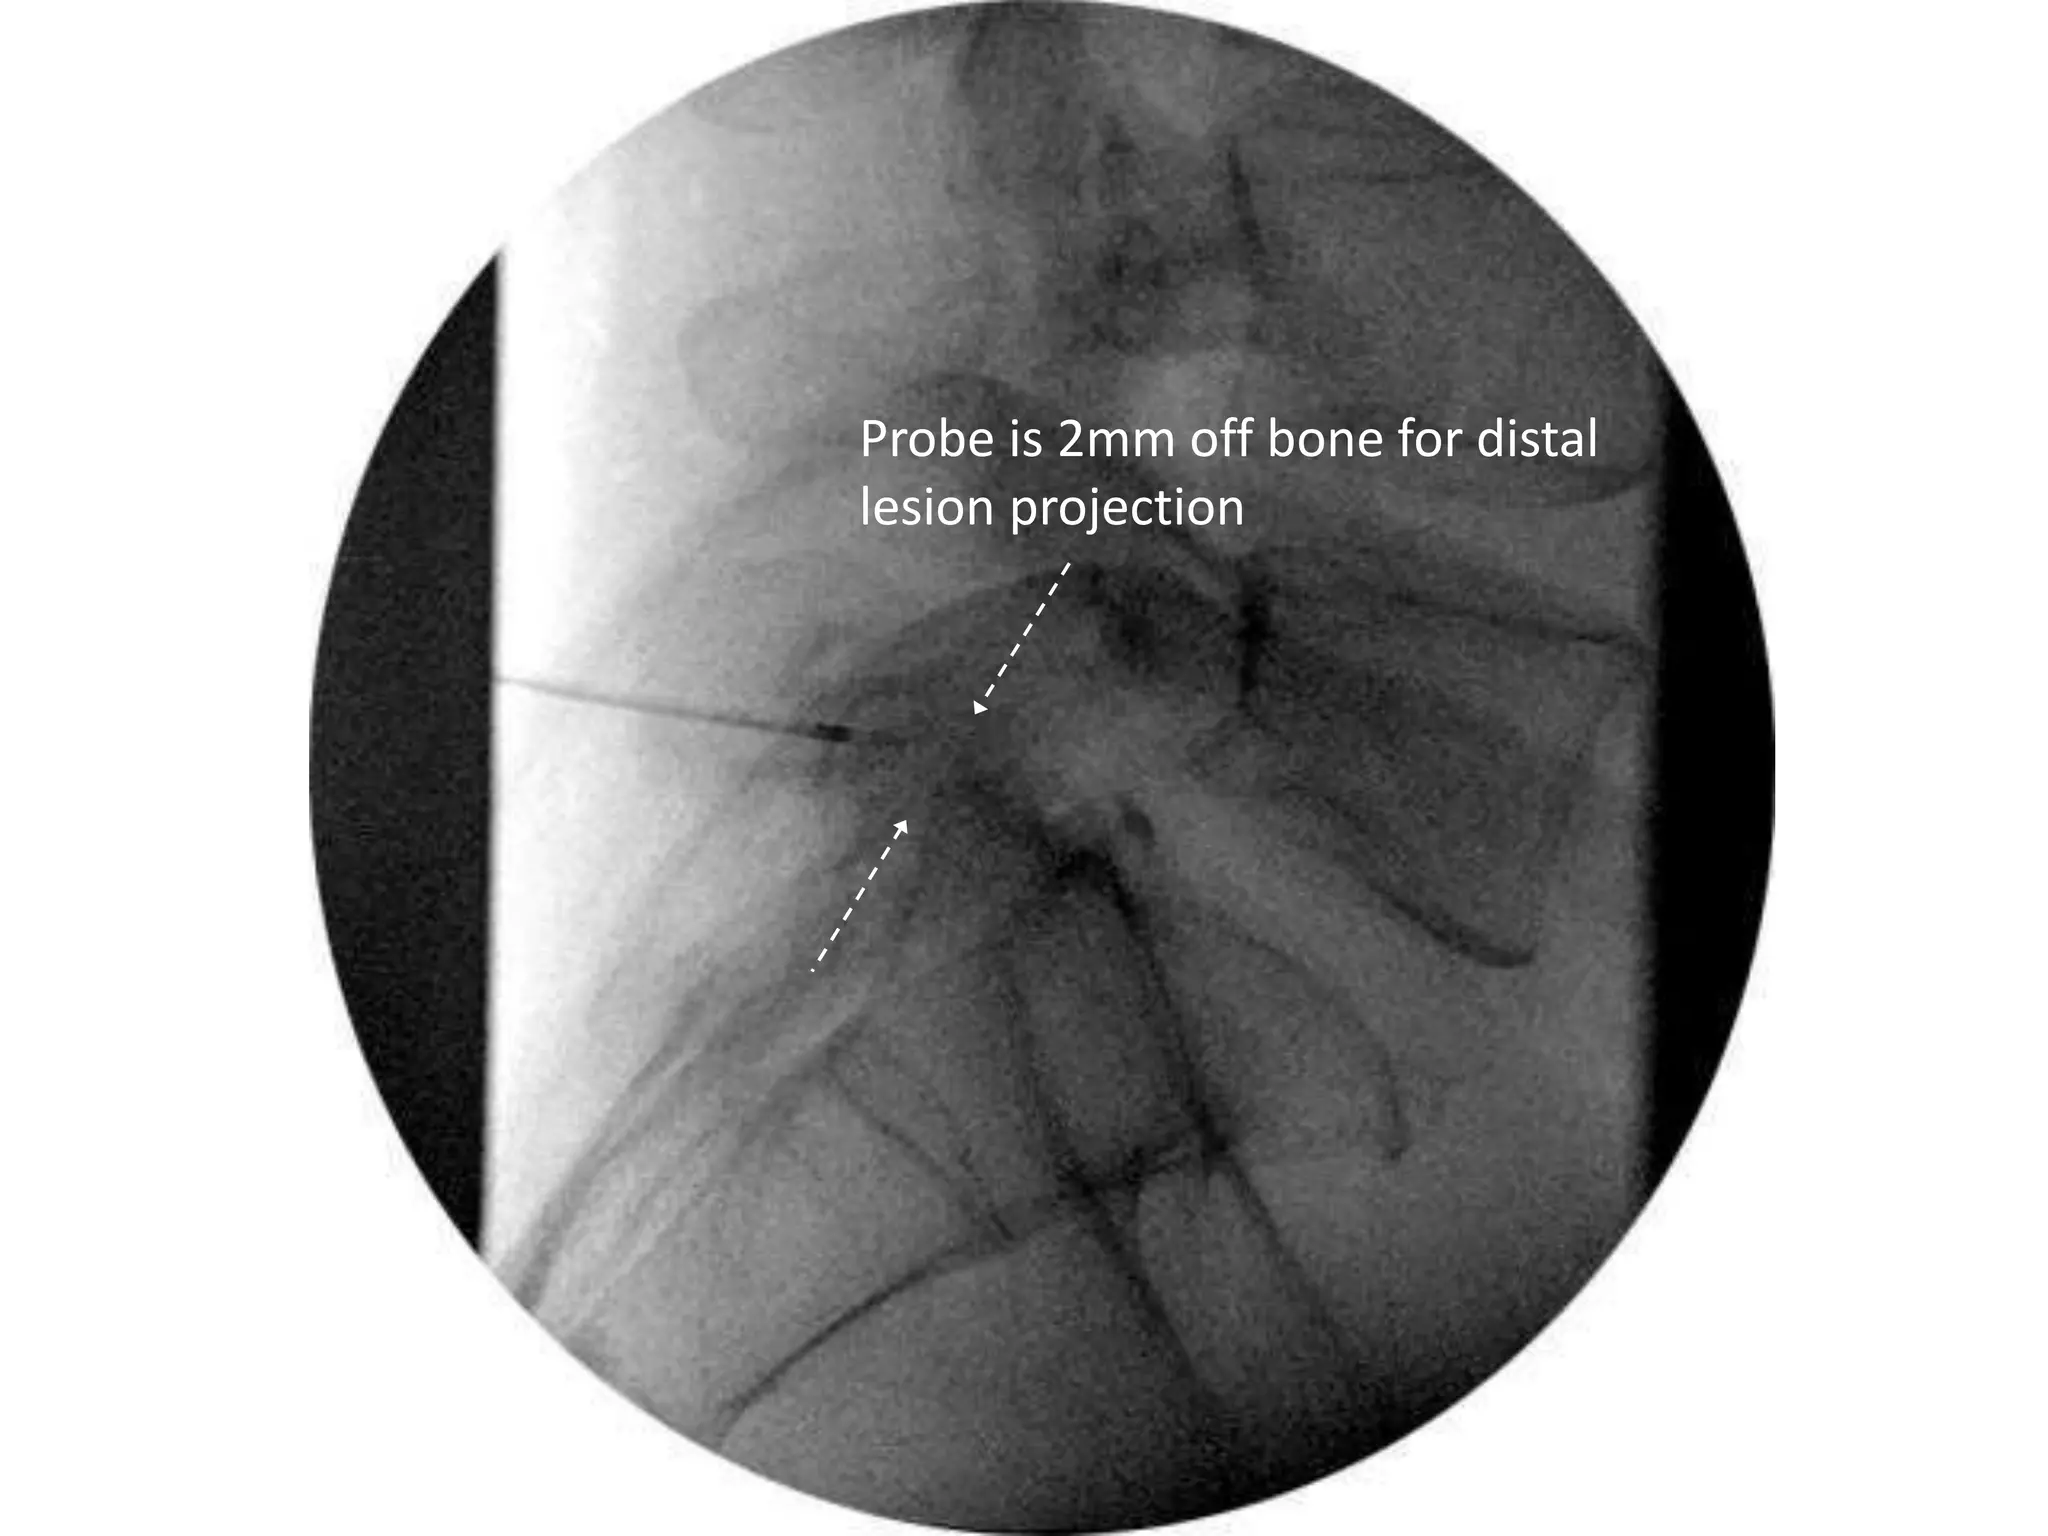
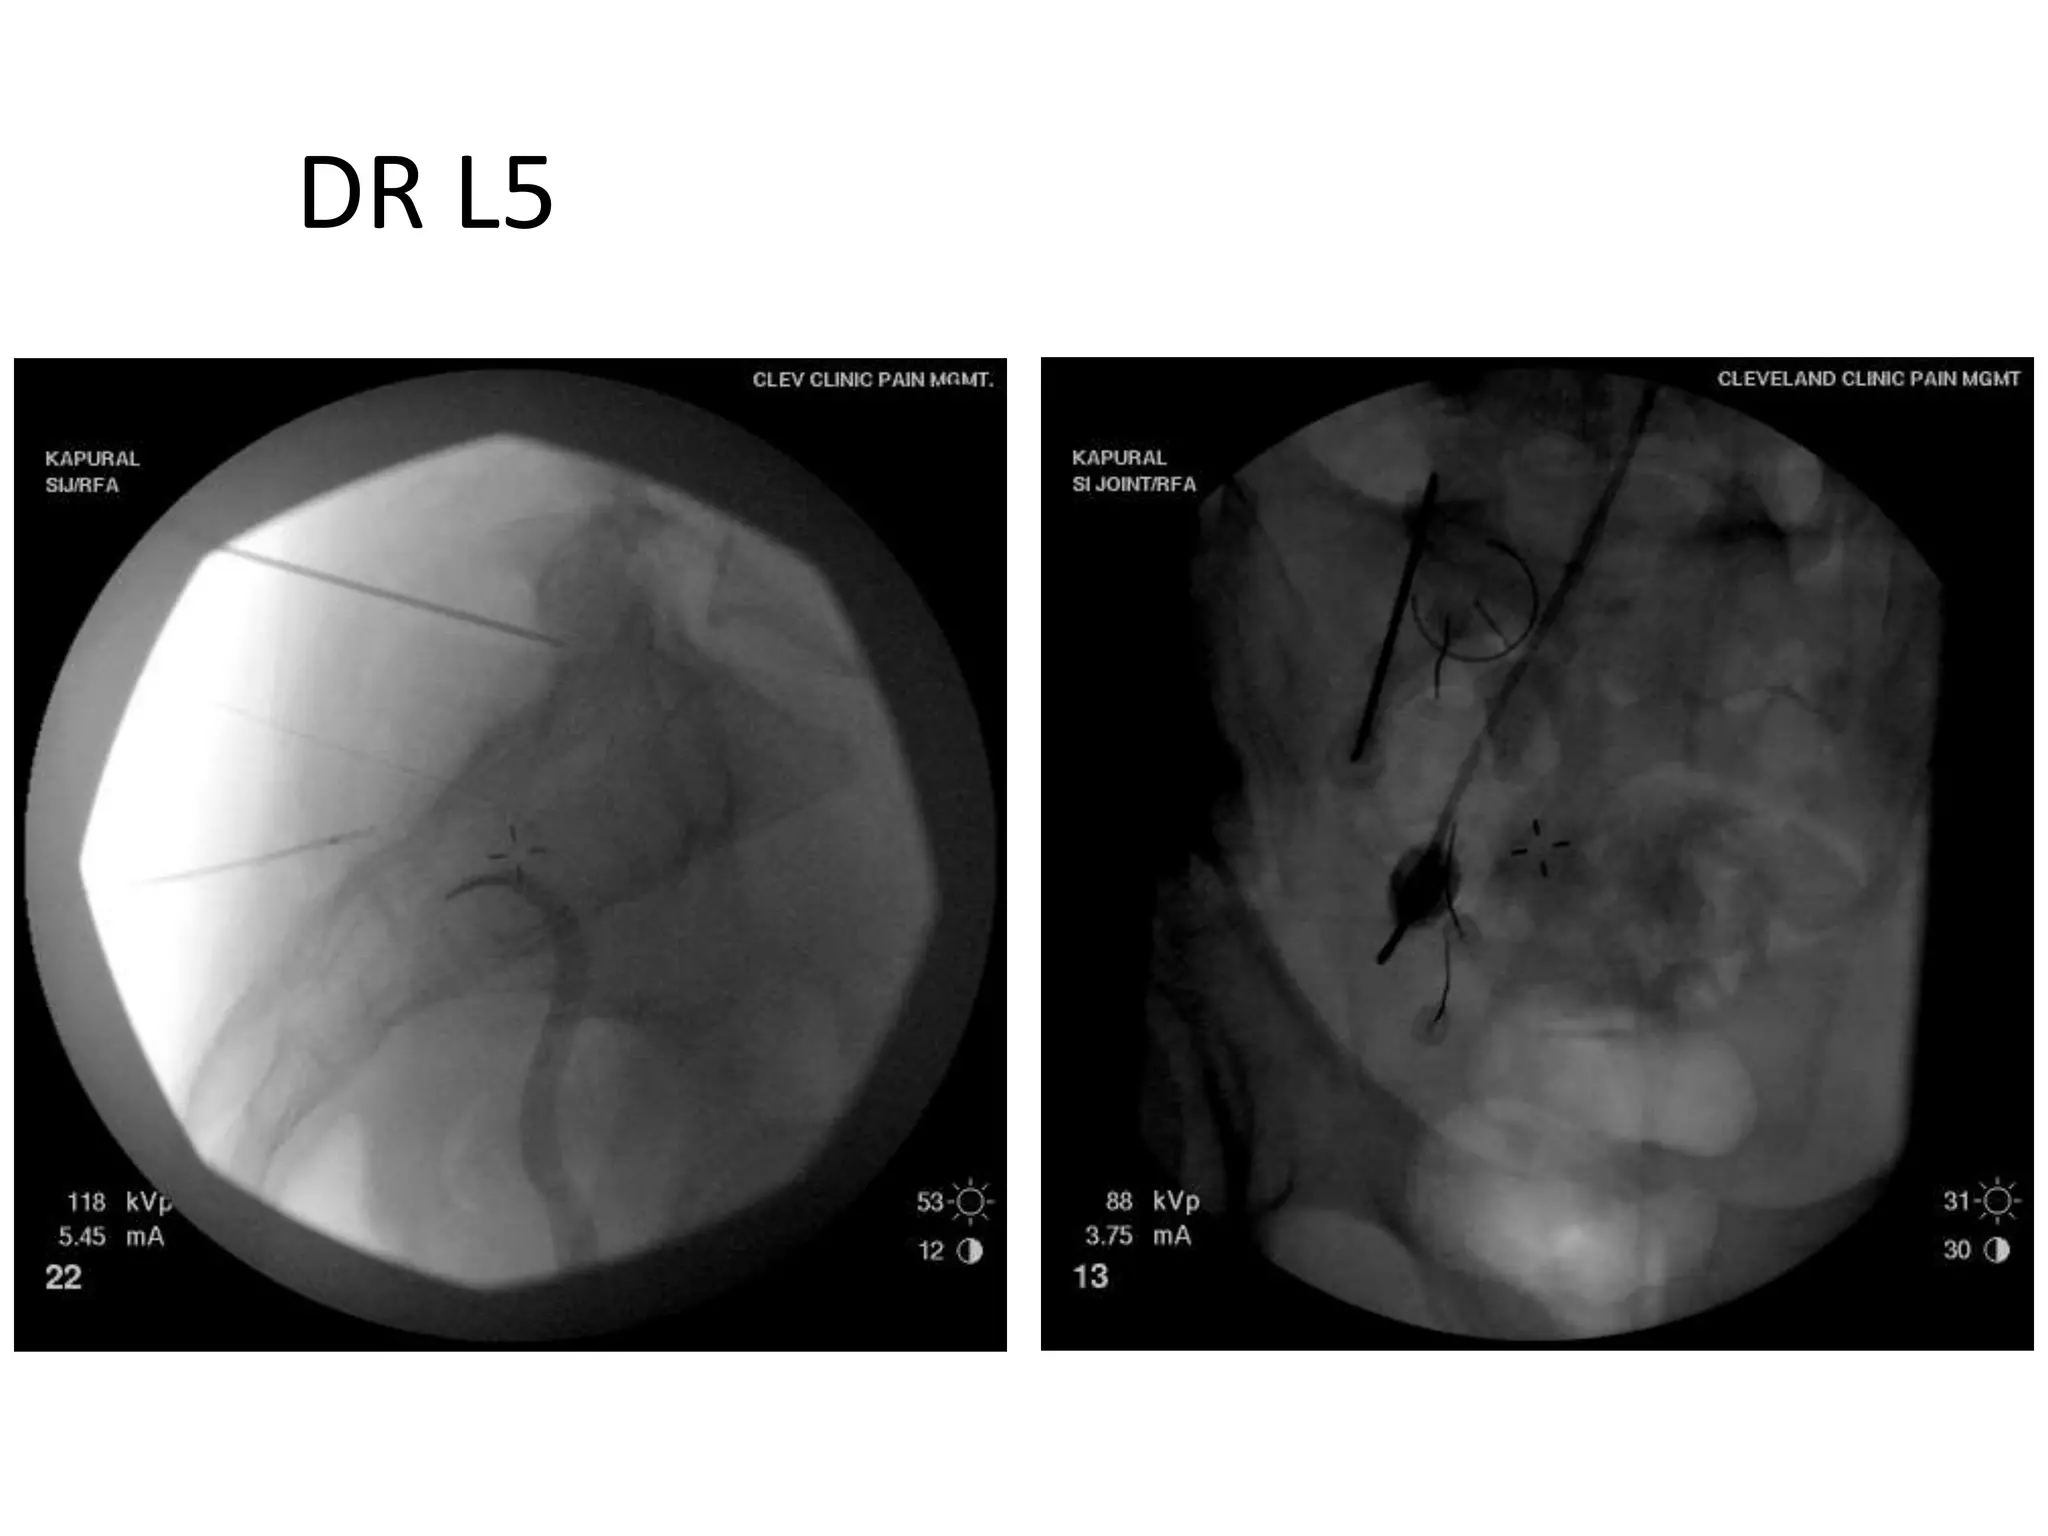
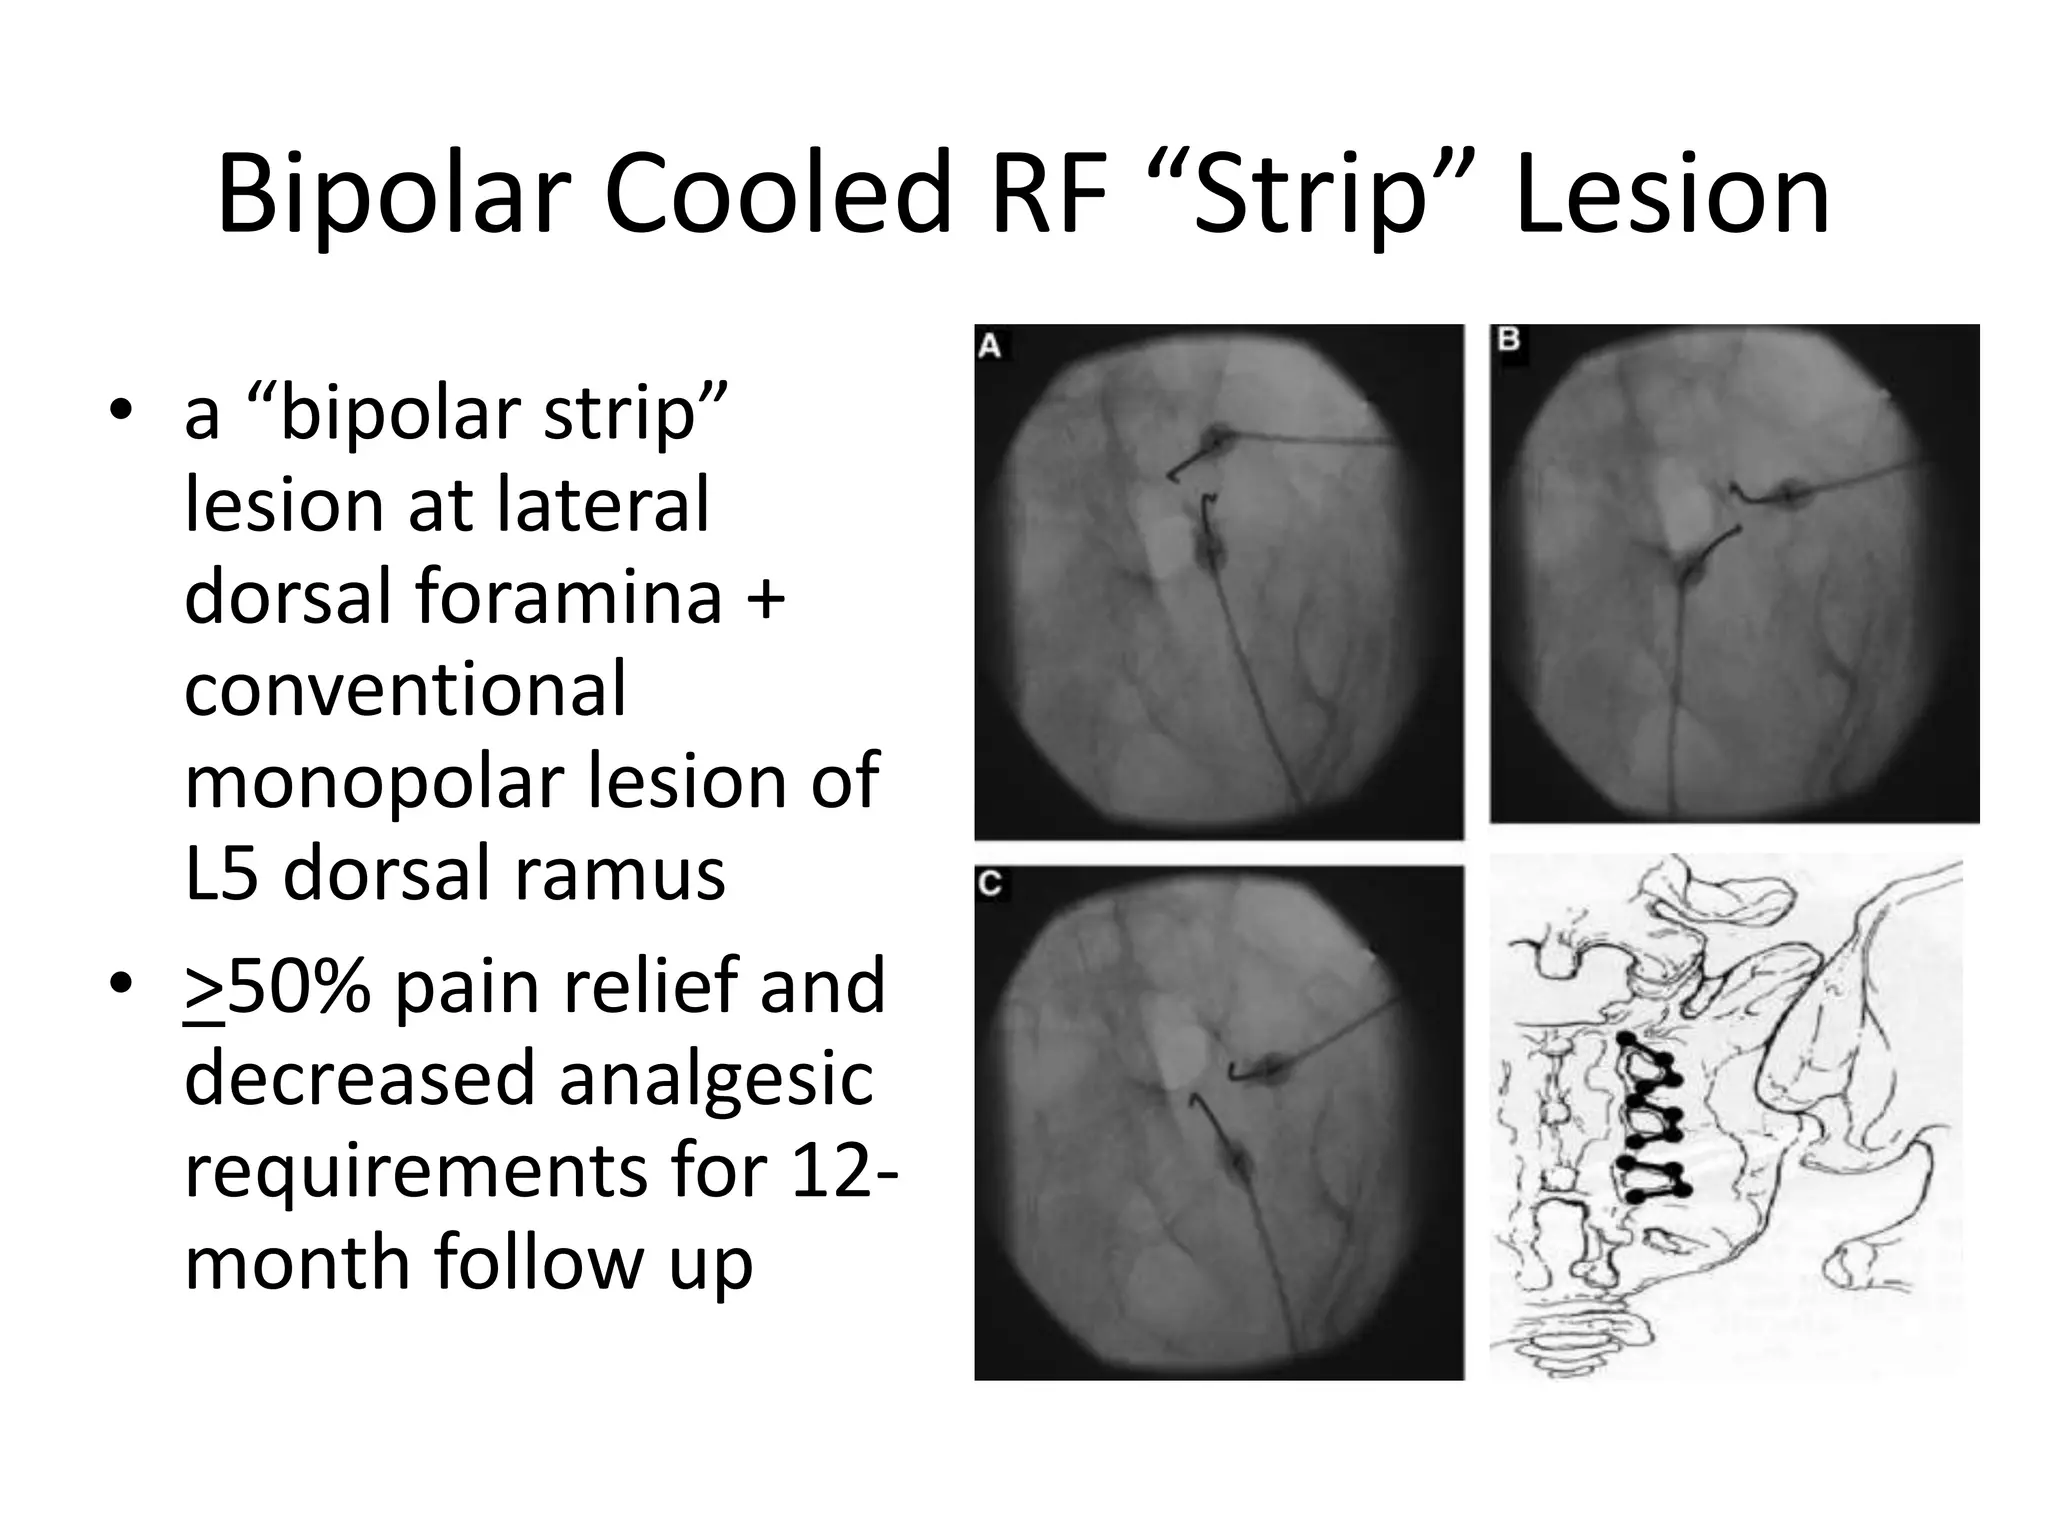
Radiofrequency Denervation
of Sacroiliac Joint
Mohamed M. Mohi Eldin,
Professor of Neurosurgery,
Faculty of Medicine,
Cairo University
One-Day Spine Clinic 2nd workshop & hands-on
20-21 April 2016
SIJ Innervation
Ventral surface by
VR of L5-S2 or
branches from the
sacral plexus.
Dorsal surface by the
L5 DR and S1-4
lateral branches
SIJ Innervation
Joint is predominantly,
innervated by
posterior primary rami
S1 and S2 lateral branches
primarily innervate the SIJ
and associated dorsal
ligaments,
occasional S3 contributions
but not S4
S1-4 Dorsal Rami
and Divisions
Midline
PSIS
S1
S2
S3
S4
Left
LDSI
lig.
Interforaminal
neural arcade
Lateral
branches
SI Joint Innervation
• Nerve location is
variable:
– Person to Person
– Side to Side
– Level to Level
• Nerves may run
along bone, or up to
8 mm superficial
from the sacrum
SI Joint Innervation
Lateral branches of cadavers with thin wires laid over
each nerve that ran into the sacroiliac joint.
Fluoro images were taken to show the relationship of the
nerves to landmarks such as the foramina and the joint
S1 S3S2
Dorsal sacral plexus & lateral branch nerves
supplying sensation
to the dorsal
sacral joint
complex (arrows)
from L5 to S3.
Note the variability
in lateral branch
topography
between right
and left.
Chronic sacroiliac joint pain:
The problem
• Pain below L5
• Twice positive (>75% relief) SIJ blocks
• Prevalence of SIJ pain 10-20%
• Persistent lower back pain after LS fusion, SIJ-
pain source in 32% (single SIJ injection)
RF of SIJ
A more definitive palliative therapeutic
treatment
Clinical causes of SIJ pain
Primary causes
1. Fracture
2. Tumor
3. Rheumatologic disorders
– ankylosing spondylitis
– psoriatic arthritis
4. infection
5. mechanical
– Locking
– hypermobility
6. DJD/overuse
7. After L/S fusion.
Secondary causes
1. discogenic pain,
2. Z-joint (facet) pain,
3. Hip disease,
4. Spinal stenosis,
5. Flail coccyx (coccygodynia),
6. S1 foraminal stenosis
How can we diagnose SI pain?
• History and physical exam
• Radiographic studies
• Intra-articular injection
• Neural blockade
Diagnosis
• Referral Zones
• Screening Exam:
– Maximum pain below L5 coupled
with pointing to the PSIS or
– local tenderness just medial to the
PSIS has the
– Distraction Tests limited utility
• Imaging: Little value
• Intra articular blocks gold
standard?
• 37-66% False positive
responses from the first
injection (22% FP rate)
Sacral Sulcus Tenderness
Buttocks 94%
Lower lumbar 72%
LE 50%
Groin 14%
candidate for treatment
Persistent low back pain
(below L5 and buttocks pain),
with a VAS score more than 5
facetogenic source ruled out,
positive temporary response to SIJ injections
Present Standard for SIJ Diagnosis:
Require
Dual positive (>80% relief) SIJ injections
(+/- steroid)
Strongly consider excluding other anatomic
structures as pain generators
(e.g. MBBs +/- discography if MRI abnormal)
before SIJ RFN
Fluoroscopy
AP only versus AP & lateral
Confusing factor
Frequent practice AP view only
Sometimes a small amount of contrast give
misleading “elongated form” producing “false
positive” intraarticular injection
if only viewed from an AP
Confirm IA -lateral view
A successful outcome
Relies specifically on a correct diagnosis
Patients should have
more than 80% pain relief on two consecutive
fluoroscopically guided SIJ injections,
a confirmed diagnosis of SI joint pain or
dysfunction.
Concept of using RF in SIJ pain
Though sound but complicated
because of the difficulty in locating the sacral
nerves and ablating them
Procedure
TECHNIQUE
1. SIJ Lesioning
• Prone position
• a pillow beneath the abdomen to reduce the lumbar lordotic
curvature
• A dispersive plate to the posterior thigh
• Sterile drape of lower lumbar region and buttocks on the
operative side
• Local/IV sedation. No GA.
• Optional Bowel prep
C-arm to visualize AP Sacrum
(adequate cranial tilt to open L5S1)
caudal/cephalad tilt of the C-arm to parallel the
superior endplate of S1
Antero-posterior (AP) projection
with a vertical position
of the C-arm,
centered on the
inferior border of the
ipsilateral sacrum
Identify the skin entry point
at the ipsilateral,
lateral, inferior
border of the
sacrum, 1 cm lateral
of and below the S4
foramen
Spinal needle placement
(from the sacral
target point to the
mid-SIJ) to
anesthetize the
track
• A 25-Gauge 3-1/2 inch (10cm) spinal needle
and 1% buffered Lidocaine can be used, to
anaesthetize the aimed track
• Tip: you could use a pencil point spinal
needle which is easier to advance when there
is bone contact.
Electrode Placement
Spinal needles are used to mark the PSFA
Introducer and electrode are directed “down the
beam” towards the target anatomy
Electrode is positioned 7-10 mm from the PSFA for
safety
Sacral target point
Advance the spinal needle to contact
sacral target point
lateral to the S4 foramen
Making sure
That sacrum is contacted at an appropriate depth
That needle has not entered either
the S4 or any other sacral foramen,
Or inferior to the sacral margin into pelvic cavity
Once the periosteum is contacted
Advance the needle in a cephalad and slightly lateral direction,
staying lateral to the sacral foramen,
in contact with the sacrum, and
medial to the SI joint, and
advance into the ligamentous tissue
between the sacrum and ilium
Tips & Tricks
Use both hands to insert and gently steer
the electrode
with one hand at the electrode and one hand at
the handle
Tips & Tricks
Placement with tip curved down until you reach
periosteum, but always try to touch it
tangentially, not under a steep angle.
Touch down the handle to the skin, and steer
the electrode with your other hand
Tips & Tricks
“wiggle” the electrode when advancing so it does not
get “stuck” into periosteum;
Assure bone contact, but merely touch the periosteum
don’t turn the electrode more than 90° (look at the
marker at the handle in case of doubt)
Beginners tip
You can use the 25-G spinal needle
as a “marker” by placing it at the endpoint
of the track of the electrode.
It defines the steering direction.
Keep one eye at this needle and one eye at the
electrode during “wiggling”
Tips & Tricks
Half way in advancing the electrode,
a critical point is encountered.
You should make a lateral x-ray
to make sure you are not advancing
over the ilium,
but indeed advancing into
the deep interosseous ligament
Lateral view
mainly to check if you are staying in contact with
the sacral posterium
Electrode is then advanced
Maintaining continuous contact with sacrum,
on a cephalad and slightly lateral line,
staying lateral to the sacral foramen,
medial to the sacroiliac joint, and
ventral to the ilium,
until contact with the sacral ala
prevents further advancement
AP view Endpoint
adjacent to the S1 posterolateral branches
Anesthetize the lesion track
(to optimize patient comfort)
Once advanced along this line to a point where no
further cephalad advancement can occur, remove
the stylette and inject 4 cc of a 2% lidocaine solution
+/- 1 cc of a non-particulate steroid as the needle is
withdrawn, to anesthetize the lesion track
Procedure
Place RF probe through introducer
(4 mm beyond tip of introducer = 2 mm off bone)
Lateral fluoroscopy to assure not in canal
Verify impedance 100 - 500 ohms
Appropriate positioning
should be confirmed by changing the
caudal/cephalad tilt of the C-arm to parallel
the superior endplate of S1 and verifying,
once again, that the entire length of the
SImplicity III electrode was advanced to the
ipsilateral sacral ala and the three
independent, active contacts were positioned
adjacent to the S1, S2, S3, and S4 lateral
branch innervation pathways
Two techniques have been
described in the literature
Yin technique
Kline technique
Yin technique
(Sensory Stimulation-Guided)
Locate relevant nerves using
traditional sensory stimulation
• If the SI pain was reproduced, ablated is done 80 C for 60 sec
• If a sensory response was elicited, but did not reproduce the
pain, the level was not ablated
• 64% of patients had > 50% pain relief at six months
Kline technique
(leap frog fashion )
Perform dual electrode lesions
to create an ablation line
long enough to ablate across all sacral nerves
Sensory stimulation is not necessary
Care must be taken to not spread the electrodes too far apart (>4 mm) or
incomplete ablating between the electrodes can result
Success between 40‐60 %
“Leapfrog” Technique for SIJ RF
Lesions made in the postero-inferior aspect
of joint by ‘leapfrogging’ RF probe
at < 1cm intervals
mean duration of pain relief 12+/- 1.2 months
Sacroiliac RF Lesion Requirements
• Level L5
– Lesion the primary
dorsal ramus at
sacral ala
• Level S1, S2, S3
– Lesion all lateral
branches as they
exit foramen
Lesion Geometry
Lesions 8-10 mm from lateral edge of foramen
Target sites should be 50° apart (1:40 on the clock) to
achieve overlap
2:30
lesion
2:30
lesion
4:00
lesion
5:30
lesion
At S2
2:30,
4 and
5:30 lesions
At S3
2:30 and
4:00 lesions
Repeat
Lateral view
Technique
2. L5 Primary Dorsal Ramus Lesioning
Tips & Tricks
First do the dorsal ramus L5 RF lesioning
in the awake patient
(as for a facet joint denervation)
Then start IV sedation
A solution containing lidocaine +/‐ steroid
solution is injected through the RF cannula,
and radiofrequency lesioning of the L5 dorsal
ramus is performed at 85 °C for up to 90
seconds
Max. Insertion depth
L5/S1 z-joint space
Probe is 2mm off bone for distal
lesion projection
DR L5
Cooled RF SIJ Neurotomy
Cooled RF Lesions
SACRAL SURFACE
Isotherm Map
White meat tests comparing SInergy probe
and Standard RF
10 mm
3.5 mm
Perpendicular & Oblique Placement
Spherical lesion shape allows for perpendicular or oblique probe placement
near the treatment site.
Bipolar Cooled RF “Strip” Lesion
• a “bipolar strip”
lesion at lateral
dorsal foramina +
conventional
monopolar lesion of
L5 dorsal ramus
• >50% pain relief and
decreased analgesic
requirements for 12-
month follow up
Bipolar disadvantage?
• Tissue along the sacrum is inhomogeneous- dense fibrous tissue,
(ligament, fascia), muscle, fat etc.
• Different tissues respond differently to RF energy.
• One type of tissue may heat up quickly, while another will require more
power to reach temperature
• Can cooled RF be better, because generator controls the rate of cooling to
each probe, thereby regulating temperature independent of energy
delivered.
Summary
• SIJ Radiofrequency provides
for anatomic RF lesioning of
the dorsal innervation of the
SIJ
• Cooled RF technology allows
for controlled and
repeatable large volume
lesions
• No significant complications
from various approaches
reported to date
Thank You

Sacroiliac Joint RF Denervation

  • 1.
    Radiofrequency Denervation of SacroiliacJoint Mohamed M. Mohi Eldin, Professor of Neurosurgery, Faculty of Medicine, Cairo University One-Day Spine Clinic 2nd workshop & hands-on 20-21 April 2016
  • 2.
    SIJ Innervation Ventral surfaceby VR of L5-S2 or branches from the sacral plexus. Dorsal surface by the L5 DR and S1-4 lateral branches
  • 3.
    SIJ Innervation Joint ispredominantly, innervated by posterior primary rami S1 and S2 lateral branches primarily innervate the SIJ and associated dorsal ligaments, occasional S3 contributions but not S4
  • 4.
    S1-4 Dorsal Rami andDivisions Midline PSIS S1 S2 S3 S4 Left LDSI lig. Interforaminal neural arcade Lateral branches
  • 5.
    SI Joint Innervation •Nerve location is variable: – Person to Person – Side to Side – Level to Level • Nerves may run along bone, or up to 8 mm superficial from the sacrum
  • 6.
    SI Joint Innervation Lateralbranches of cadavers with thin wires laid over each nerve that ran into the sacroiliac joint. Fluoro images were taken to show the relationship of the nerves to landmarks such as the foramina and the joint S1 S3S2
  • 7.
    Dorsal sacral plexus& lateral branch nerves supplying sensation to the dorsal sacral joint complex (arrows) from L5 to S3. Note the variability in lateral branch topography between right and left.
  • 8.
    Chronic sacroiliac jointpain: The problem • Pain below L5 • Twice positive (>75% relief) SIJ blocks • Prevalence of SIJ pain 10-20% • Persistent lower back pain after LS fusion, SIJ- pain source in 32% (single SIJ injection)
  • 9.
    RF of SIJ Amore definitive palliative therapeutic treatment
  • 10.
    Clinical causes ofSIJ pain Primary causes 1. Fracture 2. Tumor 3. Rheumatologic disorders – ankylosing spondylitis – psoriatic arthritis 4. infection 5. mechanical – Locking – hypermobility 6. DJD/overuse 7. After L/S fusion. Secondary causes 1. discogenic pain, 2. Z-joint (facet) pain, 3. Hip disease, 4. Spinal stenosis, 5. Flail coccyx (coccygodynia), 6. S1 foraminal stenosis
  • 11.
    How can wediagnose SI pain? • History and physical exam • Radiographic studies • Intra-articular injection • Neural blockade
  • 12.
    Diagnosis • Referral Zones •Screening Exam: – Maximum pain below L5 coupled with pointing to the PSIS or – local tenderness just medial to the PSIS has the – Distraction Tests limited utility • Imaging: Little value • Intra articular blocks gold standard? • 37-66% False positive responses from the first injection (22% FP rate) Sacral Sulcus Tenderness Buttocks 94% Lower lumbar 72% LE 50% Groin 14%
  • 13.
    candidate for treatment Persistentlow back pain (below L5 and buttocks pain), with a VAS score more than 5 facetogenic source ruled out, positive temporary response to SIJ injections
  • 14.
    Present Standard forSIJ Diagnosis: Require Dual positive (>80% relief) SIJ injections (+/- steroid) Strongly consider excluding other anatomic structures as pain generators (e.g. MBBs +/- discography if MRI abnormal) before SIJ RFN
  • 15.
    Fluoroscopy AP only versusAP & lateral Confusing factor Frequent practice AP view only Sometimes a small amount of contrast give misleading “elongated form” producing “false positive” intraarticular injection if only viewed from an AP Confirm IA -lateral view
  • 16.
    A successful outcome Reliesspecifically on a correct diagnosis Patients should have more than 80% pain relief on two consecutive fluoroscopically guided SIJ injections, a confirmed diagnosis of SI joint pain or dysfunction.
  • 17.
    Concept of usingRF in SIJ pain Though sound but complicated because of the difficulty in locating the sacral nerves and ablating them
  • 18.
  • 19.
    TECHNIQUE 1. SIJ Lesioning •Prone position • a pillow beneath the abdomen to reduce the lumbar lordotic curvature • A dispersive plate to the posterior thigh • Sterile drape of lower lumbar region and buttocks on the operative side • Local/IV sedation. No GA. • Optional Bowel prep
  • 20.
    C-arm to visualizeAP Sacrum (adequate cranial tilt to open L5S1) caudal/cephalad tilt of the C-arm to parallel the superior endplate of S1
  • 21.
    Antero-posterior (AP) projection witha vertical position of the C-arm, centered on the inferior border of the ipsilateral sacrum
  • 22.
    Identify the skinentry point at the ipsilateral, lateral, inferior border of the sacrum, 1 cm lateral of and below the S4 foramen
  • 23.
    Spinal needle placement (fromthe sacral target point to the mid-SIJ) to anesthetize the track
  • 24.
    • A 25-Gauge3-1/2 inch (10cm) spinal needle and 1% buffered Lidocaine can be used, to anaesthetize the aimed track • Tip: you could use a pencil point spinal needle which is easier to advance when there is bone contact.
  • 25.
    Electrode Placement Spinal needlesare used to mark the PSFA Introducer and electrode are directed “down the beam” towards the target anatomy Electrode is positioned 7-10 mm from the PSFA for safety
  • 26.
    Sacral target point Advancethe spinal needle to contact sacral target point lateral to the S4 foramen
  • 27.
    Making sure That sacrumis contacted at an appropriate depth That needle has not entered either the S4 or any other sacral foramen, Or inferior to the sacral margin into pelvic cavity
  • 28.
    Once the periosteumis contacted Advance the needle in a cephalad and slightly lateral direction, staying lateral to the sacral foramen, in contact with the sacrum, and medial to the SI joint, and advance into the ligamentous tissue between the sacrum and ilium
  • 29.
    Tips & Tricks Useboth hands to insert and gently steer the electrode with one hand at the electrode and one hand at the handle
  • 30.
    Tips & Tricks Placementwith tip curved down until you reach periosteum, but always try to touch it tangentially, not under a steep angle. Touch down the handle to the skin, and steer the electrode with your other hand
  • 31.
    Tips & Tricks “wiggle”the electrode when advancing so it does not get “stuck” into periosteum; Assure bone contact, but merely touch the periosteum don’t turn the electrode more than 90° (look at the marker at the handle in case of doubt)
  • 32.
    Beginners tip You canuse the 25-G spinal needle as a “marker” by placing it at the endpoint of the track of the electrode. It defines the steering direction. Keep one eye at this needle and one eye at the electrode during “wiggling”
  • 33.
    Tips & Tricks Halfway in advancing the electrode, a critical point is encountered. You should make a lateral x-ray to make sure you are not advancing over the ilium, but indeed advancing into the deep interosseous ligament
  • 34.
    Lateral view mainly tocheck if you are staying in contact with the sacral posterium
  • 35.
    Electrode is thenadvanced Maintaining continuous contact with sacrum, on a cephalad and slightly lateral line, staying lateral to the sacral foramen, medial to the sacroiliac joint, and ventral to the ilium, until contact with the sacral ala prevents further advancement
  • 36.
    AP view Endpoint adjacentto the S1 posterolateral branches
  • 37.
    Anesthetize the lesiontrack (to optimize patient comfort) Once advanced along this line to a point where no further cephalad advancement can occur, remove the stylette and inject 4 cc of a 2% lidocaine solution +/- 1 cc of a non-particulate steroid as the needle is withdrawn, to anesthetize the lesion track
  • 38.
    Procedure Place RF probethrough introducer (4 mm beyond tip of introducer = 2 mm off bone) Lateral fluoroscopy to assure not in canal Verify impedance 100 - 500 ohms
  • 39.
    Appropriate positioning should beconfirmed by changing the caudal/cephalad tilt of the C-arm to parallel the superior endplate of S1 and verifying, once again, that the entire length of the SImplicity III electrode was advanced to the ipsilateral sacral ala and the three independent, active contacts were positioned adjacent to the S1, S2, S3, and S4 lateral branch innervation pathways
  • 40.
    Two techniques havebeen described in the literature Yin technique Kline technique
  • 41.
    Yin technique (Sensory Stimulation-Guided) Locaterelevant nerves using traditional sensory stimulation • If the SI pain was reproduced, ablated is done 80 C for 60 sec • If a sensory response was elicited, but did not reproduce the pain, the level was not ablated • 64% of patients had > 50% pain relief at six months
  • 42.
    Kline technique (leap frogfashion ) Perform dual electrode lesions to create an ablation line long enough to ablate across all sacral nerves Sensory stimulation is not necessary Care must be taken to not spread the electrodes too far apart (>4 mm) or incomplete ablating between the electrodes can result Success between 40‐60 %
  • 43.
    “Leapfrog” Technique forSIJ RF Lesions made in the postero-inferior aspect of joint by ‘leapfrogging’ RF probe at < 1cm intervals mean duration of pain relief 12+/- 1.2 months
  • 44.
    Sacroiliac RF LesionRequirements • Level L5 – Lesion the primary dorsal ramus at sacral ala • Level S1, S2, S3 – Lesion all lateral branches as they exit foramen
  • 45.
    Lesion Geometry Lesions 8-10mm from lateral edge of foramen Target sites should be 50° apart (1:40 on the clock) to achieve overlap
  • 47.
  • 48.
  • 49.
  • 50.
  • 51.
    At S2 2:30, 4 and 5:30lesions At S3 2:30 and 4:00 lesions Repeat
  • 53.
  • 54.
    Technique 2. L5 PrimaryDorsal Ramus Lesioning
  • 55.
    Tips & Tricks Firstdo the dorsal ramus L5 RF lesioning in the awake patient (as for a facet joint denervation) Then start IV sedation
  • 56.
    A solution containinglidocaine +/‐ steroid solution is injected through the RF cannula, and radiofrequency lesioning of the L5 dorsal ramus is performed at 85 °C for up to 90 seconds
  • 58.
  • 59.
    Probe is 2mmoff bone for distal lesion projection
  • 60.
  • 61.
    Cooled RF SIJNeurotomy
  • 62.
    Cooled RF Lesions SACRALSURFACE Isotherm Map White meat tests comparing SInergy probe and Standard RF 10 mm 3.5 mm
  • 63.
    Perpendicular & ObliquePlacement Spherical lesion shape allows for perpendicular or oblique probe placement near the treatment site.
  • 64.
    Bipolar Cooled RF“Strip” Lesion • a “bipolar strip” lesion at lateral dorsal foramina + conventional monopolar lesion of L5 dorsal ramus • >50% pain relief and decreased analgesic requirements for 12- month follow up
  • 65.
    Bipolar disadvantage? • Tissuealong the sacrum is inhomogeneous- dense fibrous tissue, (ligament, fascia), muscle, fat etc. • Different tissues respond differently to RF energy. • One type of tissue may heat up quickly, while another will require more power to reach temperature • Can cooled RF be better, because generator controls the rate of cooling to each probe, thereby regulating temperature independent of energy delivered.
  • 66.
    Summary • SIJ Radiofrequencyprovides for anatomic RF lesioning of the dorsal innervation of the SIJ • Cooled RF technology allows for controlled and repeatable large volume lesions • No significant complications from various approaches reported to date
  • 67.