SlideShare a Scribd company logo
Web Design
and
Development
By: Shahrzad Peyman
Session 2
October-2017
shahrzad.peymaan@gmail.com
1
2
Today’s Presentation
• Understanding Common HTML Terms
• Understanding Common CSS Terms
• Semantic Overview in HTML
• Cascade in CSS
Building Your First Web
Page
3
Imagine a time before the invention of the Internet,
Websites didn’t exist, and books, printed on paper and
tightly bound, were your primary source of information.
Today you can open a web browser, jump over to your
search engine of choice, and search away. Any bit of
imaginable information rests at your fingertips. And
chances are someone somewhere has built a website
with your exact search in mind.
What Are HTML and CSS?
4
HTML, HyperText Markup Language, gives
content structure and meaning by defining that
content as, for example, headings, paragraphs,
or images.
CSS, Cascading Style Sheets, is a presentation
language created to style the appearance of
content—using, for example, fonts or colors.
What Are HTML and CSS?
5
The two languages—HTML and CSS—are
independent of one another and should remain
that way.
CSS should not be written inside of an HTML
document and vice versa.
As a rule, HTML will always represent content,
and CSS will always represent the appearance
of that content.
Understanding Common
HTML Terms
While getting started with HTML, you will likely
encounter new—and often strange—terms.
Over time you will become more and more
familiar with all of them, but the three common
HTML terms you should begin with are
elements, tags, and attributes.
6
Elements
Elements are designators that define the
structure and content of objects within a page.
Some of the more frequently used elements
include multiple levels of headings (identified as
<h1> through <h6> elements) and paragraphs
(identified as the <p> element) and many more.
7
Tags
The use of less-than and greater-than angle
brackets surrounding an element creates what is
known as a tag. Tags most commonly occur in
pairs of opening and closing tags.
An opening tag marks the beginning of an
element. It consists of a less-than sign followed
by an element’s name, and then ends with a
greater-than sign; for example, <div>.
8
Tags
A closing tag marks the end of an element. It
consists of a less-than sign followed by a forward
slash and the element’s name, and then ends with
a greater-than sign; for example, </div>.
The content that falls between the opening and
closing tags is the content of that element.
9
Attributes
Attributes are properties used to provide additional information
about an element. The most common attributes include the id
attribute, which identifies an element; the class attribute, which
classifies an element.
Attributes are defined within the opening tag, after an element’s
name. Generally, attributes include a name and a value. The format
for these attributes consists of the attribute name followed by an
equals sign and then a quoted attribute value. For example, an <a>
element including an href attribute would look like the following:
10
Attributes
The preceding code will display the text “Shay Howe” on
the web page and will take users to http://shayhowe.com/
upon clicking the “Shay Howe” text. The anchor element
is declared with the opening <a> and closing </a> tags
encompassing the text, and the hyperlink reference
attribute and value are declared with  href="http://
shayhowe.com" in the opening tag.
11
Setting Up the HTML
Document Structure
HTML documents are plain text documents saved with
an  .html  file extension rather than a  .txt  file extension. To
begin writing HTML, you first need a plain text editor that you
are comfortable using. Sadly this does not include Microsoft
Word or Pages, as those are rich text editors. Free alternatives
also include Notepad++ for Windows and TextWrangler for Mac.
All HTML documents have a required structure that includes the
following declaration and elements: 
<!DOCTYPE html>, <html>, <head>, and <body>.
12
Setting Up the HTML
Document Structure
The document type declaration, that is show by  <!DOCTYPE html>,
informs web browsers which version of HTML is being used and is
placed at the very beginning of the HTML document. Because we’ll be
using the latest version of HTML, our document type declaration is
simply <!DOCTYPE html>. Following the document type declaration,
the <html> element signifies the beginning of the document.
Inside the <html> element, the <head> element identifies the top of
the document, including any metadata (accompanying information
about the page). The content inside the  <head>  element is not
displayed on the web page itself. Instead, it may include the document
title (which is displayed on the title bar in the browser window), links
to any external files, or any other beneficial metadata. All of the visible
content within the web page will fall within the <body> element.
13
Setting Up the HTML
Document Structure
14
Setting Up the HTML
Document Structure
When an element is placed inside of another
element, also known as nested, it is a good idea
to indent that element to keep the document
structure well organized and legible.
In the previous code, you can see that both
the <head> and <body> elements were nested—
and indented—inside the <html> element.
15
Self-Closing Elements
In the previous example, the  <meta>  element had
only one tag and didn’t include a closing tag. Fear
not, this was intentional. Not all elements consist
of opening and closing tags.
Some elements simply receive their content or
behavior from attributes within a single tag.
The <meta> element is one of these elements. The
content of the previous  <meta>  element is
assigned with the use of the charset attribute and
value.
16
Self-Closing Elements
<br>
17
Self-Closing Elements
<img>
18
Self-Closing Elements
<hr>
19
Understanding Common
Css Terms
20
In addition to HTML terms, there are a few
common  CSS terms  you will want to familiarize
yourself with.
These terms include  selectors,  properties,
and  values. As with the HTML terminology, the
more you work with CSS, the more these terms
will become second nature.
Selectors
As elements are added to a web page, they may be
styled using CSS. A selector designates exactly which
element or elements within our HTML to target and
apply styles (such as color, size, and position) to.
Selectors may include a combination of different
qualifiers to select unique elements, all depending on
how specific we wish to be. For example, we may want
to select every paragraph on a page, or we may want to
select only one specific paragraph on a page.
21
Selectors
Selectors generally target an attribute value, such
as an  id  or  class  value, or target the type of
element, such as <h1> or <p>.
Within CSS, selectors are followed with curly
brackets,  {}, which encompass the styles to be
applied to the selected element. The selector here
is targeting all <p> elements.
22
Properties
Once an element is selected, a property determines the styles that
will be applied to that element. Property names fall after a selector,
within the curly brackets, {}, and immediately preceding a colon, :.
T h e r e a r e n u m e r o u s p r o p e r t i e s w e c a n u s e , s u c h
as  background,  color,  font-size,  height, and  width, and new
properties are often added.
In the following code, we are defining the  color  and  font-
size properties to be applied to all <p> elements.
23
Values
So far we’ve selected an element with a selector and
determined what style we’d like to apply with a property.
Now we can determine the behavior of that property with a
value. Values can be identified as the text between the
colon, :, and semicolon, ;.
Here we are selecting all <p> elements and setting the value
of the  color  property to be  orange  and the value of
the font-size property to be 16 pixels.
24
25
Understanding Common
Css Terms
Working with Selectors
Selectors, as previously mentioned, indicate
which HTML elements are being styled.
It is important to fully understand how to use
selectors and how they can be leveraged.
The first step is to become familiar with the
different types of selectors. We’ll start with the
m o s t c o m m o n s e l e c t o r s :  t y p e ,  c l a s s ,
and ID selectors.
26
Type Selectors
Type  selectors target elements by their element
type. For example, should we wish to target all
division elements,  <div>, we would use a type
selector of div. The following code shows a type
selector for division elements as well as the
corresponding HTML it selects.
27
Class Selectors
Class selectors allow us to select an element based on the
element’s  class  attribute value. Class selectors are a little
more specific than type selectors, as they select a particular
group of elements rather than all elements of one type.
Class selectors allow us to apply the same styles to different
elements at once by using the same  class  attribute value
across multiple elements. Within CSS, classes are denoted
by a leading period, ., followed by the class attribute value. 
28
ID Selectors
ID  selectors are even more precise than class selectors, as they
target only one unique element at a time. Just as class selectors
use an element’s class attribute value as the selector, ID selectors
use an element’s  id  attribute value as a selector.Regardless of
which type of element they appear on, id attribute values can only
be used once per page.
If used they should be reserved for significant elements. Within
CSS, ID selectors are denoted by a leading hash sign, #, followed
by the id attribute value.
29
Referencing CSS
There are three ways of inserting a style sheet:
1. External style sheet
2. Internal style sheet
3. Inline style
30
External Style Sheet
In order to get our CSS talking to our HTML, we need to
reference our CSS file within our HTML.
The best practice for referencing our CSS is to include all of
our styles in a single external style sheet, which is referenced
from within the <head> element of our HTML document.
To create our external CSS style sheet, we’ll want to use our
text editor of choice again to create a new plain text file with
a .css file extension. Our CSS file should be saved within the
same folder, or a subfolder, where our HTML file is located.
31
External Style Sheet
Within the  <head>  element of the HTML document,
the  <link>  element is used to define the relationship
between the HTML file and the CSS file. Because we are
linking to CSS, we use the  rel  attribute with a value
of  stylesheet  to specify their relationship.
Furthermore, the href (or hyperlink reference) attribute
is used to identify the location, or path, of the CSS file.
32
External Style Sheet
In order for the CSS to render correctly, the path of
the href attribute value must directly correlate to where our
CSS file is saved. In the preceding example, the main.css
file is stored within the same location as the HTML file, also
known as the root directory.
If our CSS file is within a subdirectory or subfolder,
the  href  attribute value needs to correlate to this path
accordingly. For example, if our  main.css  file were stored
w i t h i n a s u b d i r e c t o r y n a m e d  s t y l e s h e e t s ,
the href attribute value would be stylesheets/main.css,
using a forward slash to indicate moving into a subdirectory.
33
Internal Style Sheet
An internal style sheet may be
used if one single page has a
unique style.
Internal styles are defined within
the <style> element, inside the
<head> section of an HTML
page:
34
Inline Styles
An inline style may be used to apply a unique
style for a single element. To use inline styles,
add the style attribute to the relevant element.
The style attribute can contain any CSS property.
35
Getting to Know HTML
With our introduction to HTML and CSS complete,
it’s time to dig a little deeper into HTML and
examine the different components that make up
this language.
In order to start building websites, we need to learn
a little about which HTML elements are best used
to display different types of content. It’s also
important to understand how elements are visually
displayed on a web page, as well as what different
elements mean semantically.
36
Semantic Overview
So what exactly are semantics?  Semantics within
HTML  is the practice of giving content on the page
meaning and structure by using the proper element.
Semantic code describes the value of content on a page,
regardless of the style or appearance of that content.
There are several benefits to using semantic elements,
including enabling computers, screen readers, search
engines, and other devices to adequately read and
understand the content on a web page. Additionally,
semantic HTML is easier to manage and work with, as it
shows clearly what each piece of content is about.
37
Identifying Divisions and
Spans
Divisions, or  <div>s, and  <span>s are HTML
elements that act as containers solely for styling
purposes.
As generic containers, they do not come with any
overarching meaning or semantic value.
Paragraphs are semantic in that content wrapped
within a <p> element is known and understood as a
paragraph.  <div>s and  <span>s do not hold any
such meaning and are simply containers.
38
Block vs Inline Elements
Most elements are either block- or inline-level elements. What’s the
difference?
Block-level elements begin on a new line, stacking one on top of the
other, and occupy any available width. Block-level elements may be
nested inside one another and may wrap inline-level elements. We’ll
most commonly see block-level elements used for larger pieces of
content, such as paragraphs.
Inline-level elements do not begin on a new line. They fall into the
normal flow of a document, lining up one after the other, and only
maintain the width of their content. Inline-level elements may be
nested inside one another; however, they cannot wrap block-level
elements. We’ll usually see inline-level elements with smaller pieces
of content, such as a few words.
39
Identifying Divisions and
Spans
Both  <div>s and  <span>s, however, are extremely
valuable when building a website in that they give us the
ability to apply targeted styles to a contained set of
content.
A <div> is a block-level element that is commonly used
to identify large groupings of content, and which helps to
build a web page’s layout and design.
A  <span>, on the other hand, is an inline-level element
commonly used to identify smaller groupings of text
within a block-level element.
40
Comment with HTML and
CSS
41
HTML and CSS give us the ability to leave comments
within our code, and any content wrapped within a
comment will not be displayed on the web page.
Comments help keep our files organized, allow us to set
reminders, and provide a way for us to more effectively
manage our code. Comments become especially useful
when there are multiple people working on the same files.
HTML comments start with  <!-- and end with -->.
CSS comments start with /* and end with */.
Using Text-Based Elements
42
Many different forms of media and content exist
online; however, text is predominant.
Accordingly, there are a number of different
elements for displaying text on a web page. For
now we’ll focus on the more popular elements,
including headings, paragraphs, bold text to
show importance, and italics for emphasis.
Headings
43
Headings are block-level elements, and they come
in six different rankings, <h1> through <h6>.
Headings help to quickly break up content and
establish hierarchy, and they are key identifiers
for users reading a page. They also help search
engines to index and determine the content on a
page.
Headings
44
Headings should be used in an order that is
relevant to the content of a page. The primary
heading of a page or section should be marked up
with an  <h1>  element, and subsequent headings
s h o u l d u s e  < h 2 > ,  < h 3 > ,  < h 4 > ,  < h 5 > ,
and <h6> elements as necessary.
Each heading level should be used where it is
semantically valued, and should not be used to
make text bold or big—there are other, better ways
to do that.
Headings
45
Paragraphs
46
Headings are often followed by supporting
paragraphs. Paragraphs are defined using
the  <p>  block-level element. Paragraphs can
appear one after the other, adding information to
a page as desired. Here is an example of how to
set up paragraphs.
Bold Text with Strong
47
To make text bold and place a strong importance on it,
we’ll use the <strong> inline-level element. There are two
elements that will bold text for us: the <strong> and <b>
elements. It is important to understand the  semantic
difference between the two.
The <strong> element is semantically used to give strong
importance to text, and is thus the most popular option for
bolding text. The  <b>  element, on the other hand,
semantically means to stylistically offset text, which isn’t
always the best choice for text deserving prominent
attention. We have to gauge the significance of the text we
wish to set as bold and to choose an element accordingly.
Bold Text with Strong
48
Italicize Text with Emphasis
49
To italicize text, thereby placing emphasis on it, we’ll use
the  <em>  inline-level element. As with the elements for
bold text, there are two different elements that will italicize
text, each with a slightly different semantic meaning.
The <em> element is used semantically to place a stressed
emphasis  on text; it is thus the most popular option for
italicizing text. The other option, the <i> element, is used
semantically to convey text in an alternative voice or tone,
almost as if it were placed in quotation marks. Again, we
will need to gauge the significance of the text we want to
italicize and choose an element accordingly.
Italicize Text with Emphasis
50
Building Structure
51
For the longest time the structure of a web page was built
using divisions. The problem was that divisions provide
no semantic value, and it was fairly difficult to determine
the intention of these divisions. Fortunately HTML5
introduced new  structurally based elements, including
the  <header>,  <nav>,  <article>,  <section>,  <aside>,
and <footer> elements.
All of these new elements are intended to give meaning to
the organization of our pages and improve our structural
semantics. They are all block-level elements and do not
have any implied position or style. Additionally, all of
these elements may be used multiple times per page, so
long as each use reflects the proper semantic meaning.
Building Structure
52
Header
53
The <header> element, like it sounds, is used to
identify the top of a page, article, section, or other
segment of a page.
In general, the <header> element may include a
heading, introductory text, and even navigation.
Header
54
<header> vs. <head> vs. <h1> through <h6> Elements:
I t i s e a s y t o c o n f u s e t h e  < h e a d e r >  e l e m e n t w i t h
the <head> element or the heading elements, <h1> through <h6>.
They all have different semantic meanings and should be used
according to their meanings.
The  <header>  element is a structural element that outlines the
heading of a segment of a page. It falls within the <body> element.
The  <head>  element is not displayed on a page and is used to
outline metadata, including the document title, and links to external
files. It falls directly within the <html> element.
Heading elements,  <h1>  through  <h6>, are used to designate
multiple levels of text headings throughout a page.
Navigation
55
The  <nav>  element identifies a section of major
navigational links on a page. The <nav> element should
be reserved for primary navigation sections only, such as
global navigation, a table of contents, previous/next links,
or other noteworthy groups of navigational links.
Most commonly, links included within the <nav> element
will link to other pages within the same website or to parts
of the same web page. Miscellaneous one-off links should
not be wrapped within the <nav> element; they should use
the anchor element, <a>, and the anchor element alone.
Article
56
The  <article>  element is used to identify a section of
independent, self-contained content that may be
independently distributed or reused. We’ll often use
the <article> element to mark up blog posts, newspaper
articles, user-submitted content, and the like.
When deciding whether to use the <article> element, we
must determine if the content within the element could be
replicated elsewhere without any confusion. If the content
within the  <article>  element were removed from the
context of the page and placed, for example, within an
email or printed work, that content should still make sense.
Section
57
The  <section>  element is used to identify a
thematic grouping of content, which generally,
but not always, includes a heading. The grouping
of content within the <section> element may be
generic in nature, but it’s useful to identify all of
the content as related.
The  <section>  element is commonly used to
break up and provide hierarchy to a page.
Section
58
Deciding Between <article>, <section>, or <div> Elements:
At times it becomes fairly difficult to decide which element—
<article>,  <section>, or  <div>—is the best element for the job
based on its semantic meaning. The trick here, as with every semantic
decision, is to look at the content.
Both the  <article>  and  <section>  elements contribute to a
document’s structure and help to outline a document. If the content is
being grouped solely for styling purposes and doesn’t provide value to
the outline of a document, use the <div> element.
If the content adds to the document outline and it can be independently
redistributed or syndicated, use the <article> element.
If the content adds to the document outline and represents a thematic
group of content, use the <section> element.
Aside
59
The  <aside>  element holds content, such as
sidebars, inserts, or brief explanations, that is
tangentially related to the content surrounding it.
When used within an  <article>  element, for
example, the  <aside>  element may identify
content related to the author of the article.
Footer
60
The  <footer>  element identifies the closing or
end of a page, article, section, or other segment
of a page. Generally the  <footer>  element is
found at the bottom of its parent. Content within
the  <footer>  element should be relative
information and should not diverge from the
document or section it is included within.
Creating Hyperlinks
61
Along with text, one of the core components of
the Internet is the hyperlink, which provides the
ability to link from one web page or resource to
another. Hyperlinks are established using the
anchor,  <a>, inline-level element. In order to
create a link from one page (or resource) to
another, the href attribute, known as a hyperlink
reference, is required. The  href  attribute value
identifies the destination of the link.
Relative and Absolute Paths
62
The two most common types of links are links to other pages of the
same website and links to  other websites. These links are
identified by their href attribute values, also known as their paths.
Links pointing to other pages of the same website will have
a  relative path, which does not include the domain
(.com, .org, .edu, etc.) in the href attribute value. Because the link
is pointing to another page on the same website, the href attribute
value needs to include only the filename of the page being linked
to: about.html, for example.
Should the page being linked to reside within a different directory,
or folder, the href attribute value needs to reflect this as well. Say
the  about.html  page resides within the  pages  directory; the
relative path would then be pages/about.html.
Relative and Absolute Paths
63
Linking to other websites outside of the current one
requires an absolute path, where the href attribute
value must include the full domain.
A link to Google would need the href attribute value
of  http://google.com, starting with http and
including the domain, .com in this case.
Linking to Email Address
64
Occasionally we may want to create a hyperlink to our
email address—for example, hyperlink text that says
“Email Me,” which when clicked opens a user’s default
email client and pre-populates part of an email.
To create an email link, the href attribute value needs to
start with mailto: followed by the email address to which
the email should be sent.
To create an email link to  shay@awesome.com, for
e x a m p l e , t h e  h r e f  a t t r i b u t e v a l u e w o u l d
be mailto:shay@awesome.com.
Linking to Email Address
65
Additionally, subject, body text, and other information for the
email may be populated. To add a subject line, we’ll include
the  subject=  parameter after the email address. The first
parameter following the email address must begin with a
question mark,  ?, to bind it to the hyperlink path. Multiple
words within a subject line require that spaces be encoded
using %20.
Adding body text works in the same way as adding the
subject, this time using the  body=  parameter in
the  href  attribute value. Because we are binding one
parameter to another we need to use the ampersand,  &, to
separate the two. As with the subject, spaces must be
encoded using  %20, and line breaks must be encoded
using %0A.
Linking to Email Address
66
Altogether, a link to  shay@awesome.com  with the subject of
“Reaching Out” and body text of “How are you” would require
an  href  attribute value of  mailto:shay@awesome.com?
subject=Reaching%20Out&body=How%20are%20you.
Opening Link a New Window
67
One feature available with hyperlinks is the ability to
determine where a link opens when clicked. Typically, links
open in the same window from which they are clicked;
however, links may also be opened in new windows.
To trigger the action of opening a link in a new window, use
the  target  attribute with a value of  _blank.
The target attribute determines exactly where the link will
be displayed, and the  _blank  value specifies a new
window.
Link to Part of the Same Page
68
Periodically we’ll see hyperlinks that link to part of the same page the link
appears on. A common example of these same-page links are “Back to top”
links that return a user to the top of a page.
We can create an on-page link by first setting an  id  attribute on the
element we wish to link to, then using the value of that id attribute within
an anchor element’s href attribute.
Using the “Back to top” link as an example, we can place an id attribute
value of top on the <body> element. Now we can create an anchor element
with an  href  attribute value of  #top, pound sign and all, to link to the
beginning of the <body> element.
Getting to Know CSS
69
CSS is a complex language that packs quite a bit of power.
It allows us to add layout and design to our pages, and it
allows us to share those styles from element to element
and page to page. Before we can unlock all of its features,
though, there are a few aspects of the language we must
fully understand.
First, it’s crucial to know exactly how styles are rendered.
Specifically, we’ll need to know how different types of
selectors work and how the order of those selectors can
affect how our styles are rendered. We’ll also want to
understand a few common property values that continually
appear within CSS, particularly those that deal with color
and length.
The Cascade
70
We’ll begin breaking down exactly how styles are
rendered by looking at what is known as the cascade
and studying a few examples of the cascade in action.
Within CSS, all styles cascade from the top of a style
sheet to the bottom, allowing different styles to be
added or overwritten as the style sheet progresses.
For example, say we select all paragraph elements at
the top of our style sheet and set their background
color to orange and their font size to 24 pixels. Then
towards the bottom of our style sheet, we select all
paragraph elements again and set their background
color to green, as seen here.
The Cascade
71
Because the paragraph selector that sets the background
color to green comes after the paragraph selector that sets
the background color to orange, it will take precedence in
the cascade. All of the paragraphs will appear with
a  green  background. The font size will remain  24  pixels
because the second paragraph selector didn’t identify a
new font size.
Cascading Properties
72
The cascade also works with properties inside individual
selectors. Again, for example, say we select all the paragraph
elements and set their background color to  orange. Then
directly below the  orange  background property and value
declaration, we add another property and value declaration
setting the background color to green, as seen here.
Because the green background color declaration comes after
the  orange  background color declaration, it will overrule
the orange background, and, as before, our paragraphs will
appear with a green background.
Calculating Specificity
73
Every selector in CSS has a specificity weight. A
selector’s specificity weight, along with its
placement in the cascade, identifies how its
styles will be rendered.
You Know about three different types of
selectors: the type, class, and ID selectors. Each
of these selectors has a different specificity
weight.
Calculating Specificity
74
The type selector has the lowest specificity weight
and holds a point value of 0-0-1.
The class selector has a medium specificity weight
and holds a point value of 0-1-0.
Lastly, the ID selector has a high specificity weight
and holds a point value of 1-0-0.
As we can see, specificity points are calculated using
three columns. The first column counts ID selectors,
the second column counts class selectors, and the
third column counts type selectors.
Calculating Specificity
75
Here we have a paragraph element with an  id  attribute
value of  food. Within our CSS, that paragraph is being
selected by two different kinds of selectors: one type
selector and one ID selector. Although the type selector
comes after the ID selector in the cascade, the ID selector
takes precedence over the type selector because it has a
higher specificity weight; consequently the paragraph will
appear with a green background.
Combining Selectors
76
So far we’ve looked at how to use different types of selectors
individually, but we also need to know how to use these selectors
together. By combining selectors we can be more specific about
which element or group of elements we’d like to select.
For example, say we want to select all paragraph elements that
reside within an element with a class attribute value of hotdog and
set their background color to  brown. However, if one of those
paragraphs happens to have the class attribute value of mustard,
we want to set its background color to yellow. Our HTML and CSS
may look like the following:
Combining Selectors
77
When selectors are combined they should be read
from right to left. The selector farthest to the right,
directly before the opening curly bracket, is known
as the  key selector. The key selector identifies
exactly which element the styles will be applied to.
Any selector to the left of the key selector will
serve as a pre qualifier.
Spaces Within Selectors
78
Within the previous combined selector, .hotdog p.mustard, there
is a space between the hotdog class selector and the paragraph type
selector but not between the paragraph type selector and
the mustard class selector.
The use, and omission, of spaces makes a large difference in
selectors.Since there isn’t a space between the paragraph type
selector and the mustard class selector that means the selector will
only select paragraph elements with the class of  mustard. If the
paragraph type selector was removed, and the  mustard  class
selector had spaces on both sides of it, it would select any element
with the class of mustard, not just paragraphs.
The best practice is to not prefix a class selector with a type selector.
Generally we want to select any element with a given class, not just
one type of element. And following this best practice, our new
combined selector would be better as .hotdog .mustard.
Layering Styles with Multiple Classes
79
One way to keep the specificity weights of our selectors low is
to be as modular as possible, sharing similar styles from
element to element. And one way to be as modular as possible
is to layer on different styles by using multiple classes.
Elements within HTML can have more than one class attribute
value so long as each value is space separated. With that, we
can place certain styles on all elements of one sort while
placing other styles only on specific elements of that sort.
Common CSS Property
Values
80
We’ve used a handful of common CSS property
values already, such as the keyword color values
of red and green. You may not have thought too
much about them; that’s okay. We’re going to
take time now to go over some previously used
property values as well as to explore some of the
more common property values that we’ll soon be
using.
Colors
81
All color values within CSS are defined on an sRGB (or
standard red, green, and blue) color space. Colors within
this space are formed by mixing red, green, and blue
color channels together, mirroring the way that
televisions and monitors generate all the different colors
they display. By mixing different levels of red, green, and
blue, we can create millions of colors—and find nearly
any color we’d like.
Currently there are four primary ways to represent sRGB
colors within CSS: keywords, hexadecimal notation, and
RGB and HSL values.
Colors
82
Length
83
Length values within CSS are similar to colors in
that there are a handful of different types of
values for  length, all of which serve distinct
purposes. Length values come in two different
forms, absolute and relative, each of which uses
different units of measurement.
Absolute Length
84
Absolute length values are the simplest length values, as they
are fixed to a physical measurement, such as inches,
centimeters, or millimeters.
The most popular absolute unit of measurement is known as the
pixel and is represented by the px unit notation.
The pixel is equal to 1/96th of an inch; thus there are 96 pixels in
an inch. Pixels have been around for quite some time and are
commonly used with a handful of different properties. The code
here is using pixels to set the font size of all paragraphs
to 14 pixels.
Relative Length
85
In addition to absolute length values, there are
also relative length values.
Relative length values are a little more
complicated, as they are not fixed units of
measurement; they rely on the length of another
measurement.
Percentages
86
Percentages, represented by the % unit notation, are
one of the most popular relative values. Percentage
lengths are defined in relation to the length of
another object. For example, to set the width of an
element to  50%, we have to know the width of its
parent element, the element it is nested within, and
then identify 50% of the parent element’s width.
Percentages are extremely helpful for setting the
height and width of elements and building out a
web page’s layout. We’re going to rely on them
often to help us out in these areas.
Em
87
The em unit is also a very popular relative value. The
em unit is represented by the em unit notation, and
its length is calculated based on an element’s font
size.
A single em unit is equivalent to an element’s font
size. So, for example, if an element has a font size
of 14 pixels and a width set to 5em, the width would
equal 70 pixels (14pixels multiplied by 5).
Box Model
88
According to the  box model  concept, every
element on a page is a rectangular box and may
have width, height, padding, borders, and
margins.
Working with Box Model
89
Every element is a rectangular box, and there are several properties
that determine the size of that box.
The core of the box is defined by the width and height of an element,
which may be determined by specified width and height properties. 
padding and then border expand the dimensions of the box outward
from the element’s width and height. Lastly, any  margin we have
specified will follow the border.
Working with Box Model
90
According to the box model, the total width of an
element and total height of an element can be
calculated using the following formula:
Working with Box Model
91
Margine and Padding
92
Depending on the element, browsers may apply default margins and
padding to an element to help with legibility and clarity. We will generally
see this with text-based elements. The default margins and padding for
these elements may differ from browser to browser and element to
element.
The margin property allows us to set the amount of space that surrounds
an element. Margins for an element fall outside of any border and are
completely transparent in color. Margins can be used to help position
elements in a particular place on a page or to provide breathing room,
keeping all other elements a safe distance away.
The padding property is very similar to the margin property; however, it
falls inside of an element’s border, should an element have a border.
The  padding  property is used to provide spacing directly within an
element.
Borders
93
Borders fall between the padding and margin, providing
an outline around an element.
Borders can have  different appearances. The most
common style values are solid, double, dashed, dotted,
and none, but there are several others to choose from.
Individual Border Sides
94
As with the  margin  and  padding  properties, borders can be
placed on one side of an element at a time if we’d like. Doing
so requires new properties:  border-top,  border-
right,  border-bottom, and  border-left. The values for
these properties are the same as those of the border property
alone:  width,  style, and  color. If we want, we can make a
border appear only on the bottom of an element:
Border Radius
95
The  border-radius  property accepts length units, including
percentages and pixels, that identify the radius by which the
corners of an element are to be rounded. A single value will
round all four corners of an element equally; two values will
round the  top-left/bottom-right  and  top-right/bottom-
left  corners in that order; four values will round the  top-
left, top-right, bottom-right, and bottom-left corners in
that order.

More Related Content

What's hot (20)

PPTX
CSS3 Media Queries And Creating Adaptive Layouts
Svitlana Ivanytska
 
PDF
Introduction to Javascript
Seble Nigussie
 
PPTX
Css3
Deepak Mangal
 
PPTX
HTML (Web) basics for a beginner
Jayapal Reddy Nimmakayala
 
PPTX
Html and css
Sukrit Gupta
 
PDF
Introduction to CSS3
Doris Chen
 
PPTX
Bootstrap 5 ppt
Mallikarjuna G D
 
PDF
CSS Selectors
Rachel Andrew
 
PPT
Span and Div tags in HTML
Biswadip Goswami
 
PPT
Unit 2 dhtml
Sarthak Varshney
 
PDF
One step in the future: CSS variables
Giacomo Zinetti
 
PPTX
Local storage
Adam Crabtree
 
PPT
Introduction to Cascading Style Sheets (CSS)
Chris Poteet
 
PPTX
Html coding
Briana VanBuskirk
 
PPTX
1-01: Introduction To Web Development
apnwebdev
 
PPTX
Html5 and-css3-overview
Jacob Nelson
 
PDF
Introduction to Bootstrap
Ron Reiter
 
PDF
1. HTML
Pavle Đorđević
 
CSS3 Media Queries And Creating Adaptive Layouts
Svitlana Ivanytska
 
Introduction to Javascript
Seble Nigussie
 
HTML (Web) basics for a beginner
Jayapal Reddy Nimmakayala
 
Html and css
Sukrit Gupta
 
Introduction to CSS3
Doris Chen
 
Bootstrap 5 ppt
Mallikarjuna G D
 
CSS Selectors
Rachel Andrew
 
Span and Div tags in HTML
Biswadip Goswami
 
Unit 2 dhtml
Sarthak Varshney
 
One step in the future: CSS variables
Giacomo Zinetti
 
Local storage
Adam Crabtree
 
Introduction to Cascading Style Sheets (CSS)
Chris Poteet
 
Html coding
Briana VanBuskirk
 
1-01: Introduction To Web Development
apnwebdev
 
Html5 and-css3-overview
Jacob Nelson
 
Introduction to Bootstrap
Ron Reiter
 

Similar to Web Design & Development - Session 2 (20)

PPTX
HTML and CSS Basics
Lindsey Meadows
 
PPTX
Fundamental of Web Development Tutorials-CSS by PINFO Technologies.pptx
umoren
 
PPTX
Empowerment Technologies Lecture 10 (Philippines SHS)
John Bosco Javellana, MAEd.
 
PPTX
Workshop 2 Slides.pptx
DaniyalSardar
 
PDF
Html & Html5 from scratch
Ahmad Al-ammar
 
PDF
Web 101
OneDesignCompany
 
PDF
Css tutorial
Edress Oryakhail
 
PDF
Css tutorial
Mohamed Idris
 
PDF
Css tutorial
Fakhrul Islam Talukder
 
PDF
Css tutorial by [email protected]
vivek698
 
PPT
cascading style sheet in web design .ppt
lekhacce
 
PDF
Csstutorial
Ankit Rana
 
PPTX
Lab#1 - Front End Development
Walid Ashraf
 
PDF
Girl Develop It Cincinnati: Intro to HTML/CSS Class 2
Erin M. Kidwell
 
PPTX
Bootcamp - Web Development Session 2
GDSCUniversitasMatan
 
PPTX
Introduction to Html5, css, Javascript and Jquery
valuebound
 
PPT
Advanced Cascading Style Sheets
fantasticdigitaltools
 
PDF
1. Advanced Web Designing (12th IT) (1).pdf
AAFREEN SHAIKH
 
HTML and CSS Basics
Lindsey Meadows
 
Fundamental of Web Development Tutorials-CSS by PINFO Technologies.pptx
umoren
 
Empowerment Technologies Lecture 10 (Philippines SHS)
John Bosco Javellana, MAEd.
 
Workshop 2 Slides.pptx
DaniyalSardar
 
Html & Html5 from scratch
Ahmad Al-ammar
 
Css tutorial
Edress Oryakhail
 
Css tutorial
Mohamed Idris
 
Css tutorial
Fakhrul Islam Talukder
 
Css tutorial by [email protected]
vivek698
 
cascading style sheet in web design .ppt
lekhacce
 
Csstutorial
Ankit Rana
 
Lab#1 - Front End Development
Walid Ashraf
 
Girl Develop It Cincinnati: Intro to HTML/CSS Class 2
Erin M. Kidwell
 
Bootcamp - Web Development Session 2
GDSCUniversitasMatan
 
Introduction to Html5, css, Javascript and Jquery
valuebound
 
Advanced Cascading Style Sheets
fantasticdigitaltools
 
1. Advanced Web Designing (12th IT) (1).pdf
AAFREEN SHAIKH
 
Ad

More from Shahrzad Peyman (13)

PDF
Web Design & Development - Session 9
Shahrzad Peyman
 
PDF
Web Design & Development - Session 8
Shahrzad Peyman
 
PDF
Web Design & Development - Session 7
Shahrzad Peyman
 
PDF
Web Design & Development - Session 6
Shahrzad Peyman
 
PDF
Web Design & Development - Session 4
Shahrzad Peyman
 
PDF
Web Design & Development - Session 3
Shahrzad Peyman
 
PDF
Web Design & Development - Session 1
Shahrzad Peyman
 
PDF
Object Oriented Programming with Laravel - Session 6
Shahrzad Peyman
 
PDF
Object Oriented Programming with Laravel - Session 5
Shahrzad Peyman
 
PDF
Object Oriented Programming with Laravel - Session 4
Shahrzad Peyman
 
PDF
Object Oriented Programming with Laravel - Session 3
Shahrzad Peyman
 
PDF
Object Oriented Programming with Laravel - Session 2
Shahrzad Peyman
 
PDF
Object Oriented Programming with Laravel - Session 1
Shahrzad Peyman
 
Web Design & Development - Session 9
Shahrzad Peyman
 
Web Design & Development - Session 8
Shahrzad Peyman
 
Web Design & Development - Session 7
Shahrzad Peyman
 
Web Design & Development - Session 6
Shahrzad Peyman
 
Web Design & Development - Session 4
Shahrzad Peyman
 
Web Design & Development - Session 3
Shahrzad Peyman
 
Web Design & Development - Session 1
Shahrzad Peyman
 
Object Oriented Programming with Laravel - Session 6
Shahrzad Peyman
 
Object Oriented Programming with Laravel - Session 5
Shahrzad Peyman
 
Object Oriented Programming with Laravel - Session 4
Shahrzad Peyman
 
Object Oriented Programming with Laravel - Session 3
Shahrzad Peyman
 
Object Oriented Programming with Laravel - Session 2
Shahrzad Peyman
 
Object Oriented Programming with Laravel - Session 1
Shahrzad Peyman
 
Ad

Recently uploaded (20)

PDF
MiniTool Power Data Recovery 8.8 With Crack New Latest 2025
bashirkhan333g
 
PPTX
Help for Correlations in IBM SPSS Statistics.pptx
Version 1 Analytics
 
PPTX
Coefficient of Variance in IBM SPSS Statistics Version 31.pptx
Version 1 Analytics
 
PPTX
Change Common Properties in IBM SPSS Statistics Version 31.pptx
Version 1 Analytics
 
PDF
Wondershare PDFelement Pro Crack for MacOS New Version Latest 2025
bashirkhan333g
 
PDF
IDM Crack with Internet Download Manager 6.42 Build 43 with Patch Latest 2025
bashirkhan333g
 
PPTX
OpenChain @ OSS NA - In From the Cold: Open Source as Part of Mainstream Soft...
Shane Coughlan
 
PDF
Odoo CRM vs Zoho CRM: Honest Comparison 2025
Odiware Technologies Private Limited
 
PDF
Build It, Buy It, or Already Got It? Make Smarter Martech Decisions
bbedford2
 
PPTX
Homogeneity of Variance Test Options IBM SPSS Statistics Version 31.pptx
Version 1 Analytics
 
PDF
NEW-Viral>Wondershare Filmora 14.5.18.12900 Crack Free
sherryg1122g
 
PDF
Top Agile Project Management Tools for Teams in 2025
Orangescrum
 
PDF
SAP Firmaya İade ABAB Kodları - ABAB ile yazılmıl hazır kod örneği
Salih Küçük
 
PDF
Technical-Careers-Roadmap-in-Software-Market.pdf
Hussein Ali
 
PPTX
Foundations of Marketo Engage - Powering Campaigns with Marketo Personalization
bbedford2
 
PDF
iTop VPN With Crack Lifetime Activation Key-CODE
utfefguu
 
PPTX
Agentic Automation Journey Series Day 2 – Prompt Engineering for UiPath Agents
klpathrudu
 
PPTX
Tally software_Introduction_Presentation
AditiBansal54083
 
PDF
AI + DevOps = Smart Automation with devseccops.ai.pdf
Devseccops.ai
 
PDF
유니티에서 Burst Compiler+ThreadedJobs+SIMD 적용사례
Seongdae Kim
 
MiniTool Power Data Recovery 8.8 With Crack New Latest 2025
bashirkhan333g
 
Help for Correlations in IBM SPSS Statistics.pptx
Version 1 Analytics
 
Coefficient of Variance in IBM SPSS Statistics Version 31.pptx
Version 1 Analytics
 
Change Common Properties in IBM SPSS Statistics Version 31.pptx
Version 1 Analytics
 
Wondershare PDFelement Pro Crack for MacOS New Version Latest 2025
bashirkhan333g
 
IDM Crack with Internet Download Manager 6.42 Build 43 with Patch Latest 2025
bashirkhan333g
 
OpenChain @ OSS NA - In From the Cold: Open Source as Part of Mainstream Soft...
Shane Coughlan
 
Odoo CRM vs Zoho CRM: Honest Comparison 2025
Odiware Technologies Private Limited
 
Build It, Buy It, or Already Got It? Make Smarter Martech Decisions
bbedford2
 
Homogeneity of Variance Test Options IBM SPSS Statistics Version 31.pptx
Version 1 Analytics
 
NEW-Viral>Wondershare Filmora 14.5.18.12900 Crack Free
sherryg1122g
 
Top Agile Project Management Tools for Teams in 2025
Orangescrum
 
SAP Firmaya İade ABAB Kodları - ABAB ile yazılmıl hazır kod örneği
Salih Küçük
 
Technical-Careers-Roadmap-in-Software-Market.pdf
Hussein Ali
 
Foundations of Marketo Engage - Powering Campaigns with Marketo Personalization
bbedford2
 
iTop VPN With Crack Lifetime Activation Key-CODE
utfefguu
 
Agentic Automation Journey Series Day 2 – Prompt Engineering for UiPath Agents
klpathrudu
 
Tally software_Introduction_Presentation
AditiBansal54083
 
AI + DevOps = Smart Automation with devseccops.ai.pdf
Devseccops.ai
 
유니티에서 Burst Compiler+ThreadedJobs+SIMD 적용사례
Seongdae Kim
 

Web Design & Development - Session 2

  • 2. 2 Today’s Presentation • Understanding Common HTML Terms • Understanding Common CSS Terms • Semantic Overview in HTML • Cascade in CSS
  • 3. Building Your First Web Page 3 Imagine a time before the invention of the Internet, Websites didn’t exist, and books, printed on paper and tightly bound, were your primary source of information. Today you can open a web browser, jump over to your search engine of choice, and search away. Any bit of imaginable information rests at your fingertips. And chances are someone somewhere has built a website with your exact search in mind.
  • 4. What Are HTML and CSS? 4 HTML, HyperText Markup Language, gives content structure and meaning by defining that content as, for example, headings, paragraphs, or images. CSS, Cascading Style Sheets, is a presentation language created to style the appearance of content—using, for example, fonts or colors.
  • 5. What Are HTML and CSS? 5 The two languages—HTML and CSS—are independent of one another and should remain that way. CSS should not be written inside of an HTML document and vice versa. As a rule, HTML will always represent content, and CSS will always represent the appearance of that content.
  • 6. Understanding Common HTML Terms While getting started with HTML, you will likely encounter new—and often strange—terms. Over time you will become more and more familiar with all of them, but the three common HTML terms you should begin with are elements, tags, and attributes. 6
  • 7. Elements Elements are designators that define the structure and content of objects within a page. Some of the more frequently used elements include multiple levels of headings (identified as <h1> through <h6> elements) and paragraphs (identified as the <p> element) and many more. 7
  • 8. Tags The use of less-than and greater-than angle brackets surrounding an element creates what is known as a tag. Tags most commonly occur in pairs of opening and closing tags. An opening tag marks the beginning of an element. It consists of a less-than sign followed by an element’s name, and then ends with a greater-than sign; for example, <div>. 8
  • 9. Tags A closing tag marks the end of an element. It consists of a less-than sign followed by a forward slash and the element’s name, and then ends with a greater-than sign; for example, </div>. The content that falls between the opening and closing tags is the content of that element. 9
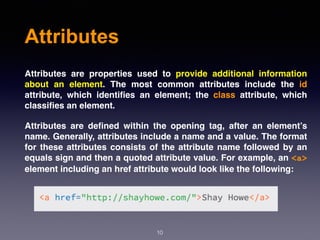
  • 10. Attributes Attributes are properties used to provide additional information about an element. The most common attributes include the id attribute, which identifies an element; the class attribute, which classifies an element. Attributes are defined within the opening tag, after an element’s name. Generally, attributes include a name and a value. The format for these attributes consists of the attribute name followed by an equals sign and then a quoted attribute value. For example, an <a> element including an href attribute would look like the following: 10
  • 11. Attributes The preceding code will display the text “Shay Howe” on the web page and will take users to http://shayhowe.com/ upon clicking the “Shay Howe” text. The anchor element is declared with the opening <a> and closing </a> tags encompassing the text, and the hyperlink reference attribute and value are declared with  href="http:// shayhowe.com" in the opening tag. 11
  • 12. Setting Up the HTML Document Structure HTML documents are plain text documents saved with an  .html  file extension rather than a  .txt  file extension. To begin writing HTML, you first need a plain text editor that you are comfortable using. Sadly this does not include Microsoft Word or Pages, as those are rich text editors. Free alternatives also include Notepad++ for Windows and TextWrangler for Mac. All HTML documents have a required structure that includes the following declaration and elements:  <!DOCTYPE html>, <html>, <head>, and <body>. 12
  • 13. Setting Up the HTML Document Structure The document type declaration, that is show by  <!DOCTYPE html>, informs web browsers which version of HTML is being used and is placed at the very beginning of the HTML document. Because we’ll be using the latest version of HTML, our document type declaration is simply <!DOCTYPE html>. Following the document type declaration, the <html> element signifies the beginning of the document. Inside the <html> element, the <head> element identifies the top of the document, including any metadata (accompanying information about the page). The content inside the  <head>  element is not displayed on the web page itself. Instead, it may include the document title (which is displayed on the title bar in the browser window), links to any external files, or any other beneficial metadata. All of the visible content within the web page will fall within the <body> element. 13
  • 14. Setting Up the HTML Document Structure 14
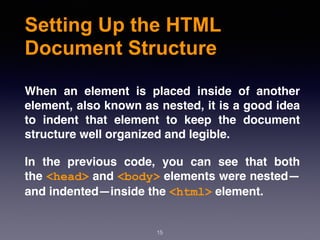
  • 15. Setting Up the HTML Document Structure When an element is placed inside of another element, also known as nested, it is a good idea to indent that element to keep the document structure well organized and legible. In the previous code, you can see that both the <head> and <body> elements were nested— and indented—inside the <html> element. 15
  • 16. Self-Closing Elements In the previous example, the  <meta>  element had only one tag and didn’t include a closing tag. Fear not, this was intentional. Not all elements consist of opening and closing tags. Some elements simply receive their content or behavior from attributes within a single tag. The <meta> element is one of these elements. The content of the previous  <meta>  element is assigned with the use of the charset attribute and value. 16
  • 20. Understanding Common Css Terms 20 In addition to HTML terms, there are a few common  CSS terms  you will want to familiarize yourself with. These terms include  selectors,  properties, and  values. As with the HTML terminology, the more you work with CSS, the more these terms will become second nature.
  • 21. Selectors As elements are added to a web page, they may be styled using CSS. A selector designates exactly which element or elements within our HTML to target and apply styles (such as color, size, and position) to. Selectors may include a combination of different qualifiers to select unique elements, all depending on how specific we wish to be. For example, we may want to select every paragraph on a page, or we may want to select only one specific paragraph on a page. 21
  • 22. Selectors Selectors generally target an attribute value, such as an  id  or  class  value, or target the type of element, such as <h1> or <p>. Within CSS, selectors are followed with curly brackets,  {}, which encompass the styles to be applied to the selected element. The selector here is targeting all <p> elements. 22
  • 23. Properties Once an element is selected, a property determines the styles that will be applied to that element. Property names fall after a selector, within the curly brackets, {}, and immediately preceding a colon, :. T h e r e a r e n u m e r o u s p r o p e r t i e s w e c a n u s e , s u c h as  background,  color,  font-size,  height, and  width, and new properties are often added. In the following code, we are defining the  color  and  font- size properties to be applied to all <p> elements. 23
  • 24. Values So far we’ve selected an element with a selector and determined what style we’d like to apply with a property. Now we can determine the behavior of that property with a value. Values can be identified as the text between the colon, :, and semicolon, ;. Here we are selecting all <p> elements and setting the value of the  color  property to be  orange  and the value of the font-size property to be 16 pixels. 24
  • 26. Working with Selectors Selectors, as previously mentioned, indicate which HTML elements are being styled. It is important to fully understand how to use selectors and how they can be leveraged. The first step is to become familiar with the different types of selectors. We’ll start with the m o s t c o m m o n s e l e c t o r s :  t y p e ,  c l a s s , and ID selectors. 26
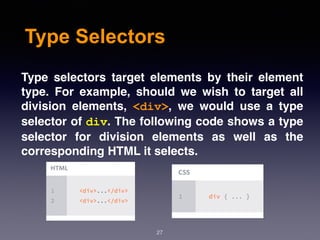
  • 27. Type Selectors Type  selectors target elements by their element type. For example, should we wish to target all division elements,  <div>, we would use a type selector of div. The following code shows a type selector for division elements as well as the corresponding HTML it selects. 27
  • 28. Class Selectors Class selectors allow us to select an element based on the element’s  class  attribute value. Class selectors are a little more specific than type selectors, as they select a particular group of elements rather than all elements of one type. Class selectors allow us to apply the same styles to different elements at once by using the same  class  attribute value across multiple elements. Within CSS, classes are denoted by a leading period, ., followed by the class attribute value.  28
  • 29. ID Selectors ID  selectors are even more precise than class selectors, as they target only one unique element at a time. Just as class selectors use an element’s class attribute value as the selector, ID selectors use an element’s  id  attribute value as a selector.Regardless of which type of element they appear on, id attribute values can only be used once per page. If used they should be reserved for significant elements. Within CSS, ID selectors are denoted by a leading hash sign, #, followed by the id attribute value. 29
  • 30. Referencing CSS There are three ways of inserting a style sheet: 1. External style sheet 2. Internal style sheet 3. Inline style 30
  • 31. External Style Sheet In order to get our CSS talking to our HTML, we need to reference our CSS file within our HTML. The best practice for referencing our CSS is to include all of our styles in a single external style sheet, which is referenced from within the <head> element of our HTML document. To create our external CSS style sheet, we’ll want to use our text editor of choice again to create a new plain text file with a .css file extension. Our CSS file should be saved within the same folder, or a subfolder, where our HTML file is located. 31
  • 32. External Style Sheet Within the  <head>  element of the HTML document, the  <link>  element is used to define the relationship between the HTML file and the CSS file. Because we are linking to CSS, we use the  rel  attribute with a value of  stylesheet  to specify their relationship. Furthermore, the href (or hyperlink reference) attribute is used to identify the location, or path, of the CSS file. 32
  • 33. External Style Sheet In order for the CSS to render correctly, the path of the href attribute value must directly correlate to where our CSS file is saved. In the preceding example, the main.css file is stored within the same location as the HTML file, also known as the root directory. If our CSS file is within a subdirectory or subfolder, the  href  attribute value needs to correlate to this path accordingly. For example, if our  main.css  file were stored w i t h i n a s u b d i r e c t o r y n a m e d  s t y l e s h e e t s , the href attribute value would be stylesheets/main.css, using a forward slash to indicate moving into a subdirectory. 33
  • 34. Internal Style Sheet An internal style sheet may be used if one single page has a unique style. Internal styles are defined within the <style> element, inside the <head> section of an HTML page: 34
  • 35. Inline Styles An inline style may be used to apply a unique style for a single element. To use inline styles, add the style attribute to the relevant element. The style attribute can contain any CSS property. 35
  • 36. Getting to Know HTML With our introduction to HTML and CSS complete, it’s time to dig a little deeper into HTML and examine the different components that make up this language. In order to start building websites, we need to learn a little about which HTML elements are best used to display different types of content. It’s also important to understand how elements are visually displayed on a web page, as well as what different elements mean semantically. 36
  • 37. Semantic Overview So what exactly are semantics?  Semantics within HTML  is the practice of giving content on the page meaning and structure by using the proper element. Semantic code describes the value of content on a page, regardless of the style or appearance of that content. There are several benefits to using semantic elements, including enabling computers, screen readers, search engines, and other devices to adequately read and understand the content on a web page. Additionally, semantic HTML is easier to manage and work with, as it shows clearly what each piece of content is about. 37
  • 38. Identifying Divisions and Spans Divisions, or  <div>s, and  <span>s are HTML elements that act as containers solely for styling purposes. As generic containers, they do not come with any overarching meaning or semantic value. Paragraphs are semantic in that content wrapped within a <p> element is known and understood as a paragraph.  <div>s and  <span>s do not hold any such meaning and are simply containers. 38
  • 39. Block vs Inline Elements Most elements are either block- or inline-level elements. What’s the difference? Block-level elements begin on a new line, stacking one on top of the other, and occupy any available width. Block-level elements may be nested inside one another and may wrap inline-level elements. We’ll most commonly see block-level elements used for larger pieces of content, such as paragraphs. Inline-level elements do not begin on a new line. They fall into the normal flow of a document, lining up one after the other, and only maintain the width of their content. Inline-level elements may be nested inside one another; however, they cannot wrap block-level elements. We’ll usually see inline-level elements with smaller pieces of content, such as a few words. 39
  • 40. Identifying Divisions and Spans Both  <div>s and  <span>s, however, are extremely valuable when building a website in that they give us the ability to apply targeted styles to a contained set of content. A <div> is a block-level element that is commonly used to identify large groupings of content, and which helps to build a web page’s layout and design. A  <span>, on the other hand, is an inline-level element commonly used to identify smaller groupings of text within a block-level element. 40
  • 41. Comment with HTML and CSS 41 HTML and CSS give us the ability to leave comments within our code, and any content wrapped within a comment will not be displayed on the web page. Comments help keep our files organized, allow us to set reminders, and provide a way for us to more effectively manage our code. Comments become especially useful when there are multiple people working on the same files. HTML comments start with  <!-- and end with -->. CSS comments start with /* and end with */.
  • 42. Using Text-Based Elements 42 Many different forms of media and content exist online; however, text is predominant. Accordingly, there are a number of different elements for displaying text on a web page. For now we’ll focus on the more popular elements, including headings, paragraphs, bold text to show importance, and italics for emphasis.
  • 43. Headings 43 Headings are block-level elements, and they come in six different rankings, <h1> through <h6>. Headings help to quickly break up content and establish hierarchy, and they are key identifiers for users reading a page. They also help search engines to index and determine the content on a page.
  • 44. Headings 44 Headings should be used in an order that is relevant to the content of a page. The primary heading of a page or section should be marked up with an  <h1>  element, and subsequent headings s h o u l d u s e  < h 2 > ,  < h 3 > ,  < h 4 > ,  < h 5 > , and <h6> elements as necessary. Each heading level should be used where it is semantically valued, and should not be used to make text bold or big—there are other, better ways to do that.
  • 46. Paragraphs 46 Headings are often followed by supporting paragraphs. Paragraphs are defined using the  <p>  block-level element. Paragraphs can appear one after the other, adding information to a page as desired. Here is an example of how to set up paragraphs.
  • 47. Bold Text with Strong 47 To make text bold and place a strong importance on it, we’ll use the <strong> inline-level element. There are two elements that will bold text for us: the <strong> and <b> elements. It is important to understand the  semantic difference between the two. The <strong> element is semantically used to give strong importance to text, and is thus the most popular option for bolding text. The  <b>  element, on the other hand, semantically means to stylistically offset text, which isn’t always the best choice for text deserving prominent attention. We have to gauge the significance of the text we wish to set as bold and to choose an element accordingly.
  • 48. Bold Text with Strong 48
  • 49. Italicize Text with Emphasis 49 To italicize text, thereby placing emphasis on it, we’ll use the  <em>  inline-level element. As with the elements for bold text, there are two different elements that will italicize text, each with a slightly different semantic meaning. The <em> element is used semantically to place a stressed emphasis  on text; it is thus the most popular option for italicizing text. The other option, the <i> element, is used semantically to convey text in an alternative voice or tone, almost as if it were placed in quotation marks. Again, we will need to gauge the significance of the text we want to italicize and choose an element accordingly.
  • 50. Italicize Text with Emphasis 50
  • 51. Building Structure 51 For the longest time the structure of a web page was built using divisions. The problem was that divisions provide no semantic value, and it was fairly difficult to determine the intention of these divisions. Fortunately HTML5 introduced new  structurally based elements, including the  <header>,  <nav>,  <article>,  <section>,  <aside>, and <footer> elements. All of these new elements are intended to give meaning to the organization of our pages and improve our structural semantics. They are all block-level elements and do not have any implied position or style. Additionally, all of these elements may be used multiple times per page, so long as each use reflects the proper semantic meaning.
  • 53. Header 53 The <header> element, like it sounds, is used to identify the top of a page, article, section, or other segment of a page. In general, the <header> element may include a heading, introductory text, and even navigation.
  • 54. Header 54 <header> vs. <head> vs. <h1> through <h6> Elements: I t i s e a s y t o c o n f u s e t h e  < h e a d e r >  e l e m e n t w i t h the <head> element or the heading elements, <h1> through <h6>. They all have different semantic meanings and should be used according to their meanings. The  <header>  element is a structural element that outlines the heading of a segment of a page. It falls within the <body> element. The  <head>  element is not displayed on a page and is used to outline metadata, including the document title, and links to external files. It falls directly within the <html> element. Heading elements,  <h1>  through  <h6>, are used to designate multiple levels of text headings throughout a page.
  • 55. Navigation 55 The  <nav>  element identifies a section of major navigational links on a page. The <nav> element should be reserved for primary navigation sections only, such as global navigation, a table of contents, previous/next links, or other noteworthy groups of navigational links. Most commonly, links included within the <nav> element will link to other pages within the same website or to parts of the same web page. Miscellaneous one-off links should not be wrapped within the <nav> element; they should use the anchor element, <a>, and the anchor element alone.
  • 56. Article 56 The  <article>  element is used to identify a section of independent, self-contained content that may be independently distributed or reused. We’ll often use the <article> element to mark up blog posts, newspaper articles, user-submitted content, and the like. When deciding whether to use the <article> element, we must determine if the content within the element could be replicated elsewhere without any confusion. If the content within the  <article>  element were removed from the context of the page and placed, for example, within an email or printed work, that content should still make sense.
  • 57. Section 57 The  <section>  element is used to identify a thematic grouping of content, which generally, but not always, includes a heading. The grouping of content within the <section> element may be generic in nature, but it’s useful to identify all of the content as related. The  <section>  element is commonly used to break up and provide hierarchy to a page.
  • 58. Section 58 Deciding Between <article>, <section>, or <div> Elements: At times it becomes fairly difficult to decide which element— <article>,  <section>, or  <div>—is the best element for the job based on its semantic meaning. The trick here, as with every semantic decision, is to look at the content. Both the  <article>  and  <section>  elements contribute to a document’s structure and help to outline a document. If the content is being grouped solely for styling purposes and doesn’t provide value to the outline of a document, use the <div> element. If the content adds to the document outline and it can be independently redistributed or syndicated, use the <article> element. If the content adds to the document outline and represents a thematic group of content, use the <section> element.
  • 59. Aside 59 The  <aside>  element holds content, such as sidebars, inserts, or brief explanations, that is tangentially related to the content surrounding it. When used within an  <article>  element, for example, the  <aside>  element may identify content related to the author of the article.
  • 60. Footer 60 The  <footer>  element identifies the closing or end of a page, article, section, or other segment of a page. Generally the  <footer>  element is found at the bottom of its parent. Content within the  <footer>  element should be relative information and should not diverge from the document or section it is included within.
  • 61. Creating Hyperlinks 61 Along with text, one of the core components of the Internet is the hyperlink, which provides the ability to link from one web page or resource to another. Hyperlinks are established using the anchor,  <a>, inline-level element. In order to create a link from one page (or resource) to another, the href attribute, known as a hyperlink reference, is required. The  href  attribute value identifies the destination of the link.
  • 62. Relative and Absolute Paths 62 The two most common types of links are links to other pages of the same website and links to  other websites. These links are identified by their href attribute values, also known as their paths. Links pointing to other pages of the same website will have a  relative path, which does not include the domain (.com, .org, .edu, etc.) in the href attribute value. Because the link is pointing to another page on the same website, the href attribute value needs to include only the filename of the page being linked to: about.html, for example. Should the page being linked to reside within a different directory, or folder, the href attribute value needs to reflect this as well. Say the  about.html  page resides within the  pages  directory; the relative path would then be pages/about.html.
  • 63. Relative and Absolute Paths 63 Linking to other websites outside of the current one requires an absolute path, where the href attribute value must include the full domain. A link to Google would need the href attribute value of  http://google.com, starting with http and including the domain, .com in this case.
  • 64. Linking to Email Address 64 Occasionally we may want to create a hyperlink to our email address—for example, hyperlink text that says “Email Me,” which when clicked opens a user’s default email client and pre-populates part of an email. To create an email link, the href attribute value needs to start with mailto: followed by the email address to which the email should be sent. To create an email link to  [email protected], for e x a m p l e , t h e  h r e f  a t t r i b u t e v a l u e w o u l d be mailto:[email protected].
  • 65. Linking to Email Address 65 Additionally, subject, body text, and other information for the email may be populated. To add a subject line, we’ll include the  subject=  parameter after the email address. The first parameter following the email address must begin with a question mark,  ?, to bind it to the hyperlink path. Multiple words within a subject line require that spaces be encoded using %20. Adding body text works in the same way as adding the subject, this time using the  body=  parameter in the  href  attribute value. Because we are binding one parameter to another we need to use the ampersand,  &, to separate the two. As with the subject, spaces must be encoded using  %20, and line breaks must be encoded using %0A.
  • 66. Linking to Email Address 66 Altogether, a link to  [email protected]  with the subject of “Reaching Out” and body text of “How are you” would require an  href  attribute value of  mailto:[email protected]? subject=Reaching%20Out&body=How%20are%20you.
  • 67. Opening Link a New Window 67 One feature available with hyperlinks is the ability to determine where a link opens when clicked. Typically, links open in the same window from which they are clicked; however, links may also be opened in new windows. To trigger the action of opening a link in a new window, use the  target  attribute with a value of  _blank. The target attribute determines exactly where the link will be displayed, and the  _blank  value specifies a new window.
  • 68. Link to Part of the Same Page 68 Periodically we’ll see hyperlinks that link to part of the same page the link appears on. A common example of these same-page links are “Back to top” links that return a user to the top of a page. We can create an on-page link by first setting an  id  attribute on the element we wish to link to, then using the value of that id attribute within an anchor element’s href attribute. Using the “Back to top” link as an example, we can place an id attribute value of top on the <body> element. Now we can create an anchor element with an  href  attribute value of  #top, pound sign and all, to link to the beginning of the <body> element.
  • 69. Getting to Know CSS 69 CSS is a complex language that packs quite a bit of power. It allows us to add layout and design to our pages, and it allows us to share those styles from element to element and page to page. Before we can unlock all of its features, though, there are a few aspects of the language we must fully understand. First, it’s crucial to know exactly how styles are rendered. Specifically, we’ll need to know how different types of selectors work and how the order of those selectors can affect how our styles are rendered. We’ll also want to understand a few common property values that continually appear within CSS, particularly those that deal with color and length.
  • 70. The Cascade 70 We’ll begin breaking down exactly how styles are rendered by looking at what is known as the cascade and studying a few examples of the cascade in action. Within CSS, all styles cascade from the top of a style sheet to the bottom, allowing different styles to be added or overwritten as the style sheet progresses. For example, say we select all paragraph elements at the top of our style sheet and set their background color to orange and their font size to 24 pixels. Then towards the bottom of our style sheet, we select all paragraph elements again and set their background color to green, as seen here.
  • 71. The Cascade 71 Because the paragraph selector that sets the background color to green comes after the paragraph selector that sets the background color to orange, it will take precedence in the cascade. All of the paragraphs will appear with a  green  background. The font size will remain  24  pixels because the second paragraph selector didn’t identify a new font size.
  • 72. Cascading Properties 72 The cascade also works with properties inside individual selectors. Again, for example, say we select all the paragraph elements and set their background color to  orange. Then directly below the  orange  background property and value declaration, we add another property and value declaration setting the background color to green, as seen here. Because the green background color declaration comes after the  orange  background color declaration, it will overrule the orange background, and, as before, our paragraphs will appear with a green background.
  • 73. Calculating Specificity 73 Every selector in CSS has a specificity weight. A selector’s specificity weight, along with its placement in the cascade, identifies how its styles will be rendered. You Know about three different types of selectors: the type, class, and ID selectors. Each of these selectors has a different specificity weight.
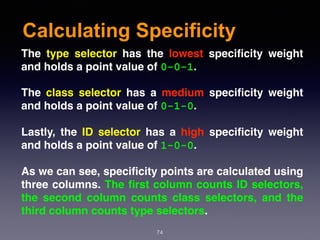
  • 74. Calculating Specificity 74 The type selector has the lowest specificity weight and holds a point value of 0-0-1. The class selector has a medium specificity weight and holds a point value of 0-1-0. Lastly, the ID selector has a high specificity weight and holds a point value of 1-0-0. As we can see, specificity points are calculated using three columns. The first column counts ID selectors, the second column counts class selectors, and the third column counts type selectors.
  • 75. Calculating Specificity 75 Here we have a paragraph element with an  id  attribute value of  food. Within our CSS, that paragraph is being selected by two different kinds of selectors: one type selector and one ID selector. Although the type selector comes after the ID selector in the cascade, the ID selector takes precedence over the type selector because it has a higher specificity weight; consequently the paragraph will appear with a green background.
  • 76. Combining Selectors 76 So far we’ve looked at how to use different types of selectors individually, but we also need to know how to use these selectors together. By combining selectors we can be more specific about which element or group of elements we’d like to select. For example, say we want to select all paragraph elements that reside within an element with a class attribute value of hotdog and set their background color to  brown. However, if one of those paragraphs happens to have the class attribute value of mustard, we want to set its background color to yellow. Our HTML and CSS may look like the following:
  • 77. Combining Selectors 77 When selectors are combined they should be read from right to left. The selector farthest to the right, directly before the opening curly bracket, is known as the  key selector. The key selector identifies exactly which element the styles will be applied to. Any selector to the left of the key selector will serve as a pre qualifier.
  • 78. Spaces Within Selectors 78 Within the previous combined selector, .hotdog p.mustard, there is a space between the hotdog class selector and the paragraph type selector but not between the paragraph type selector and the mustard class selector. The use, and omission, of spaces makes a large difference in selectors.Since there isn’t a space between the paragraph type selector and the mustard class selector that means the selector will only select paragraph elements with the class of  mustard. If the paragraph type selector was removed, and the  mustard  class selector had spaces on both sides of it, it would select any element with the class of mustard, not just paragraphs. The best practice is to not prefix a class selector with a type selector. Generally we want to select any element with a given class, not just one type of element. And following this best practice, our new combined selector would be better as .hotdog .mustard.
  • 79. Layering Styles with Multiple Classes 79 One way to keep the specificity weights of our selectors low is to be as modular as possible, sharing similar styles from element to element. And one way to be as modular as possible is to layer on different styles by using multiple classes. Elements within HTML can have more than one class attribute value so long as each value is space separated. With that, we can place certain styles on all elements of one sort while placing other styles only on specific elements of that sort.
  • 80. Common CSS Property Values 80 We’ve used a handful of common CSS property values already, such as the keyword color values of red and green. You may not have thought too much about them; that’s okay. We’re going to take time now to go over some previously used property values as well as to explore some of the more common property values that we’ll soon be using.
  • 81. Colors 81 All color values within CSS are defined on an sRGB (or standard red, green, and blue) color space. Colors within this space are formed by mixing red, green, and blue color channels together, mirroring the way that televisions and monitors generate all the different colors they display. By mixing different levels of red, green, and blue, we can create millions of colors—and find nearly any color we’d like. Currently there are four primary ways to represent sRGB colors within CSS: keywords, hexadecimal notation, and RGB and HSL values.
  • 83. Length 83 Length values within CSS are similar to colors in that there are a handful of different types of values for  length, all of which serve distinct purposes. Length values come in two different forms, absolute and relative, each of which uses different units of measurement.
  • 84. Absolute Length 84 Absolute length values are the simplest length values, as they are fixed to a physical measurement, such as inches, centimeters, or millimeters. The most popular absolute unit of measurement is known as the pixel and is represented by the px unit notation. The pixel is equal to 1/96th of an inch; thus there are 96 pixels in an inch. Pixels have been around for quite some time and are commonly used with a handful of different properties. The code here is using pixels to set the font size of all paragraphs to 14 pixels.
  • 85. Relative Length 85 In addition to absolute length values, there are also relative length values. Relative length values are a little more complicated, as they are not fixed units of measurement; they rely on the length of another measurement.
  • 86. Percentages 86 Percentages, represented by the % unit notation, are one of the most popular relative values. Percentage lengths are defined in relation to the length of another object. For example, to set the width of an element to  50%, we have to know the width of its parent element, the element it is nested within, and then identify 50% of the parent element’s width. Percentages are extremely helpful for setting the height and width of elements and building out a web page’s layout. We’re going to rely on them often to help us out in these areas.
  • 87. Em 87 The em unit is also a very popular relative value. The em unit is represented by the em unit notation, and its length is calculated based on an element’s font size. A single em unit is equivalent to an element’s font size. So, for example, if an element has a font size of 14 pixels and a width set to 5em, the width would equal 70 pixels (14pixels multiplied by 5).
  • 88. Box Model 88 According to the  box model  concept, every element on a page is a rectangular box and may have width, height, padding, borders, and margins.
  • 89. Working with Box Model 89 Every element is a rectangular box, and there are several properties that determine the size of that box. The core of the box is defined by the width and height of an element, which may be determined by specified width and height properties.  padding and then border expand the dimensions of the box outward from the element’s width and height. Lastly, any  margin we have specified will follow the border.
  • 90. Working with Box Model 90 According to the box model, the total width of an element and total height of an element can be calculated using the following formula:
  • 91. Working with Box Model 91
  • 92. Margine and Padding 92 Depending on the element, browsers may apply default margins and padding to an element to help with legibility and clarity. We will generally see this with text-based elements. The default margins and padding for these elements may differ from browser to browser and element to element. The margin property allows us to set the amount of space that surrounds an element. Margins for an element fall outside of any border and are completely transparent in color. Margins can be used to help position elements in a particular place on a page or to provide breathing room, keeping all other elements a safe distance away. The padding property is very similar to the margin property; however, it falls inside of an element’s border, should an element have a border. The  padding  property is used to provide spacing directly within an element.
  • 93. Borders 93 Borders fall between the padding and margin, providing an outline around an element. Borders can have  different appearances. The most common style values are solid, double, dashed, dotted, and none, but there are several others to choose from.
  • 94. Individual Border Sides 94 As with the  margin  and  padding  properties, borders can be placed on one side of an element at a time if we’d like. Doing so requires new properties:  border-top,  border- right,  border-bottom, and  border-left. The values for these properties are the same as those of the border property alone:  width,  style, and  color. If we want, we can make a border appear only on the bottom of an element:
  • 95. Border Radius 95 The  border-radius  property accepts length units, including percentages and pixels, that identify the radius by which the corners of an element are to be rounded. A single value will round all four corners of an element equally; two values will round the  top-left/bottom-right  and  top-right/bottom- left  corners in that order; four values will round the  top- left, top-right, bottom-right, and bottom-left corners in that order.