
Após anos criando sites WordPress, aprendemos como é importante ter uma configuração local do WordPress em seu computador.
Ter o WordPress em sua máquina pessoal permite que você experimente novos recursos sem arriscar seu site ao vivo, mergulhe fundo no desenvolvimento do WordPress e até mesmo crie sites inteiros antes de eles entrarem no ar. É como ter uma caixa de areia particular para todos os seus projetos do WordPress.
Se você é um usuário do Windows, há várias maneiras de configurar o WordPress localmente. Mas reduzimos a lista para os dois métodos mais fáceis. Neste guia, mostraremos como instalar facilmente o WordPress em um computador com Windows, independentemente da versão que estiver usando.

Por que você deve instalar o WordPress no Windows?
Se você for usuário do Windows, a instalação do WordPress localmente no seu computador oferece vários benefícios.
Uma instalação local do WordPress cria um ambiente de teste que não afeta seu site ativo. Essa configuração, geralmente chamada de servidor local ou localhost, é seu playground pessoal para o WordPress.
Os desenvolvedores do WordPress usam regularmente instalações locais para seu trabalho. Por exemplo, eles podem usá-las para experimentar novos plugins ou temas ou testar o site antes de atualizar para o editor de blocos Gutenberg.
Mas isso não é apenas para os profissionais. Se você é novo no WordPress, uma configuração local é perfeita para aprender. Você pode explorar recursos, testar temas e plug-ins e fazer experimentos livremente sem se preocupar em danificar um site ativo.
É importante observar que, quando você instala o WordPress localmente no Windows, somente você pode ver o site. Se quiser criar um site público, você precisará de um nome de domínio e de hospedagem na Web.
Agora, tecnicamente, você pode instalar o WordPress no Windows usando o XAMPP, e já escrevemos um tutorial sobre isso.
Dito isso, descobrimos duas maneiras ainda mais simples do que o XAMPP para configurar um ambiente local do WordPress, o que as torna excelentes para iniciantes ou usuários que precisam criar um site local rapidamente. Você pode clicar no link abaixo para avançar para qualquer método de seu interesse:
Método 1: Instalar o WordPress no Windows usando o Studio (rápido e simples)
Para o primeiro método, usaremos o Studio. É um software WordPress local criado pela Automattic, a empresa que gerencia e administra o WordPress.com, que é um construtor de sites baseado no software WordPress.
Falaremos sobre esse método primeiro porque ele é muito mais rápido e simples de seguir, o que o torna perfeito para iniciantes.
Primeiro, você precisa abrir o site Studio by WordPress.com. Em seguida, clique no botão “Download for Windows”.

Depois de fazer isso, basta abrir o arquivo baixado para iniciar a instalação.
Uma janela pop-up será exibida, mostrando que o aplicativo está sendo instalado.

Com isso feito, você pode adicionar seu primeiro site.
Para fazer isso, basta digitar o nome do novo site local do WordPress e clicar em “Adicionar site”. Você pode nomear o site como quiser, desde que isso ajude a identificá-lo facilmente.

Agora você deve ver o painel do site local do WordPress.
Para acessar o painel do WordPress e editar o site, basta clicar no botão “Iniciar” no canto superior direito. Isso tornará seu site local acessível em seu computador.

Quando o botão “Start” (Iniciar) mudar para “Running” (Em execução), você poderá clicar no link “WP Admin” (Administração do WP) no canto superior esquerdo da página.
Isso o levará à página de administração local do WordPress.
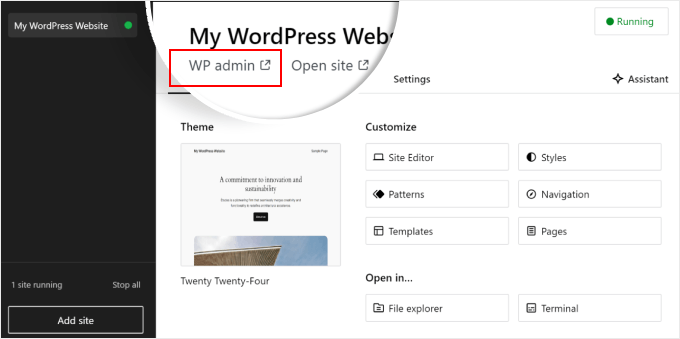
E isso é praticamente tudo para a configuração. Vamos explorar as outras configurações que podem ser necessárias à medida que você cria seu site local.
Como você pode ver na guia “Overview” (Visão geral), é possível acessar imediatamente o menu do editor de site completo do WordPress diretamente do painel do Studio. Você também pode clicar em “File explorer” (Explorador de arquivos) para abrir as pastas e os arquivos do seu site WordPress e clicar em “Terminal” para gerenciar seu site usando o WP-CLI.
Se você mudar para a guia “Compartilhar”, poderá fazer login na sua conta do WordPress.com, clonar seu site local e carregá-lo nos servidores do WordPress.com. Isso tornará o site clonado temporariamente on-line, o que é útil para compartilhar sites de demonstração com seus clientes ou membros da equipe.

Às vezes, você pode querer fazer login no seu site local diretamente pelo navegador em vez de usar o Studio. Nesse caso, você precisa saber suas credenciais de wp-admin.
Para encontrá-los, vá para a guia “Configurações” e encontre o nome de usuário, a senha e o URL de login do administrador do WordPress.

Outro recurso interessante do Studio é o chatbot de IA incorporado, com o qual você pode se comunicar clicando no botão “Assistant”.
Aqui, você pode pedir ajuda ao Studio em tarefas como atualizar todos os seus plug-ins de uma só vez, atualizar a versão principal do WordPress ou criar código para um bloco personalizado.

Quando terminar de trabalhar em seu site local, basta passar o mouse sobre o botão “Running” (Em execução) no canto superior direito até que ele diga “Stop” (Parar).
Em seguida, clique no botão para interromper o site.

Uma desvantagem do Studio é que você não pode configurar o ambiente do WordPress a seu gosto. Isso significa que você precisa usar a versão do PHP, o servidor da Web e o banco de dados que foram pré-selecionados para você.
Isso pode ser uma desvantagem se você precisar testar seu site ou plug-in com configurações de servidor específicas.
Se precisar de mais controle sobre o ambiente local do WordPress ou se precisar combinar sua configuração local com uma configuração específica de servidor ativo, confira o próximo método usando o Local WP.
Método 2: Instalar o WordPress no Windows usando o WP local (mais personalizável)
Primeiro, você precisa fazer o download e instalar o software Local WP em seu computador Windows. Basta acessar o site do Local WP e clicar no botão “Download for Free”.

Depois disso, será exibida uma janela pop-up na qual você precisará selecionar a plataforma. Vá em frente e escolha “Windows” no menu suspenso.
Em seguida, insira seus dados, como nome e sobrenome, endereço de e-mail profissional e número de telefone para fazer o download do software.

Depois de inserir os detalhes, basta clicar no botão “Get it Now”.
Depois disso, o software será baixado automaticamente em seu computador. Caso contrário, você pode clicar no link “clique aqui” para iniciar o download.

Depois que o arquivo for baixado, inicie o assistente de configuração.
Agora, você precisará selecionar se deseja instalar o software para todos os usuários ou apenas para você.
Depois de selecionar uma opção, clique no botão “Next” (Avançar).

Na próxima etapa, você pode selecionar a “Pasta de destino” onde o software será instalado.
Basta clicar no botão “Procurar” para definir o caminho e, em seguida, clicar no botão “Instalar”.

O software Local WP será instalado em seu computador Windows.
Depois de concluído, você pode marcar a caixa de seleção “Run Local” (Executar local) e clicar no botão “Finish” (Concluir) no assistente de configuração.

O software será iniciado em seu dispositivo Windows.
A próxima etapa é adicionar um novo site local. Para fazer isso, basta clicar no botão de adição “+” na parte inferior.

Depois disso, você pode criar um site no software Local.
Selecione a opção “Criar um novo site” e clique no botão “Continuar”. Também há opções para criar o site a partir de um projeto ou de um arquivo de site existente, mas vamos escolher a primeira opção para fins de demonstração.

Em seguida, você pode inserir um nome para seu site local, como “My WordPress Website”.
Há também opções avançadas em que você pode inserir o domínio do site local e o caminho do site local. Por padrão, o domínio usará o título do seu site, mas separado por traços.
Quando terminar, basta clicar no botão “Continue” (Continuar).

Depois disso, você precisará escolher um ambiente para seu site local.
Você pode usar o ambiente “Preferred”, no qual o software selecionará automaticamente a versão do PHP, o servidor da Web e a versão do MySQL. Por outro lado, você também pode selecionar “Custom” (Personalizado) e inserir os detalhes do ambiente.
O Local WP oferece as versões mais recentes do PHP. Quanto ao servidor da Web, você pode escolher entre Nginx ou Apache. Você também pode escolher entre MySQL ou MariaDB para os bancos de dados.
Observe que algumas versões de PHP, servidor da Web e banco de dados exigem o download de algumas dependências para que funcionem corretamente.

Em seguida, você pode inserir um nome de usuário e uma senha do WordPress para o seu site local. Além disso, há também uma opção para escolher um endereço de e-mail do WordPress no qual você receberá todas as notificações por e-mail.
Além disso, há uma opção avançada em que o software perguntará se você tem uma rede WordPress multisite. Caso contrário, basta clicar em “Não”.
Depois de inserir esses detalhes, basta clicar no botão “Add Site”.

O software agora instalará o WordPress e configurará seu site.
Para iniciar o site local, clique no botão “Start site” (Iniciar site) no canto superior direito.

Em seguida, clique no botão “WP Admin” e você verá a página de login do administrador do WordPress.
Basta digitar o nome de usuário e a senha que você digitou anteriormente ao configurar o site local e, em seguida, clicar no botão “Log In”.

Agora você pode editar o site local em seu computador Windows.
Quando terminar, não se esqueça de interromper o site do software Local WP clicando no botão “Stop site”.

Dica profissional: se quiser ignorar o processo de login, você pode ativar um login de administrador com um clique no Local WP.
Para fazer isso, basta voltar ao painel do Local WP e alternar o botão “One-click admin” até que ele diga “On”. Em seguida, no menu suspenso, selecione o usuário administrador que pode usar esse recurso de login com um clique.

Alternativa: Use o WordPress Playground para testar temas, plug-ins e muito mais
O WordPress Playground é uma ferramenta inovadora que permite fazer experiências com o WordPress diretamente no navegador da Web. É uma caixa de areia virtual onde você pode experimentar novos temas, plug-ins e recursos do WordPress sem afetar nenhum site real.
O WordPress Playground é diferente de um ambiente local do WordPress em vários aspectos importantes.
Primeiro, ele não requer instalação em seu computador e é redefinido após cada uso, ao contrário das configurações locais permanentes. Você pode acessá-lo de qualquer dispositivo com um navegador, enquanto as instalações locais estão vinculadas a um computador.
Embora o WordPress Playground seja ideal para testes rápidos e aprendizado, um ambiente local do WordPress em seu computador Windows oferece mais flexibilidade para projetos de desenvolvimento de longo prazo.
Para obter um passo a passo detalhado, consulte nosso guia sobre como usar o WordPress Playground em seu navegador.
Instalei o WordPress em meu computador Windows, e agora?
Agora que você tem o WordPress em seu computador, aqui estão algumas coisas que você pode fazer:
- Aprenda dicas e truques básicos do WordPress para usar melhor seu site.
- Experimente diferentes temas do WordPress para ver como seu site pode ficar.
- Instale e teste os plug-ins obrigatórios do WordPress para adicionar novos recursos ao seu site.
- Saiba como corrigir erros comuns do WordPress por conta própria.
- Experimente diferentes construtores de páginas do tipo arrastar e soltar para deixar seu site mais bonito.
- Saiba como redefinir a senha de administrador do WordPress no localhost para recuperar o acesso ao seu site.
- Configure fluxos de trabalho automatizados para facilitar o gerenciamento de seu site.
- Saiba mais sobre a segurança do WordPress para manter seu site protegido contra hackers.
- Mova seu site local do WordPress para um servidor ativo quando estiver pronto para compartilhá-lo com todos.
Esperamos que este artigo o tenha ajudado a aprender como instalar o WordPress localmente em um computador Windows. Talvez você também queira ver nosso artigo sobre como instalar o WordPress localmente em um computador Mac e nosso guia definitivo para criar um site de teste do WordPress.
Se você gostou deste artigo, inscreva-se em nosso canal do YouTube para receber tutoriais em vídeo sobre o WordPress. Você também pode nos encontrar no Twitter e no Facebook.


Moinuddin Waheed
This is the best method for anyone who just want to learn and gets hands dirty before actually making a big debut in the WordPress industry.
I have used both the methods local by flywheel and wampserver for local installation of WordPress.
I have also used xampp server for wordpress installation and have experimented with many themes and plugins.
Konrad
Everything went smoothly, no issues with installation, thanks to the simple yet effective guide. Much appreciated!
WPBeginner Support
Glad to hear it worked for you
Admin
saajina
Hi. i am new to WordPress and i am trying to install WampServer. i downloaded WampServer from the link you mentioned above. and i tried to install after download , i choose english language after that i accepted the agreement. after that when i click on the next button to install a pop come by saying this installation can only work if the above vc++ package is installed ……. and please cancel the installation . i don’t know what to do next. please help me
WPBeginner Support
It would depend on which VC++ package is missing but you should be able to go to the Microsoft website and search for the Visual C++ library that WAMP needs to download and install it.
Admin
Jiří Vaněk
Thank you for the guide. Usually, I’ve always tested WordPress, for instance, on services like instawp.com, or I’ve set up everything myself in some virtualization tool on a Linux distribution. This looks quite simple.
WPBeginner Support
Glad you found this a helpful option
Admin
sieutonghop
Is Local WP website data guaranteed?
WPBeginner Support
I don’t think I understand what you’re asking, the files and your content are stored on your computer.
Admin
kiemtienspeed
If using Local WP, where will the website data be saved? Can you explain more clearly?
WPBeginner Support
The data would be stored in the database and the files would be saved in the site’s folder.
Admin
Jiří Vaněk
It’s practically the same as with WordPress on shared hosting. The database can then be exported via PHPMyAdmin, and data via an FTP client (FTP data is stored in a folder locally on the computer). Alternatively, a migration plugin can be used, just like on the server.
Koweh
Hi, please is the a video explainable for the above steps to install Install WordPress on Windows Using WampServer?
WPBeginner Support
Not at the moment but we will consider that for future videos!
Admin
M Sohail
this article is very helpful to me.
Thanks to all Team
WPBeginner Support
Glad to hear our post was helpful!
Admin
Danielle
Hi, very helpful article. How would you do this for an existing WordPress site? (I’m hosting on Hostinger and selected WordPress to construct my site). I already have a domain name and login for WordPress as well.
WPBeginner Support
To move a currently active site to a locally installed WordPress site, you would want to take a look at our guide below!
https://www.wpbeginner.com/wp-tutorials/how-to-move-live-wordpress-site-to-local-server/
Admin
Joseph Lewinski
Fabulous instruction set. I installed WAMP Server simply and without a hitch. There was only one very minor “glitch” in your instructions, which were easy enough to figure out. When the instructions explain the installation of WordPress proper, it says, “Paste the ‘wordpress’ folder into the C:\wamp64\www folder.”, but the IMAGE shows you installing it into the C:\wamp64 folder. Like I said, easy enough to figure out (I used your WORDS, NOT the IMAGE).
THANK YOU for this! I’m subscribing NOW!
WPBeginner Support
Glad our guide was helpful and thank you for pointing that out!
Admin
Duncan Philps-Tate
Hi useful article. The only thing I’m aware of not seeing is anything about when to use Local WP and when to use WAMP. Now I’ve got a choice and I don’t know which is better for me.
Local WP sounds more straightforward and with less to do – but the test doesn’t say whether it also installs Apache, PHP, MySQL (which the WAMP text does say).
On the other hand, WAMP sounds like you have to do more getting it going (just compare the number of paragraphs it needs) but apart from (possibly) adding choice over Apache, PHP, MySQL, what does it give you that Local WP doesn’t?
Hope you can answer this easily.
WPBeginner Support
WAMP has been around longer and was our original recommendation, Local WP was created to make it easier for those just starting out and both will install what is needed to run a WordPress site on your computer.
Admin
Duncan Philps-Tate
Thanks – useful
Seyi
Thanks for this… really helpful
WPBeginner Support
Glad our article was helpful!
Admin
Kylie
I have installed wampserver and have a green light. When I right click I can not find any button called phpadmin. And when I type localhost/phpadmin in my browser I am getting this message.
The requested URL was not found on this server.
Apache/2.4.51 (Win64) PHP/7.4.26 Server at localhost Port 80
WPBeginner Support
You would want to left-click on WAMP’s icon for phpmyadmin, when you go through that route it should show what your URL is set to if it is not properly set under localhost.
Admin
Layla
I’ve done this and started work on one pc but this now needs to go for repair and will be away a while. If I am to install this on a second pc, what files do I need to transfer over so I can continue working on the same website on the other pc? Feeling a bit dumb here that I can’t figure it out myself.
WPBeginner Support
We would recommend following our guide below for transferring your site to a different computer to continue working on it. While the article is for live sites, the method should still work for your local installation.
https://www.wpbeginner.com/wp-tutorials/how-to-move-live-wordpress-site-to-local-server/
Admin
Layla
Thank you so much! That worked perfectly and was so simple!
WPBeginner Support
Glad we could help!
Renata
I installed Wamp Server and C++ Redistributable 2012, 2013 and 2015 but when I try to open it it opens 4 black windows and then it shuts down. What should I do
WPBeginner Support
You would want to check in the bottom right with your hidden icons, WAMP does not have a window pop up by default but would add an icon there for your options with WAMP
Admin
Hosea
Straightforward and to the point guide. Followed it and achieved exactly what I wanted. Great and helpful write-up.
WPBeginner Support
Glad you found our guide helpful
Admin
Ibrahim Yusuff
Thanks for this invaluable guide. The issue of having is with the wamp download. The language is in French and each time i try to change it it goes back to french which i do not understand. i filled all the necessary information but to click on download it changes back to french. pls help me out on this
WPBeginner Support
They currently have a popup that is French when selecting the file to download but at the end of the first paragraph you should see a link to download directly without having to deal with the popup
Admin
prilla kobugabe
hello, i need some help. when i put this localhost/mysite/ in my web browser it responds negatively saying
“The requested URL was not found on this server.
Apache/2.4.41 (Win64) PHP/7.3.12 Server at localhost Port 80”
WPBeginner Support
If you have restarted your computer since installing WAMP you would want to ensure that WAMP is running as that is the most common cause of that specific error.
Admin
Ronnie Ferrer
You are legend guys! Thanks.
Francis Guchie
Thank you so much for this very nice article for beginners
prakoo
api-ms-win-crt-string-l1-1-0.dll is missing from your computer it shows error?
WPBeginner Support
You would want to ensure you install Visual C++ Pro for the most common solution to that error.
Admin
Melissa
Hi – I have WAMP installed locally on my Windows 10 machine running PHP version: 7.3.12. I want to upgrade to PHP 7.4 – do I need to reinstall WAMP or can I update PHP separately?
WPBeginner Support
You would want to click on the WAMP icon, and check under PHP, Version and depending on when you installed WAMP there should be the option to change versions by clicking on the version you want to use.
Admin
melissa
thanks – this was perfect advice!
Holly
Thanks for this article! It is the best and most straight-forward one I’ve come across, it’s very helpful and detailed. Keep up the great work! As a beginner, I really appreciate it.
WPBeginner Support
Glad you found our guide helpful
Admin
Jules Ivan
This is awesome! Thank you for making this article!
WPBeginner Support
Glad you found our guide helpful
Admin
Ben
While installing, I got a System error that says ”The code execution cannot proceed because MSVCR120.dll was not found. Reinstalling the program may fix this problem'”
How can I get this done please
WPBeginner Support
You need to install Visual C++ Redistributable that we link to in the article
Admin
Diya
I have installed wordpress in wamp and completed my first website. I have got another project now. So for the second website how should I start?Should I install wordpress again in a second “mysite2” folder?
WPBeginner Support
You can certainly do that for the most common method for creating a new site.
Admin
saheed
im receiving myssqld.exe- system error. how do i fix it
WPBeginner Support
You would want to ensure you installed Visual C++ Redistributable
Admin
Tom Bauer
WAMP64 will not install on a win7 64 machine.
WPBeginner Support
Unless we hear otherwise, you can install it on Windows 7 still, depending on the error you are running into, you may need to reach out to WAMP’s support.
Admin
Paul
Great instructions, thanks.
Everything installed fine, just have a problem this morning in trying to log into the browser. Every setting I have tried hasn’t worked.
I know I am being thick but could you confirm what I should be typing in the browser to access the program.
Thanks
WPBeginner Support
As we state in the article, it should be something similar to localhost/mysite. You would also want to ensure WAMP is running for the most common reason for that issue.
Admin
Peter
I was having similar issue as others. All went well until I got to the point with Apache not running. The issue was with Port 80 it was used by something else (not skype) so I went to Tools > Use other port than 80 I added the port 8080. Then it all worked however then when you want to access your website you can’t use localhost/mysite/ but localhost:8080/mysite/ since you changed the default port.
I didn’t find this in the comments. Maybe it will help someone.
WPBeginner Support
Thanks for sharing what helped you with this issue
Admin
Bas
Hi, thanks for the tutorial. I completed it, and it works like a charm. But now my question is: how do I get my “real” live website data in the local test environment? Is there some way to export that and import it into the local test environment?
WPBeginner Support
For that, you would want to take a look at our article below:
https://www.wpbeginner.com/wp-tutorials/how-to-move-live-wordpress-site-to-local-server/
Admin
Mahima Pandey
here i have downloaded the wordpress file and done everything according to the given instruction . but lastly stuck in the localhost address bar
localhost/servername in the internet explore has to be typed to get to wordpress. but what to be type for google ,firefox. pls lhelp me with this its really urgent.
WPBeginner Support
You should be able to type that same address on any internet browser to see the site on your local computer. If you wanted to have your site found online, you would want to look into a domain and hosting provider.
Admin
Konstantinos Paturas
Thank you so much.
WPBeginner Support
You’re welcome
Admin
Armel
Thanks for this useful article. I successfully installed WordPress using Wamp. But, I get this message. “Installation failed: there has been a critical error on your website. Please check your site admin email inbox for instructions. Learn more about debugging in WordPress.”
Please, how can i fix it ?
WPBeginner Support
For that error, you would want to take a look at our article below:
https://www.wpbeginner.com/wp-tutorials/how-to-fix-the-wordpress-white-screen-of-death/
Admin
Hoat Le
Dear WPBeginner Support;
I read your tut very carefully, and didn’t see you mention about VirtualHost in WampServer, so I don’t know if I have to create a Virtual Host for my test site.
WPBeginner Support
It can make URLs closer to what you would expect from a site but it is not a requirement and can be difficult for beginners to set up.
Admin
Shani
Hello,
Thank you so much for this article!
You’ve really helped me!
I’m interested to know now how to login to my site when I go on wordpress.
WPBeginner Support
If you can navigate to your WordPress site then you would add /wp-admin to the end, we cover a few more options in our article below that you can also try:
https://www.wpbeginner.com/beginners-guide/how-to-find-your-wordpress-login-url/
Admin
mimi
I followed the process accordingly but when i click on the green WAMP icon in order to create a blank MySQL database nothing pops up
WPBeginner Support
The most common reason for that would be if you didn’t install the C++ redistributable if you have not done that.
Admin
Aminat
Thanks a lot, really helpful
WPBeginner Support
You’re welcome
Admin
Dav
Hi,
I have installed as per instructions but I am getting an error trying to log into
ERROR: Failed to set session cookie. Maybe you are using HTTP instead of HTTPS to access phpMyAdmin.
What am I doing wrong?
WPBeginner Support
That is likely a hiccup with either your browser cache or a browser addon, we would recommend clearing your cache or trying to use an incognito browser to see if that helps resolve the issue.
Admin
Dav
Thanks, that works
Nathan Zindikilani
Hi, thank you for the article. when i try to open my local host site i get the following error; There has been a critical error on your website.this is after pasting ‘wordpress’ to www folder. how may i solve this
WPBeginner Support
You would want to ensure the file is unzipped, if it is you may want to try reading a fresh WordPress download to the folder to see if there was a hiccup with your download.
Admin
Spyros
Hi, i need your help please, i follow all the steps in your detailed article but i saw a message “can’t select database We were able to connect to the database server (which means your username and password is okay) but not able to select the test_db database and some other that i believe you know”.
Thanks in advance!
WPBeginner Support
You may want to ensure there are no typos in the database name you set, it looks like it is not able to find a database with the name given.
Admin
Raheel
I am getting “Error establishing a database connection”
Any help here please
WPBeginner Support
For common solutions to that error, you would want to take a look at our article below:
https://www.wpbeginner.com/wp-tutorials/how-to-fix-the-error-establishing-a-database-connection-in-wordpress/
Admin
Steve
Hi,
I have installed WAMP and created a WordPress site on my computer – thanks for your excellent guide. I used “mysite” as in your example to stay consistent with you as I built my software kingdom. Now that things are looking good, is it possible to simply rename the “mysite” folder (which is inside “www” to my preferred name, or is it more complicated than that? I’m trying to avoid starting over. Thanks
WPBeginner Support
We would recommend staying with the format you’ve set up already if possible and once you have hosting ready we would recommend taking a look at our guide below:
https://www.wpbeginner.com/wp-tutorials/how-to-move-wordpress-from-local-server-to-live-site/
Admin
Francesco
Hi,
Can I use this system to test a previous back up I did via the server control panel?
I have a zip file which is a mirror of my directory on the server, including database and WP-admin file.
I would line to test if the backup I have works fine and possible run it on a precioys version of the WP
WPBeginner Support
You would want to check with the tool you are using for the specifics but it should allow you to do what you’re wanting.
Admin
Melissa T
Installed WAMP and WordPress – thanks for the wonderfully detailed instructions! So now it’s time to create the web site — is there a guide on wpbeginner for that?
thank you!
WPBeginner Support
There are many different types of sites so there is no complete guide but for a starting point you may want to take a look at our article below. Step 3 and beyond in the guide should help.
https://www.wpbeginner.com/guides/
Admin
kwestyon
First, thank you so much for the guide! It’s working. Second, is there a way wherein after you create the website, would there a way to view the site after you clicked the published button. Sorry for the dumb question.
WPBeginner Support
If you are logged in, in the top right you should be able to open the dropdown that has your site title, and there you should find a link to view your site.
Admin
Yomi
Hello,
If I install WordPress on a localhost based on the content of this blog, will I be able to use plugins like woocommerce, elementor, astra & kadence?
Thank you.
WPBeginner Support
Yes, installing locally you would be able to use plugins and page builders like those on your site
Admin
Lisa
Hi,
I am at the point where I would put localhost/mysite/ in the browser. I am getting the “404 not found error”.
I named the copy of wordpress to wamp the same and have double checked the address to see if it’s typed in correctly. This still happens, what am I doing wrong?
Thanks!
WPBeginner Support
You would want to ensure you’re not running into the Skype error where it is trying to use port 80 while WAMP is.
Admin
WPBeginner Support
Currently, the WAMP website is down which is why we’ve added a different link and included a note above and are working on updating this article as quickly as we are able
Admin
mark
WAMP link redirects to a different site.